


Every DJ struggles with it at some time – the varying levels of loudness between tracks catch you by surprise. One minute you’re boosting gain on a channel to keep your levels smooth, and the next track is blasting into the red. Surfing levels is part of the art form, no doubt. But when you’re focused on every aspect of your DJ set, there’s one option that might help.
DJing, when artfully done, makes music flow together without a listener noticing the changes. So the best sets manage to minimize the variations that come from those changes. There are a lot of ways that technology has made the technical side of this easier, most of them have come via software tools like TRAKTOR. Purists will argue that these tools reshape the role of the DJ. The more adventurous among us argue that removing technical hurdles simply opens more opportunities for greater creativity. Wherever you land on that spectrum, it’s still important to know your options and how to use them.
Like any other live performance, there will be surprises – and maintaining control is the name of the game. We all know some of the options you have to keep control over some variables: internal sync, key matching, filters and EQs, but levels are often the area that throw the biggest surprises. While a good DJ set always involves watching and maintaining balanced levels, it’s important to avoid surprise peaks that can clip a signal and undermine your overall session.
So, without further ado, let’s dig into when, why and how to use a limiter in your DJ set.

When?
Let’s get one point covered up front – there are people who will say a limiter should never appear in the signal flow of a DJ. But many more people will say “never say never.” The important question is when is it appropriate to use a limiter in a DJ set?
The most appropriate time to use a limiter in a DJ set is when you are planning to play material that may have a wide variation between the loudness of certain tracks, or a wide range between peaks and lows within those tracks. This can mean that your set has a few tracks which switch quite dramatically from quiet moments to percussive hits. Or it can mean that some of your tracks are compressed heavily enough to be loud, while others are quieter. Both of these scenarios refer to dynamic range – the difference between the lowest signal and the highest peaks.
A limiter is useful to narrow this dynamic range – to make the quietest parts louder, while keeping the loudest parts under control. To our ears, this tends to make everything sound louder. The fewer quiet moments, the more everything seems loud.
One important factor here comes down to which kind of set you’re playing. Are you playing a soft, gentle ambient set for the chill out room or some friends at home? You won’t need a limiter. But if you’re playing a set meant to get the walls shaking and people sweating (or get the walls sweating and the people shaking) – a limiter might be in your interest.
So to recap – are you playing a loud, banger set with lots of variable tracks at different levels of mastering or loudness? Good time to consider a limiter. Are you playing a smooth chill set with plenty of open space and not much variation in your tracks? Probably skip it.
Before they know it, everyone is looking at them wondering why the whole set sounds like a heavy metal show, as the whole system is on overload.
Why?
The best reason to use a limiter in a DJ set is to avoid surprise peaks that can distort the overall output of your mix. This can happen in a few different ways:
- Some tracks which may not have been fully mastered could have a broad dynamic range. They’ll sound quieter than the other tracks in your set, because only the peaks reach the same level as your other tracks. So on a meter they’re tapping the same level as others, but they don’t have the same weight. Most DJs will reach for the gain on that channel and boost it until everything sounds comparable. But now the peaks are hitting the red. With a limiter turned on, those peaks won’t hit the red line, as the limiter will compress those to make space for the quieter sounds.
- Maybe you’ve made a digital edit of a track you really like. Sometimes, when edits are made, small moments in the edit don’t line up, and a millisecond of audio doesn’t sync up. It can sound like a pop or click. This is sometimes what’s known as “intersample peaking” – and it can interfere with other parts of a sound system, or the recording of a set. A limiter can catch these peaks or pops before they make it to an amplifier or speaker, and save a lot of headaches.
- You may eventually fall prey to the dreaded gain creep – the habit that many DJs fall into when they get so hyped that they keep pushing everything louder. Before they know it, everyone is looking at them wondering why the whole set sounds like a heavy metal show, as the whole system is on overload. Has this happened to you?
Overall the limiter is a good insurance policy. You’ll have another layer of protection against poorly mastered files, digital flaws, or your own excitement. Even the most relaxed confident DJs can use a backup plan.
How?
Despite what any purist says, limiters are not the problem – it’s how they’re used. Use a good tool poorly, and the results will be poor – or worse! But if you use the same tool wisely, the results can be, at minimum a good insurance policy, or potentially a game changer!
So let’s talk about how to set up your limiter for two different scenarios within TRAKTOR’s Internal Mixing mode. It’s pretty simple, and easily adaptable to whatever you’re planning to play. For both of these, we’re going to use the new iZotope Ozone Maximizer in TRAKTOR PRO Plus. You can read more about TRAKTOR PRO Plus here and sign up for free.
Scenario 1 – A live DJ set made of mastered tracks, demos, and old vinyl rips
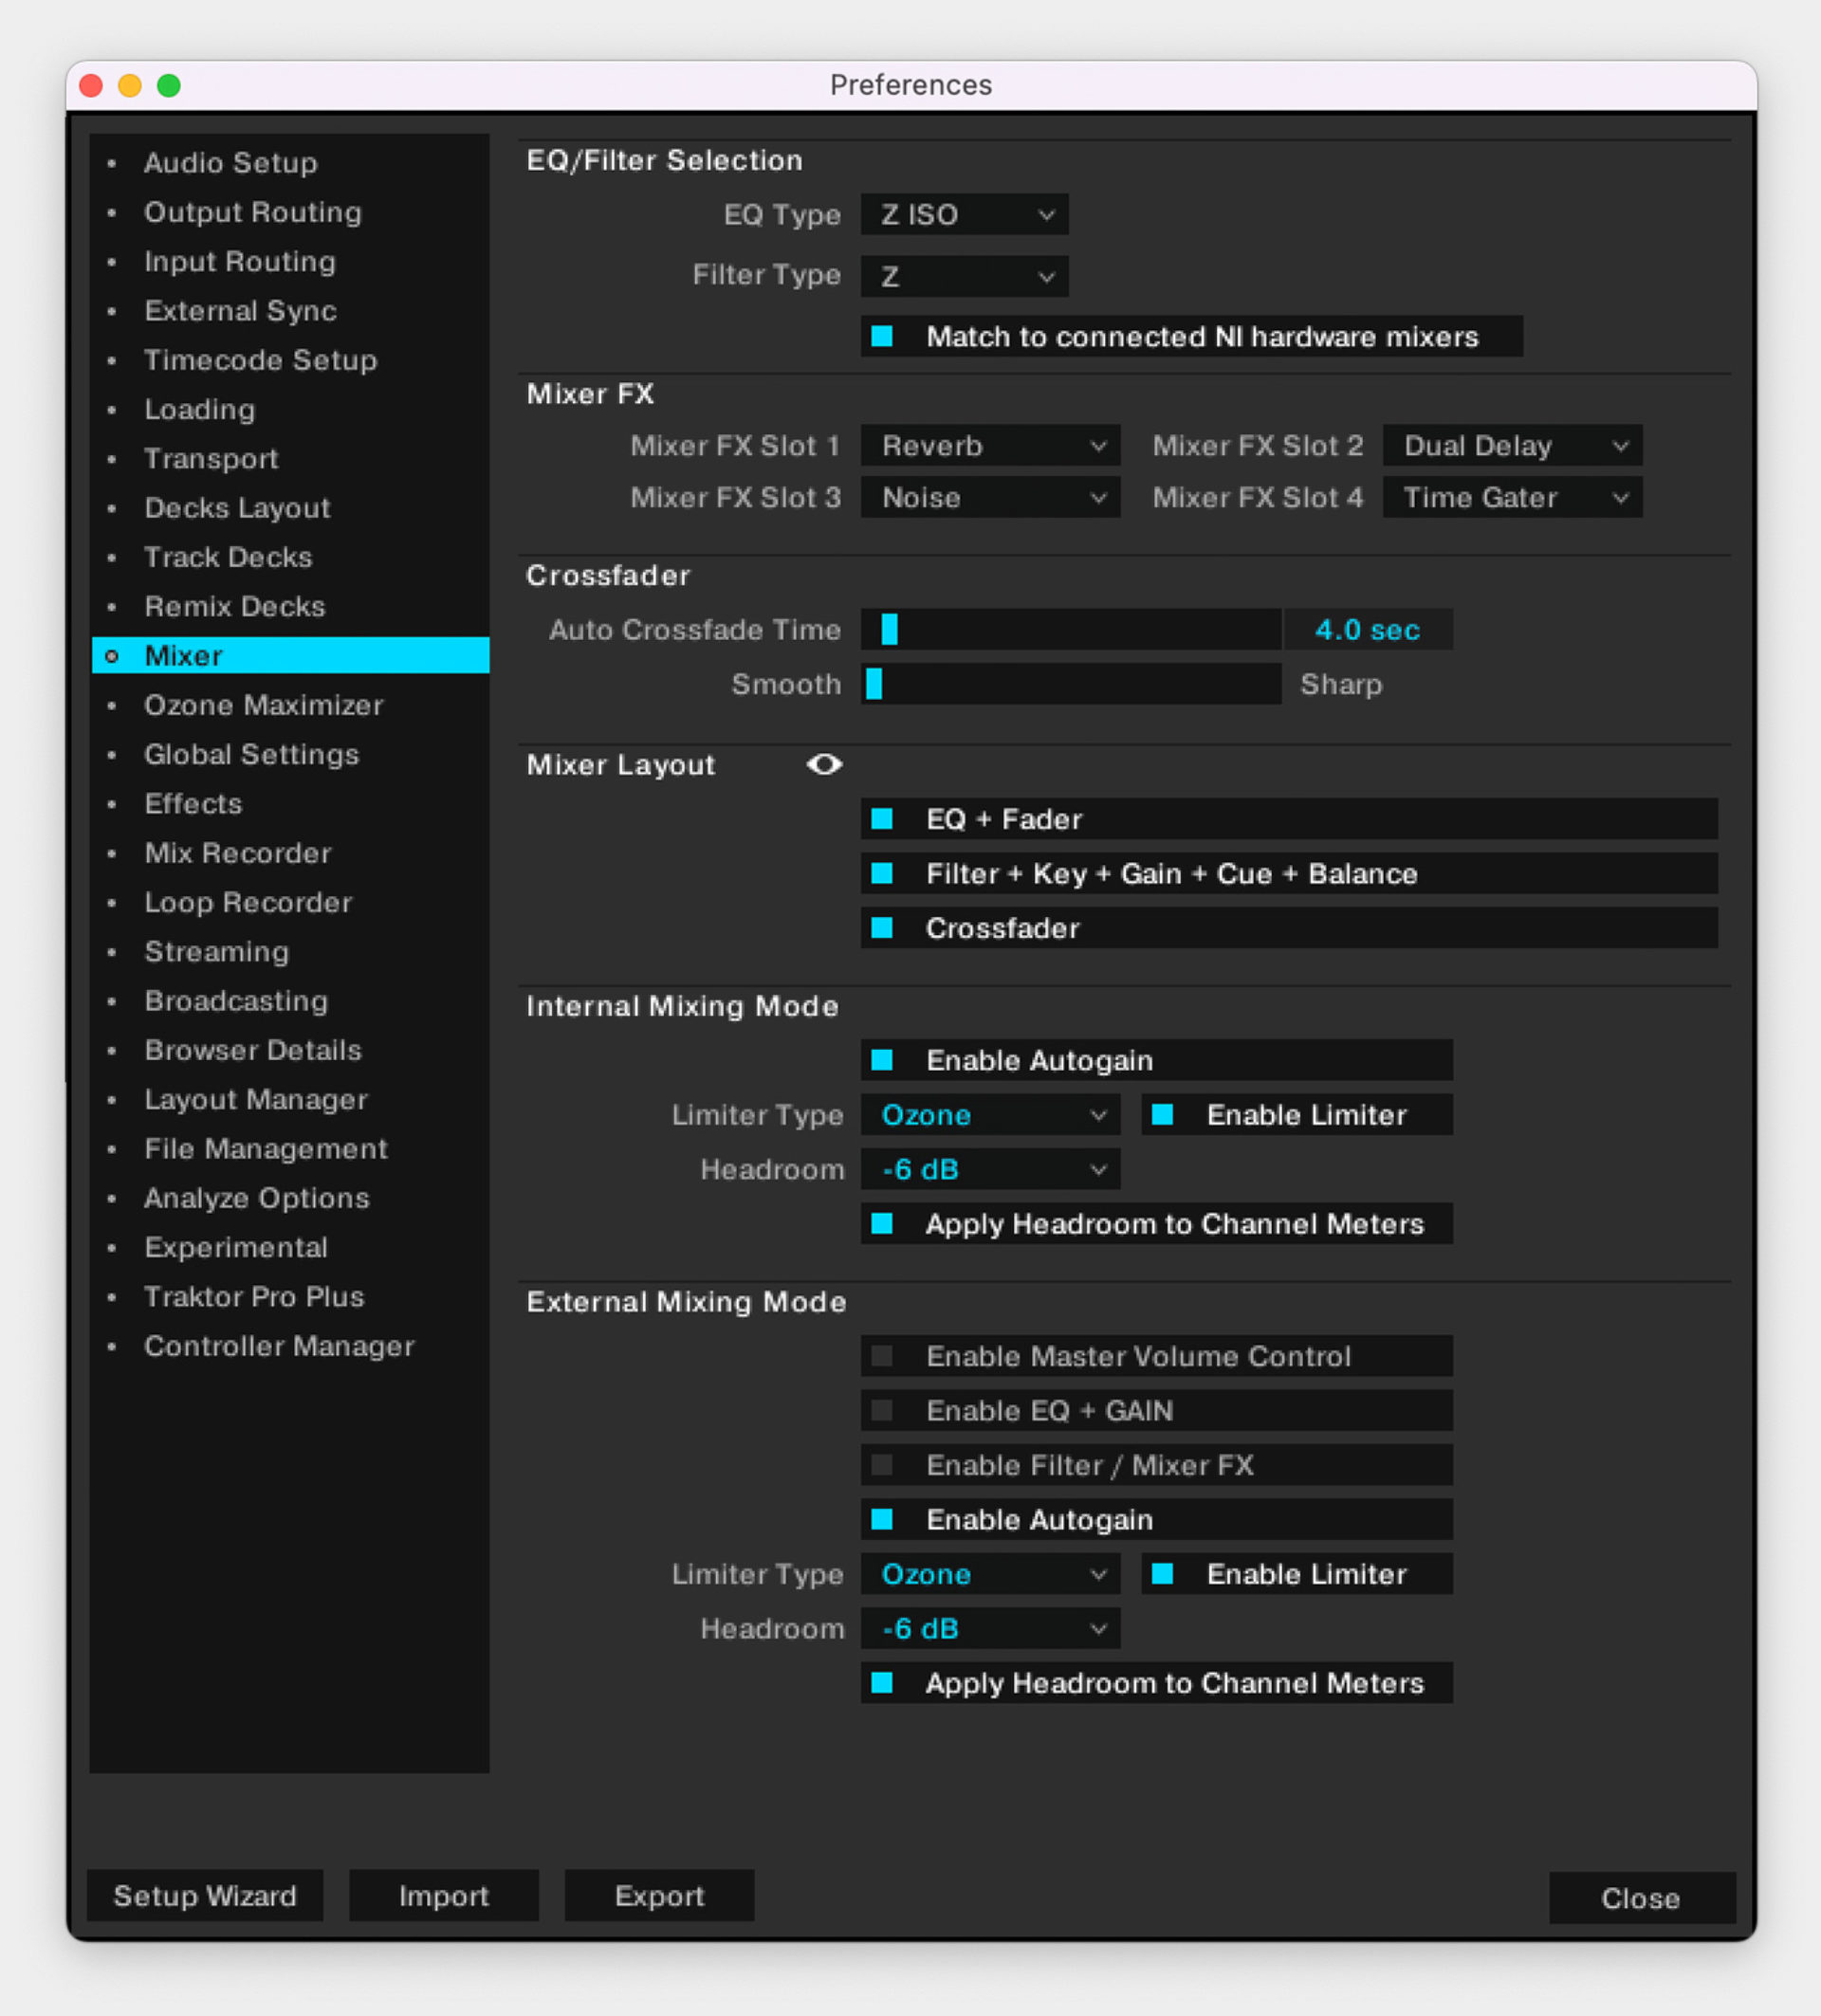
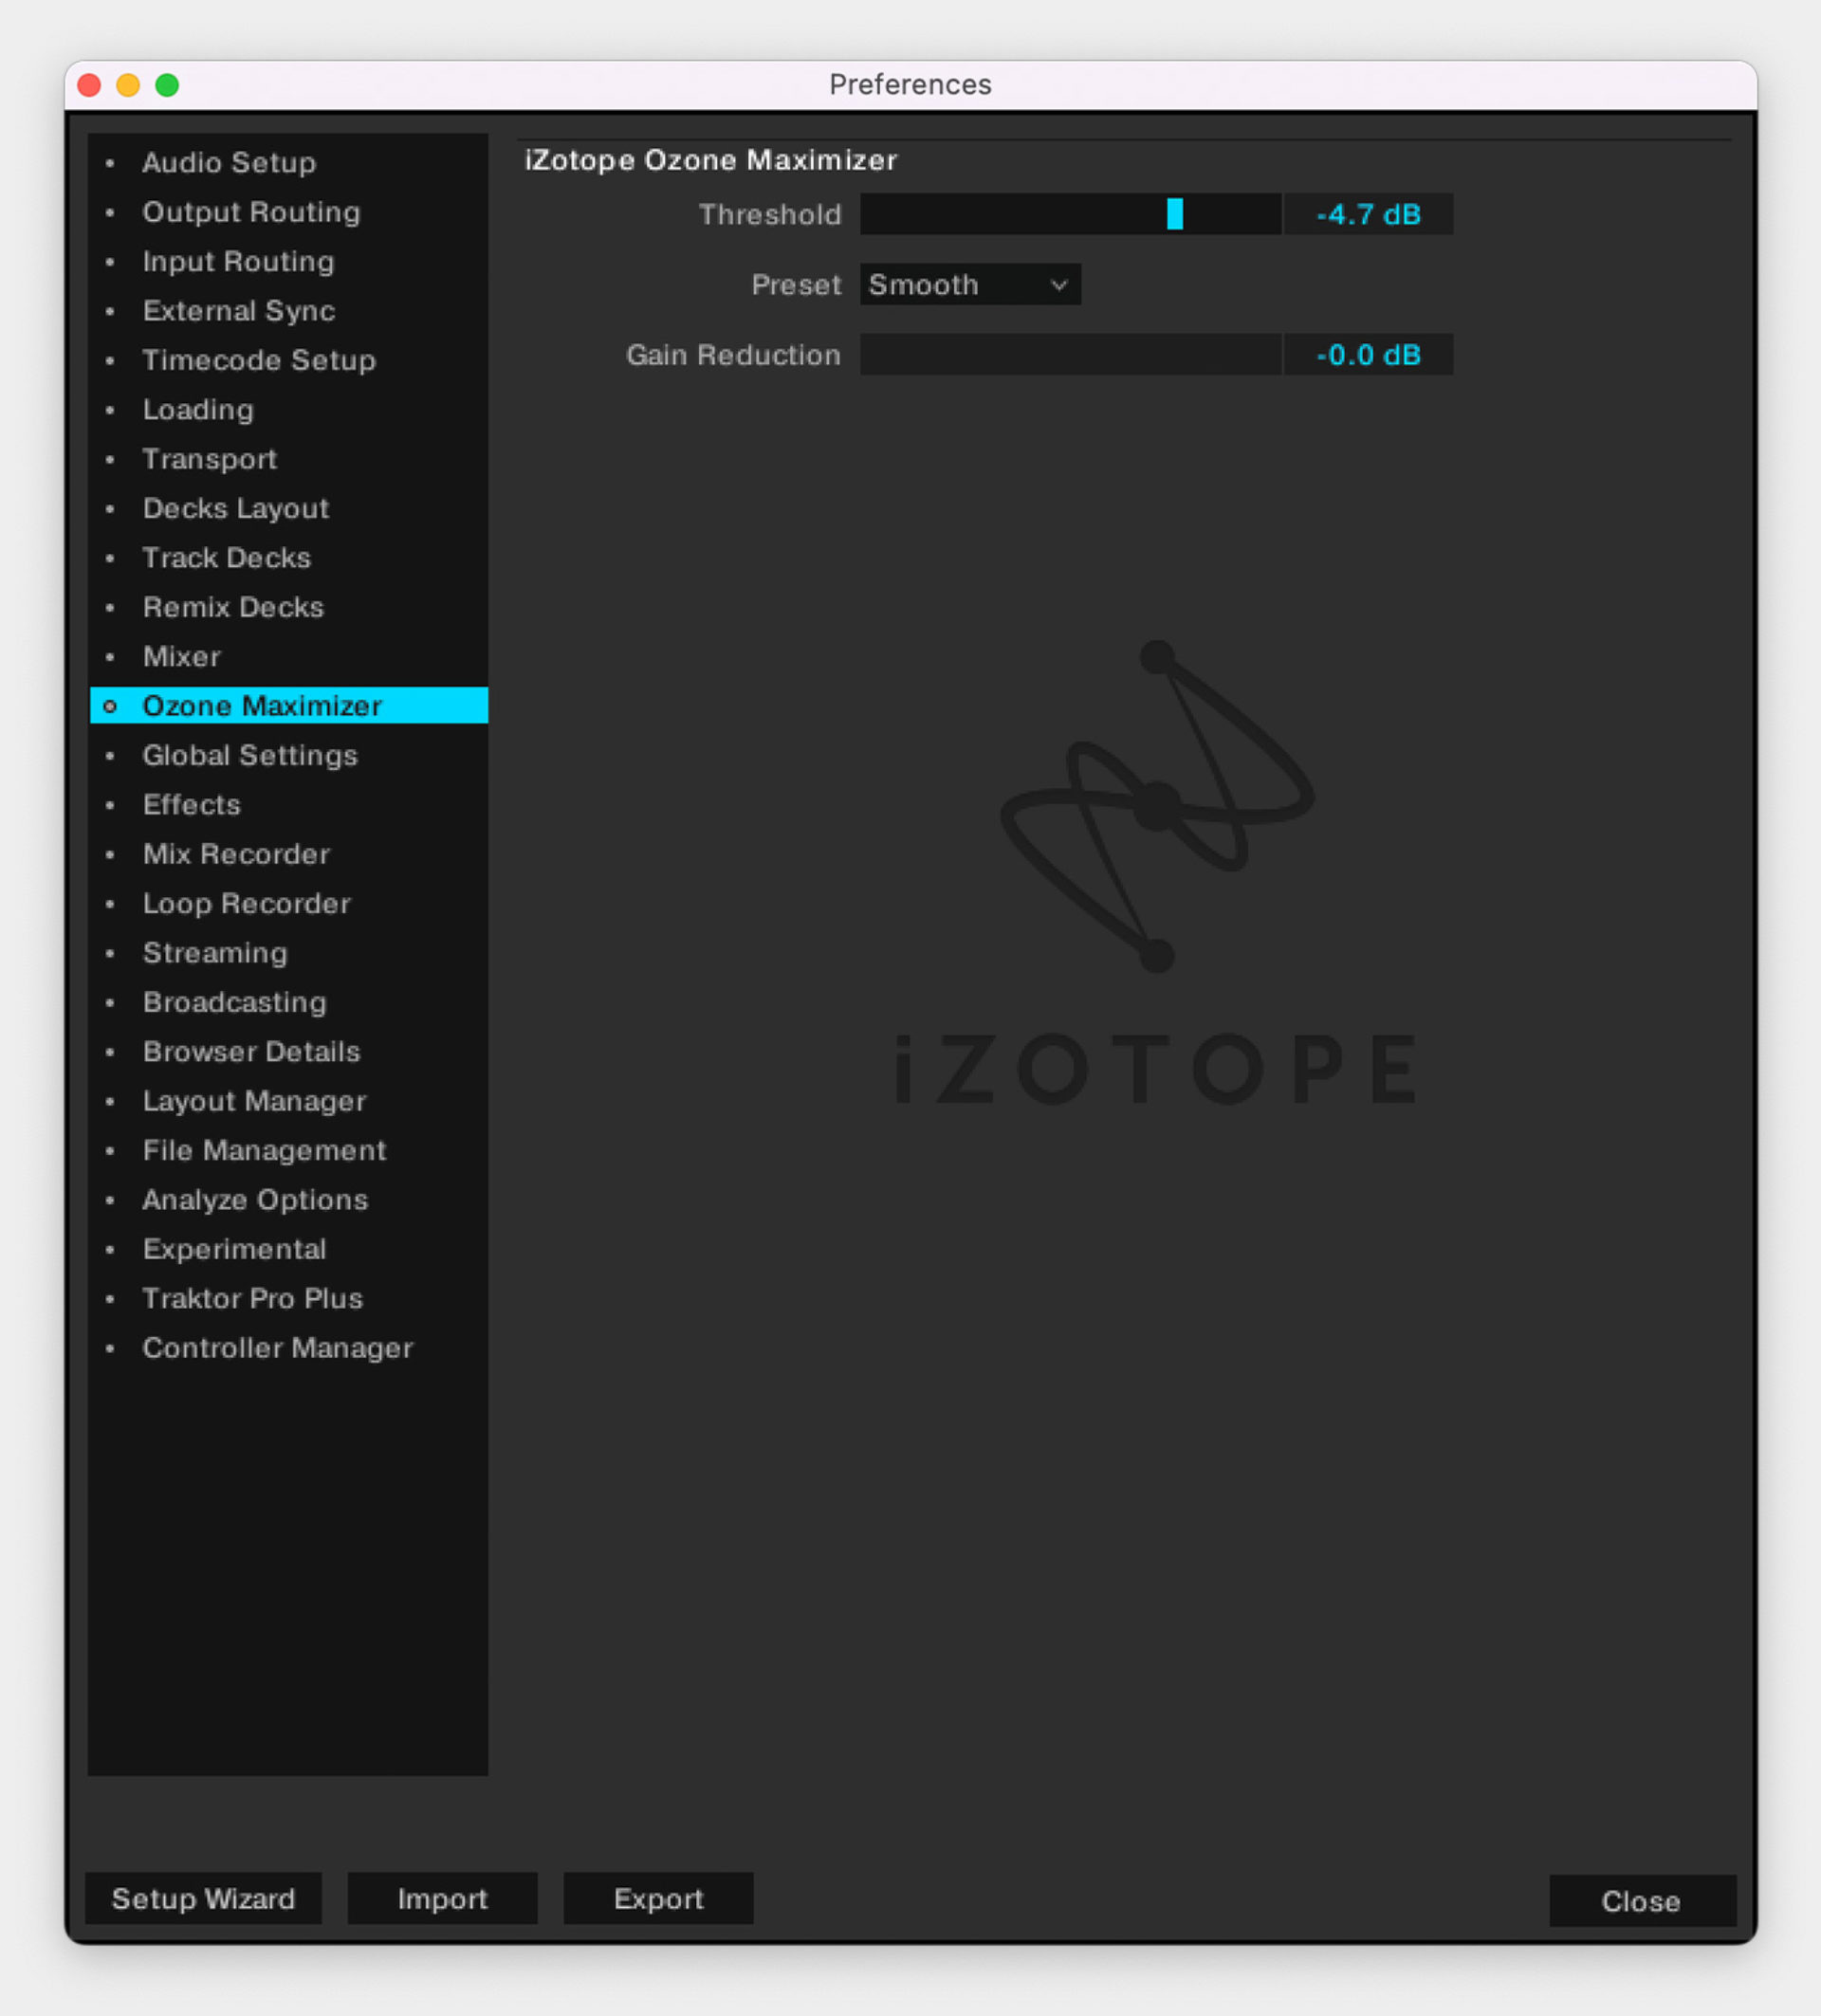
First, open your Preferences in TRAKTOR PRO Plus. In the Mixer section, you’ll want to select “Enable Autogain”, and then in the “Limiter Type” dropdown menu, select “Ozone” and “Enable Limiter.” For this scenario, you will want to change “Headroom” to -6 dB and “Apply Headroom to Channel Meters.” In the Preferences menu, select “Ozone Maximizer” and leave the window open.
Next, you’ll want to pick your quietest track from your playlists. Load it to a deck in TRAKTOR, start playing and look at the Threshold slider. Grab the slider and move it to the left until you see some motion in the “Gain Reduction” meter. Since this is the quietest track in your set, we don’t want a lot of gain reduction, so you’ll want to pick a setting where the meter is “tickling” around -0.5 dB to -0.1 dB. You’ll notice that the overall gain of the track comes up. For this scenario, pick the Smooth Preset. Now load a louder track, and you’ll see how the Gain Reduction is working a lot harder. The quieter parts are louder, but the loud parts are quieter.
To compensate for this, when you’re playing your set, adjust the gain of your overall output up, to balance for the reduced dynamic range. Congratulations, you’ve “leveled up!”
Scenario 2 – A studio set made of new, freshly mastered tracks
Think of this one as a general-purpose safety net or an “insurance policy” for your set. Just as in the scenario above, you’ll want to select the Mixer section of the preferences and choose “Ozone” for your limiter. We’re going to leave Autogain on and the other settings will remain, but let’s change the Headroom to “None.”
Select Ozone Maximizer from Preferences, as before and load a TRAKTOR deck from your playlists and start playing. Again we’ll watch the Gain Reduction meter as we adjust Threshold to the left. Since, in this scenario, all of your tracks will likely be in a very similar range, we don’t want to push the limiter too hard. So you’ll find that point where the Gain Reduction is “tickling,” and then just back off the Threshold a touch to the right. This will ensure that the Ozone Maximizer isn’t reducing the gain on your tracks unless a big pop or jump happens occasionally.
After you’ve tried these steps, start thinking about other scenarios where you might want to use the Ozone Maximizer. You might find some situations where you don’t need a limiter at all, or others where a light touch is helpful. Overall, be mindful of HOW you use the limiter, to make sure you don’t overuse it. In the end you’ll see that careful use of a limiter can be a helpful asset in the right situations.
Level up your DJ sets with TRAKTOR PRO Plus, our new-add on subscription that brings you the newest TRAKTOR features first. Sign up before September 1 and get 50% off a year’s subscription – or try it out for one month for free!
Related articles
-
Sub bass: how to add that deep tone to your tracks
What is sub bass? Learn how to make sub bass and how to use sub bass effectively in your productions.
-

How to make a melodic techno track
Learn what melodic techno music is and how to make a melodic techno track that features melodic progressions, atmospheric sounds,…
-

How to make future funk music
Explore what makes future funk unique and get expert guidance on crafting your own tracks, covering beats, basslines, synths, and…
-

Everything you need to know about UK garage music and how to make it
Discover the essence of UK garage music production in our comprehensive guide. Uncover rhythmic intricacies, harness influences, and create infectious…
-

How to make a tropical house track that takes the beach vibe to the dancefloor
Learn the art of making vibrant and uplifting tropical house tracks with our comprehensive guide. Explore step-by-step techniques, musical elements,…
-

How to make a dynamic electro house track
Learn how to make an electro house track complete with bass, drums, and drops that will take your production skills…
-

What is acid house? How to make a euphoric acid house track
Learn about the key elements of acid house music, its history, and how to make an acid house track in…
-

House music 101: Everything you need to know to create your own tracks
Discover the fundamentals of creating your own house music. Learn about the origins of house music and master the art…