


Author of “How to Get the Most Out of Amp Sim Software,” and all-around guitar expert Craig Anderton, provides five tips on how to use EQ in Guitar Rig. Read on to find out how a few simple modifications can take your guitar’s amp sim tone to the next level. Scroll on to the end to get a free demo download of Guitar Rig.
One of the best aspects of amp sims (amplifier simulators) is being able to create sounds that would be difficult to implement with physical amps. But these changes needn’t be complicated; even some simple tweaks can alter an amp’s character. By using Guitar Rig and Solid EQ, and the following tips below, you can enhance your guitar sound, and improve your productions immediately.
New: Guitar Rig 7 Pro is out now, including over 100 new rack presets, four new lo-fi components, an enhanced sidebar, and fresh amps powered by machine learning.
1. Tighter low end
Using Solid EQ to trim the low frequencies before an amp like Hot Plex changes the sound in two ways. First, it becomes thinner, and sounds more like an open-back cabinet. Second, there’s less distortion on the lower strings, because they don’t send as much level to the amp as the higher ones. This changes the amp’s balance of highs and lows.

The screen shot above shows that the S0lid EQ’s LF (low frequency) section cutting the bass by -20 dB at 96 Hz (the other stages are inactive). Extra tip: Automating the EQ’s DB (boost/cut) parameter can give a full rhythm guitar sound in some parts by having no cut, but in other sections where you need to open up more room for the bass and kick drum, you can reduce the lows.
2. Bi-amping Guitar Rig
If you know how studio monitor speakers work, then you’re probably aware of the advantages of a bi-amped design. This uses EQ to split the low frequencies to a woofer and the high frequencies to a high-frequency driver, which allows each speaker to do what it does best. The device that does the splitting is called a Crossover—and Guitar Rig has one in the Tools section.
One of my favorite techniques is to split the signal with the crossover at around 500 Hz, and insert an amp and cab in the low-frequency split that sounds good with power chords, like Jump. This gives a big, solid, powerful low end. Meanwhile, the high frequencies split off to the Twang Reverb, which is set up to give a more jangly, twangy sound. This way the guitar has both power and articulation. Once the amps are set up, use the Crossfade slider in the Crossover component to optimize the balance of high and low frequencies.
For a wide stereo image and an even more articulated sound, you can pan the lows and highs. Panning the lows to the left and the highs to the right gives the widest possible stereo image. Another useful panning option is when there’s another instrument part, like piano or synth. Pan the guitar lows to center, and the highs to the left or right (or vice-versa). This leaves room in the opposite channel for the other instrument.
3. Increasing touch sensitivity for leads
Boosting the EQ around 3 kHz makes solos at the top of the neck more sensitive to your touch, because the boosted levels go into distortion sooner. This is another situation where the Solid EQ can come in to help. Only the one stage outlined in red below is needed; set the amount of boost to maximum, and the Q to minimum as a starting point.

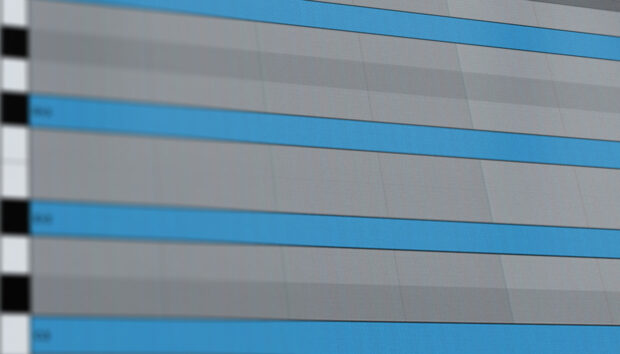
3 kHz is a high enough frequency range that the lower strings aren’t affected as much as the higher ones. The following image shows how the EQ affects levels.

This screenshot shows four identical riffs. The first is played starting on low E, the second an octave above, another octave above that (i.e., starting on the open first string), and finally, the octave starting on the first string, twelfth fret. The lower image shows the same file, but processed with the Solid EQ settings shown above. The level of the lowest frequency’s riff is essentially unaffected, the second one is boosted somewhat, but the two higher riffs have considerably more level. This makes for a more even, sustained sound with solos played on the higher frets.
4. Bigger, beefier tone
If you trim the high frequencies, then this will lead to less distortion, especially when you compare them to the rest of the sound. With the settings shown below, the HF (high frequency) EQ section before the Gratifier amp cuts the level at 4.7 kHz by -20 dB. This reduces the higher guitar harmonics getting into the sim so they don’t become as distorted, which gives a beefy, bassier rhythm guitar sound. With a lesser cut, like -10 dB, the sound simply becomes a bit less harsh.
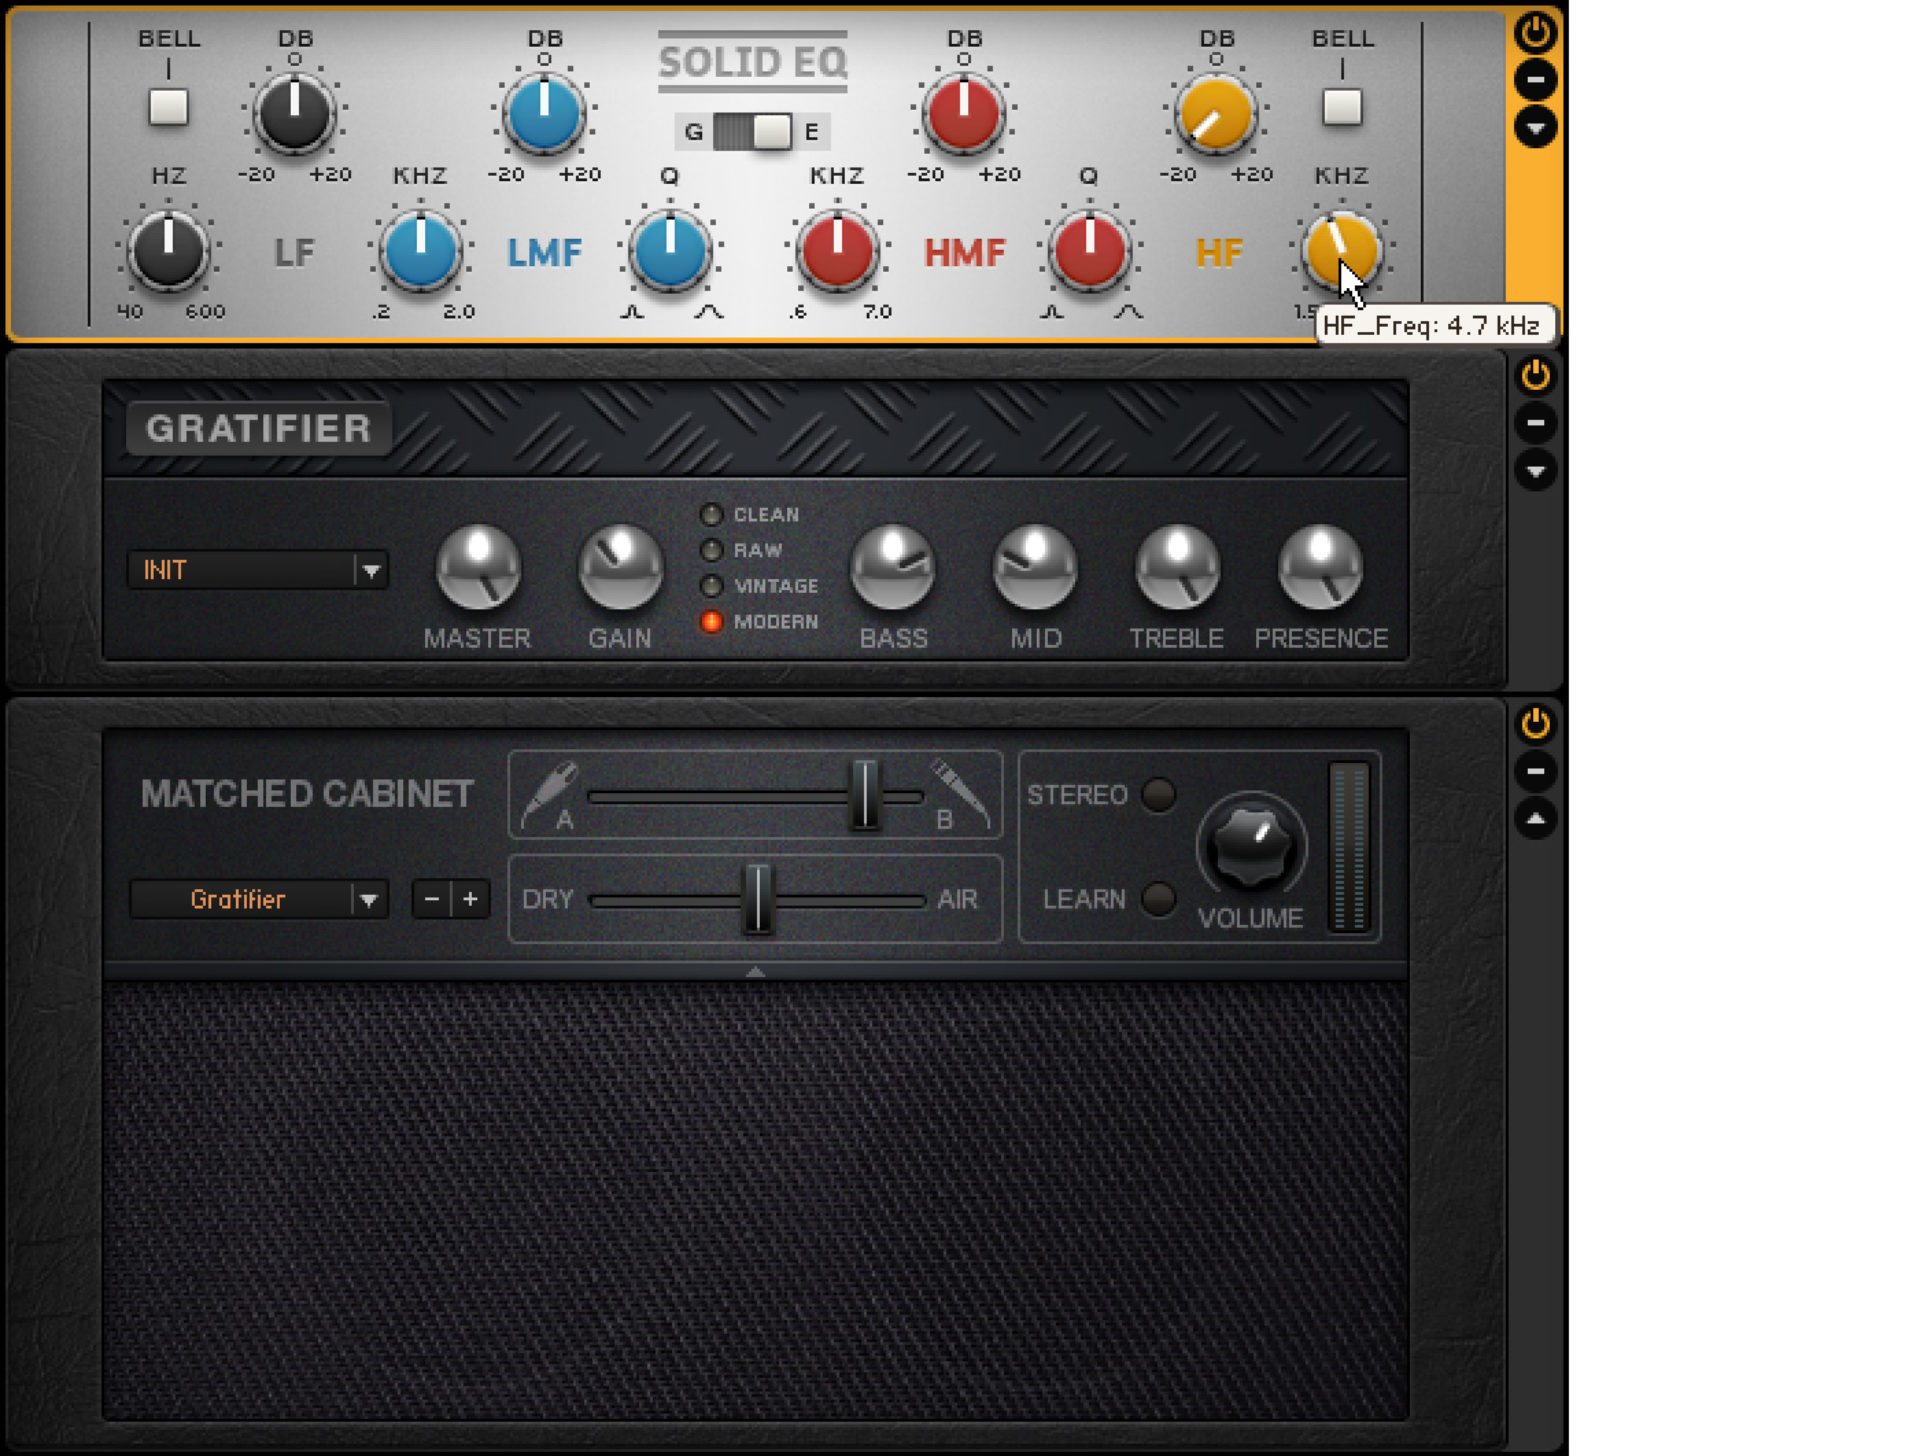
Different guitars, strings, pickups, and playing styles will produce different results, so any suggestions for frequencies and cut amounts are starting points. As you experiment, you’ll probably discover a “sweet spot” that works particularly well for you.
5. The resonance notch
Certain amps have resonances that add a low-level, sort of “whistling” effect that can make the sim sound more artificial. For example, I hear this whistling when playing the bridge pickup through the High White amp’s Init setting. To notch out this whistling, insert a stage of parametric EQ either before or after the cabinet with the following settings: Freq = 2328 Hz, Gain = -10 dB, Q = 0.05.
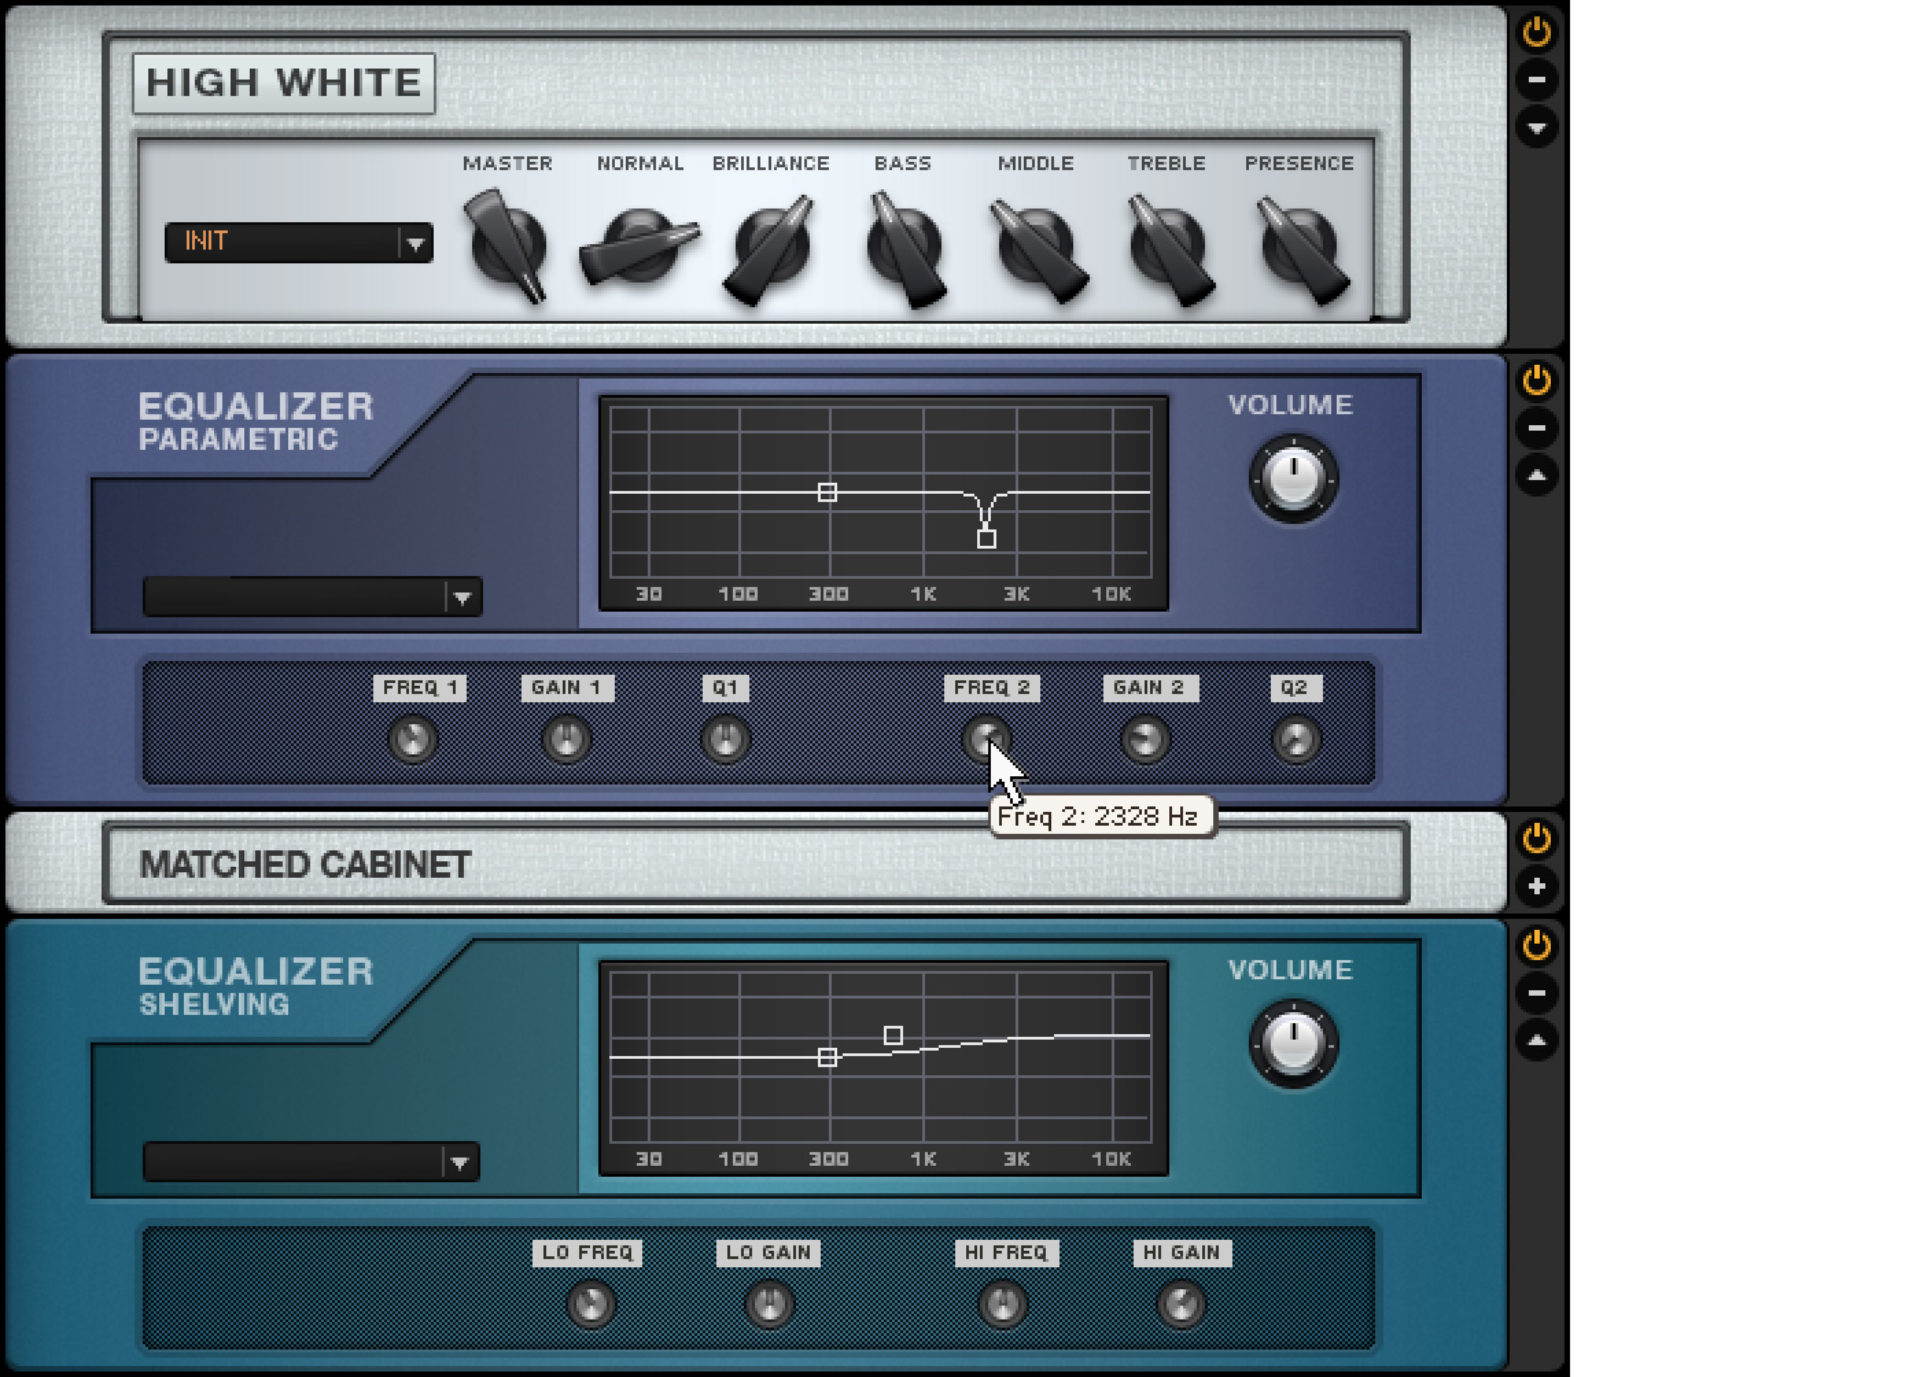
Because you’re notching out a high frequency, the resulting sound may seem to lack brightness. To compensate, add the Shelving Equalizer afterward, with a mild high-frequency shelf starting at around 1500 Hz.
If you encounter this whistling in other amps, set up a notch like the one above, and while holding shift for more precise tuning, vary the Freq control in the 1 kHz to 8 kHz range until the whistling disappears.
Related articles
-
Synth pads: how to create atmospheric textures in your music
Learn everything you need to know about synth pads, with a step-by-step guide to creating this crucial electronic sound to…
-
Sub bass: how to add that deep tone to your tracks
What is sub bass? Learn how to make sub bass and how to use sub bass effectively in your productions.
-

How to use tempo in music to create dynamics and shape emotions
Learn what tempo and BPM mean in music, how to calculate the BPM of your song, and how to use…
-

What is EDM music and how to make it
Discover what is EDM music and master how to make EDM with this comprehensive guide, featuring essential production techniques and…
-

How to make a melodic bass track with emotive and powerful bass lines
Discover what is melodic bass music, its unique sound, and learn how to make melodic bass music with practical tips…
-
5 of the best color box plugins for music production
Learn what defines a color box and which color box plugins are the best for adding depth, warmth, and personality…
-
5 jazz chord progressions to transform your songwriting
Jazz chord progressions can help make your music more colorful and exciting, no matter what genre you make. Discover five…
-

Getting started with Native Instruments software and hardware
Discover full-length tutorials on the top Native Instruments software and hardware, including Kontakt, Komplete, Guitar Rig, Maschine, and more.