You’ve got your playlists in order, you know your tracks, but there’s one more piece of the puzzle: beatgridding. From the basics of the gridding process, to the potential problems you might encounter, this article will get you started.
What are beatgrids?
During the music analysis, TRAKTOR attempts to learn how your tracks are structured. Tempo is based on the shape of the waveform, with the sharp peaks (known as transients) understood as your rhythm sounds. TRAKTOR then works out where the first beat is, counts based on a 4/4 time signature, and adds a grid marker to the track.
The analysis creates a grid over the rhythm, based on what tempo is determined, either by TRAKTOR, or manually. This is based on a special cue point called a grid point, which is shown as a white, downward pointing triangle on the waveform. As long as your beatgrids are consistent throughout all your music, you’ll have reliable sync and effects, whatever you’re doing.
Before you begin…
Make sure you have Store Beatmarker as Hotcue enabled. You can find this in the preferences under the Analyze Options section. This will mean the grid marker will appear as cue point 1 in the advanced panel after initial analysis, letting you quickly jump to it when you need to. Next, set Mouse Control to Snap in the Transport section, so that when you click on a point in the waveform, the track will jump to the nearest beat to that location.
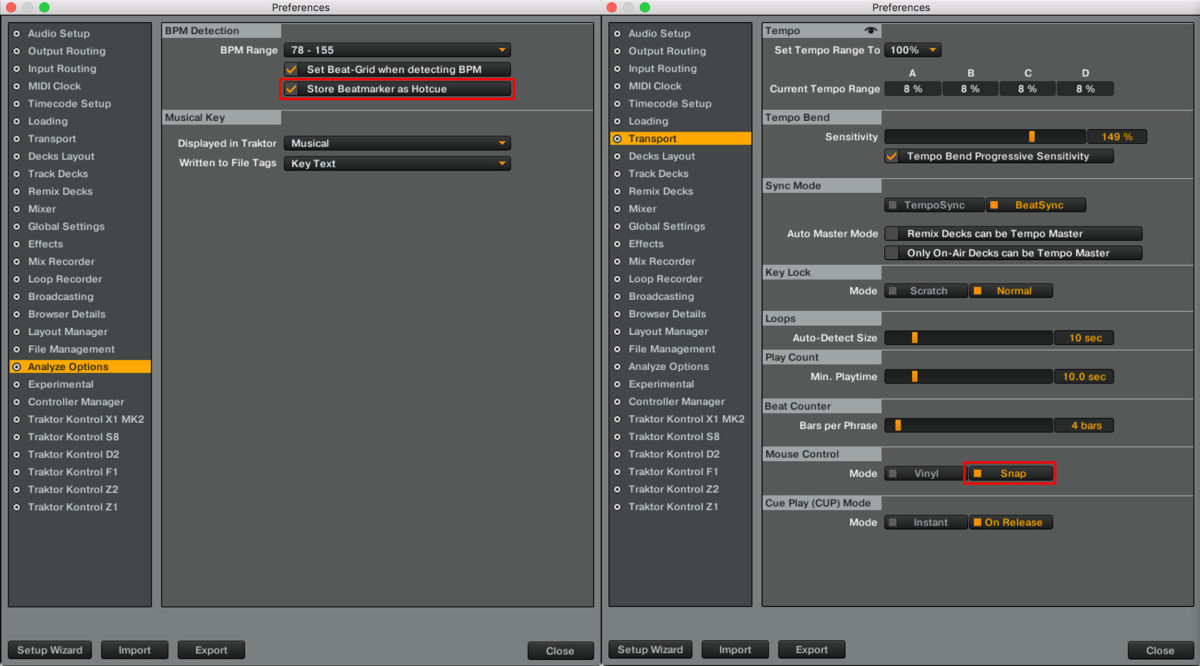
With these options set up, you can quickly jump around your music to accurately find where you need to go.
How to
While the process of beatgridding isn’t complicated, there are a few steps involved to make sure it’s correctly done.
The first thing to do is… nothing. As a starting point, let TRAKTOR analyze the tracks automatically, the first time you load them into your deck. You’ll see a progress bar along the bottom of the windows as the analysis is happening. The process will add a beat marker on the first beat TRAKTOR finds, laying out the beatgrid for the track.

Once the analysis is done, make sure you’ve got the advanced panel showing on the deck, and switch to the GRID tab to turn on the metronome. This will play a click track synced to the beatgrid whenever you play the track. If the click track sounds like it’s out of sync with the beat, shift the grid using the MOVE GRID BWD/FWD buttons on the GRID tab of the advanced panel. It also helps to zoom closer into the scrolling waveform using the zoom buttons on the right side of the deck. You can also reset the zoom level using the middle button.

At a minimum, you’ll need a cue point, but it’s best to go through the track at this point to add more hotcues where you might need them. Add a load point by clicking an empty cue slot at the desired location, and selecting Load from the drop down on the right of the advanced panel. You can also add loop markers using the same system.

Once you’re done, it’s always good practice to lock your track using the padlock button on the GRID tab of the advanced panel.
Beatgridding problems
Whilst most of the tracks you’ll encounter will need very little attention, there are several issues you may encounter as you go along. Most of these can be easily fixed within TRAKTOR itself, but sometimes you might need some extra help.
The grid looks irregular, or doesn’t stay in time with every beat
If you’re finding your beatgrid doesn’t seem steady, or is out of time with the tempo, this usually means there is no grid marker on your track. Find the first kick of the track and add a grid marker cue point to see if this helps. Adding it to the first beat also ensures your phrasing is correctly set up in the grid.


If TRAKTOR is struggling to read the correct transients to add a grid marker, find a point where the grid correctly hits a beat and add a temporary marker to lay a steady grid. After that, you can create the grid marker you want, then delete the temporary one. As long as the tempo is correctly set, you should have a fresh working beatgrid.
Incorrect grid markers
TRAKTOR’s analysis will occasionally guess the wrong place for a your grid marker, causing the beatgrid to be out of measure (for example, not starting on the downbeat) or out of sync with the music. There are two ways to solve it, depending on how badly out it is.
1. You can move grid markers by hand using the MOVE GRID BWD and MOVE GRID FWD buttons; or;
2. start again on the correct beat.
The first method is useful when the grid marker is no more than a beat out from where it should be. Either on the wrong transient (like a clap instead of a kick), or just a beat out. Zoom in on the waveform using the + button on the right of the scrolling waveform, and shift the marker to its correct location using the MOVE GRID BWD/FWD buttons, found at the top left of the GRID tab in the advanced panel.
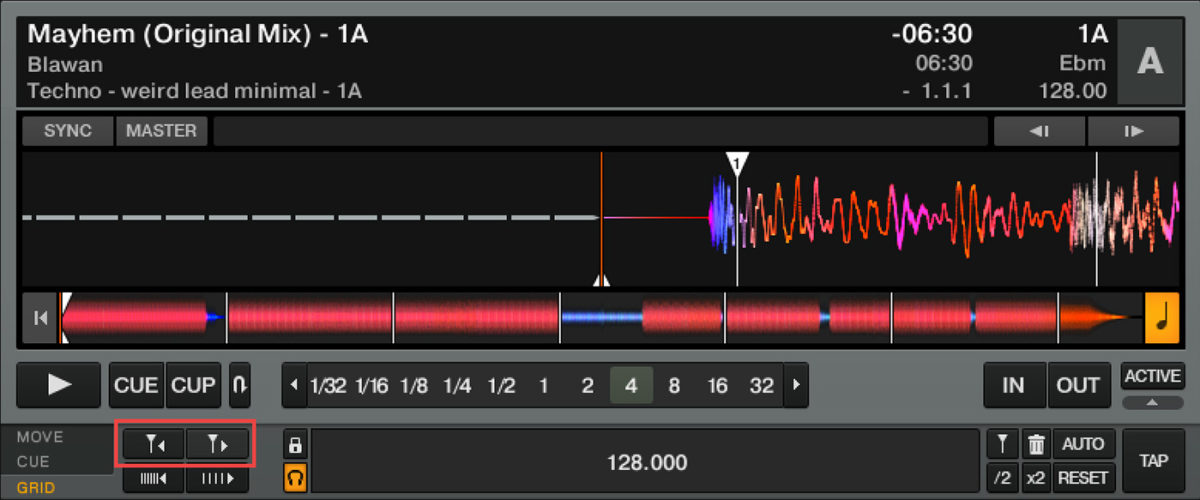
The second method involves deleting the grid marker completely and finding the right spot to add a replacement. Jump to the grid marker using either the waveform, or the cue point button. You can then use the DELETE CUE button to remove the grid marker, and follow the steps from the previous section (The grid looks irregular…) to create a new one.

For both of these methods, use the metronome to make sure your track is in time, and make adjustments using the MOVE GRID buttons, until the music and metronome are in sync.
Drifting tempo
The term ‘drifting tempo’ relates to tracks where the BPM is meant to remain constant, but shifts out at the point it was recorded. This issue can be easily overcome when doing simple mixing, by riding the pitch fader and nudging the track, but with fixed beatgrids, the quickest way is to fix the track itself so that it has a steady tempo.

If you only have TRAKTOR available, and the tempo only drifts slightly throughout the track, you can use the Audio Recorder along with the deck Tempo Fader to ‘ride the fader’ and re-record the corrected track. While this method is far from accurate, you’ll have the necessary tools already available.
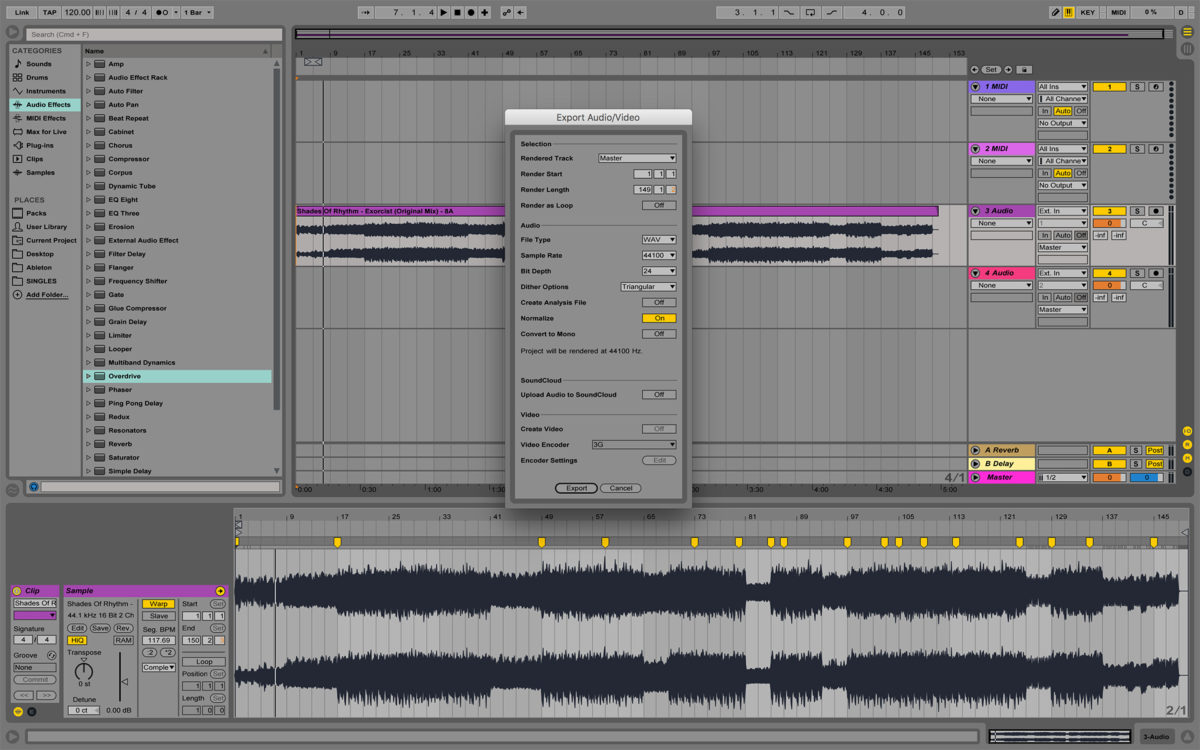
Alternatively, the most accurate way of ensuring a track’s tempo is consistent is by using third party software such as Ableton Live, Bitwig, or Logic, to quantize the track back to a regular rhythm. You’ll need to export the fixed version as a new track and import it back into TRAKTOR to beatgrid as normal.
Beatgridding specific genres
Some genres can fall into two different tempo ranges. For example, dubstep can either be around 70bpm, or 140bpm, and drum and bass can either be around 85bpm or 170bpm. The decision on which way to go is entirely up to you, and the genres you play in the same set.
A quick way to change the grid on tracks like these is to use the BPM x2 and BPM /2 buttons on the GRID tab of the Advanced panel. This will let you toggle between the higher and lower tempos, and you can even map the buttons to a MIDI controller to switch on the fly.

Overcome temporary change in tempo
You might come across a track where the producer/artist added a rhythm at a different tempo (for example, a breakdown that speeds up then slows back down to the original tempo), causing the track to fall out of sync with the time signature. To work around this, you’ll need to reset the beatgrid half way through the track.
1. Move to the current point on the grid that’s closest to correct beat at the end of the tempo change.
2. Add a grid marker.
3. Use the MOVE GRID FWD to align the marker with the down beat after the tempo change, using the metronome to check it’s in sync.

If set up correctly, the metronome should sound out of time with before arriving at the new grid marker, and then sync up afterwards.
While this method lets you reset the grid back to the correct rhythm, it won’t reset your time signature, nor adapt for variations in tempo across the whole track (for this, see the Drifting tempo section). It will mean that effects will be quantized, and other tracks will sync properly after the new grid marker.


