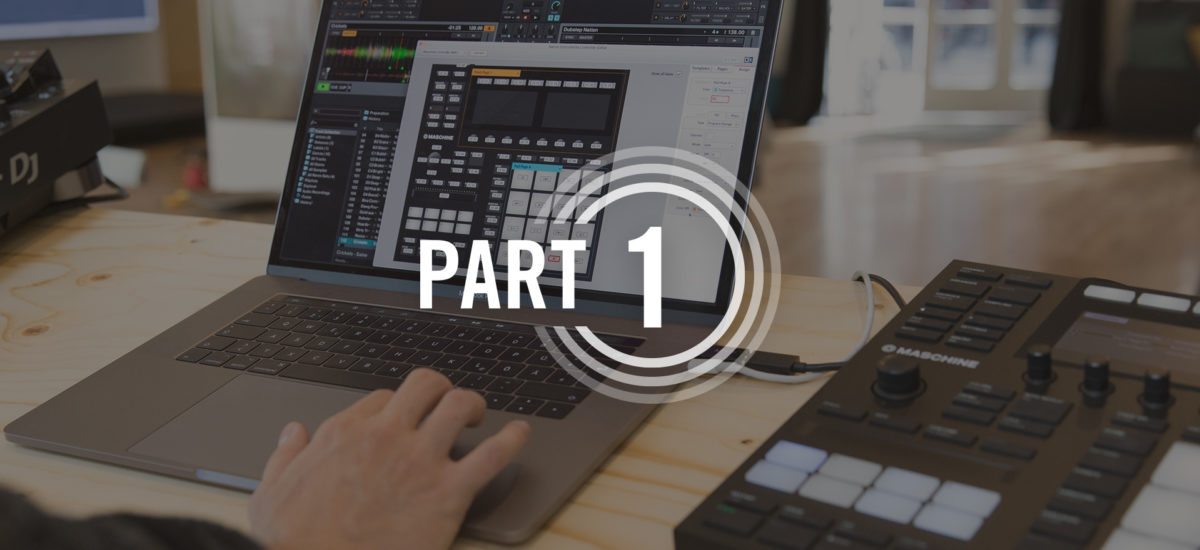
Ever wanted to go beyond the tried-and-true “decks and mixers” control paradigm? Through the magic of mapping, anything with a MIDI output can become your new TRAKTOR controller, and there are few better blank canvases for this than MASCHINE. With the MK3 model featuring 16 RGB-backlit pads, 8 knobs with visual readout, a tactile encoder, buttons aplenty, and multiple pages of controls, there’s enough mappability here to handle all the Hotcues you can throw it at – and then some.
But back to that mapping functionality. Almost any feature in TRAKTOR can be mapped, meaning that it can be controlled with MASCHINE’s pads and buttons. You can map multiple features to one control to turbocharge your on-stage workflow and creativity. Use Modifiers and Pages to create layers of controls, massively multiplying what your MASCHINE setup is capable of. And how about mapping MASCHINE’s multicolored pads to show which TRAKTOR features are active at a glance?
In this in-depth tutorial, you’ll learn how to do all of this and more, creating a custom TRAKTOR mapping for MASCHINE from scratch. This tutorial refers to the MASCHINE MK3 hardware throughout, as that’s the device we are using, but the same techniques are applicable to all MASCHINE models.
One of the beauties of the MASCHINE hardware is that it can be used to control both the MASCHINE and TRAKTOR software simultaneously. Obviously, if you want to actually do this during a set, then you’ll want to synchronise playback timing of the two applications. With Ableton Link, you can synchronize MASCHINE to TRAKTOR with one push of a button in each program. However, Ableton Link is still a work in progress, and the timing tends to drift in tempo sync mode, so we recommend the old-school method of sending a virtual MIDI clock from TRAKTOR to MASCHINE.
In normal use, when controlling MASCHINE, the controller is in what’s known as Application Mode. However, MASCHINE – as with most Native Instruments controllers – has what’s called a MIDI Mode. This gives you a whole new layer of assignable buttons, knobs and faders that you can program to control virtually anything inside TRAKTOR – called a mapping.
To start, make sure your MASCHINE is in MIDI Mode. Here’s how:
- Shift + Channel (MASCHINE MK3 & MASCHINE STUDIO)
- Shift + Control (MASCHINE MK2 & MASCHINE MK1)
- Shift + F1 (MASCHINE MIKRO, MIKRO MK2)
The same key combination will switch you back into Application Mode.
With the MASCHINE and TRAKTOR software synced, and your MASCHINE controller talking to both of them, you can begin making a MASCHINE mapping for TRAKTOR.
A typical mapping might have an effects section, browsing controls for browsing playlists and loading tracks, Hotcues, Loop controls, Play, Sync, Tempo Bend, Flux Mode, BeatJump, and then perhaps a few of the programmer’s own secret weapons. To get an idea of what mappings can do in the hands of a master, check out midimonsters.com/midi-maps/
Before diving headlong into the MIDI mapping process, it’s crucial to plan it out. There’s nothing worse than getting deep into it, then realising you didn’t leave space for some vital function. One of the best approaches is to simply draw out a labelled diagram of the mapping with paper and pencil. Alternatively, you can plan the mapping directly inside the Native Instruments CONTROLLER EDITOR application (installed with any NI controller, or downloadable here).
Here’s an example of a MASCHINE mapping for TRAKTOR, with each control labelled inside CONTROLLER EDITOR.
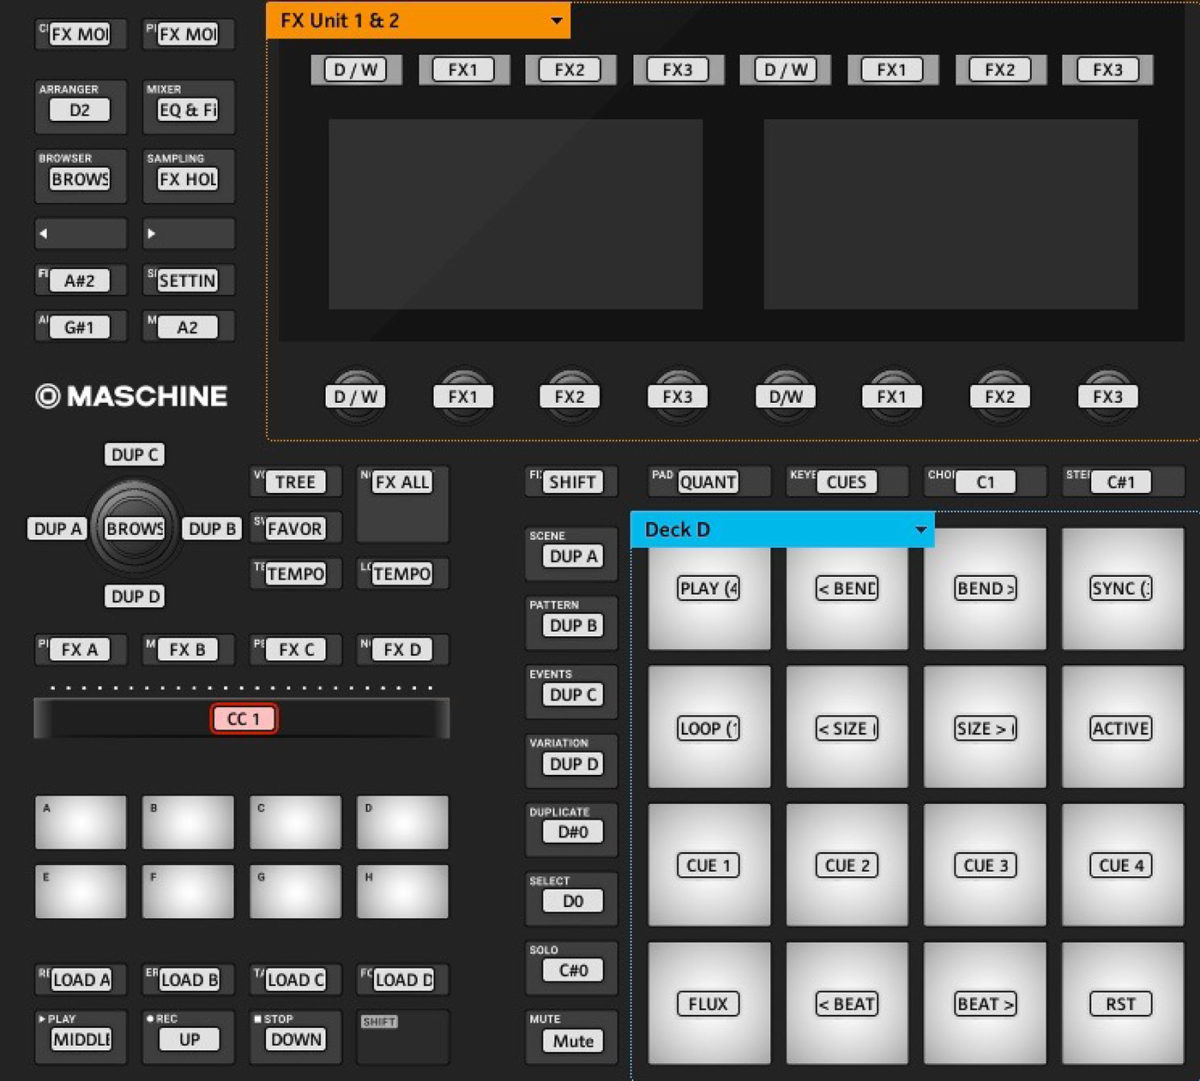
CONTROLLER EDITOR is basically the middleman between your MASCHINE controller and TRAKTOR – or indeed, any other combination of NI controllers and software in your studio or live setup. It will let you define – or ‘assign’ – the MIDI messages sent by each control element (pads, buttons, knobs, encoders, etc), for example, Pad 13 sends note A-1, Knob 4 sends MIDI CC 2, and so on. You can also configure other behaviour, such as the colors used by the RGB-backlit Pads.
1. Opening the Controller Editor
Go ahead and open the CONTROLLER EDITOR. At this point, all connected Native Instruments controllers will automatically enter MIDI Mode – useful in the studio, but potential hugely confusing on the stage. For this reason, we advise not to open the CONTROLLER EDITOR in a live setting.
If it’s your first time with the CONTROLLER EDITOR, the default Template for your controller will load; otherwise, all of your Templates will load. A Template is a complete set of MIDI assignments for an NI controller. Feel free to try the default Template, but keep in mind that some of the mappings may not be to your personal taste.
This tutorial is all about customization, of course, so we’ll be designing our own custom CONTROLLER EDITOR Template from scratch. It’ll be clearly color-coded, nicely labeled, customized to our every need, and designed for maximum dancefloor destruction.
2. Creating a new template
In the Device Menu (upper-left corner of interface), choose your MASCHINE controller – Maschine Controller MK3, in our case.
In the center of the CONTROLLER EDITOR you’ll find the Hardware area, showing your MASCHINE’s mappable control elements graphically. To the right is the Inspector, featuring three tabs: Templates, Pages and Assign – here, you define the MIDI messages and other behaviour of each MASCHINE control.
To give us a blank slate, click the Templates tab and choose Edit > New. Double-click where it says “Template X” and type your Template name, eg, “TRAKTOR Mapping”.
3. Configuring MASCHINE’s pads for TRAKTOR
Over the next seven steps, we’ll configure the behaviour of MASCHINE’s controls for use with TRAKTOR, assign colors where needed, then go through each MASCHINE control element and assign the exact MIDI messages it sends outs. We’ll be straight with you: this part is tedious and time consuming. It’s gotta be done, though, so let’s get to it…
Let’s set up our basic pad behaviour. Double-click the text box in the middle of Pad 1 (the bottom-left one). This pops the Inspector’s Assign tab to the front, so you can see its current assignments.
At the top is the Description area. For the selected pad, it shows the Pad Page it’s part of (more on Pages later), the Pad Page’s Color (reflected in MASCHINE’s Group buttons – individual pad colors are set elsewhere), and the Label (name) for the pad – because we haven’t set a Label yet, it shows the pad’s MIDI note. The labeling feature is a massive help, allowing you to give meaningful names to all controls; however, we’ll do all that after making MIDI assignments because editing can erase Labels.
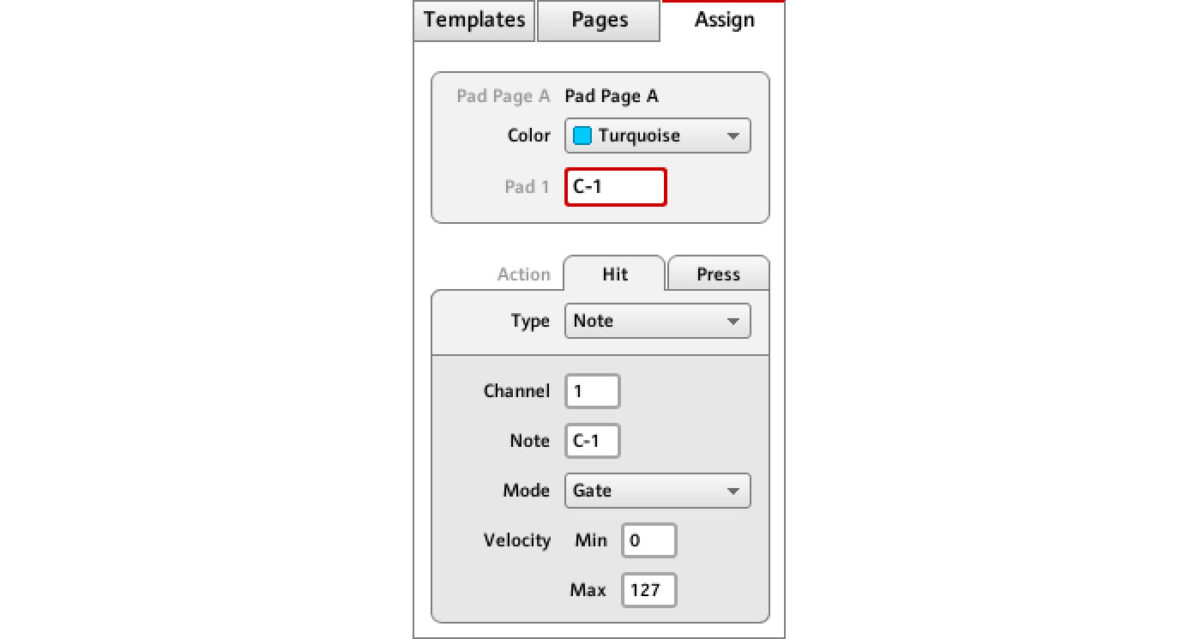
Next is the Definition area, where you define the MIDI message sent out by the control, and its behaviour. The tabs show us that a pad has two action types: Hit, when you hit and release it; and Press, when you apply sustained pressure. Each can send its own unique MIDI messages.
There’s little room for error in DJing, so let’s disable the Press action, to prevent triggering of unintended MIDI messages – under the Press tab, change Type to Off.
Under the Hit tab, set Type to Note, which sends MIDI note on/off messages. The next option in the Type list, Control Change, sends MIDI CCs (aka Continuous Controllers), which are generally used for knobs and encoders. For TRAKTOR, you’ll only really use Note and Control Change messages.
Leave the Channel and Note parameters for now, as we need to set these for each pad, and that’s best done for the whole lot in one go.
Mode gives two options for Note messages: Toggle and Gate. This allows for sending Note On/Off messages alternately with each hit, or in momentary fashion (Note On when the pad is pressed down, Note Off when it’s released). We always set Mode to Gate for TRAKTOR – if we need toggling behaviour, we can simply create that in TRAKTOR later on, with greater flexibility and ease.
Leave Velocity at the default of Min 0 and Max 127 – we won’t use velocity response inside TRAKTOR.
4. Selecting multiple controls for faster editing
At this point, you may be panicking at the prospect of having to configure every parameter of every control.
Thankfully, we can select multiple controls and edit their parameters as one, saving tons of time. To do this, drag outside of the control labels to select multiple controls. Note that you can select, say, all 16 pads on Pad Page A, adjust them, then switch to Pad Page B and the corresponding 16 pads of that Page will now be selected.
Armed with this knowledge, select all 16 pads, and set them up as you did for Pad 1 in the previous step.
You must also set LED On to For MIDI IN so MASCHINE’s pads always reflect changes in TRAKTOR (for example, a Pad is Red if a song is stopped, and Green if the Deck is playing).
5. Assigning colors to pads
At the bottom of the Assign tab we can color-code our pads. First, though, set Color Mode to Dual for all pads – now you can have separate colors for the Color On/Off state, which is extremely useful. A lot of DJs like to make the Color Off value the same across all pads, so there’s a consistent background color when pads are in their ‘neutral’ state. For example, you could set Color Off to Yellow for all pads, and then set your Hotcues to Blue, Loops to Green, Sync to Orange, and miscellaneous colors for Tempo Bend, Flux Mode, Beatjump, etc.

6. Setting up knobs for TRAKTOR
Now our pads are perfectly tuned for TRAKTOR, let’s do the same with the knobs beneath the LCD display. Multiselect the eight knobs and check out the parameters in the Assign tab – they’re a bit different to those for pads.
Although MASCHINE’s Knobs are endless encoders in the physical sense, they work like virtual potentiometers, with MASCHINE internally keeping track of the absolute value. By default, the LCD display shows the virtual encoder positions numerically. To show graphical “level” bars instead, hold Shift and turn Knob 5 until it says “SHOW BARS”, then release Shift.
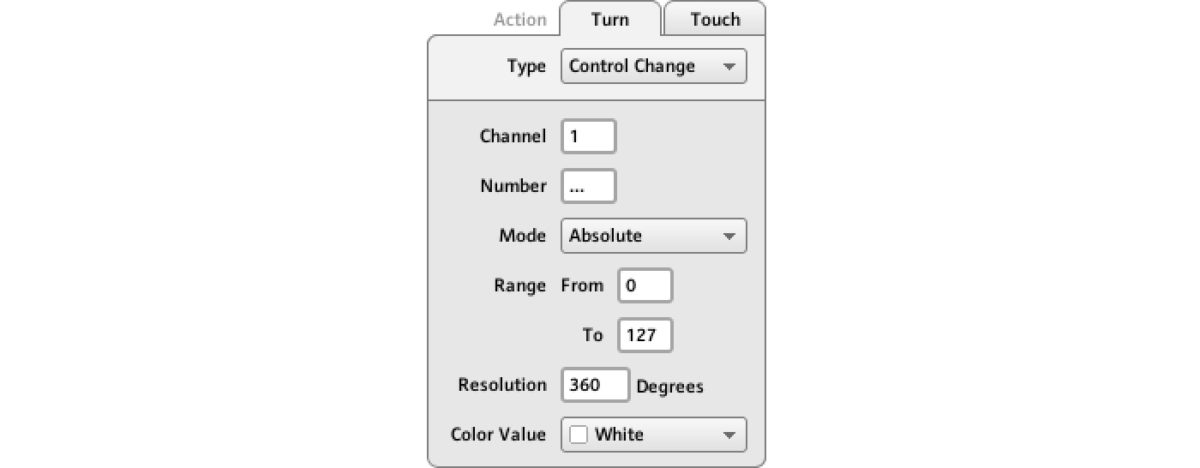
MASCHINE’s knobs are touch-sensitive, so they can send MIDI when you simply lay your fingers on them. That’s great in the studio, but too sensitive for live use, so set Type to Off under the Touch tab to disable it.
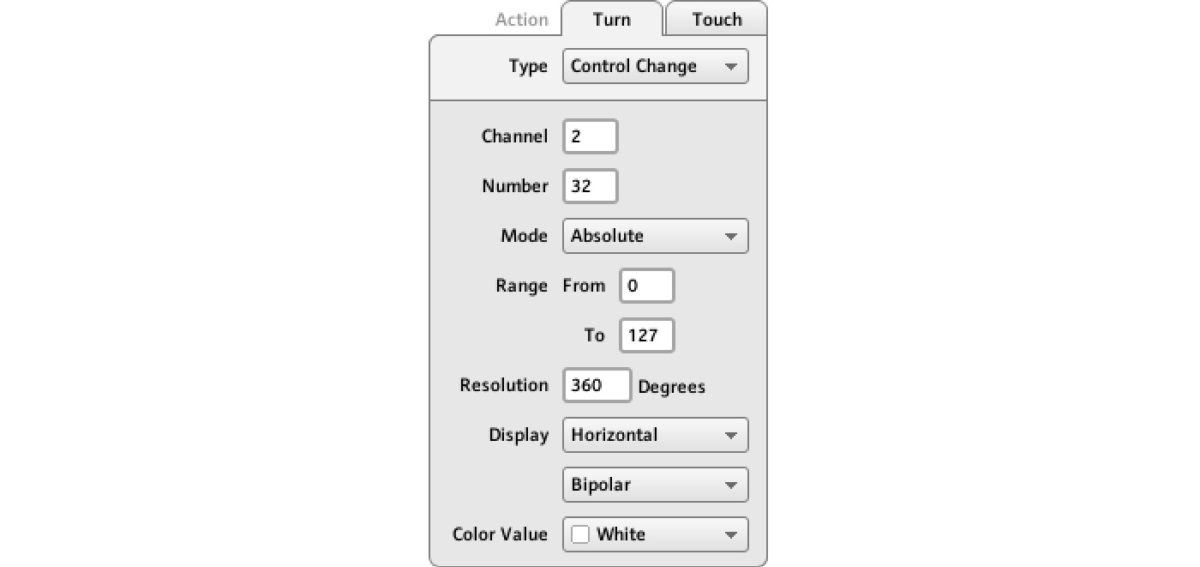
As we said earlier, Control Change messages are typically used with knobs, where a value is gradually changed. Under the Turn tab, ensure Type is Control Change and Mode is Absolute.
EQ knobs almost always have their neutral or ‘zero’ point when in the 12 o’clock position. You want this same behavior on your MASCHINE, so head to your Mixer Knob Pages, and change the Turn > Display parameter from Unipolar to Bipolar for all your EQ knobs. Now you’ll see a line in the middle of the bar on your MASCHINE’s display, indicating the ‘zero’ point.
7. Multilayered control using pad and knob pages
MASCHINE has 16 pads, so it might seem like you can only map 16 TRAKTOR functions to them. But that’s not the case, thanks to Pages. With Pages, the same set of 16 pads can be switched to control, say, Deck A and Deck B, with a separate Page of assignments for each Deck. That’s a very basic example, as you’ll see.
Pad Pages let you define up to 8 sets of MIDI commands for MASCHINE’s 16 pads. Hit the Group Buttons on the MASCHINE hardware to change the active Pad Page – or click it in the CONTROLLER EDITOR’s Pages tab. A typical TRAKTOR DJing setup might use Pad Pages A-D for main control of Decks A-D, then Pad Pages E-H for Hotcues, Auto Loops and Flux Mode on Decks A-D respectively.
You also get Knob Pages (two by default, but you can create as many as needed with Edit > New) for the eight unlabelled knobs and buttons below and above MASCHINE’s LCD displays. Change the active Knob Page in CONTROLLER EDITOR’S Pages tab or by pushing the Page Left/Right arrows on MASCHINE. A typical mapping could comprise two Pages for effects units, two DJ mixer Pages, and individual Pages for Stems, Loop Recorder, and a simplified mixer.
The Edit dropdown menus contain New, Duplicate, Copy, Paste and Delete options. Since we already set up our parameters for the knobs and pads in Knob Page 1 and Pad Page A, delete all the other Pages, then use Duplicate to create as many Pages as you want to use. This saves us setting the parameters all over again.
Rename your Pages by double-clicking the title – following on from our example, we’d label the Pad Pages “Deck A”, “Deck B”, etc, and Knob Pages “FX Unit 1 & 2”, “Mixer A & B”, and “Mixer Basic”.
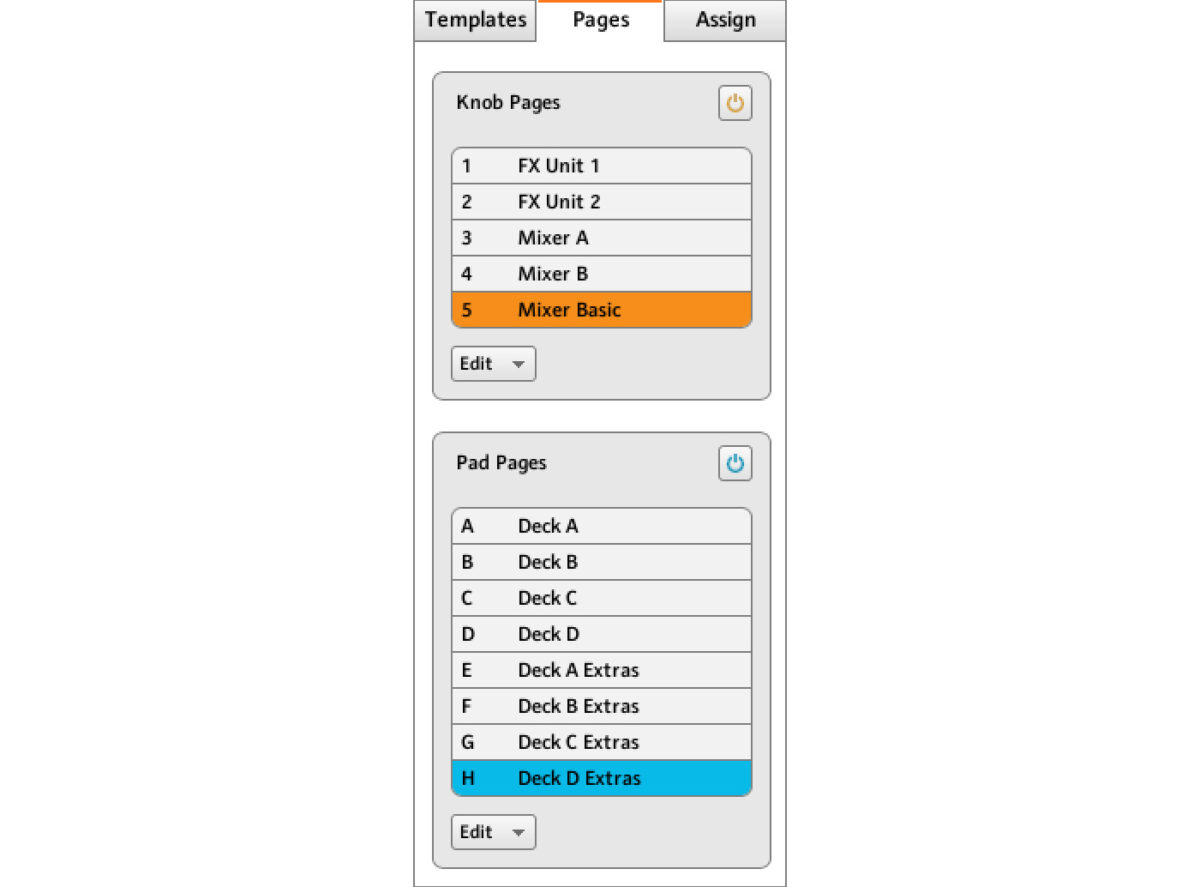
At this point, you should consider the order you want your Decks in with respect to your mixer. Some DJs like their Decks in straight ABCD order for regular four channel DJ mixers, while some prefer the main decks on the middle channels – CABD – as they appear on controllers like the S4 or S8.
Note that you can disable Pages with the Enable (‘power’) button. Why? Well, that frees the Group or Page Left/Right buttons from their Page-switching duties, which means you can now MIDI map those too. We won’t be doing that, but the option is there.
8. Dialing in MASCHINE’s encoder for browsing
Most MASCHINE controllers have a large encoder for browsing. It doesn’t have a ‘virtual’ position like the knobs – instead, it’s used to adjust software parameters relative to their current position. This is essential for traversing TRAKTOR’s Browser because you might want to jump around with the mouse or keyboard, then carry on flicking through from the exact same point with the encoder. The other big difference is that the encoder is stepped, with a tactile click at each ‘step’.
Set the Encoder up like this:
- Turn > Type: Control Change
- Turn > Mode: Relative
- Turn > Step: 1
- Push > Type: Note
- Push > Mode: Gate
- Push > Value: 127
Touch > Type: Off


This configures the encoder for relative operation and allows it to send a MIDI note when pushed.
Note that practically every other control on MASCHINE can be assigned too, and not just the pads, knobs and encoder that we’ve looked at here.
9. Assigning MIDI messages
Now it’s time to configure the MIDI messages (Notes and Control Changes) sent by each control. Obviously, it’s vital that every control sends the intended message – assignment mistakes, like having two Pads sending the same MIDI note, can cause all kinds of confusion.
A smart way to approach this is to work through the entire MASCHINE interface pad by pad (and then Page by Page), starting at the lowest available note (A-2) and working your way up chromatically.
Eventually you’re going to get up to G#7 and run out of MIDI notes. Now what?! Don’t panic: there are 16 channels of MIDI Notes, so just type 2 in the Channel box, and start again at A-2. Once you max out channel 2, change up to channel 3, and so on. Channels can also be used to organise your assignments.

When you’re finished with the pads, do the same for all other controls. To deal with Control Changes, take the same approach: start at CC1 and work your way up. That way you’ll know that none of the CCs are overlapping.
10. Labelling your template
With every MASCHINE control element mapped to a MIDI message, you can begin labeling it with its intended TRAKTOR function – this is where you really plan how your mapping will interact with TRAKTOR.
To label a control element, double-click it, then either type directly into the label field in the Hardware area, or at the top of the Assign tab. Here is an example of a fully labelled template:
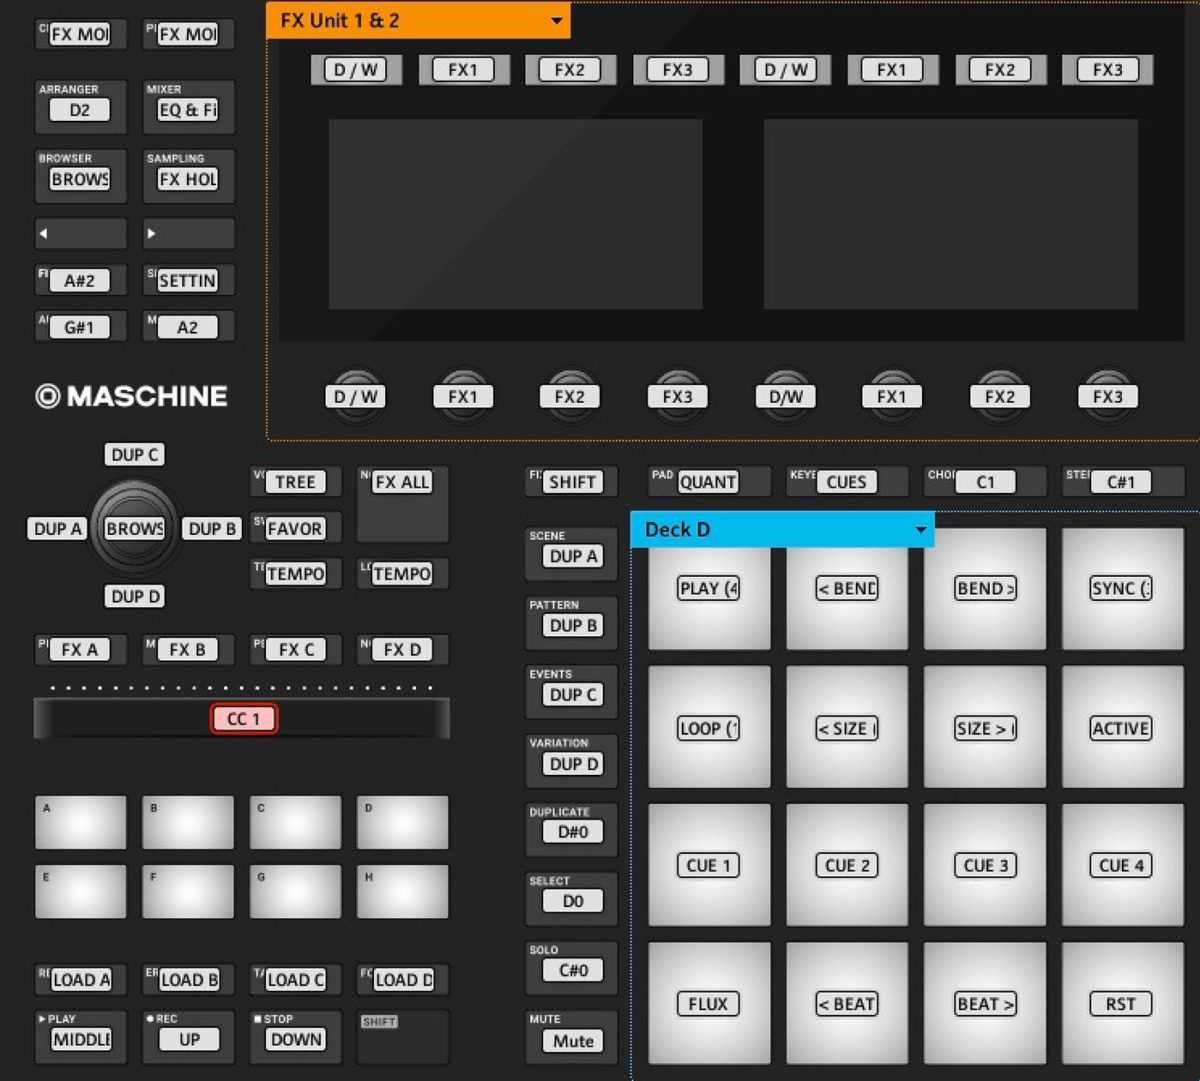
Remember, if you change the mode or parameters of a control, it may remove the label you’ve typed in.
11. Exporting your template
Although CONTROLLER EDITOR saves your changes automatically, it’s wise to save the Template out to a file for backup purposes. Click the Templates tab in the Inspector. With your current Template selected, choose Edit > Export. Name your template file accordingly and save it.
Most of the time, you’ll use just the one Template, but it’s certainly possible to create multiple Templates to handle different situations, or for use with different programs (e.g., TRAKTOR, Ableton Live, etc). To switch the Template on your MASCHINE controller, hold Shift and push the Page (arrow) buttons on MASCHINE Studio, MK3 or MK2; or Shift and Left/Right Arrow buttons on MASCHINE Mikro – note that this works even when the CONTROLLER EDITOR is not open.
And that’s how to use the CONTROLLER EDITOR!
PART 2 of this feature can be read here.
For more information about the author Mike Henderson, check the following links:
ENDO
Facebook – http://facebook.com/djendomusic
MIDI Monsters
Facebook – https://www.facebook.com/midimonsters


