
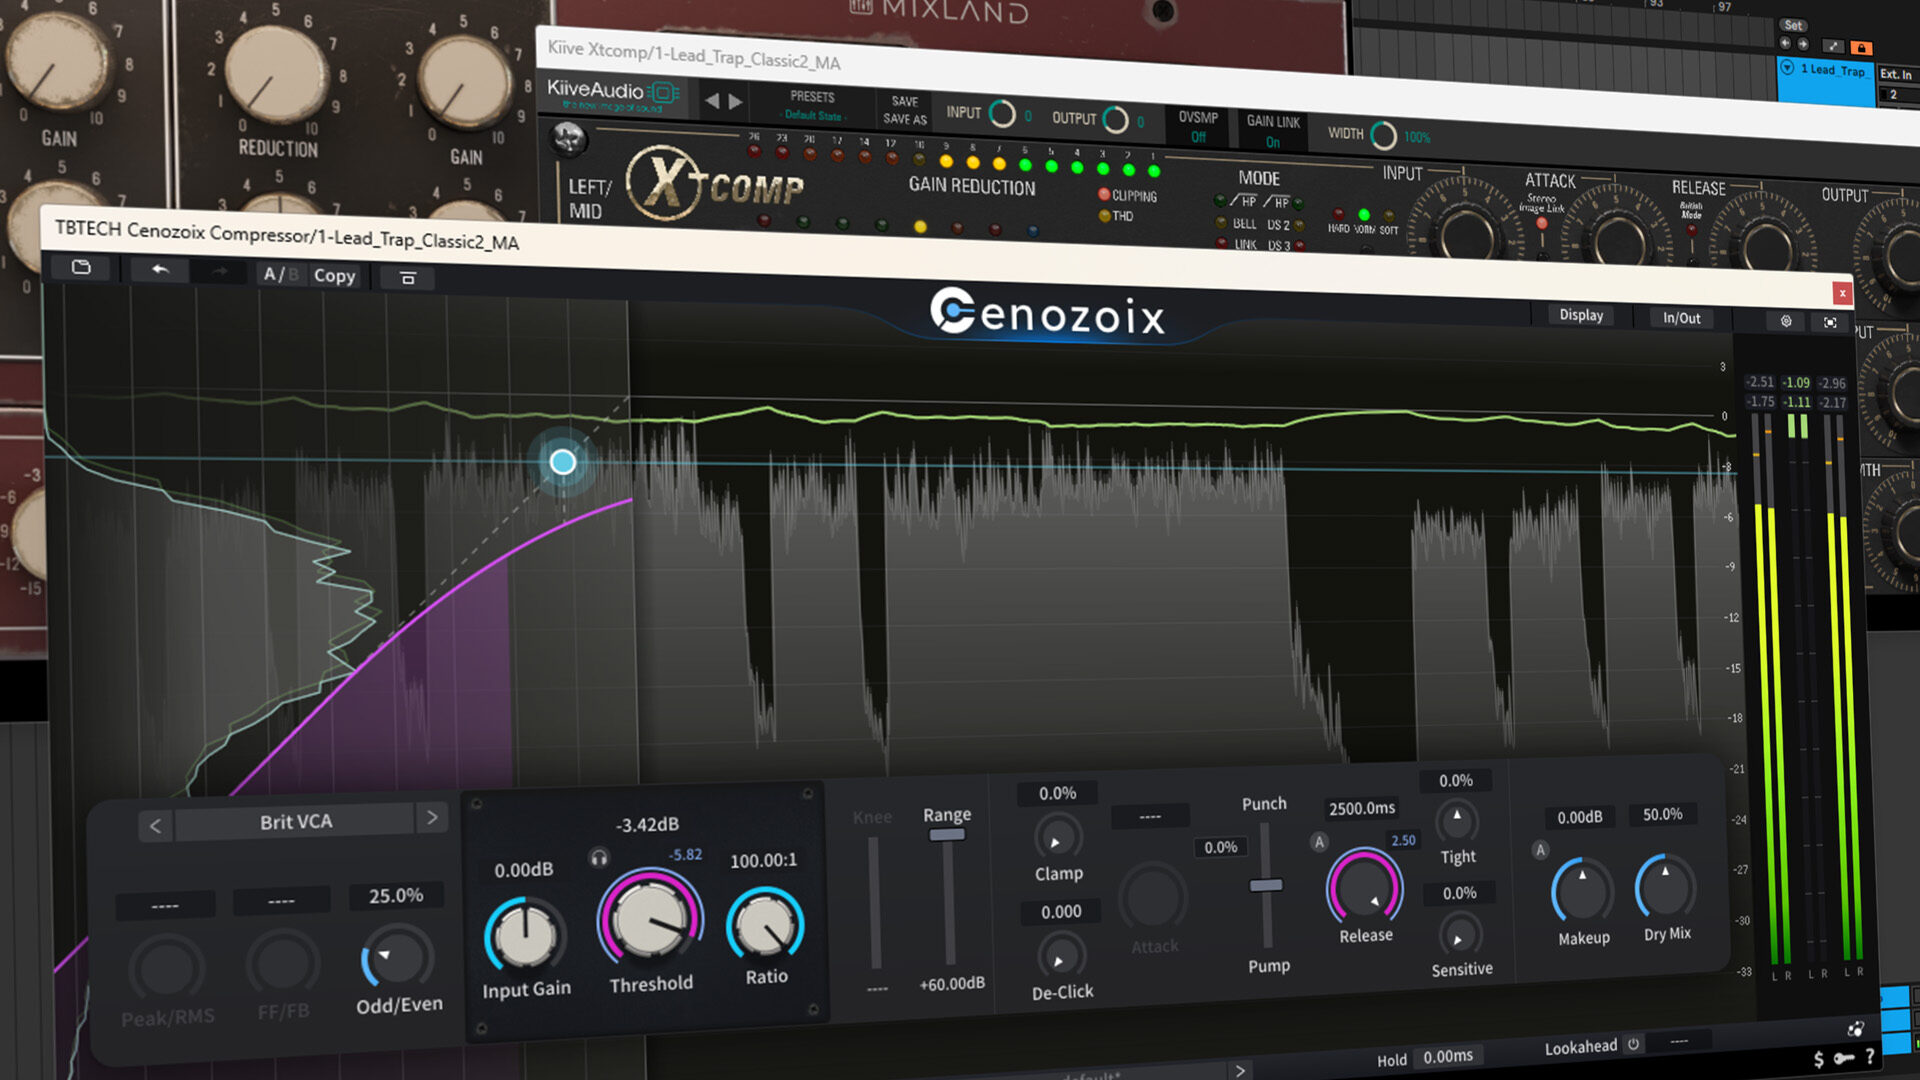
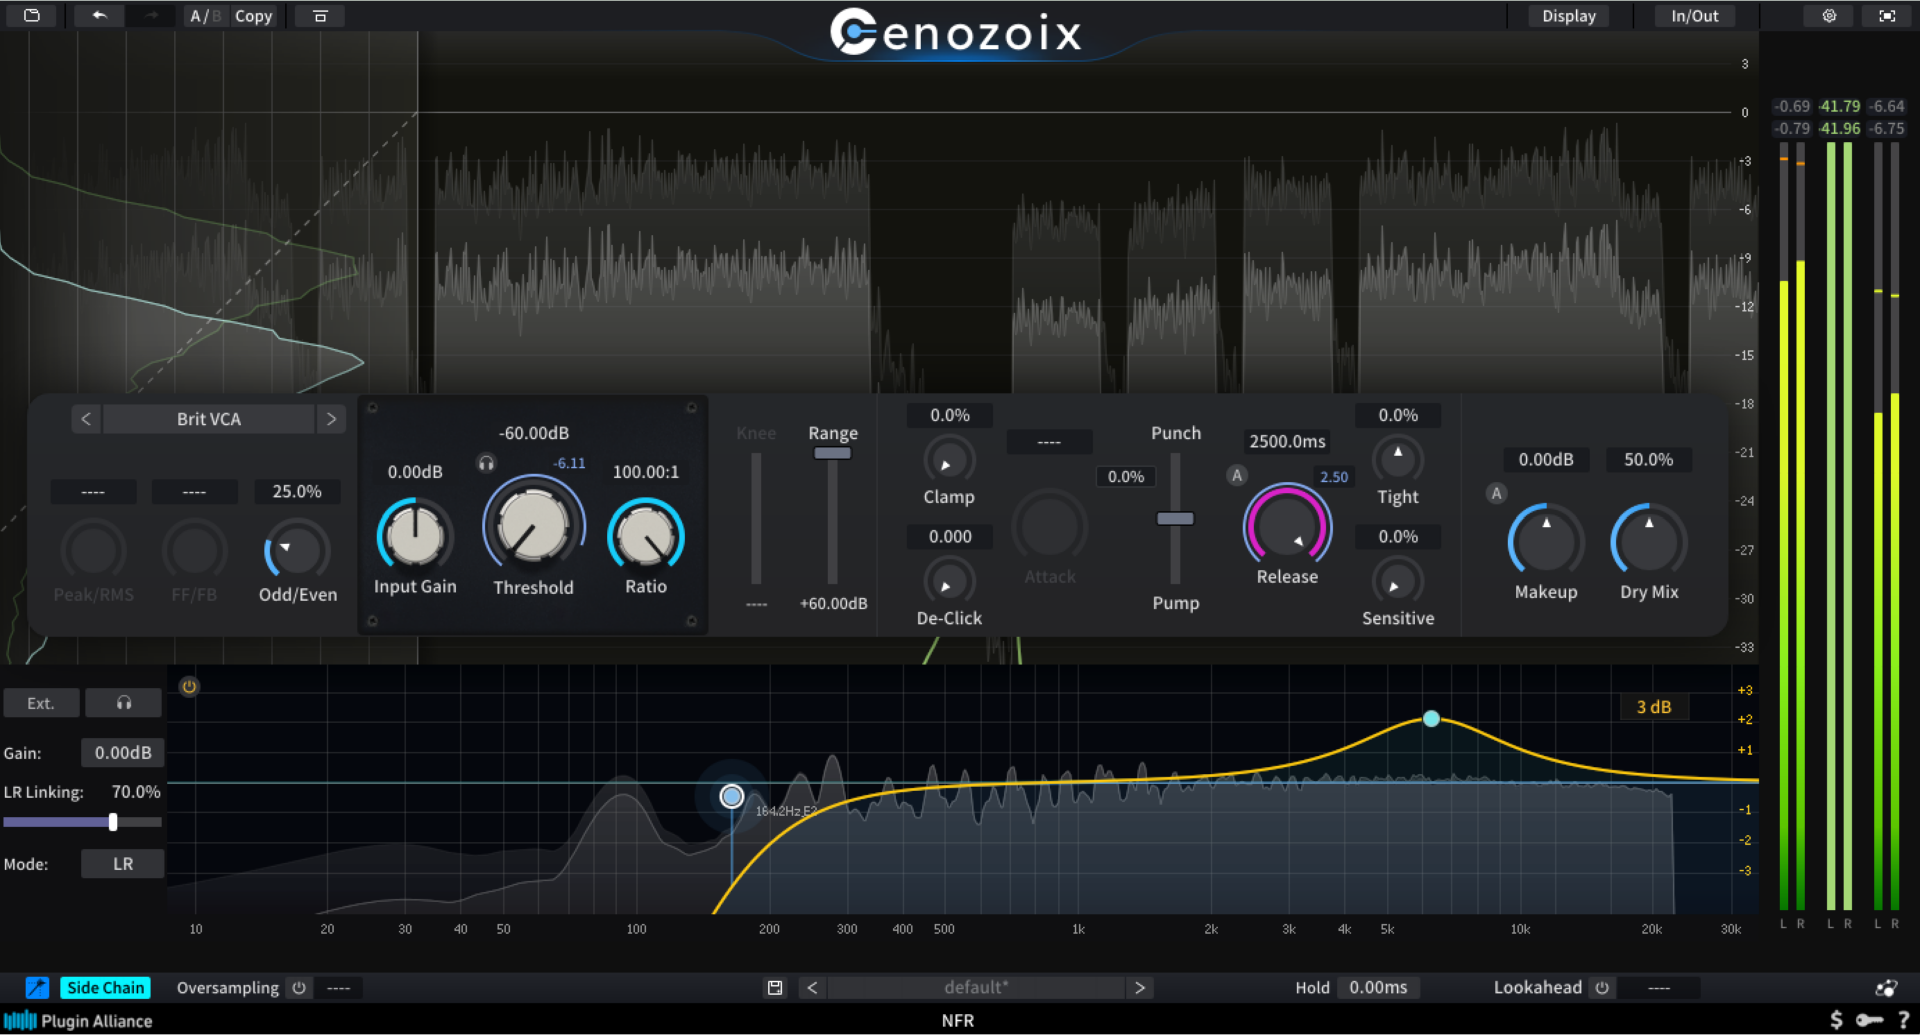
Compression is a crucial tool for modern producers, enhancing the punchiness, loudness, and consistency of instruments and vocals. It often adds a desirable ‘analog’ quality to the sound. While some compressor plugins are entirely digital, others are designed to emulate the characteristics of specific hardware compressors. The Cenozoix Compressor by Three-Body Technology is a jack of all trades, merging the feature-rich design of modern compressors with the sound of multiple classic hardware compressors.
Having the gear is one thing, knowing how to put it to work is another. We’re serving up seven essential techniques and considerations to help you get more out of this cornerstone processor.
1. Use the right compressor for the job
Plugin compressors typically mimic one of four classic analog designs. The most common is the Voltage Controlled Amplifier (VCA) compressor, renowned for its rapid response and clear sound. It’s particularly effective for enhancing drums and percussion, providing uncolored control and beefing up transient-heavy material. Optical compressors are more suited for vocals, synthesizers, strings, and similar musical elements, offering a musical and transparent processing style. Field-Effect Transistor (FET) compressors are known for their fast attack and distinctive coloration, making them ideal for drums, guitars, and bold vocal effects. Lastly, Variable Mu compressors use a valve-based approach for a slower, smoother response, which is particularly well-suited for vocals, groups, and mastering purposes.
The Cenozoix Compressor provides you with 12 classic compression algorithms that recreate the sound of well-known studio compressors. There are six VCA algorithms, two FET algorithms, an opto algorithm, a diode-bridge algorithm, a Virtual-Mu algorithm, and a vintage tube algorithm. Cycling through algorithms feels like plugging different hardware compressors into your signal path.

2. Dial-in parallel compression for the best of both worlds
Parallel compression, often referred to as ‘New York style’ compression, is primarily used for enhancing drums. It involves mixing the original, unprocessed signal with its compressed counterpart, allowing for a blend of both characteristics. This technique boosts quieter parts without compromising the crucial transients. To apply parallel compression, you can either use the dry/wet mix control on the Cenozoix Compressor or set up a compressor plugin on an auxiliary bus and route the track to it. Increase the compression ratio to at least 20:1 and lower the threshold to effectively compress the signal’s main elements. Then, gradually reintroduce the dry signal using the mix knob or send control to achieve a balance between transient sharpness and overall robustness.

3. Expand your sidechain compression horizons
Sidechain compression is a well-known term in dance music, often associated with the distinct ‘pumping’ effect achieved by compressing the bassline or entire mix, triggered by the kick drum’s sidechain input. However, sidechain compression has a variety of other applications. It can be used for de-essing vocals, reducing reverb tails in acoustic guitar tracks, or making room for the snare in cymbal-heavy drum overheads. Essentially, it’s a versatile technique for controlling the volume or dynamics of one sound based on another, for either corrective or creative purposes.
4. Control your compression with sidechain EQ
A compressor’s sidechain equalizer allows you to adjust the frequencies that activate the compressor’s detection circuit. Whether the trigger signal is a duplicate of the processed signal or an external source, this feature can help you fine-tune your sound. Using a high-pass filter in the sidechain circuit helps reduce the influence of kick drums and heavy bass on mix bus compression, avoiding unwanted ‘pumping’ effects. Another important use involves ‘de-essing’. In the absence of a dedicated de-esser, you can accentuate the sibilant frequencies in the sidechain circuit of a compressor applied to vocals. This makes the compressor respond more aggressively to these frequencies, reducing the volume more significantly when it detects loud ‘esses’.
5. Compression or EQ first?
When using compression and EQ together, it can be challenging to determine which should come first in the processing chain. The truth is, there’s no definitive answer; it depends on the characteristics of the source material and your specific goals. For instance, if you’re dealing with a dynamically inconsistent drum loop, it’s usually beneficial to apply compression first to stabilize it before moving on to EQ. Conversely, if a vocal or guitar track has frequencies that are disproportionately affecting the compressor, applying EQ first to moderate these frequencies might be more effective. Additionally, there’s the option to apply additional compression after EQ to smooth out any peaks introduced by the EQ, or another round of EQ post-compression to address any harsh frequencies that the compressor may have emphasized.
6. Color your sound with character compression
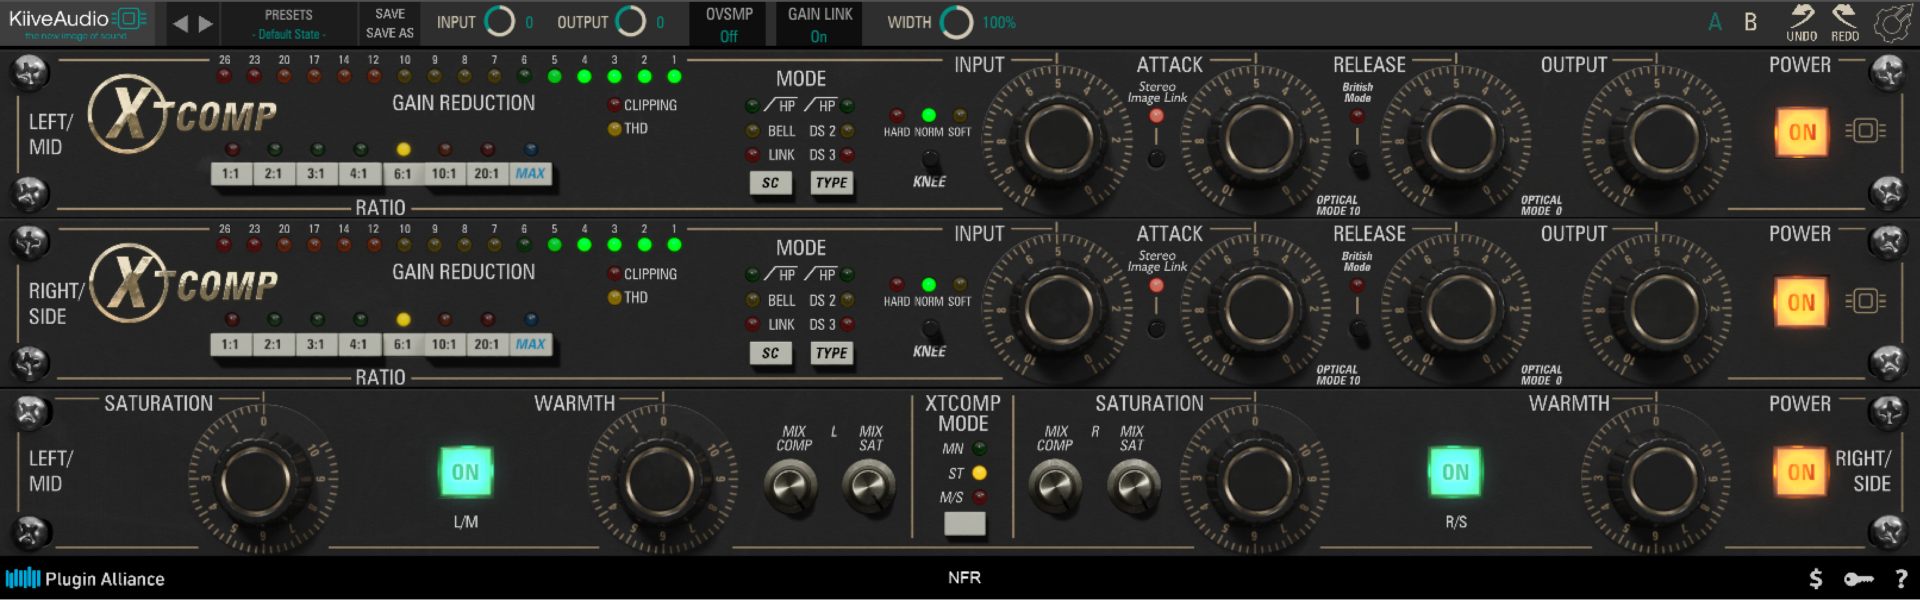
In emulating the analog circuitry of real-world gear, many compressor plug-ins also introduce harmonic distortion and other inherent acoustic characteristics to the signal, yielding ear-pleasing coloration that can make all the difference in the mix. Bear this in mind when choosing the ‘right’ plug-in for a given compression task. A compressor like Mixland’s Vac Attack is a vacuum tube optical limiter that’s known for adding rich harmonics to the sound it’s applied to. In comparison, an FET compressor like Kiive Audio’s XTComp will still apply saturation to your sound, but depending on the ratio you’ve selected, may sound dirty and gritty like an 1176, or warm and open like an LA-2A.
7. Don’t compress for the sake of compressing
Compression is a useful tool in certain situations, but you don’t need to compress every sound in your mix. Many new producers often mistakenly think that using compression always improves a sound, even when applied lightly. However, you should avoid using a compressor on a track unless you have a clear purpose for it. Compression was initially created as a solution to manually adjusting volume levels, offering an automatic alternative. Although its creative uses have expanded over the years, its primary function remains to manage volume. If the sound you’re working with is already dynamically consistent and effective as it is, or if its dynamic range is essential to its character, it’s best not to apply compression.
更多关于 Komplete 的文章
-

iZotope、Brainworx 和 Plugin Alliance 现已成为 Native Instruments 的一部分
阅读有关最新 Native Instruments 动态的内容,Native Instruments 成为了 iZotope、Plugin Alliance 和 Brainworx 的主品牌。…
-

KOMPLETE KONTROL 超级快速上手教程
* 该超级快速上手指南适用于任何 Native Instruments 下的 Komplete Kontrol 键盘(S 系列,A 系列和 M 系列)…
-

新剧 Home Before Dark 配乐师 Nathan Lanier 谈论剧集背后的声音创作
APPLE TV+ 的御⽤配乐师在创作其最新惊悚片配乐时将传统与数字完美融合 - 阅读本文还可下载同款免费的 REAKTOR 效果器。…
-
5个KONTAKT的免费人声库
没有歌手,没问题。 这些虚拟歌手也很不错,而且完全免费。…
-
用 MASCHINE 和 Waves 插件 玩转复古Hip Hop旋律
NI产品专家 Tim Cant 教你如何为 Beat 增添复古风味。…
-

观看:DJ Khalil 和他的艺术家扩展包
格莱美获奖制作人分享:LA是如何给予他找自己专属声音的灵感的。…
-

5 种让弦乐 MIDI 更棒的方式
不知道为什么你的弦乐断奏总是不顺利吗? Reuben Cornell 的这篇文章就是为了解决这个问题。…
-
5种免费的 KONTAKT 拟音工具在您的下一首曲目中或许会有用
从影视世界中汲取灵感,并将真实世界的声音添加到您的作品中。…