


Audio interfaces are dedicated hardware units featuring inputs and outputs designed to improve sound quality and give you more audio routing options.
In this beginner’s guide to audio interfaces we’ll explain why they’re useful, including why it’s important to use audio interfaces for recording, and why it’s helpful to have one even if you work entirely in-the-box.
Then we’ll look at how to choose an audio interface that meets your needs, and go through setting it up in your audio editing software step-by-step.
Jump to these sections:
- What is an audio interface?
- Why do I need an audio interface?
- Type of input connections
- Type of output connections
- Converter quality
- Additional capabilities
- How to set up your audio interface
Follow along with this guide using a KOMPLETE AUDIO interface.
What is an audio interface?
An audio interface is a piece of hardware that is a foundational tool of most studios, acting as the mediator between computers, instruments, and speakers or headphones. Whether you’re recording guitar, producing electronic music, or podcasting, an audio interface is one of the most essential bits of kit you’ll need.
Computers tend to come with limited audio input and output options as standard. For example, you may just have a single headphone jack output on your laptop. This can be restrictive, and you’re not guaranteed great sound quality, especially on lower-end machines.
This is where audio interfaces come in. They have inputs and outputs designed to improve the sound quality and they give you more routing options in your productions. A wide range of audio interfaces are available, from small affordable units priced at around a hundred dollars to featured-packed rackmount behemoths that cost several thousand.
Why do I need an audio interface?
As mentioned, computers don’t usually come with high-quality audio connections. An audio interface gives you dedicated inputs and output connections designed for working with audio. This is important for three key reasons: number of connections, type of connections, and quality of digital-to-analogue and analogue-to-digital conversion.
The number of inputs is important because this is what determines how many sources you can record at once. If you want to record several hardware synths simultaneously or mic up a drum kit, you’re going to need plenty of input connections.
The number of outputs determines how many signals you can send from your computer. If you want to use a hardware mixing desk, use external effects or run multiple sets of monitor speakers, you’ll need lots of outputs.
If you’re spending a lot on an audio interface, it’s advisable to be future-proof by selecting an audio interface that has more inputs or outputs than you currently need.
However, if you’re buying a lower-cost entry-level device, an interface with just one set of headphone and monitor speaker outputs, plus a couple of inputs will be enough for most beginners.
Type of input connections
The type of connections you have are important because they determine what you can hook up to your computer, and whether the sound is protected against electrical interference or not.
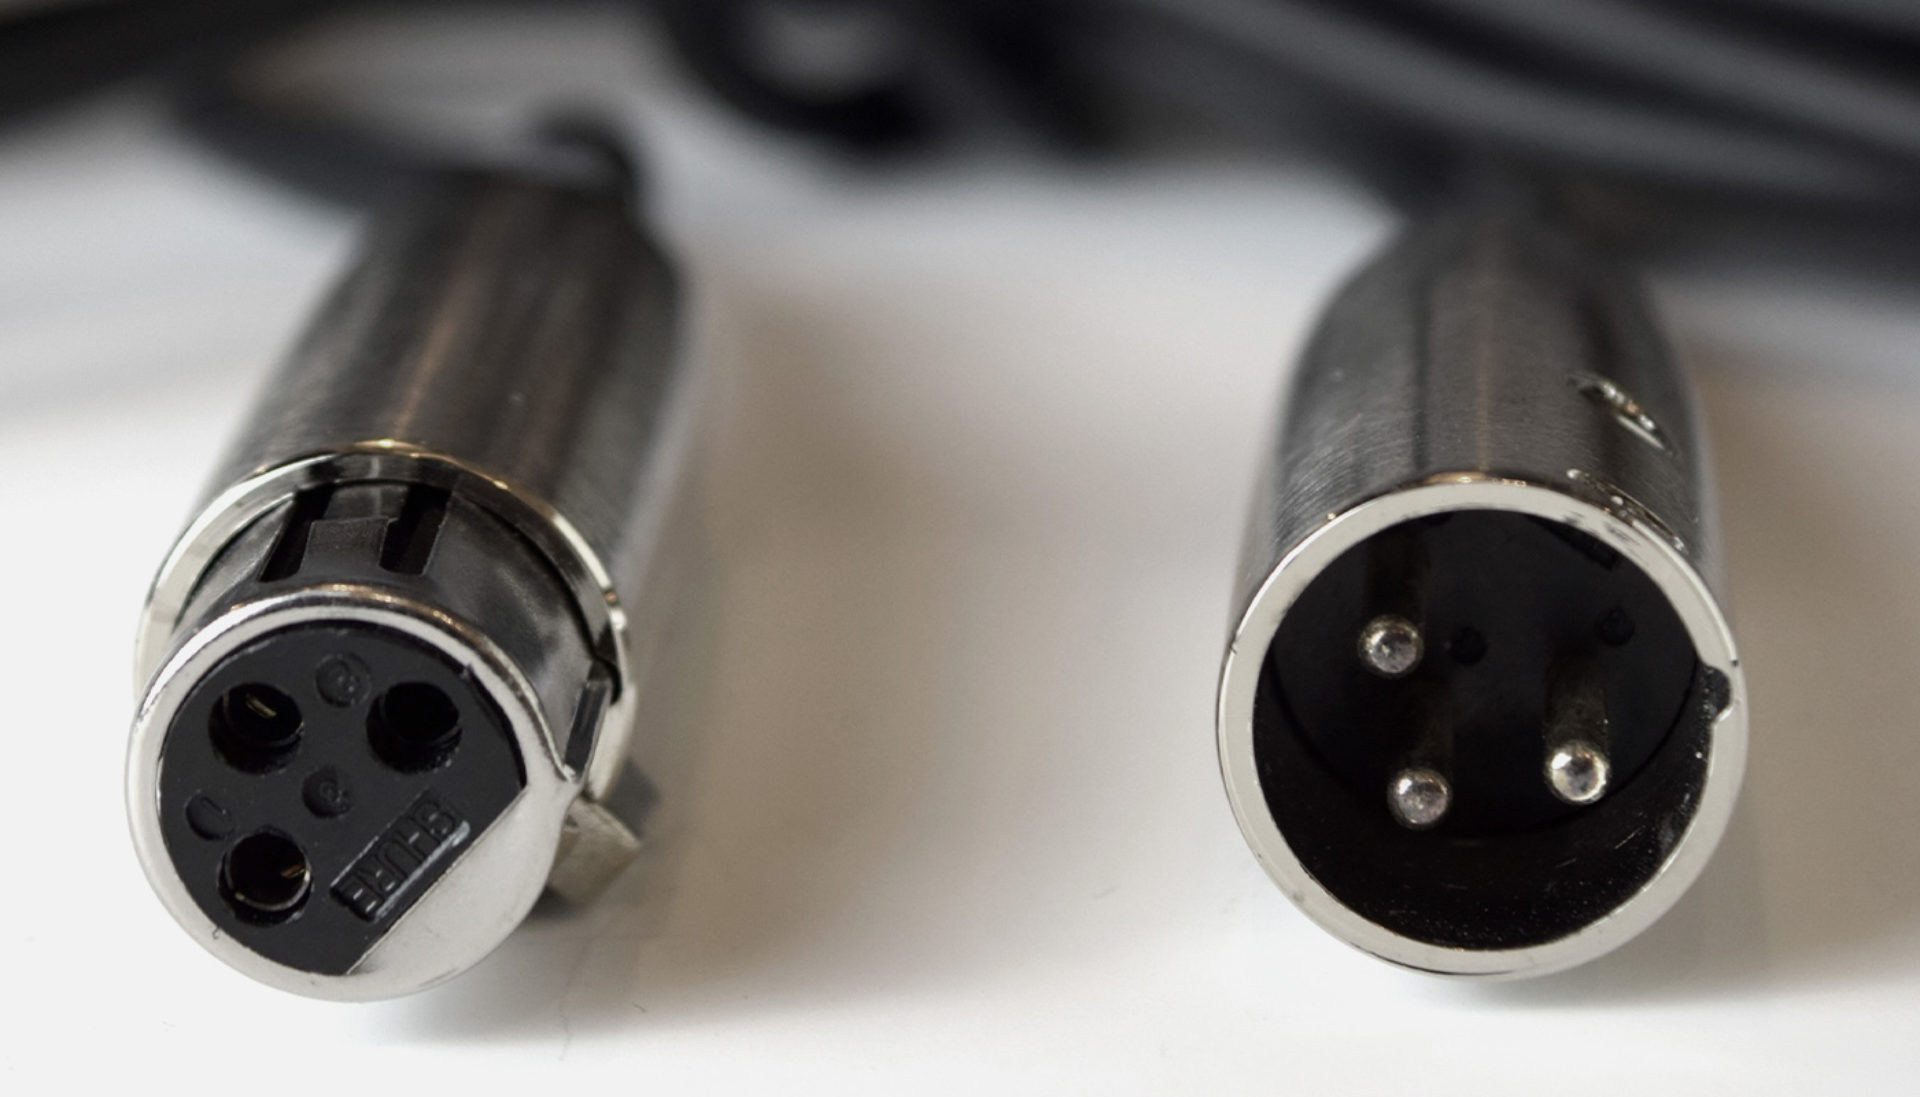
If you want to connect microphones, you’ll need XLR inputs, which usually include pre-amps to boost the level of the microphone input signal so that it’s loud enough to work with in your audio software. Pre-amps can have an effect on the characteristics of the signal, so the quality of results you get can vary depending which audio interface you use. XLR cables are balanced, which means they are protected from interference. Some mics require phantom power to be used, and most audio interfaces will have this capability on their XLR inputs.
To record a kit such as synths or guitars directly, you’ll use 1/4” jack inputs. Like XLR inputs these are balanced, mono inputs, so you’ll need to use two if you want to capture both the left and right channels of a stereo synth. Most audio interfaces have a way to switch a jack input between “line level” input, a high-level signal used by equipment such as synths, hardware effects and mixers, and “instrument level,” a lower-level signal output by instruments such as electric guitar and bass.

Some interfaces have combination XLR and 1/4 jack inputs that can be used for either type of cable.
RCA (or Phono) connectors are unbalanced stereo connectors that are typically used with consumer audio hardware and DJ equipment. RCA typically works at line level, aside from turntable outputs which require pre-amplification. As they’re unbalanced they’re potentially susceptible to interference, though this is less likely to occur with the shorter cable lengths used in non-studio setups.
Some interfaces such as the KOMPLETE AUDIO 6 additionally offer SPDIF and optical digital connections which expand both their input and output capabilities, though these capabilities are generally required by more advanced users.
Type of output connections
Most audio interfaces offer two or more mono 1/4” jack outputs. These can be used to connect directly to one or more pairs of monitor speakers, or if you have sufficient outputs a surround-sound setup.
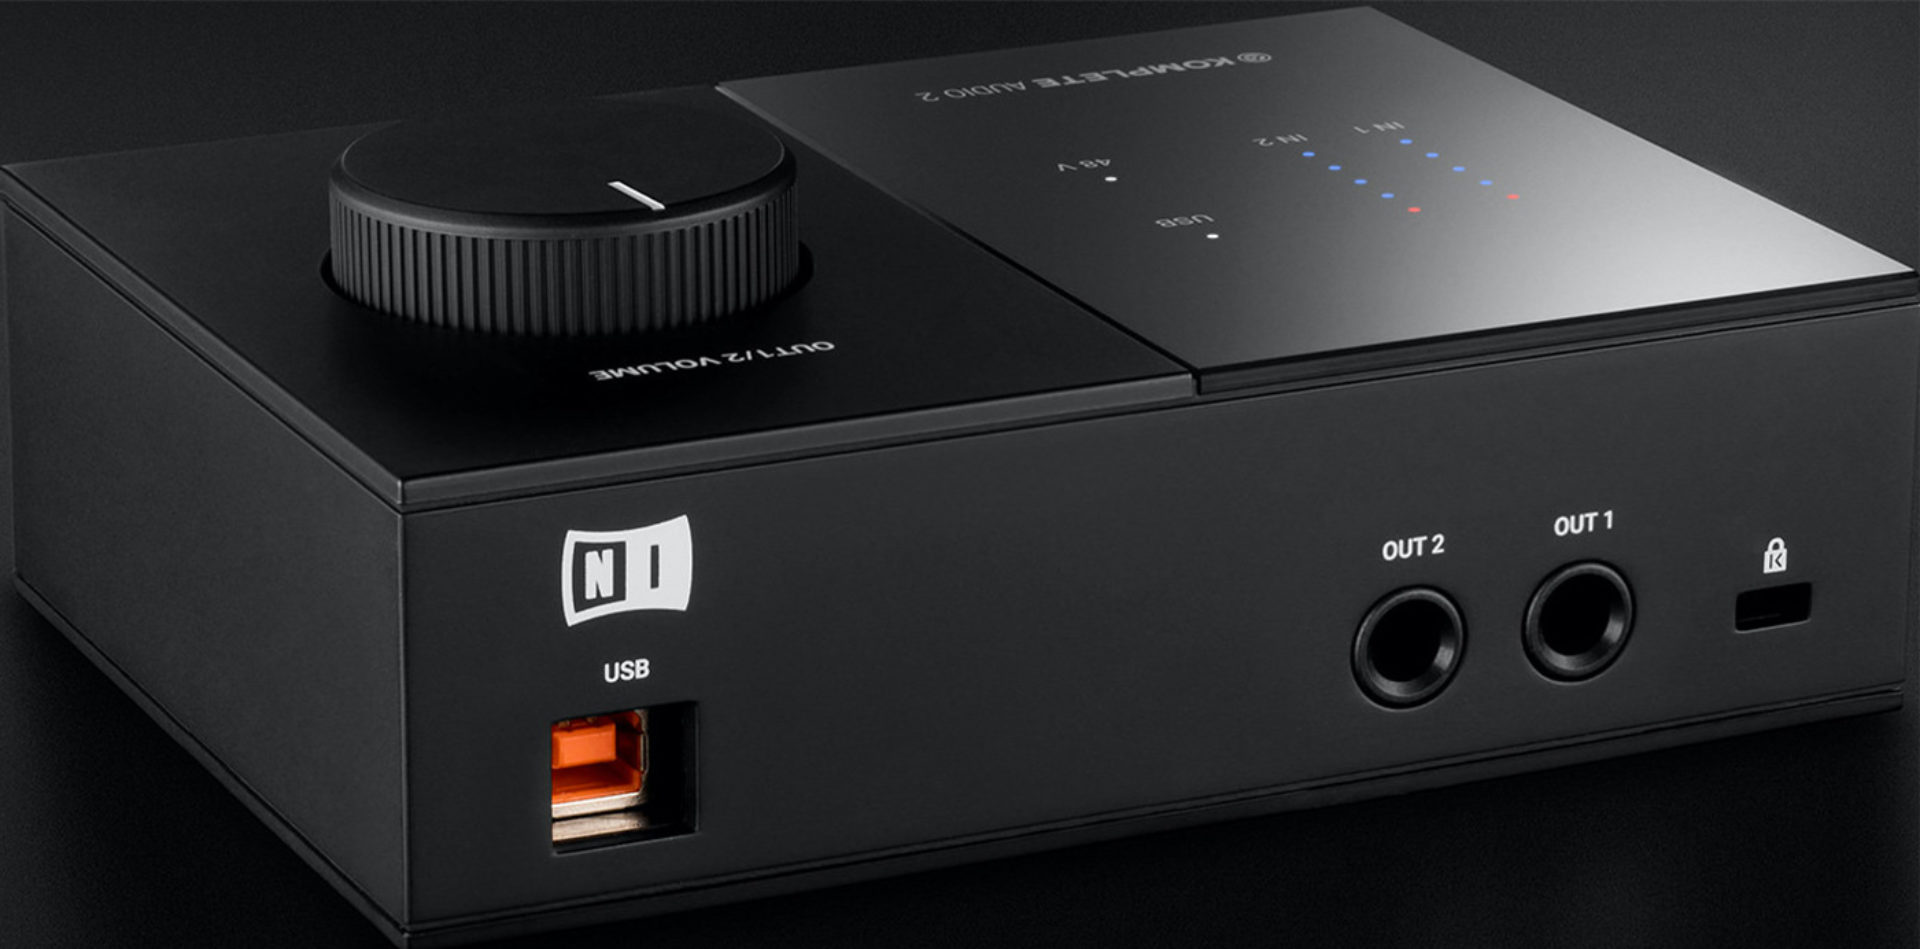
Some audio interfaces have RCA outputs. Native Instruments KOMPLETE AUDIO 1 features stereo RCA outs, while KOMPLETE AUDIO 2 has stereo jack outs.

If your monitor speakers have balanced jack or XLR inputs, you’ll want an interface that offers jack outputs like the KOMPLETE AUDIO 2.
You can also use outputs to run audio to external hardware effects and mixers, and the outputs of these hardware devices can be run back into your interface if you have enough free inputs.
Almost all audio interfaces will also have stereo 1/4” jack headphone outs designed to be used with professional headphones. If you’re using high-end, high impedance headphones, it’s worth checking out the audio interface’s recommended impedance level to make sure you’re getting the best results. KOMPLETE AUDIO 6 features two sets of high-powered headphone outputs, perfect for using with high impedance headphones.
Converter quality
Beyond the number and type of connections an audio interface has, the quality of its digital-to-analogue and analogue-to-digital converters is a primary concern. This determines how good the recordings made by the interface sound, and what its output sounds like. This is something that’s harder to quantify than raw connectivity, and some industry professionally swear by particular high-end brands.
However, as a relative newcomer, you should find that the major brands have lower-end devices that have sound quality that’s more than sufficient for professional production work. Here are some artists using the Komplete Audio 6 in their studio and live setups.
Audio interfaces offer a variety of recording sample rates and bit depths, which are settings that affect the quality of the recording input and output. 44.1kHz at 24-bits is a common setting for music production, with 48kHz 24-bit used for multimedia projects. Some interfaces feature 96kHz 24-bit sampling rates for enhanced quality, and for the ultimate in fidelity some interfaces such as the KOMPLETE AUDIO devices offer 192kHz 24-bit recording. For beginners, 44.1kHz 24-bit recording is ample, and delivers great sound quality.
Running monitor speakers from an audio interface will usually give you far improved audio quality over using a computer’s built-in audio output, and if you’re using balanced connectors you’ll be able to work without worrying about interference affecting your inputs or outputs. For these reasons alone, audio interfaces are a worthwhile purchase for music-makers.
Additional capabilities
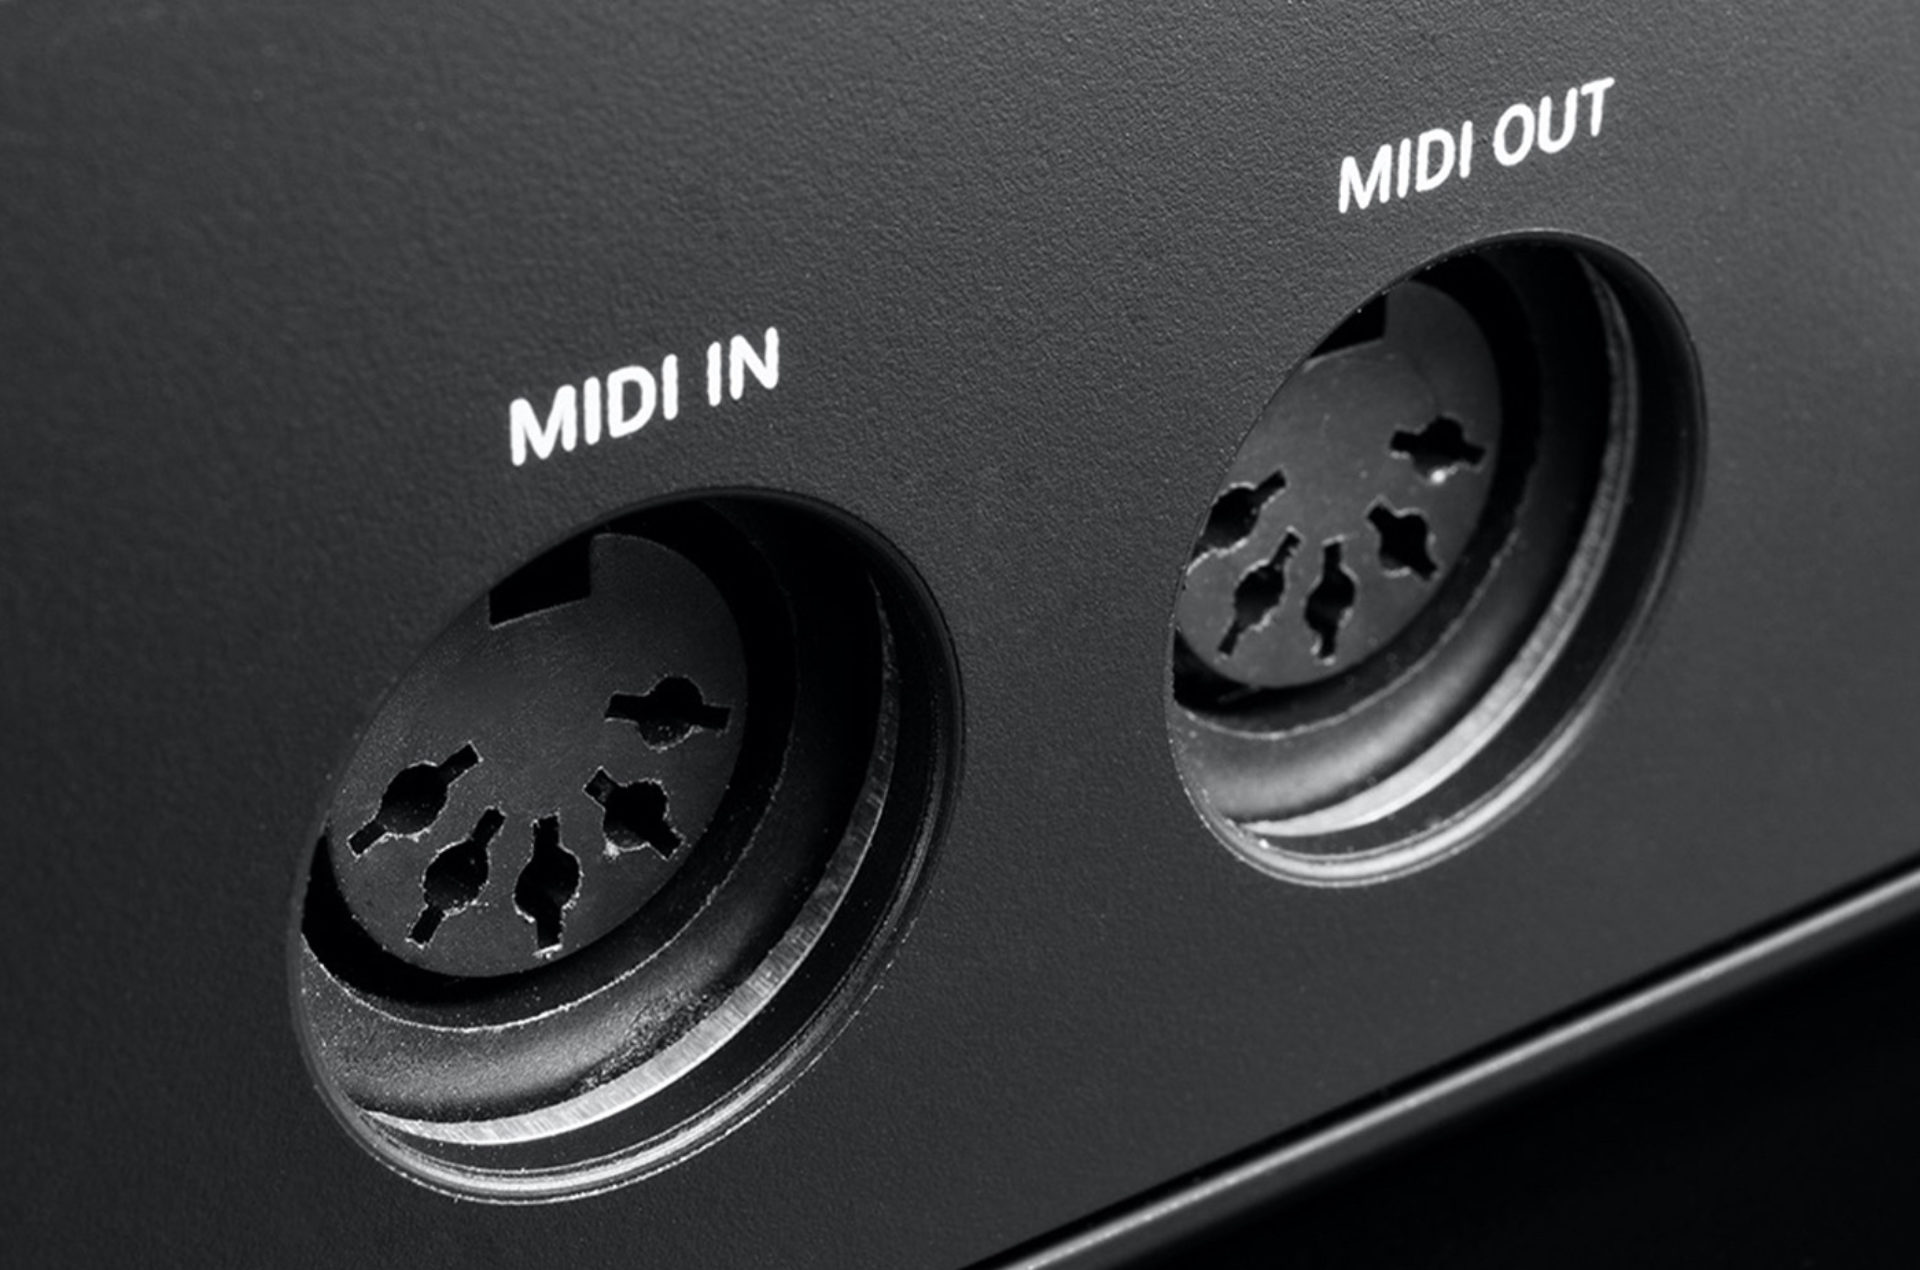
There are other features an audio interface might have, such as the ability to connect MIDI input and output cables. This is useful if you want to sequence or otherwise control external MIDI hardware such as synths and effects. If your audio interface doesn’t have included MIDI connectors you can simply buy a dedicated MIDI interface, and if you only require MIDI input from a controller keyboard, most modern devices such as Native Instruments’ KOMPLETE KONTROL A25 have MIDI over USB capability.
Some audio interfaces have input and output level meter displays. These are helpful because they let you know when your input or output signals are too loud, and can prevent you from making clipped recordings.
Direct monitoring is a useful capability offered by some interfaces, which allows you to monitor your live recording directly from the interface before it enters the computer. Once the recording enters the computer it becomes subject to latency, that is the amount of time it takes to be sent through your computer and back into, for example, your headphones. This time delay in the monitored signal is small, but it can make performing difficult. As direct monitoring allows you to hear the input signal directly, it does away with latency, allowing you to concentrate on the perfect performance.
Some more involved interfaces have their own proprietary mixer software which you can use for controlling the device’s parameters and dictate levels and audio routing. However, entry-level devices don’t usually require this feature and can be operated entirely from the hardware.
Many audio interfaces come with software bundles, and these can include free audio editing software, instruments and effects. It’s always worth checking to see what an audio interface comes bundled with. In the case of the Native Instruments KOMPLETE AUDIO interfaces you get a bundle that includes Ableton Live 11 Lite, GUITAR RIG 6 LE, MASCHINE Essentials, plus a selection of instruments and effects.
These additional features can be extremely useful, but are of secondary importance relative to number of connections, type of connections, and converter quality.
How to set up your audio interface
1. Install your driver software
Audio interfaces often require driver software that tells your computer how to communicate with them. Sometimes, if they’re very simple, they don’t need this software, or it can be installed automatically when they’re plugged in. If your device comes with driver software, it’s recommended to install this before connecting your audio interface hardware.
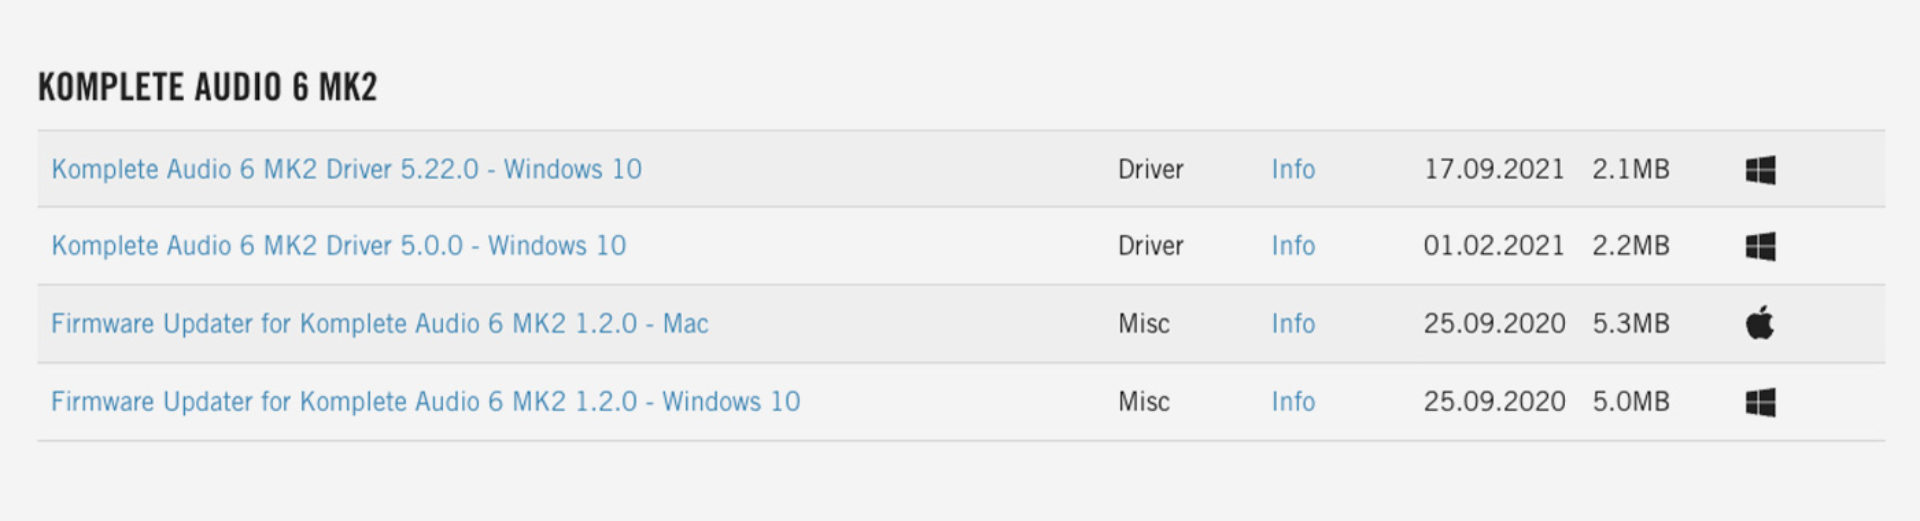
Your audio interface will usually come with a supplied link to any required driver software, and in the case of Native Instruments KOMPLETE AUDIO interfaces you can find the latest installers on the Downloads: Drivers & Other Files page.
2. Plug in the hardware
Once your driver software has been installed it’s time to plug in your hardware. Audio interfaces usually connect via USB, though some can connect via Thunderbolt, Firewire, or Ethernet.
If you’re using a larger audio interface you might need to connect mains power too, but many interfaces such as the KOMPLETE AUDIO range are USB-powered.
3. Apply firmware updates
If you want to be as up-to-date as possible, you can check to see if your audio interface has any firmware updates.
Native Instruments KOMPLETE AUDIO firmware updates are available on the Downloads: Drivers & Other Files page. These updates come in the form of a simple application that you can run with your KOMPLETE AUDIO audio interface connected, and they will complete the firmware update automatically.
4. Connect your headphones or monitor speakers
Plug in your monitor speakers and/or headphones to your audio interface’s outputs. In the case of monitor speakers, these will need to be connected to a power supply and powered on. Some audio interfaces have multiple outputs, in these cases you’ll be able to set up their routing in your audio editing software after you’ve selected the correct audio driver.
5. Select the audio driver
Now load up your audio editing software and find the audio device settings. The KOMPLETE AUDIO range comes with bundled versions of Ableton Live Lite 11. In this software you can find the audio device settings in Preferences > Audio.
Here you can select the Input Device, Output Device and Sample Rate. You can also select a Buffer Size, which is how long the computer allocates to processing audio. Smaller buffer sizes lower latency but give you less processing power for running virtual instruments and effects, so if you find your audio editing software’s CPU meter is running high then try turning up the Buffer Size.

If you want to use your audio interface for your operating system’s primary output, you can do that separately. In MacOS this can be done in System Preferences > Sound, and in Windows you can find the option in Control Panel > Hardware and Sound > Sound.
6. Set up your audio outputs
If your audio interface has multiple outputs you can select these in your audio editing software. For example, in Ableton Live you should make sure that the Master Out is set to the outs you have your monitor speakers connected to.

7. Connect any audio inputs
Connect your microphones or instruments. Be sure to set 1/4” inputs to the correct line/instrument level mode for the connected device: line for synths, effect and mixers, instrument for electric guitar and bass.
8. Test your inputs and outputs
The easiest way to test your software’s audio output is to load up some audio onto an audio track and play it back. Start with a low level on your audio interface’s output level so that you don’t damage your equipment or hurt your ears. If you can’t hear anything, check your connections and try gradually turning your audio interface’s output level up.
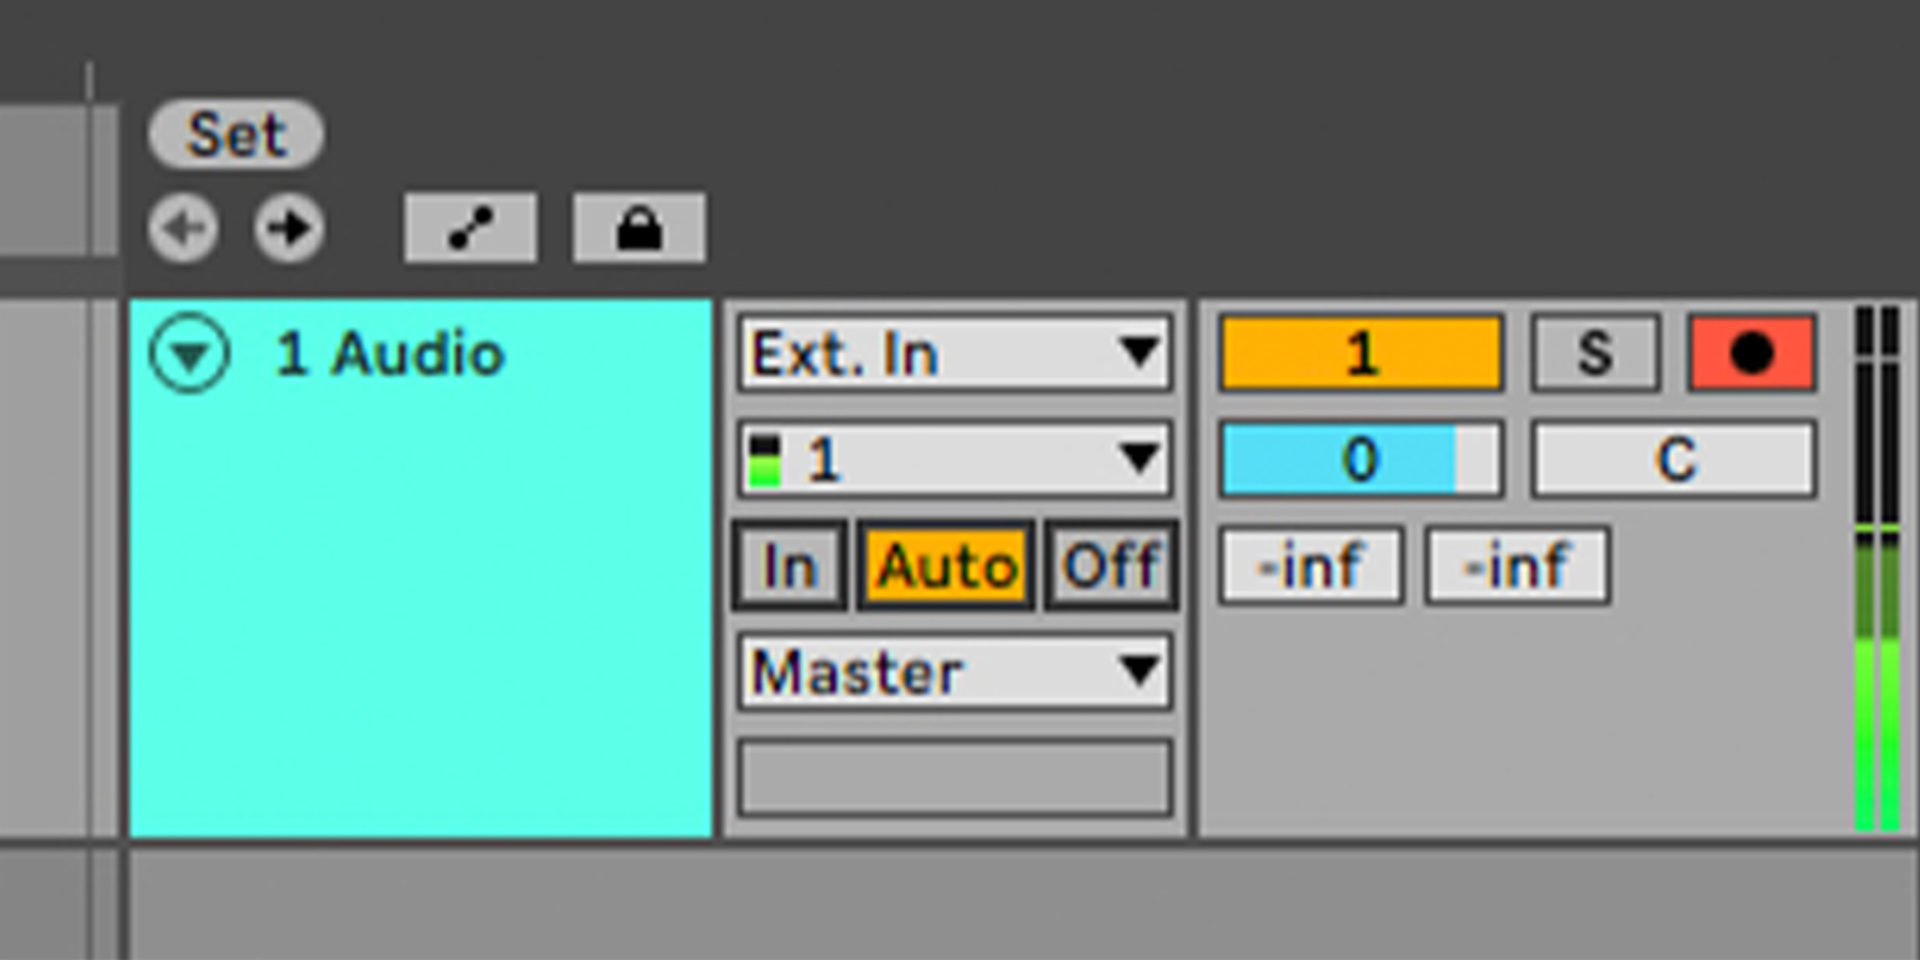
Next, set up an audio track routed to one of your inputs, and turn on its monitoring. In Ableton Live you can do this by setting an audio track’s Monitor Input to Auto, and activating its Arm Record button. Now you should be able to hear the instrument or microphone input, if not, check your connections and input levels on the audio interface itself.
Start making music with your new audio interface
Once you’ve chosen an audio interface and set it up, you’re ready to record and playback audio in your music software, and begin making music. Learn more about audio interfaces and music making with the KOMPLETE AUDIO 1 Quick Start Guide and our blog on making music on the move.
Related articles
-

Behind the synth: A. G. Cook on stacked sawtooths and the creation of Super*Saw
Explore the extremes of stacked sawtooth waves with Super*Saw, a new synthesizer co-created with A. G. Cook. Learn how to…
-

Inside the evolution of orchestral sampling: an interview with ProjectSAM
Discover how ProjectSAM’s Lineage Series uses NKS and smart features to change orchestral sampling. Plus, save on instruments in our…
-

How New Constellations turn emotion into sound with Massive X
Go inside the studio with New Constellations. Learn how they use Native Instruments gear, happy accidents, and lifelong friendship to…
-

Citizen Kain on building emotion and space with Replika
Citizen Kain explains how Replika helped shape the rhythm, tension, and emotion behind his debut Eversun Records single “Moments.”…
-

The organic precision behind Calcou’s Anjuna release featuring Reaktor
Calcou shares how Reaktor, Monark, and Super 8 shaped the creative balance and live energy behind their new duo EP,…
-

14 NKS instruments that will change the way you create music
Discover 14 NKS instruments to freshen up your workflow. From lo-fi tape synths to cinematic strings, shop the Native Instruments…
-

Parallelle on crafting living basslines with Reaktor and TRK-01
Parallelle share how Reaktor and TRK-01 shape the bass and warmth in 11th Avenue, balancing analog depth with modern control.
-

Where will your sound lead you? Explore the Native Instruments Summer Sale
Save 30% on instruments, effects, and sounds in our Summer Sale. Find the tools to keep your tracks moving and…