


Audio mastering is the final step that transforms a track from good to great, ensuring it sounds polished, powerful, and ready to shine on any sound system – from intimate settings to massive festival stages. While some producers prefer to hand off this crucial stage to experts, others, like Avoure, take full creative control, mastering their own tracks with precision and intent.
With tools like iZotope Ozone, mastering has never been more accessible, allowing producers to harness the power of digital and analog techniques in one streamlined package without breaking the bank by investing in thousands of dollars of analog hardware.
Avoure’s process is a perfect example of how to bring analog warmth into a modern, digital workflow. With years of experience and millions of streams and releasing on industry-defining labels like Lane 8’s This Never Happened, Colorized, and his own newly-launched label, Biome Recordings, he knows exactly how to achieve that sought-after warmth and character without relying on expensive hardware.
Jump to these sections:
- What does “analog warmth” mean?
- Most effective tools for emulating analog warmth
- What type of saturation to use in mastering
- Dynamics processing to reinforce analog warmth
- Common mistake producers make when trying to emulate analog warmth
- Advice to producers without access to physical hardware
We sat down with him to explore his mastering techniques, including his go-to tools like Ozone, and how he creates modern and timeless tracks. Stick around as we dive into his workflow, explore his favorite plugins, and discover how you can add that same analog magic to your own productions.
What does “analog warmth” mean to you in the context of mastering, and why is it so desirable, yet difficult to achieve, in a digital workflow?
To start, it’s important to understand the core difference between analog and digital sound:
Analog sound is essentially an electrical signal that represents sound waves in their natural, continuous form. This is where the “magic” comes in – analog signals have slight nonlinearities and even a bit of unpredictability, which give the sound warmth, life, and character.
Digital sound, on the other hand, works differently. It converts the signal into a sequence of numbers, making it precise and predictable. Originally, digital was designed as a highly accurate tool, though over time, it evolved to encompass a variety of “flavors” that give it more depth and versatility.
Our brains are naturally wired to respond to “nonlinear sound.” Think about it – the rustling of leaves in the wind, the sound of waves crashing on the shore, or even the echo of birdsong in a forest. These sounds are never the same twice, and this unpredictability makes them feel alive. It’s psychoacoustics at play. While it’s hard to explain exactly why, we instinctively find this kind of sound more engaging and pleasing.
The challenge of recreating analog warmth digitally lies in the complexity of emulating all those little nuances: the behavior of microchips, circuits, filters, and the randomness of electricity itself. Building these algorithms is incredibly demanding, both in terms of development and computing power.
Thankfully, we now have plugins like Ozone that can strike the perfect balance. They can be as surgically precise or as delightfully unpredictable as analog, depending on what the producer or engineer needs. This allows us to achieve that “analog warmth” while maintaining the clarity needed for everything from massive club systems to everyday car stereos.

Which plugins or tools do you find most effective for emulating analog warmth in the box?
I’ve relied on Ozone for mastering my tracks since 2018. I’ve tried a lot of alternatives, but Ozone has always been the winner. Right now, Ozone 11 is my go-to tool for finalizing mixes and giving them the tone and color I’m looking for.
Some of my favorites include:
1. Vintage Tape

When I need tape saturation, Vintage Tape is my first choice. It gives me full control over the harmonic content, allowing me to shape the sound exactly how I want it – whether I’m boosting the highs or lows.
I can even tweak the tape speed to dial in more warmth and saturation, creating a vibe that feels authentic and analog.
2. Vintage Limiter
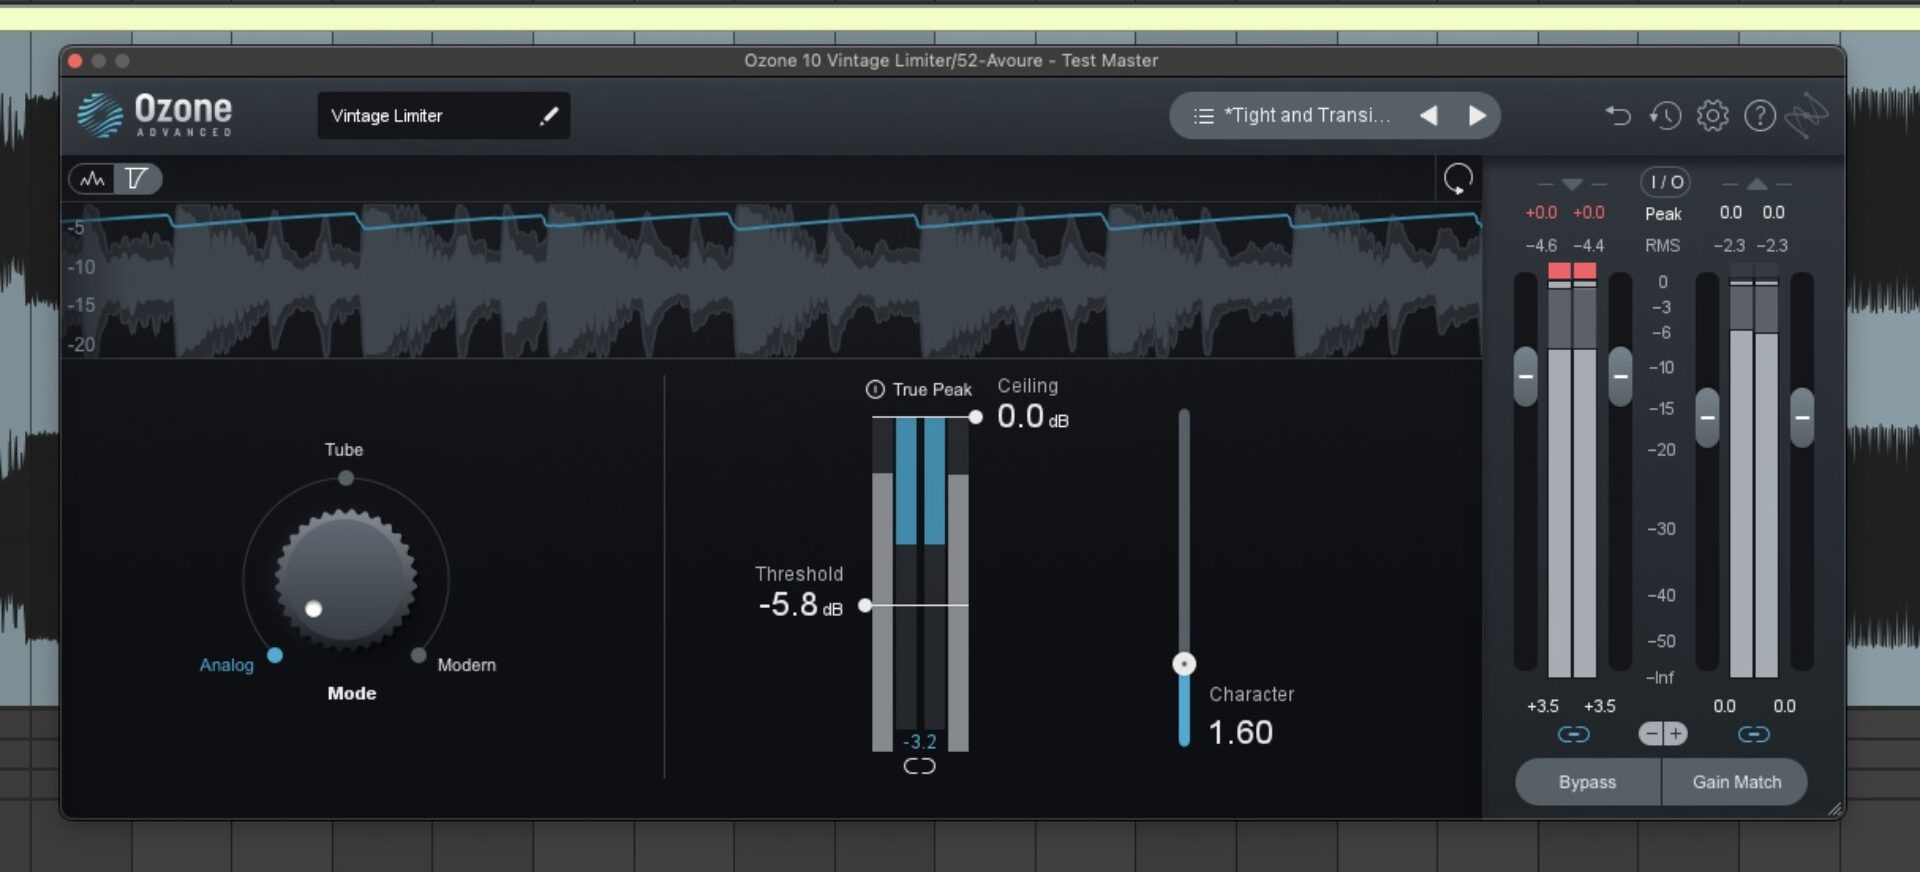
Even though Ozone is primarily designed for mastering, I often use its modules during mixing. The Vintage Limiter in “Tube” mode is a game-changer. Whenever I need to smooth out sharp peaks and give them a softer, more organic feel, it works 100% of the time. The output sounds alive and natural. The key is to ensure the gain reduction only engages on the peaks themselves, so you don’t squash the signal too much.
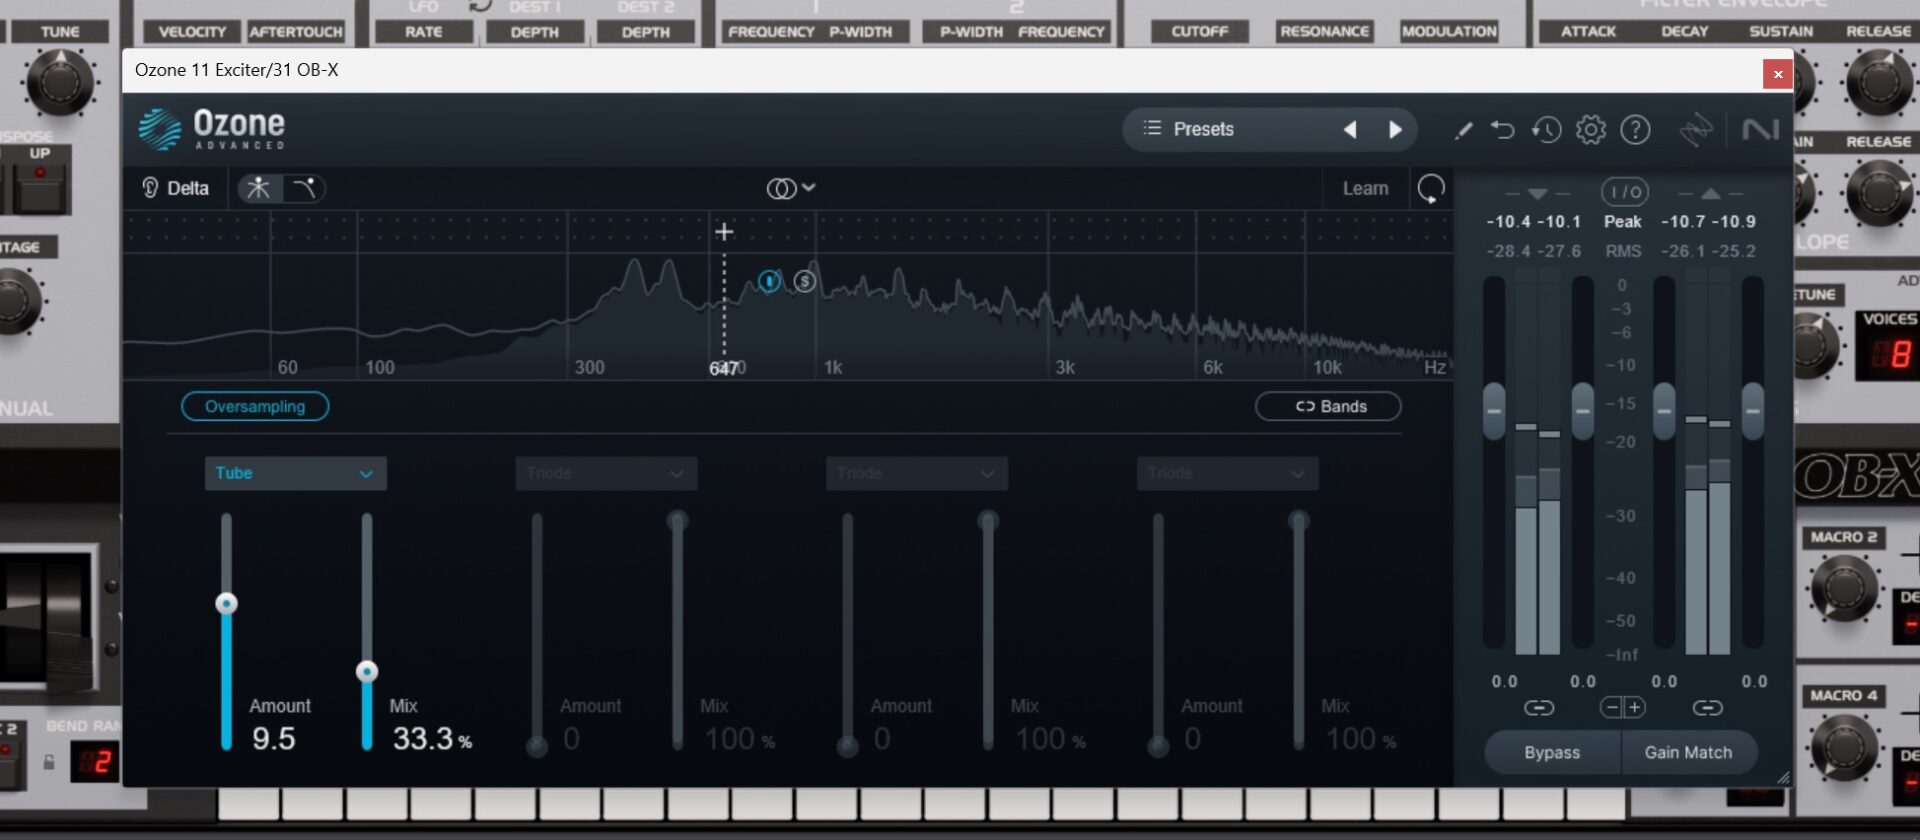
3. Exciter
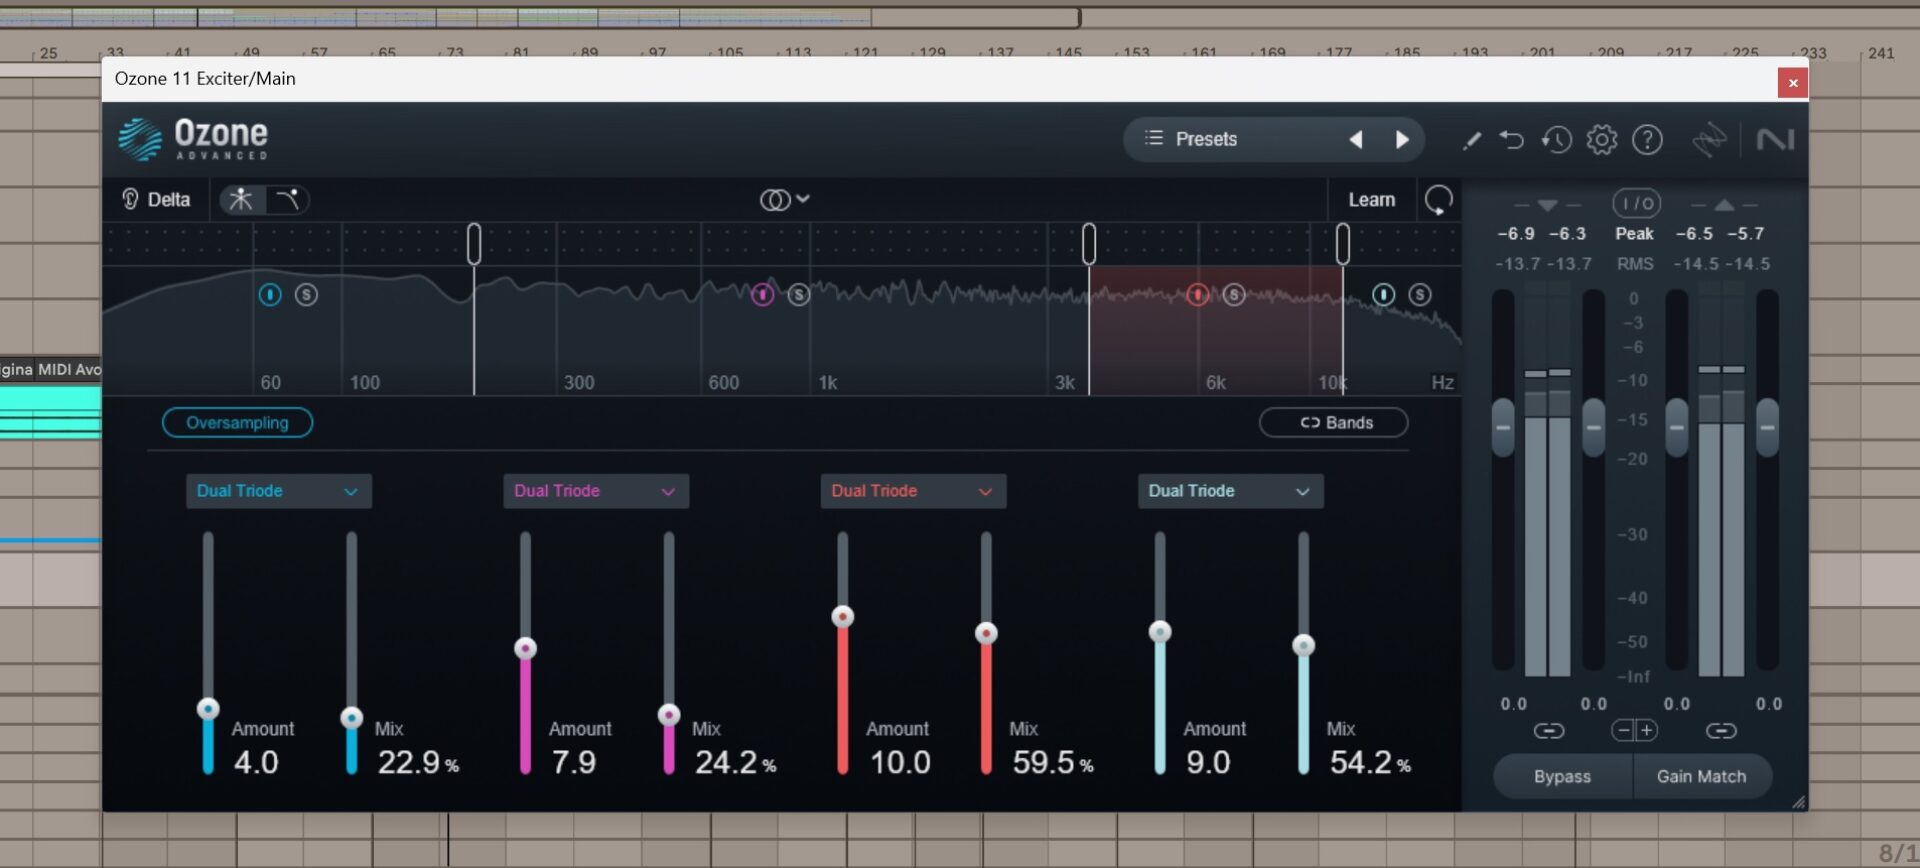
Ah, the good old Exciter – it’s been with me for almost a decade. It always delivers exactly what I expect. With seven different saturation types that can be applied to individual frequency bands, it’s incredibly versatile. My favorite algorithm, hands down, is “Dual Triode,” which emulates tube saturation. It does wonders for the midrange, bringing it to life, while adding softness and presence to the highs without introducing harsh distortion. It somehow makes the mix feel tighter and more cohesive, no matter if I apply it before or after compression. It works every time.
4. Vintage EQ
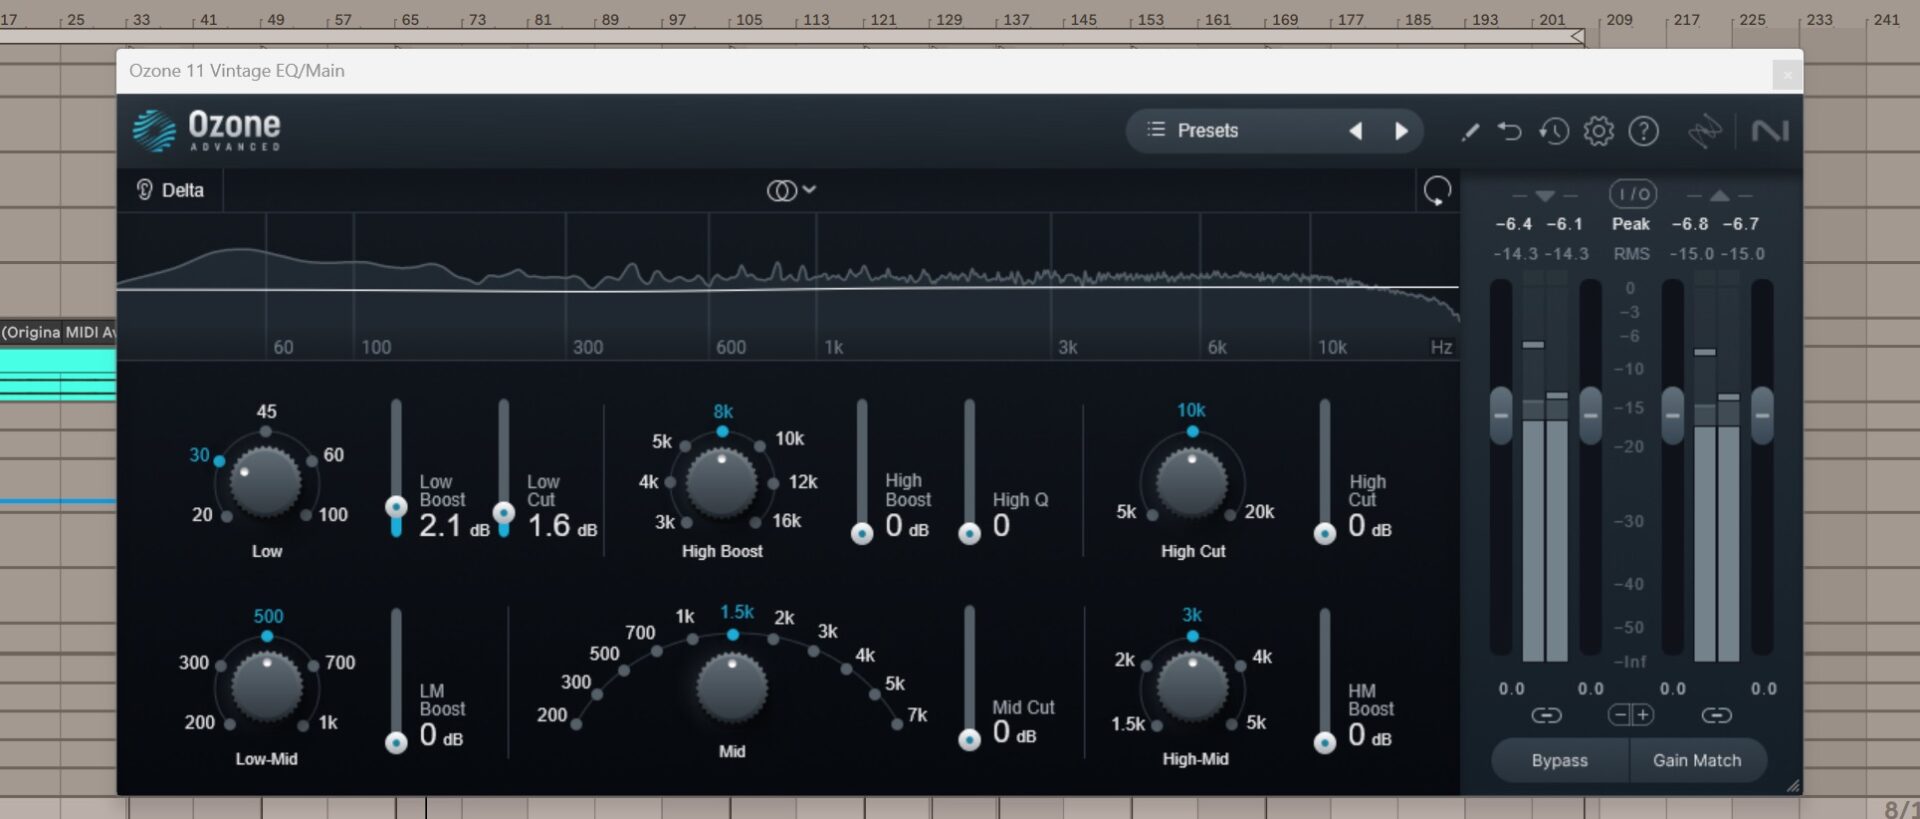
For mastering, when I want to add character to a mix, I turn to Vintage EQ, which is based on the legendary Pultec tube EQs. I use a simple two-step technique to enhance the sub frequencies:
- In the low boost section (30–60 Hz), I add 2–3 dB to emphasize the sub. The frequency range depends on the mix, and sometimes I’ll even push it to 100 Hz for specific tracks.
- In the low cut section, I apply attenuation at around 1.5–2 dB. The exact values vary depending on the mix, but as a rule of thumb, the attenuation is usually about 70–80% of the boost value.
Thanks to the Pultec-style algorithms, this approach creates a subtle bump in the sub-bass while taming the low-mid range. What I love about Vintage EQ is that it offers two different models of my favorite analog EQs in a single plugin. Plus, I don’t need fancy analog-style knobs in my plugins – I prefer efficient, intuitive designs, and Ozone nails it across the board.

Do you find that different types of saturation – like tape, tube, or others – give distinct results in adding warmth? How do you decide which to use?
When it comes to saturation, tape and tube are clear winners for me. However, based on my experience, I find myself leaning toward tube saturation more often. Here’s how I “feel” and understand the difference between these types of saturation and when to use each:
1. Tube saturation
Most people already know that tube saturation primarily enhances even harmonics, enriching the midrange and interacting smoothly with the highs, without significantly affecting the mix’s dynamics. This is where the term “analog warmth” feels the most appropriate, in my opinion. If you need to add “presence” to a mix or an instrument without sacrificing its dynamic range, tube saturation is your best choice.
After applying it, compression becomes much easier because the added distortion feels subtle and natural. When it comes to mastering, tube saturation helps give the mix a sense of cohesion and unity.
2. Tape saturation
To me, tape saturation is all about enhanced highs and rich lows, where the midrange takes a bit of a backseat in the groove and dynamics of the track. Tape naturally compresses peaks slightly, which can give the mix a sense of “density” – something that’s invaluable in certain genres. When used subtly, tape saturation can create a “shiny” mix with a well-defined sub and silky-smooth highs.
I often reach for tape saturation when my mix already has a strong, well-balanced midrange, and I want to add a vintage “sparkle” to the highs while giving the low-end that extra punch.
How do you use dynamics processing, like compression or limiting, to reinforce analog warmth without squashing the mix?
Dynamics processing is more about personal taste than following a “correct approach,” but I’ll share a few techniques that I use in my workflow.
1. Parallel compression

I’ve only recently started using parallel compression, and when done right – which, of course, takes some practice – it can make your mix sound exactly how you envision it. The thing is, compressing the entire dynamic range can sometimes mess with the accents and nuances we’ve intentionally added during production.
Additionally, if the track has already been saturated earlier in the process, even subtle compression (with just 2–3 dB of gain reduction) can exaggerate unwanted distortion or some artifacts that were meant to stay quieter. That’s why getting the right attack, release, and reduction settings is crucial. When mastering, I rarely use a ratio higher than 2.5:1, but that’s just my personal preference.
2. Multiband compression with Ozone Dynamics
If your song has multiple “acts” – as I like to call them – and the mix isn’t static, for instance, transitioning from a verse and chorus to a bridge with new instruments or rhythm changes, you’ll probably need to balance your mix spectrally rather than using a single-band compressor across the whole spectrum. Multiband compression inside Ozone Dynamics makes this incredibly easy.
Plus, if you’re not sure how to split your mix into frequency bands, the “Learn” button is a lifesaver. It analyzes your mix and sets up the bands for you, which can be very helpful, even for professionals.
3. Don’t over-limit your mix at the final mastering stage
Over-limiting creates the illusion that your track is louder and therefore “better,” but when aiming for an “analog warmth,” moderation is key. I work with analog synthesizers and know that between the notes they play, there’s always some noise.
Now imagine your mix as a recorded synth bass line, and you crush it with 5–7 dB of limiting. Not only have you made the bass line quieter, but you’ve also brought that noise up to the same level as your peaks. Now your track takes up more of the spectral range, and that “analog noise” that used to add character is now just “dirt” you need to clean up.
To put it simply, saturation on the mastering chain is like that “noise” from the synth. If you overdo it, you lose the balance and clarity. The key is to manage the balance at every stage of the process, always keeping your next steps in mind.
What’s the most common mistake you see producers make when trying to emulate analog warmth digitally?
I’ve already touched on how overdoing things can be a problem. But stepping away from the technical side for a moment, the biggest issue I see with modern producers isn’t so obvious, even though it’s right in front of us:
In a world with virtually unlimited possibilities for creating music, we often forget the most important thing – the music itself. We’ve become overly focused on quantity rather than quality. I’m talking about the sheer number of plugins available on the market. It’s incredible to have so many options, but it can also be distracting. Too many choices can scatter a producer’s focus and make it harder to stay centered on what really matters.
My advice to musicians and producers: Find a handful of synths and plugins you truly love and become an expert with them. That’s how I think you’ll achieve better results than constantly chasing the next best thing on the market.
What advice would you give to producers who want to bring an analog feel to their tracks without access to physical hardware?
My advice ties closely to everything I’ve mentioned above: focus on finding what truly fits your needs and creative goals. Start by analyzing the music that inspires you. How much of it actually embodies the idea of “analog warmth”?
And what does “analog warmth” mean to you personally?
Any musician, myself included, or any professional can share their perspective, but the beauty of this world is that we’re free to create our own rules and break out of conventional boundaries.
As the legendary jazz musician Miles Davis once said, “Do not fear mistakes, there are none.”
This principle works both ways: when we work on our music and skills, we grow as individuals and gain experience. But the fear of falling behind – whether it’s in meeting your own expectations or keeping up with technology – can prevent you from fully enjoying the process.
Find a couple of compressors you love – maybe one that’s an analog emulation and another that’s a versatile digital all-rounder – and master them. Don’t turn your passion into an obsession where it’s not necessary.

Be mindful when using analog emulation plugins. As I mentioned earlier, moderation is key. This not only saves your computer’s resources but also helps you develop a more refined sense of how subtle adjustments affect your mix.
Experiment with new techniques, but stick to tools you’re already familiar with. If your favorite YouTube channel showcases a unique compression technique using a plugin you don’t own, don’t rush to buy it. Instead, try replicating the technique with the tools you already have. This way, you’ll deepen your understanding of what’s genuinely useful to you and avoid being distracted by gimmicks that often waste time and energy.
Start creating analog warmth in your music
A huge thank you to Avoure for offering such valuable insights into mastering and how he brings analog warmth into his tracks using iZotope Ozone.
What really stood out was his approach – mastering isn’t about dramatic changes, but about making subtle, focused adjustments that bring out the track’s full potential. It’s those small tweaks that ensure your track is not only punchy and clear but also translates perfectly across different sound systems and into the hands of DJs and listeners alike.
The best part?
You don’t need an expensive studio setup to get that warm and analog sound that the biggest record released these days all seem to have. With Ozone, the process is simplified, making high-quality mastering accessible to producers at every level. Whether you’re fine-tuning for big-room energy or smooth playlist vibes, Avoure’s approach demonstrates that the right tools and thoughtful, deliberate use can take your tracks from bright and brittle to warm, punchy, and pro.
Related articles
-

Behind the synth: A. G. Cook on stacked sawtooths and the creation of Super*Saw
Explore the extremes of stacked sawtooth waves with Super*Saw, a new synthesizer co-created with A. G. Cook. Learn how to…
-

Inside the evolution of orchestral sampling: an interview with ProjectSAM
Discover how ProjectSAM’s Lineage Series uses NKS and smart features to change orchestral sampling. Plus, save on instruments in our…
-

How New Constellations turn emotion into sound with Massive X
Go inside the studio with New Constellations. Learn how they use Native Instruments gear, happy accidents, and lifelong friendship to…
-

Citizen Kain on building emotion and space with Replika
Citizen Kain explains how Replika helped shape the rhythm, tension, and emotion behind his debut Eversun Records single “Moments.”…
-

The organic precision behind Calcou’s Anjuna release featuring Reaktor
Calcou shares how Reaktor, Monark, and Super 8 shaped the creative balance and live energy behind their new duo EP,…
-

14 NKS instruments that will change the way you create music
Discover 14 NKS instruments to freshen up your workflow. From lo-fi tape synths to cinematic strings, shop the Native Instruments…
-

Parallelle on crafting living basslines with Reaktor and TRK-01
Parallelle share how Reaktor and TRK-01 shape the bass and warmth in 11th Avenue, balancing analog depth with modern control.
-

Where will your sound lead you? Explore the Native Instruments Summer Sale
Save 30% on instruments, effects, and sounds in our Summer Sale. Find the tools to keep your tracks moving and…