


Producers and engineers are always looking for ways to shape and sculpt sound. The optical compressor is one such tool that can bring countless new sonic possibilities to a mix. With its unique ability to add warmth, control dynamics, and enhance the overall quality of audio, the optical compressor is a must-have for any audio engineer or producer.
Optical compressors are known for their smooth, organic compression and the ability to add harmonic richness to music. Hardware optical compressors contain a light source and light-dependent resistor, often resulting in non-linear gain reduction that sounds incredibly musical.
In this article, we’ll explore seven ways to use an optical compressor in your mix.
Jump to these sections:
- Smooth out vocals
- Make drum recordings sound cohesive
- Enhance bass guitar
- Balance acoustic guitars
- Thicken up keys
- Creative parallel compression
- Glue your mix together with bus compression
Follow along with your own optical compressor. Start a free MEGA Bundle trial to download a 30-day demo of every Plugin Alliance product mentioned throughout this guide. Access over 180 plugins, apps, and FX from over 40 brands.
1. Smooth out vocals
Vocals are often the centerpiece of a song. Achieving a smooth and consistent vocal performance allows listeners to focus on storytelling and emotional expression rather than audio playback inconsistencies. You can use compression to help vocals sit in a mix.
The smooth dynamic range reduction that optical compressors provide is a result of their design. They contain a light source, which is typically either a small light panel or LED, that gets brighter as the amplitude of the input signal gets stronger.
Optical compressors also contain a light-sensitive resistor, placed next to the light source, that applies gain reduction to the audio signal based on how bright the light is. When the light gets brighter, more gain reduction is applied to the signal.
Optical gain reduction can lead to non-linear compression depending on the specific compressor’s design. With a soft knee, the ratio ramps up as the amplitude of the signal increases, applying more intense compression to louder parts of your audio signal.
Mixland’s Vac Attack is a great choice for vocal compression. It’s an optical vacuum tube limiter intended for individual tracks and groups. On top of applying a natural form of gain reduction, it delivers beautiful saturation, warmth, and character that suits vocals perfectly.
To dial in Vac Attack’s settings for vocal compression, start by setting the level of your vocals so that the quiet sections sound balanced against the rest of your mix. Adjust Vac Attack’s Knee setting so that it uses a moderately soft value.

Drive your vocals into the limiter by boosting the “Reduction” knob. Progressively apply more gain reduction until the loudest parts of your vocal no longer sound like they’re sticking out of your mix. Then, adjust the makeup gain to rebalance the level of your vocal if necessary.
Optionally, you can brighten up the top end of your vocals to provide them with a glossy finish. Vac Attack’s “HF Push” knob allows you to apply a high-shelf boost at 4.4 kHz (J mode) or 10 kHz (E mode). Boosting vocals around 5 kHz is quite common, so try the 4.4 kHz setting to start.
The Total Harmonic Distortion (THD) knob that Vac Attack provides can add dirt to vocals, giving them a slightly gritty texture that’s perfect for genres like rock or blues. When driven to the extreme, it can sound like your vocals are running through a guitar amp.
If you’re looking for a hands-off approach to compressing vocals, consider a plugin like iZotope Nectar. It includes a Mix Assistant feature that uses artificial intelligence to analyze your audio and provide vocal processing chain recommendations. The built-in compressor module includes an optical mode, providing the silky natural sound of optical compression via a simplified interface.
2. Make drum recordings sound cohesive
Processing raw drum recordings can be quite a challenge. You’re required to manage an assortment of audio recordings, which involves setting appropriate track levels, ensuring phase alignment, and making the recordings sound like one cohesive instrument.
Raw drum recordings will often sound detached from one another with no processing applied. Kicks and snares are typically close-mic’d, while other percussion—like cymbals—are usually recorded from farther away. Drum bus compression is commonly used to put these elements into the same perceived space.
While many mixing engineers use a FET compressor like the Purple Audio MC77 to glue the drum bus of a rock mix, this type of compressor is sometimes too intense for dynamic genres like jazz, blues, and folk. An optical compressor can provide dynamic drums with the cohesiveness you want while still sounding natural.
With compression applied to your drum bus, you’ll notice that background percussion seemingly increases in level. The tail end of transients will also become more apparent. However, these changes tend to be more pronounced when applying drum bus compression with a FET compressor versus an optical compressor.
Depending on the FET compressor you’re using and the settings you’ve selected, you might be able to apply gain reduction reminiscent of an optical compressor. However, the benefit of using an optical compressor is that it’s fast and easy to dial in your settings.
For example, the ACME Audio Opticom XLA-3 has an “Input Gain” knob, three response settings, and an “Output Gain” knob—these are all of the main controls. Drive your drums into the compressor’s threshold using the “Input Gain” knob. Then, choose how quickly you’d like the compressor to respond to the input signal by adjusting the “Response” switch. Finally, turn the “Output Gain” knob to match the input level and conduct an accurate A/B comparison. As an added bonus, the Opticom XLA-3 includes tons of coloration, making it perfect for processing drums.
3. Enhance bass guitar
Live bass guitar recordings are typically rich with upper harmonic content. Bass lines generated using a synthesizer rarely contain the same level of “bite.” While this upper harmonic content can help your bass line cut through the mix, it presents an interesting issue when it starts to overpower the other elements in your song.
The low end of a bass guitar is typically the loudest part of the signal. However, due to the way that humans perceive sound, frequency content with a sound pressure level (SPL) between 2,000–5,000 Hz can appear louder than frequency content with a higher SPL further down the frequency spectrum.
By default, most compressors don’t respond to audio in the same way humans perceive sound, but that doesn’t mean they can’t come close. The VC 2A compressor includes a high-pass filter that allows you to cut the low end from the signal that it responds to, somewhat mimicking human hearing. Applying this form of processing allows you to avoid pumping effects caused by resonant low-end transients.
Another low-end mixing issue you may encounter is bass notes that jump in level. Referring to pitch, higher notes can appear much louder than lower notes. Rather than wasting time manually applying gain reduction to each note, you can use a smooth-riding optical compressor like the VC 2A.
Thanks to the natural sound that the VC 2A provides, the risk of sucking the life out of your bass line is quite low. A well-compressed bass can fill out your mix, making it sound full and balanced. The VC 2A is an excellent tool for providing consistent low-end levels alongside enhanced sustain.

4. Balance acoustic guitars
Capturing a consistent and balanced acoustic guitar sound can be challenging due to the instrument’s wide dynamic range and complex harmonic content. This is where an optical compressor like NEOLD U2A can make a significant impact.
Crushing the detail of guitar plucks with a compressor that has an aggressive ratio and ultra-fast attack can be detrimental. Optical compressors are great for managing the transients of acoustic guitar recordings without losing articulation.
The U2A’s emulated internal components play a large role in its sound. The T4B opto attenuator delivers smooth and natural leveling characteristics, while the 12AX7 amplifier tube gives the U2A its warm and deep tone. Adjusting the “Drive” control lets you increase the amount of saturation applied by the 12AX7, which can help deepen the sound of bright and brittle acoustic guitar recordings.
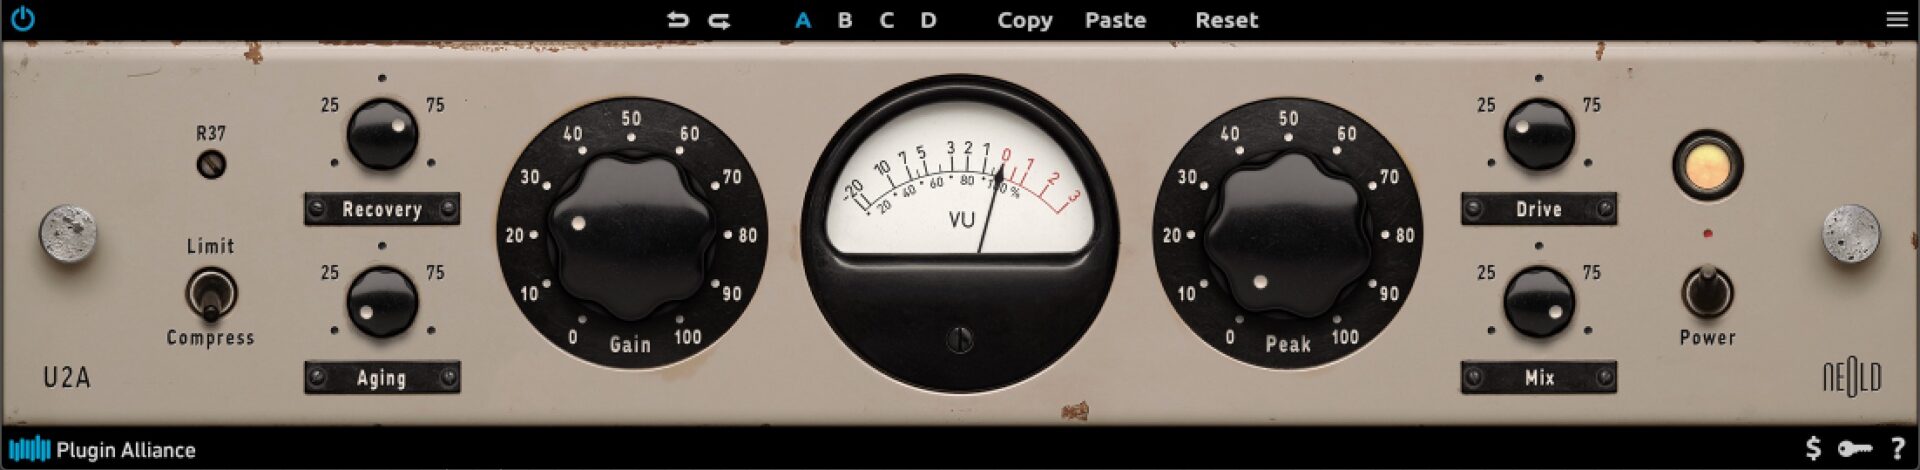
One design characteristic that makes the U2A stand out is its “Aging” feature. This setting lets you modify the age of its internal components, altering the way that the plugin sounds and behaves. For example, you can blend the sound of a freshly serviced unit with a new opto cell together with a time-worn vintage unit. On a technical level, the “Aging” setting affects the threshold/ratio/knee interaction.
5. Thicken up keys
Keyboards and synthesizers sometimes sound too sterile or lack the organic qualities that make acoustic instruments appealing. An optical compressor like Brainworx bx_opto can help add warmth, character, and dynamic control to your keys.
The “Speed” control mainly affects the release time of bx_opto. A fast “Speed” setting might suit a percussive electric piano, while a slower one would work better for a sustained organ sound. Generally, the less transient your waveform, the slower the release setting that you can get away with while avoiding pumping effects.

bx_opto also lets you filter its sidechain circuit using a high-pass, low-pass, wide bandpass, or narrow bandpass filter. You can adjust the center frequency of the filter you’ve selected using the frequency selection knob. Due to the broad range of frequencies that keys produce, having control over the frequency content that bx_opto responds to makes it ideal for processing keys.
6. Creative parallel compression
Parallel compression involves blending an uncompressed (dry) signal with a compressed (wet) version of the same signal. This technique can add thickness and fullness to your tracks without losing punch and impact. A harmonically rich optical compressor is a great choice for parallel compression, especially if it includes a limiter mode, like the VC 2A or U2A.
Vac Attack acts as a limiter by default. You can add heavy compression using Vac Attack’s “Reduction” knob. Then, use the built-in “Mix” knob to blend the compressed signal with the original signal, striking a balance between lively dynamics and a full body. The Sidechain EQ can also be used to make Vac Attack more or less sensitive to specific frequency ranges, providing you with an additional layer of creative control.
7. Glue your mix together with bus compression
Bus compression can help create a cohesive sense of space. By applying gentle compression to your stereo bus, you can “glue” all the elements of your mix together. A twin topology opto-compressor/limiter like the Millennia TCL-2 is perfect for applying bus compression.
The TCL-2 is an optical compressor that allows you to select between a discrete FET mode and vacuum tube mode. It also provides dedicated attack, release, and ratio controls, which is quite uncommon for an optical compressor.
When applying bus compression to a mix, start with a moderate ratio of 2:1, a medium attack time of around 30 ms, and a release time of 50–100 ms. Aim for 1–3 dB of gain reduction to begin with.
You can dial in your processing further, leading with your ears. Adjust the attack time until your drums sound as punchy as you want them. Then, tweak the release time to strike a balance between a responsive sound and a colorful sound. For more aggressive songs, try using a ratio of 4:1 while staying within a 1–3 dB gain reduction range.
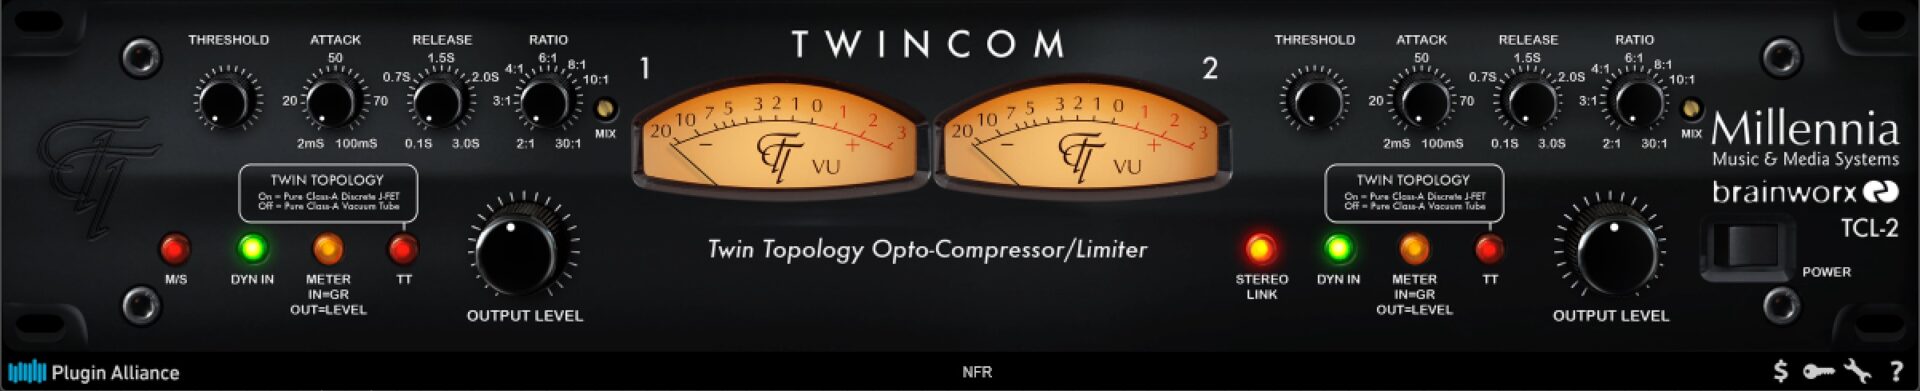
When using the TCL-2 to apply bus compression, keep the channels linked together. Unlinking the channels can help your mixes breathe, but it’s counterintuitive in this context. You want the cohesiveness that linking the channels together provides.
Start using optical compressors to get a polished sound
Optical compressors play a pivotal role in achieving a polished, musical, and rich mix. From thickening up vocals and keys to gluing entire mixes, the musicality of optical compressors can help you produce more emotionally impactful songs. By understanding and leveraging the unique features provided by the optical compressors in this guide, you can add depth, warmth, and character to your mixes.
Start a 30-day MEGA Bundle trial to demo the Plugin Alliance products mentioned throughout this guide. Get instant access to over 150 plugins, many of which are exacting emulations of coveted analog hardware for mixing and mastering.
Related articles
-

Behind the synth: A. G. Cook on stacked sawtooths and the creation of Super*Saw
Explore the extremes of stacked sawtooth waves with Super*Saw, a new synthesizer co-created with A. G. Cook. Learn how to…
-

Inside the evolution of orchestral sampling: an interview with ProjectSAM
Discover how ProjectSAM’s Lineage Series uses NKS and smart features to change orchestral sampling. Plus, save on instruments in our…
-

How New Constellations turn emotion into sound with Massive X
Go inside the studio with New Constellations. Learn how they use Native Instruments gear, happy accidents, and lifelong friendship to…
-

Citizen Kain on building emotion and space with Replika
Citizen Kain explains how Replika helped shape the rhythm, tension, and emotion behind his debut Eversun Records single “Moments.”…
-

The organic precision behind Calcou’s Anjuna release featuring Reaktor
Calcou shares how Reaktor, Monark, and Super 8 shaped the creative balance and live energy behind their new duo EP,…
-

14 NKS instruments that will change the way you create music
Discover 14 NKS instruments to freshen up your workflow. From lo-fi tape synths to cinematic strings, shop the Native Instruments…
-

Parallelle on crafting living basslines with Reaktor and TRK-01
Parallelle share how Reaktor and TRK-01 shape the bass and warmth in 11th Avenue, balancing analog depth with modern control.
-

Where will your sound lead you? Explore the Native Instruments Summer Sale
Save 30% on instruments, effects, and sounds in our Summer Sale. Find the tools to keep your tracks moving and…