


The Patterns Tool is a new feature in Kontakt that combines the ease-of-use of an arpeggiator with the powerful flexibility of a sequencer, making it easier than ever to create exciting new rhythms and musical sequences.
In this guide to using patterns in Kontakt we’ll show you how to add the Patterns Tool to instruments, how to edit patterns, and how to create new rhythmic patterns in Kontakt. This will enable you to create exciting sequences more quickly, regardless of which style of music you make.
Jump to these sections:
- What is the Patterns Tool in Kontakt and what does it do?
- How to use Patterns in Kontakt:
- Patterns Tool in practice: making a trance arp
To follow along with this tutorial you can use Kontakt 8 or the free Kontakt 8 Player which is included in the Komplete Start bundle. In this guide we’ll use Analog Dreams from Komplete Start to play back the patterns we make.
What is the Patterns Tool in Kontakt and what does it do?
Patterns is a polyphonic step sequencer and arpeggiator that creates evolving melodies and rhythms. It includes more than 40 unique pattern presets designed to spark movement and creativity, making it ideal for beat creation in Kontakt.
Adding the Patterns Tool is easy. You can simply drag it onto an instrument in Kontakt, and then when you play a note with the instrument, it will trigger the pattern sequencer, allowing you to play complex rhythmic, melodic or harmonic ideas easily.
How do I access the Patterns Tool in Kontakt?
You can access the Patterns Tool from the Tools tab, where it can be dropped onto any Kontakt instrument. We’ll show you how to do this step-by-step in this guide.
How to use the Patterns Tool in Kontakt
1. Add the Patterns Tool
Begin by opening your DAW, and adding an instance of Kontakt 8 or Kontakt 8 Player to a MIDI track. In Kontakt click the Analog Dreams library, then double-click New World in the list of presets to load it up.

Now, let’s add the Patterns Tool. Click the Tools tab in the Side Pane on the left, and the available Tools will appear. Click the Patterns Tool to bring up the list of available patterns.

You can preview each pattern in the list by clicking it. Let’s start with a simple pattern. Double-click Arp Up to load it.

Now when you play the monophonically, you’ll hear it play ascending octaves, just like an arpeggiator.
You can see this pattern reflected in the Patterns Tool panel. The horizontal axis represents time, and the vertical axis represents octave.

Note that if you play polyphonically, i.e. more than one note at once, that the Patterns Tool will trigger the notes you’ve played rather than simply playing octaves.
So for example, if we play a C3 and a G3, we’ll get an output of C3, G3, C4, G4.
If we play C3, E3, G3 we’ll get an output of C3, E3, G3 and C4.
If we play C3, E3, G3 and B3, we’ll get C3, E3, G3 and B3.
When used with more complex patterns, this approach makes it possible to create complex musical ideas quickly.
2. Adjust the Patterns Tool’s parameters
Just like an arpeggiator, we can change the Rate and Duration of the notes to get different feels. For example, let’s set the Rate to 1/16 and the Duration to 50% to get a faster, tighter sound.

You can control the direction of playback with the arrow buttons. These offer forward, backwards, ping-pong and shuffle modes. Let’s try shuffle mode.

In this mode, the pattern will play back randomly.
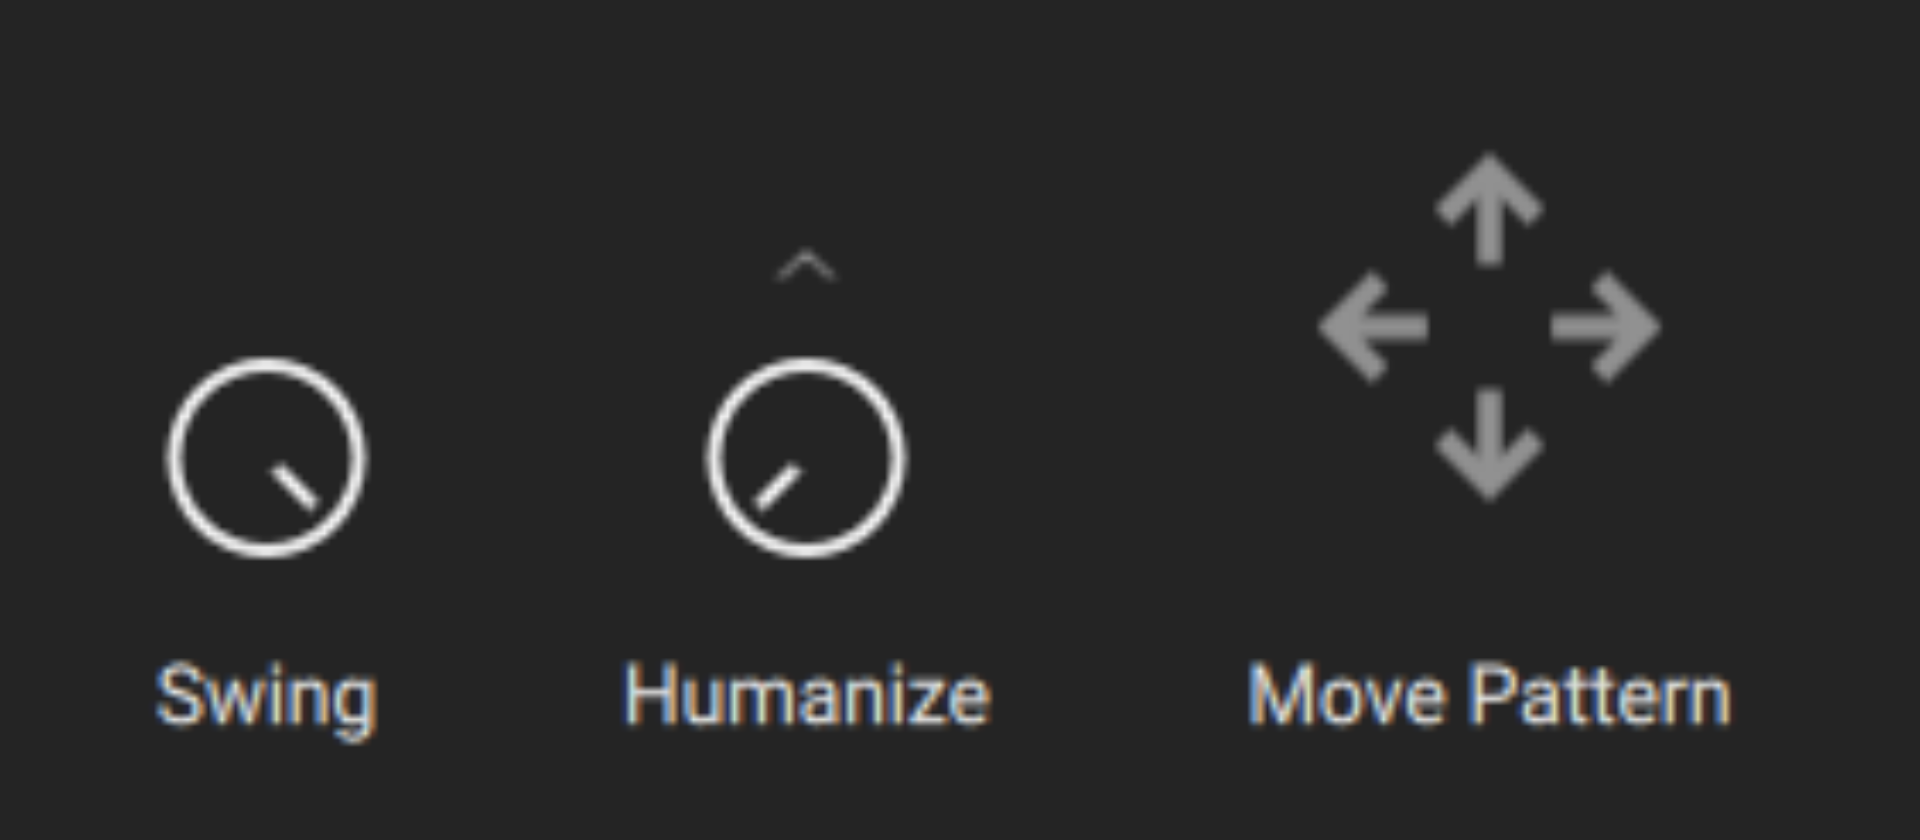
Let’s return to forward playback, but this time let’s add some swing, turning the Swing knob up to 100%.

This adjusts the timing of every other note, giving the pattern a push-pull feel.
You can control the velocity of the Patterns Tool’s MIDI output with the Velocity knob, and the arrow above the Velocity knob gives you further settings for fine-tuning. You can also adjust the root octave with the Octave parameter.

Humanize controls how much the Duration and Velocity are randomised, and how often notes are skipped. You can control the balance of these random factors by clicking the arrow about the Humanize knob.

The key-range parameter determines which notes will be triggered by the Patterns Tool, between C0 and B6.

You can move the pattern both horizontally and vertically with the Move Pattern arrow buttons.
3. Find new patterns
You can load new patterns by double-clicking them in the preset list as we did before, but this isn’t the only way to load new patterns. You can also click the patch name at the top of the Patterns Tool to bring up the Pattern browser, where you can filter patterns by Type, Tempo and Attributes. The relevant patterns are displayed in the Patterns list on the right.

The die icon at the top left-hand corner of the panel will load a randomly selected pattern from the filtered search results, or all the available patterns if you haven’t used any of the filters.
4. Edit patterns
You can disable columns or rows in the Pattern Editor by clicking the circular blue icons adjacent to them.

The length of the pattern can be adjusted with the Length parameter.

You can activate or deactivate the cells in the Pattern Editor by clicking on them. This way you can define the exact pattern you desire. You can change the length of notes by dragging them horizontally and change their velocity (which is visually represented by their colour intensity) by dragging them vertically.

When active, the Paint Mode button (a paintbrush) allows you to draw on the editor rather than clicking each individual cell.

The trash can icon removes all the notes from the pattern and resets all the Step and Pitch switches to their default active state, leaving you with an empty pattern.
When the Retrigger button is active the pattern restarts from the beginning for every new key that you press, otherwise it starts from the beginning as you press the first key and goes on looping until you release the last held key. When Latch is active, the pattern goes on looping even if you release all the keys. You can stop the pattern by clicking the active Latch button.

The final buttons are the drop buttons. Drops are optional, random notes “dropped” onto your pattern. The large Drops on/off button toggles the drops on or off. When you turn on the drops for the first time, a set is generated automatically. Dropped notes will be cyan.
To the left, the Renew button (with two cycling arrows) lets you manually generate a new set of drops, instantly replacing the current ones in the pattern. To the right, the Auto Renew button (marked with an infinity icon) will automatically refresh the drops every time the pattern loops.

Patterns Tool in practice: making a trance arp
Now we’ve seen all of Patterns Tool’s capabilities, let’s see how we can use it in practice to make a soaring trance arp. Double-click the Arp Up pattern again to load it up again. Then, click the Clear button to empty the pattern editor.

Now set the pattern length to 8.

Set the Rate to 1/16 and the Duration to 50%.

Now copy the pattern we’ve used here – or use your own pattern! You can’t really get this “wrong” as the Patterns Tool can only transpose notes up and down a whole octave, keeping it in key with the notes that you play.

Now copy the chord progression we’ve used here (or, of course, compose your own) in your DAW’s MIDI grid editor.

We can add more interest by adding extra notes, which will change the feel of the pattern. Let’s add some C5 notes like so.

Start using Patterns in Kontakt today
In this guide we’ve shown you how to apply the Patterns Tool to an instrument, find and load patterns, tweak those patterns, and make your own pattern from scratch. If you’d like to learn more about making music with Kontakt, check out What is Kontakt?, Getting started with Kontakt to create music and Instant sonic inspiration with Phrases & Chords Tools.
Related articles
-

Inside Pythius’s workflow for fusing metal and drum and bass
Pythius explains how Pharlight and Damage shaped his newest EP, merging cinematic tension with the high-energy precision of drum and…
-

How Tom Schraeder brings humanity to horror with Thrill
Composer Tom Schraeder explains how Native Instruments’ Thrill helped him shape the haunting, human tension behind Vicious.
-

10 Phantom Rooms on RSI 2: how rare Berlin synths shape the future of NKS
Tobias from 10 Phantom Rooms discusses the making of RSI 2, an NKS exclusive performance-focused instrument made from rare sampled…
-

Jonas Blue on rediscovering house and reshaping his sound with Transient Master
Jonas Blue breaks down “Edge of Desire,” explaining how Transient Master shaped its energy and why he’s returning to his…
-

Corren Cavini on building narrative through sound in his debut album
Corren Cavini discusses emotional storytelling and sound design in A Place To Call Home, exploring how Kontakt and Raum shaped…
-
How to design evolving soundscapes: a sound designer’s workflow with Absynth 6
Learn Absynth 6 sound design and create evolving soundscapes with this article. Includes an MSEG tutorial, MPE synth workflow, and…
-
Introducing Absynth 6: The iconic hybrid synth returns with unprecedented depth and expression
Explore the rebirth of Absynth with a new interface, hybrid synthesis tools, expressive control, and a deeper library of surreal…
-

How Guy Mantzur and Chicola build depth in modern melodic techno
Guy Mantzur and Chicola share how Raum and Replika XT shaped the atmosphere and depth of their new EP Neon…