


Conjure surreal cinematic soundscapes and experimental sound design with Erosia, an idiosyncratic sound design instrument that creates unique tones with its granular synthesis engine and huge library of bespoke, friction-based sound sources.
Erosia’s library of more than 250 presets gives you a vast array of wild sonic tools that can be morphed easily between different states. Its deep layering, effects, and grain synth modulation capabilities give it the potential to generate a practically unlimited library of esoteric timbres.
In this walkthrough, we’ll show you how to quickly pick, play, and morph a preset. Then we’ll take a look under the hood and discover the instrument’s inner workings so you can make your own experimental sounds.
You can follow along with this tutorial using the Erosia sound design instrument. Similarly to instruments like Circular, it requires Kontakt 8 or the free Kontakt 8 Player to run.
Jump to these sections:
- How is Erosia different from other granular synths or sample libraries?
- How to start out with Erosia
- How to make your own patches
Follow along with this tutorial using Erosia.
How is Erosia different from other cinematic instruments or sample libraries?
Erosia uses a unique combination of granular synthesis, wavetable synthesis, and a massive selection of handcrafted sound sources from recordings of physical objects, making it capable of creating an array of mysterious sonic textures.
It’s a perfect fit for cinematic electronic music, ambient soundscapes, and more.
How to start out with Erosia
Load and play a preset
In Kontakt 8 or Kontakt 8 Player, select the Erosia library, and load up the Erosia instrument.

When the instrument loads, click the All Banks button on the left-hand side of the interface, and you’ll be given the option to select various types of presets: Atmospheres, Drones, Pads, Textures, and Transitions.

Select Textures, for example, and the list of available presets will be filtered to show just the texture presets. Double-click Brass Strings Cymbalis to load it up.

If we play this sound with C3 on a MIDI controller, we get a rich, metallic texture.
Now let’s play it on C3 again, but this time we’ll sweep the Transform knob at the bottom of the interface while it plays. This is assigned to your MIDI controller’s mod wheel by default, so you can use that instead if you prefer.

As you turn the knob, you’ll hear the sound morph between various states, creating a surreal sonic journey. It’s this flexibility that makes Erosia such a powerful tool for sound-based storytelling.
How does Erosia morph sounds?
Erosia features four sound Layers, and when we first played the preset back without using the Transform parameters, we only heard Layer 1. You can examine the Layers by clicking the Layers button at the top right-hand corner of the interface.

On the Layers page you can see the four Layers, and the parameters used to control them.

When we played the sound back the second time and used the Transform parameter, Erosia moved between the four Layers. If you try this again with the Layers page selected, you’ll see various parameters animate too, and it’s this modulation that adds another dimension to the transforming sound.
We can get a better understanding of how this works by deconstructing a preset, so let’s try that next.
How to make your own patches
1. Deconstruct an Erosia preset
In the preset selector on the left select All Banks again, and this time load the Dark TV preset.

You’ll notice that this preset has only a single Layer active, and Layers 2, 3, and 4 are greyed out. This makes it a good starting point for exploring how Erosia works.
Under the Layer 1 header, you’ll see it says Grain Layer.
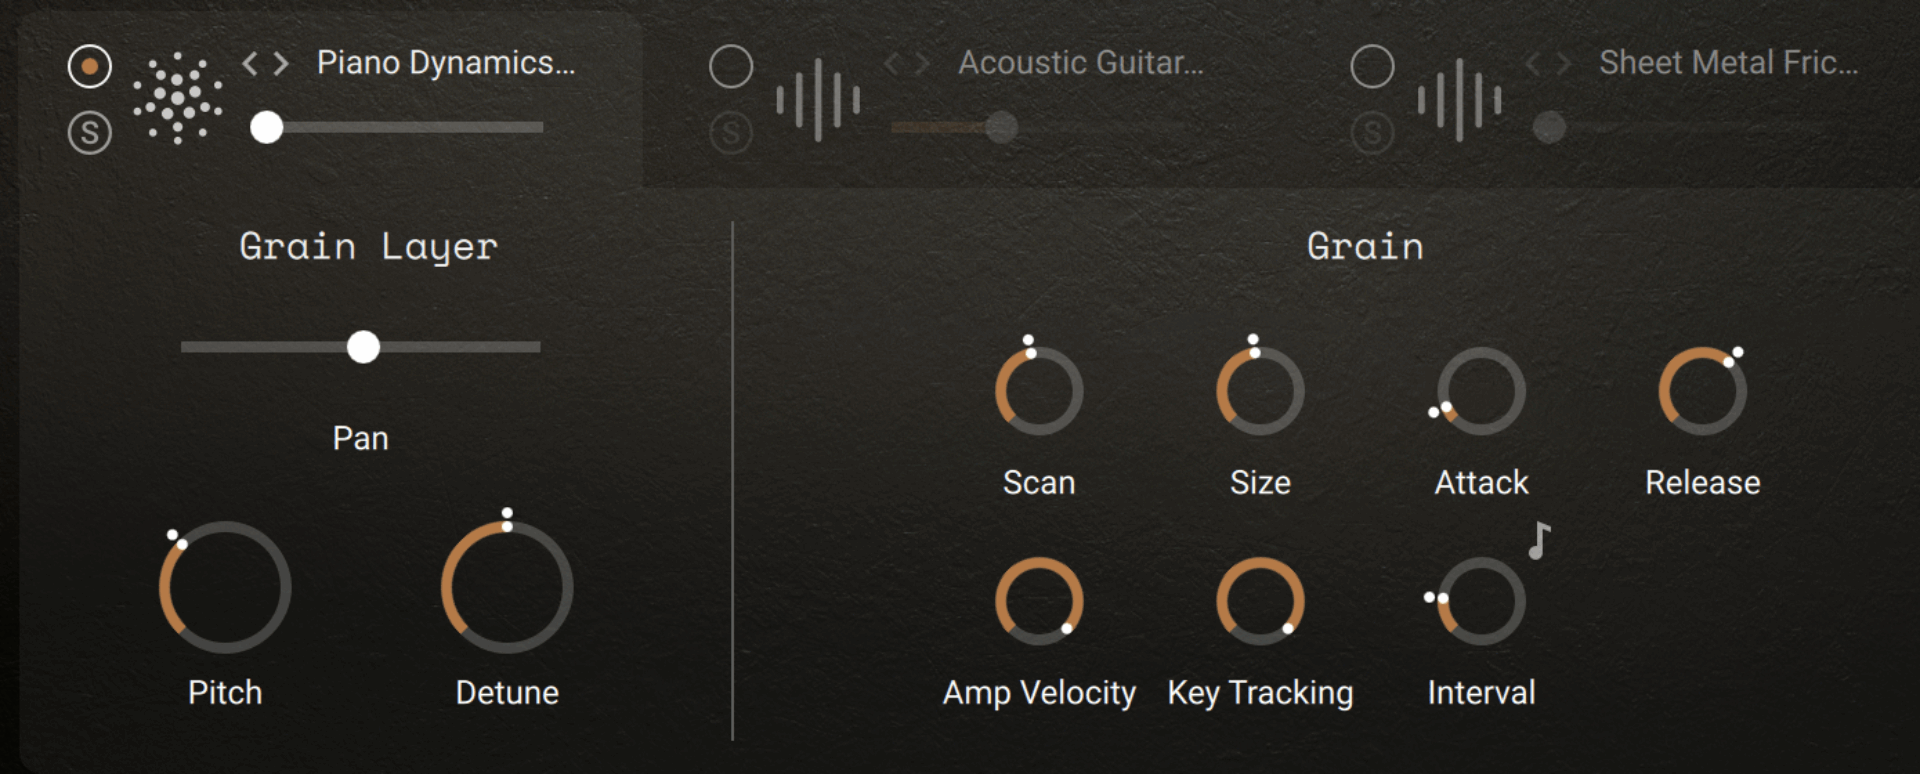
Layer 1 is always the Grain Layer, which means it uses a granular synthesis source to create its tones. When we play a note, you’ll see the horizontal volume fader under the header animate. This is because this parameter is being modulated, and this is what gives this preset its rhythmic feel.
Let’s simplify the sound by removing this modulation. To do this, move your cursor to the right of the horizontal fader, and a modulation icon will appear.
This causes the parameter’s modulation sources to appear. Hold the Command key on macOS or the Control key on Windows, and click the Combiner 1 modulation source to set it to 0%.

This stops the modulation source from changing the layer’s volume, and as the Layer’s volume level is set to 0%, we won’t hear anything when we play the sound. Set the Layer’s volume fader to 25% so we can hear it again.

Now when we play back the sound, we’ll hear it play with a consistent volume level.
However, the sound still has a rhythmic movement, and you may have noticed that the Scan parameter animates when the sound is played back. This is because this parameter is being modulated by the instrument’s LFOs.
Hover your cursor to the left of the Scan parameter, and a modulation icon will appear. Click it, and set both the LFO 1 and LFO 2 modulation sources to 0%.

Now, when we play the sound, it sounds static.
Now, if you sweep the Scan parameter as you play the sound back, you’ll hear that you can directly control the texture of the sound.
The sound still has a big reverb on it, so let’s turn that off. Click the FX button at the top right-hand corner of the interface.
Now click the power icon in the Ambience panel.

2. Save an initialised preset
If you’re interested in designing your own sounds from scratch, you might find it beneficial to save this patch as a preset. It’s as close as we can get to an initialised patch in Erosia. To do this, select File > Save As > Instrument #1 – Erosia.

Name the file “Erosia Init”. You can load this file at any time using the File > Load option.

3. Audition new sound sources
Let’s try a different sound source. To do this, you can click the arrow buttons in the Layer header to cycle through the sounds, or you can click the sound source’s name to bring up the Grain Layer Sound menu.

Here you can filter the sound sources with the Filter tags, or scroll through the entire list on the right. Let’s scroll right to the bottom and click Winter Harmonics.

Click the Layers button again to bring up the Layers parameters, and now sweep the Scan parameter while you play a note.
By selecting different sound sources and sweeping the Scan parameter, you can audition each sound source and find a good starting point for your own patch.
You can change the feel of a sound source with the Size and Interval parameters. With the Scan set to 50%, set the Size to 330 ms, and the Interval to around 120 ms.

As you can hear, these parameters can add a rhythmic quality to the sound.
Now let’s modulate the Scan position. Click the modulation icon next to the parameter, and bring up the LFO 2 modulation amount to 40%.

This adds a dimension of movement to the sound.
4. Add FX
Return to the FX page, and reactivate the Ambience effect. Now change the impulse response from Cathedral to Acoustic Body, and the Size to 150%.

This gives our sound a richer timbre, and we can develop that texture further by adding more effects.
In the FX Bus panel above, click the Shape button on the left.

Now change the Mode from Spectral 2 to Formant 1.

Set the Talk parameter to around 50%, then click its modulation button. Set the second modulation source to LFO 1, and turn its modulation amount up to 50%.

LFO 1 is currently set to create a complex modulation source, and this gives us an excitingly animated sound.
Now select the Color effect, and set the effect on the right’s mode to Choral – Ensemble.

This gives the sound yet more depth and the feeling of being in a virtual space.
5. Add another layer
So far we’re only using one Layer of a possible four, so let’s try adding another. Return to the Layers page, then deactivate the first Layer, and activate the second.

Click the Layer sound source name, and you’ll be presented with the Layer 1 Sound page. Here you’ll see that this Layer, like all Layers aside from the Grain Layer, can be set in one of two modes: Sample and Wavetable.
Keep this Layer in Sample mode, and click Dry Ice Garbage Can 1 from the list of available sound sources on the right.

You’ll hear that this Layer is also affected by the effects we applied earlier, giving it an intriguing, articulated feel.
Reactivate the first layer, and return to the Play page.

6. Transform the sound
Now we can use the Transform knob to morph between the Layers we’ve created, giving us an otherworldly sound.
You’ll notice as you sweep the Transform knob that the four parameters at the bottom of the interface move too. You can set the values of these parameters for each Layer using the buttons A to D above them, and they’ll automatically be morphed between when you sweep the Transform knob.

Start using Erosia to enhance your music
In this tutorial, we’ve just scratched the surface of what’s possible with Erosia. As you’ve heard, it can be used to create some truly indescribable sounds!
Try Erosia’s powerful granular synthesis engine today and create your own layers of complex, evolving, and weird sound.
Related articles
-
The best sound design plugins from Native Instruments
Discover the best sound design plugins for music, film, and games, including top synths, effects, and creative tools from Native…
-

Taming the monster: behind the soundtrack of K-Pop Demon Hunters
Discover how GRAMMY-nominated engineer Curtis Douglas and producer Lindgren used iZotope Ozone, RX, and Kontakt to craft the high-impact, polished…
-

The best DJ effects: a complete list for beginners and pros
Discover the best DJ effects for every mix, from essential filters and delays to creative tools like the Beatmasher. Learn…
-

Weird by design: HAAi on the limitless potential of Absynth 6
Discover how the Australian artist HAAi uses the new engine in Absynth 6 to create layered atmospheres and immersive soundscapes…
-

$0 to pro studio: your first 5 music production tools that replace $3,000 of gear
In this blog, you’ll learn how to replace hardware gear with VST plugins and get a cheap pro home studio…
-

Noha on groove, texture, and using Guitar Rig to shape emotion
Italian producer Noha explains how Guitar Rig, modulation, and subtle distortion shape his minimal yet emotional sound in “The Place.”…
-

Junaco on DIY recording, Sonic Ranch, and the subtle power of RX
Junaco share how RX helped shape In Motion, keeping the album’s warmth and intimacy intact while refining every detail of…
-

Inside Oli Julian’s rhythmic approach to Netflix’s The Twits
Oli Julian breaks down how Abbey Road Vintage Drummer helped him score Netflix’s The Twits with rhythm, humor, and personality.