


Sound design is the art of creating new and unique sounds for music productions. This can be accomplished using various techniques and tools, including free Kontakt instruments, free Kontakt libraries, and free sound design plugins. This guide will show you how to get started with sound design by using granular manipulation, modulation, and effects chains to craft original sounds. By the end of this article, you’ll be making inspiring sounds that will catch your listener’s ears and give your sounds texture, depth, and movement.
Jump to these sections:
Follow along with this tutorial using Komplete Start, free bundle of pro-grade instruments, sounds, effects, and more to help you create your signature sound.
Free sound design tools
Having access to quality free sound design tools is essential for audio producers of all levels. Komplete Start is a free bundle of sounds, instruments, and effects from Native Instruments. It’s an excellent way for new producers to begin creating music with a professional suite of tools, including the legendary Kontakt Player. This collection is a great starting point into music production and sound design, giving a taste of a much bigger collection of creative tools without any cost.
Once you have Komplete Start downloaded, you get access to even more free instruments and tools to use in sound design.
1. Granular manipulation
Granular synthesis is a sound design technique that involves breaking down an audio sample into small segments called “grains.” It allows you to transform familiar sounds into entirely new soundscapes and effects. You can use this method to turn a single piano note from a free Kontakt instrument into a rich pad sound.
Here’s how to create a pad from a piano note using granular manipulation.
First, download Kontakt Player (which is part of Komplete Start) and a free Kontakt Player piano instrument like the Heavyocity FOUNDATIONS Piano.
In this demo, I’m using Steinway Grand from Pianobook that works with the full version of Kontakt, but you can create the same sounds with similar free Kontakt Player libraries.

Record or select a single piano note with a noticeable decay and bounce this note as a separate audio file.

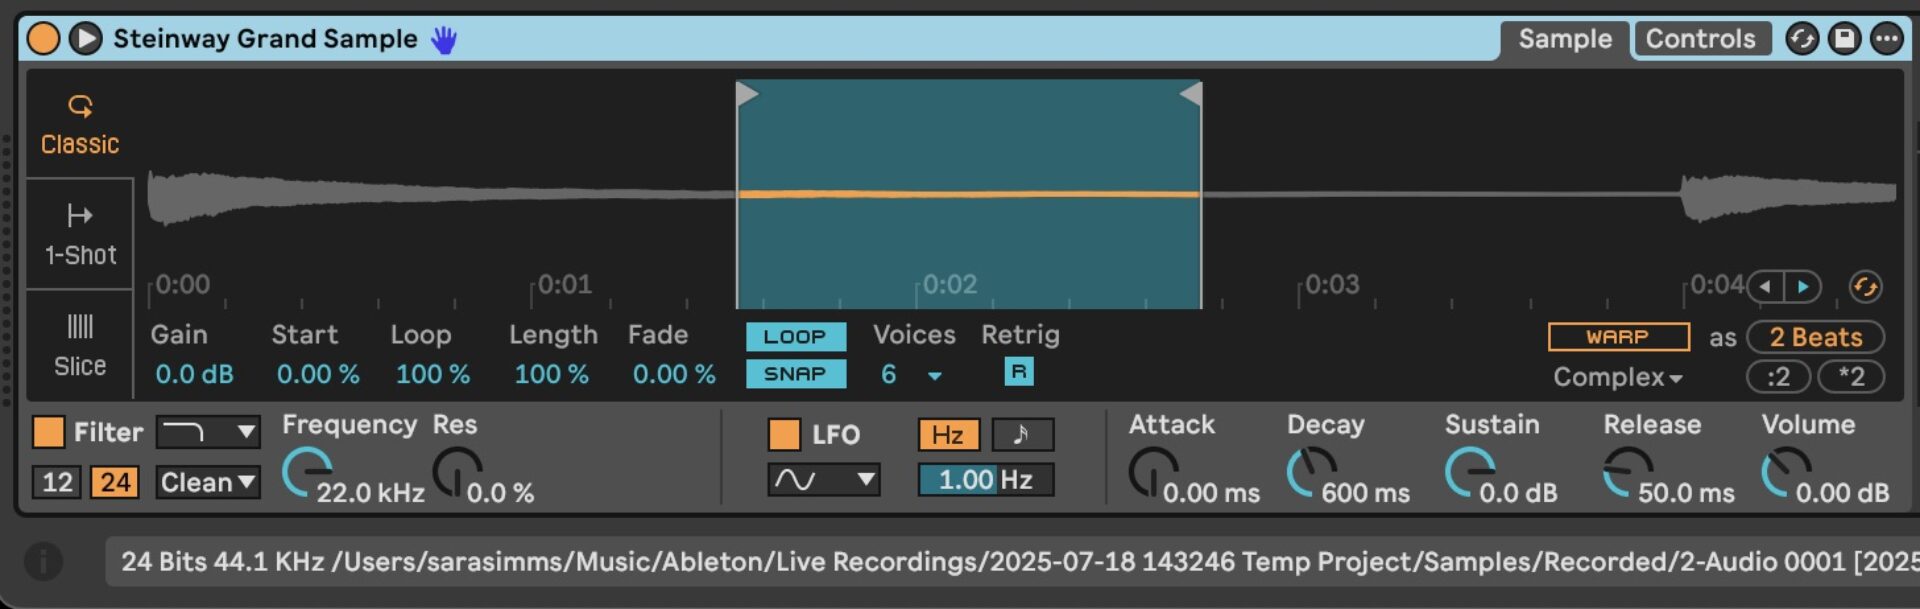
Find and loop a segment within the piano’s decay. Open the audio file in your DAW’s sampler or editor (like Ableton’s Simpler). Find a small section within the note’s decay that has a consistent tone. To avoid clicks and pops, make sure the loop’s start and end points are at zero-crossing points. Trim the audio to this segment, loop it, and bounce it out as a new audio file.
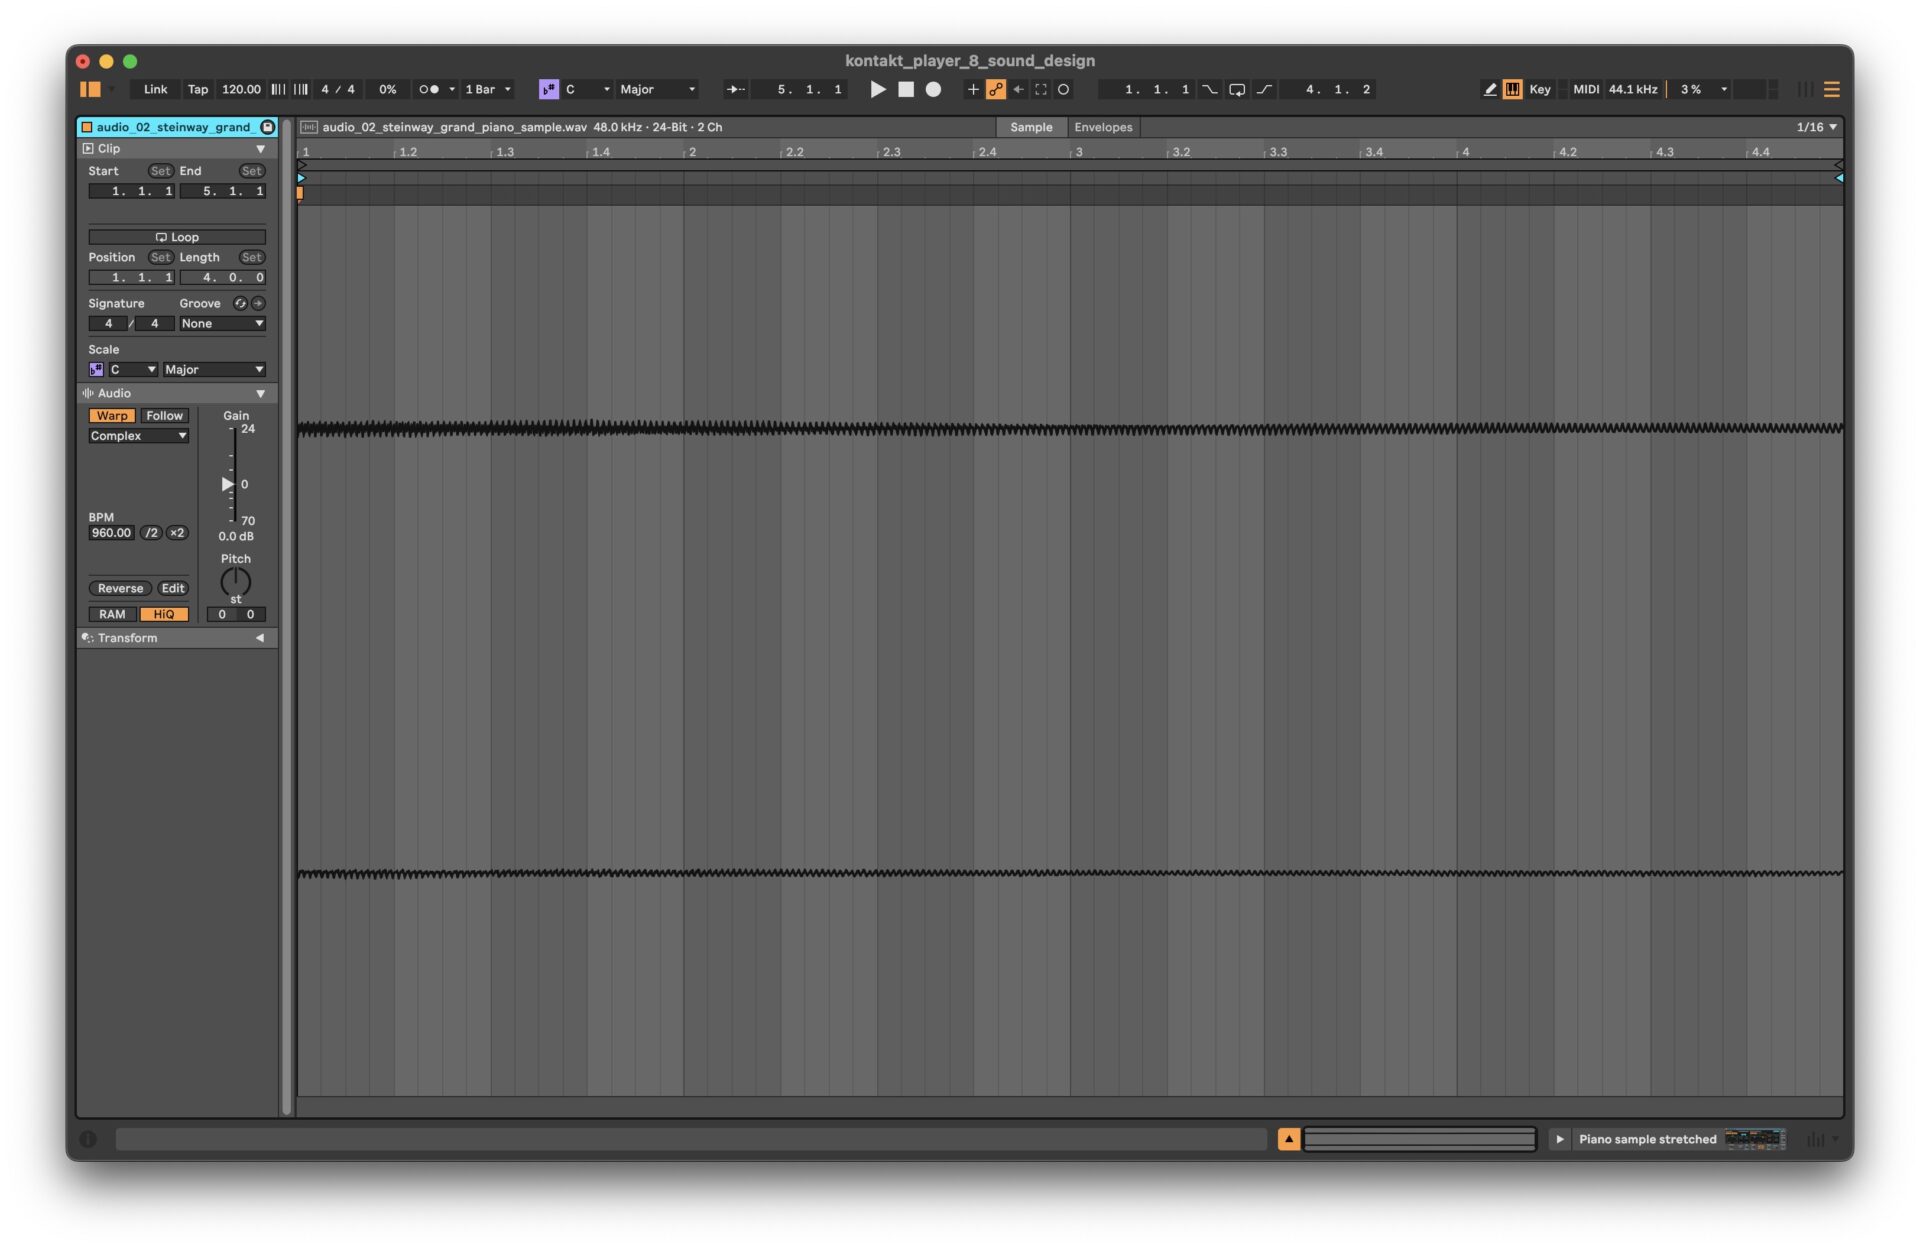
Stretch the loop into a pad. Enable time-stretching (like Ableton’s Warp function) to lengthen the loop without altering its pitch. Hold down shift and drag the sample to the right to stretch it.
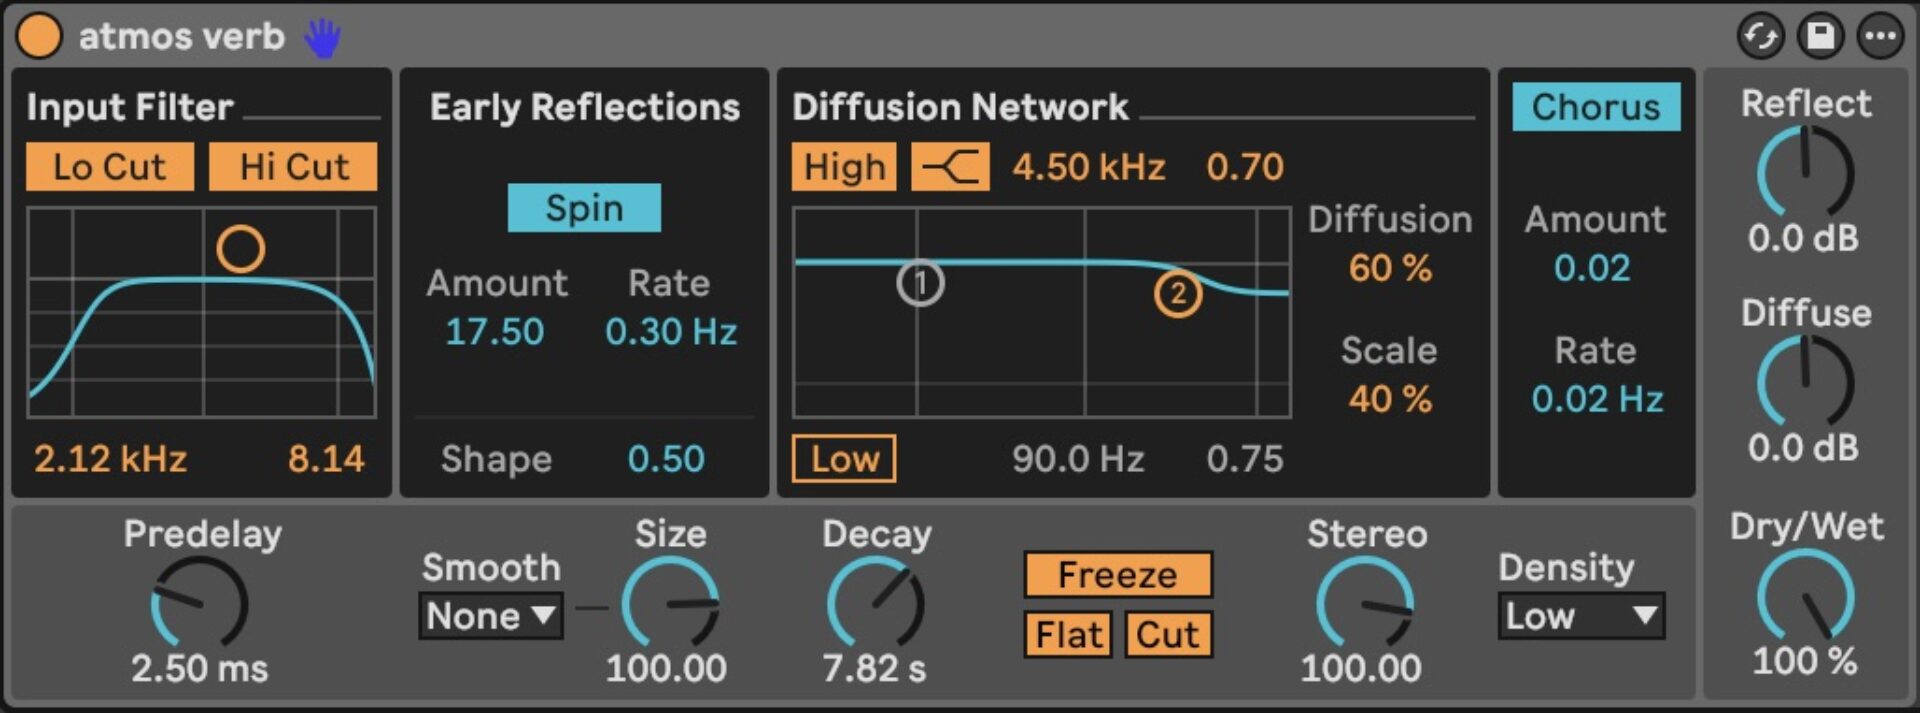
Next, we add effects. Start with using reverb and delay plugins to add depth. Set your reverb’s decay to a high value, like 7.82s. Play the sample and press Freeze.
Create a new audio track in Ableton, and record the piano sample with the reverb. To do this, set the Audio From the track with the piano audio and reverb, and set the Monitor to In.

Following this, add reverb to create an ethereal pad sound. Try adding Raum (a free download with Komplete Start) with the Valentine Backwards Preset, or select your favorite preset to refine the sound.
You can also add delay to create a sense of movement. Use either the delay included in your DAW, or Replika (another free effect plugin included with Komplete Start). In the example below, Replika’s Soft Clouds preset is used. Optionally, you can try reversing the stretched audio sample, or duplicating the audio sample and reversing it to introduce additional layers and textures to the pad.

You can further shape the sound by applying filters, modulation effects, and other processing to the audio.
2. Using modulation to create movement
You can use modulation to add movement and texture to your sounds. A great way to do this is by using low-frequency oscillators (LFOs) in Kontakt Player to modulate a filter. This technique works particularly well with the Heavyocity Foundations Synth Bass, a free Kontakt library with macro controls that can be mapped to Kontakt’s internal LFOs.
Follow these steps to modulate the Foundations Synth Bass with an LFO:
Load the instrument. In your DAW, load Kontakt Player onto a MIDI track and open Heavyocity Foundations Synth Bass. Create a four-bar MIDI note to produce a continuous bass sound.


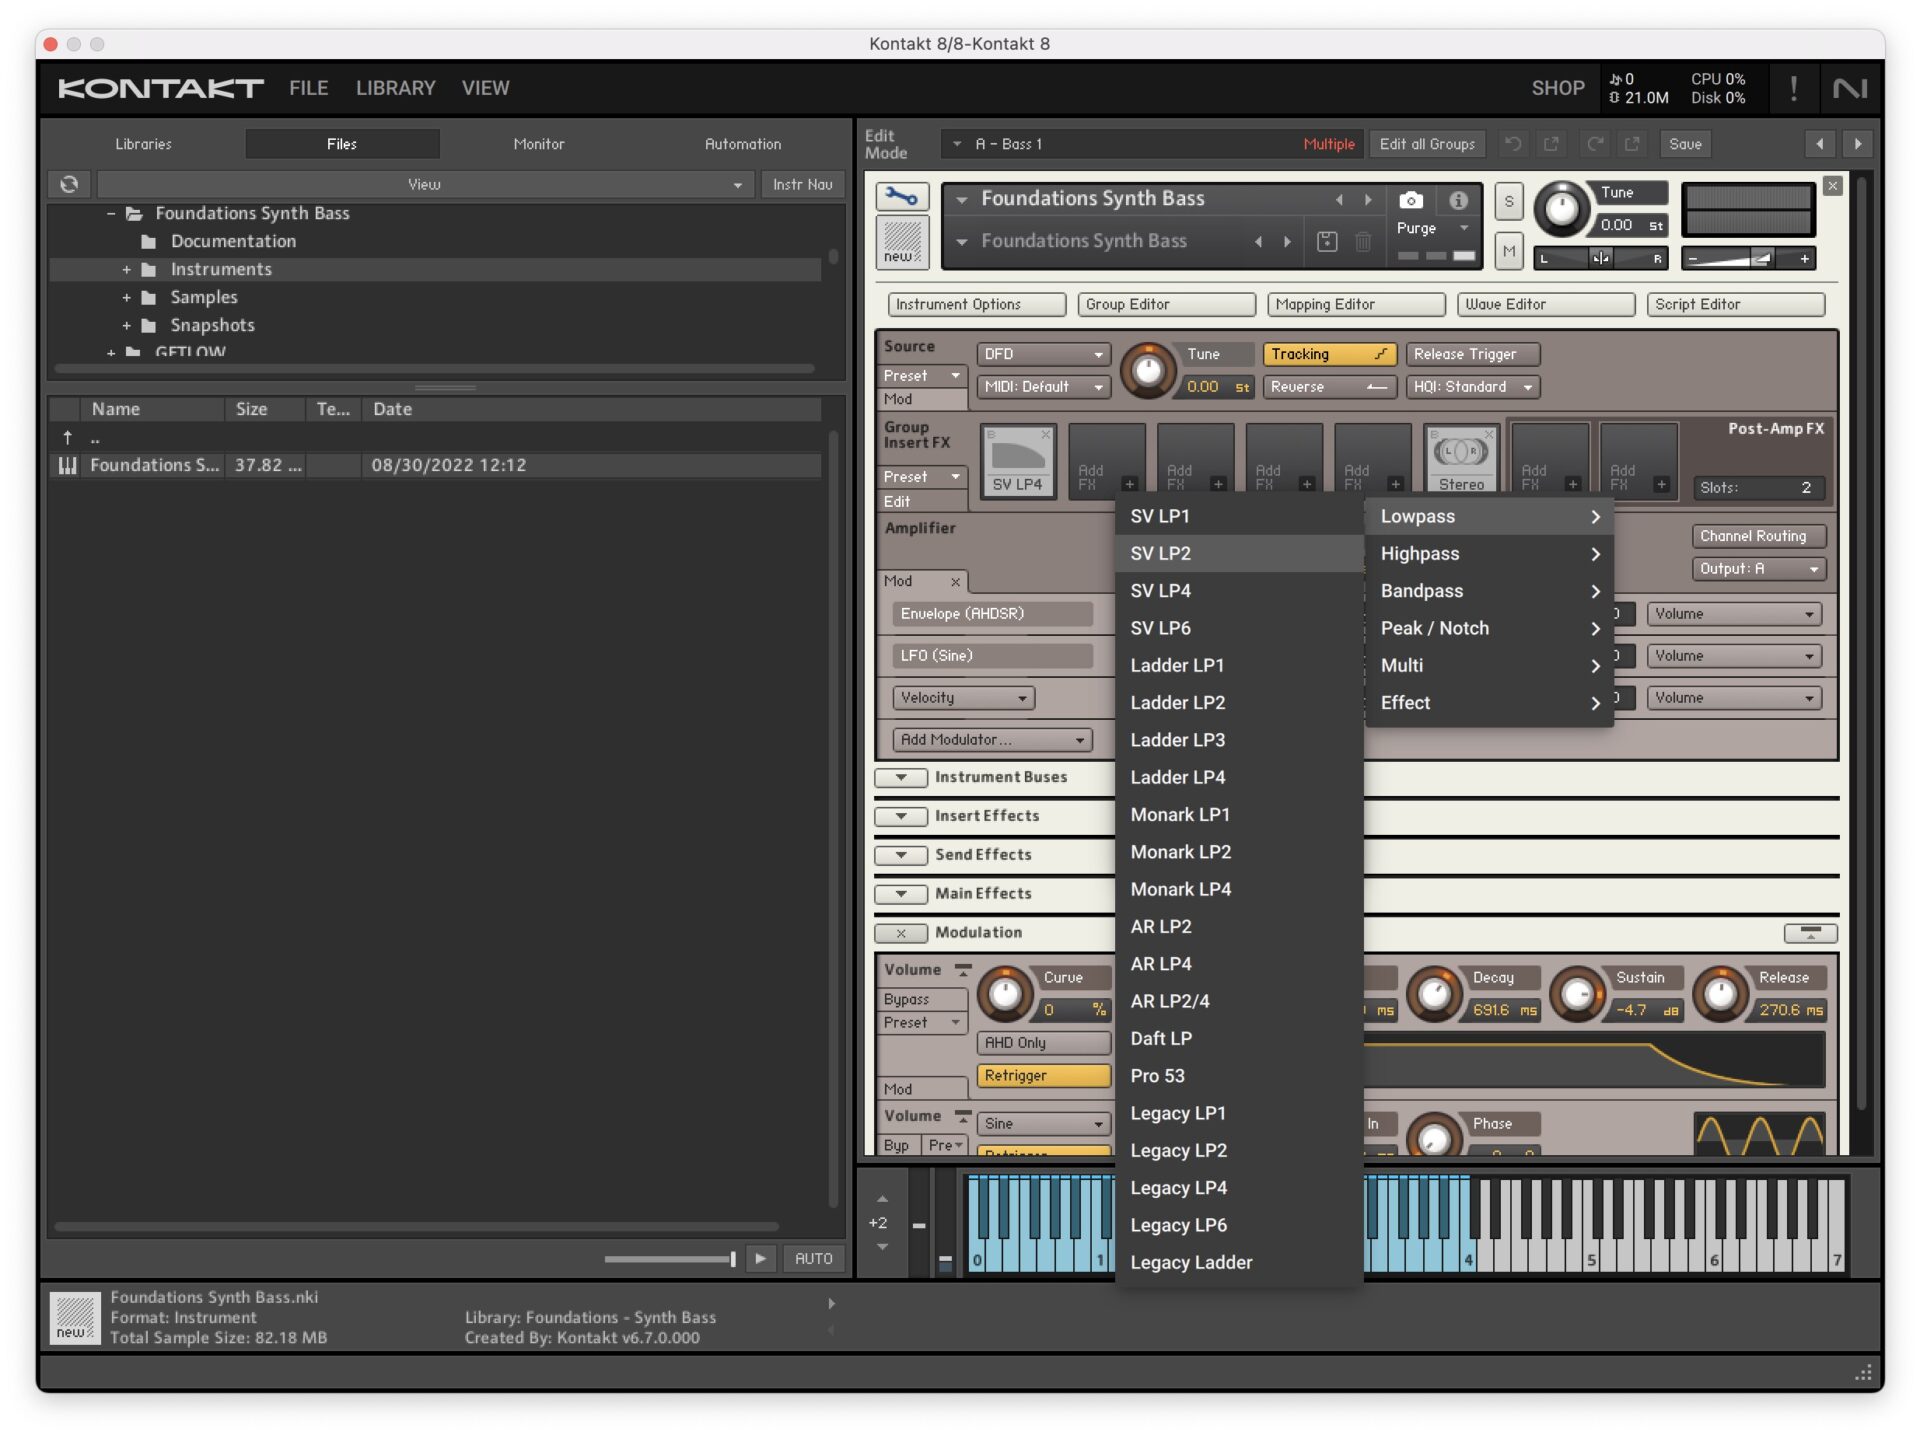
Add a filter. Open the Instrument Edit Mode by clicking the “wrench” icon in Kontakt Player. In the Group Insert FX section, click “Add FX” and select a Low Pass Filter like the SV LP2 Filter.
Add an LFO. In the Mod Section, click “Add Modulator,” and under LFOs, choose Sine.
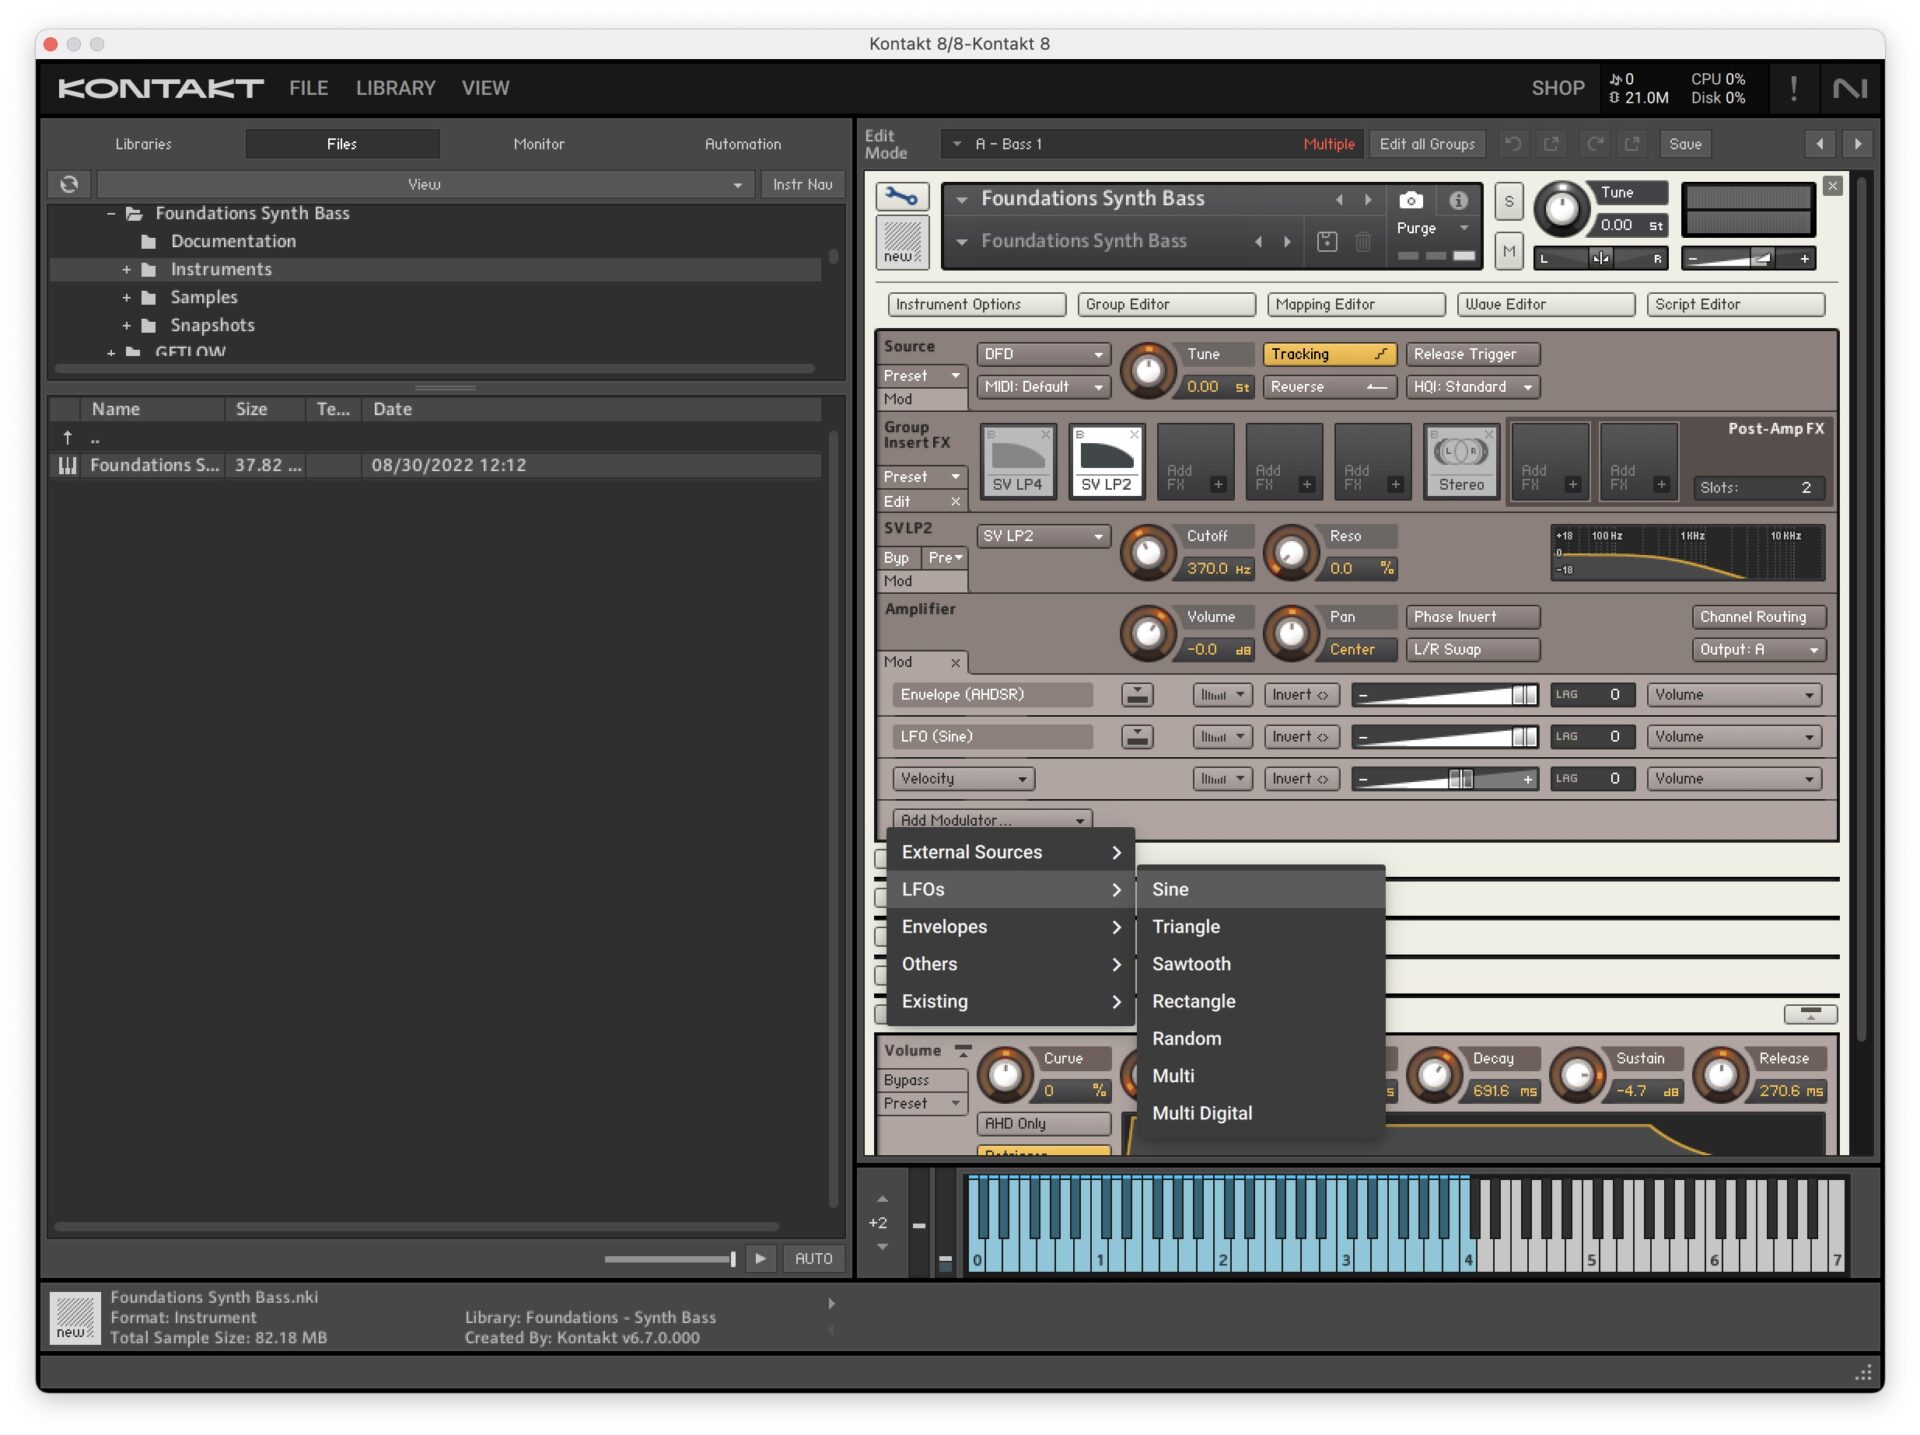
Scroll down to the Modulation section at the bottom and open it by clicking the downwards arrow. The frequency adjusts the frequency of the LFO’s output signal in Hz. Turn the Freq knob to hear how it affects the LFO’s signal. The speed of the LFO can be synched to your DAW’s host tempo if you click on Hz. Play around and find the right amount of LFO modulation for your bass sound.

It’s worth noting that the Filter Cutoff of the Foundations Bass Synth is routed to CC #01, which is assigned to the Modulation Wheel on a MIDI controller. If you have a MIDI controller, play around with the Modulation Wheel to hear how it affects the bass sound.

Continue to configure the LFO by making adjustments in the modulation section. You can adjust the ADSR (Attack, Decay, Sustain and Release) of the Filter, as well as the Fade In.

The overall modulation amount of the LFO on the sound can be adjusted in the Mod section (located above the Modulation section) There’s a horizontal fader next to the LFO assignment. Try reversing the modulation direction by clicking the ‘invert’ button next to the fader.
3. Effects chains
Effect chains are a powerful way to create unique sounds by layering multiple plugins together. With free plugins from Komplete Start, you can build custom chains to achieve specific results, like a simple delay effect chain for synth lines.
Here’s a few sound design tips for a simple delay effect chain you can use on synth lines.
Start out with a synth audio sample, or create a simple synth MIDI pattern that repeats. To create your own synth pattern, load up Komplete Player onto a MIDI track, and choose a synth sound from a Kontakt library like Factory Selection 2, or Analog Dreams, which are both included with Komplete Start.
The example below, an analog synth sample is the type of sound that’s used.

Create the delay chain by beginning with Replika, a free delay plugin included with Komplete Start. Keep Replika on the INIT patch. Create a longer delay by setting the delay time to ⅛, and set the feedback to 39%. This long delay will add a lot of vibe to your audio.

Continue to build out the effects chain by adding Raum, a free creative reverb plugin. Create a relatively dry reverb sound by setting the Pre Delay to 0.23 ms, decay to 1.2 seconds and Mix to 20%. Set the tone to Airy (or if you prefer, you could use Grounded).

Here’s an additional effect to try adding to the chain. To give the sound a different character, try varying the effect chain by adding Guitar Rig 7 Player at the beginning, before Replika or Raum. In this example, try adding Chorus or a Modulated effect before the delay and reverb plugins to break up the sound a bit. On the left hand side of Guitar Rig 7, in the FX Type choose Modulation and then Chorus. There are two Chorus presets that I found worked well with Replika and Raum; the first is Underwater and the second is Dream Lounge.

Turn off the reverb inside either of these presets, as Raum is already in the effect chain.

The creative options for effects chains are really endless. If you’d like to go in a slightly different direction and make your sound a little more vintage sounding, turn off or remove Guitar Rig 7 Pro, and add Vinyl, a free low-fi plugin after Replika and Raum. In Vinyl, select the era of your choice (each decade has a slightly different sound) and turn down the dust so the additional noise added is more subtle. For the synth sound used in the examples, the 1960’s preset worked well with the dust turned down to about 23%.

Experiment with the order of effects in effect chains. It’s a good idea to have a goal in mind when you’re layering effects, and not to add too many effects. Each effect you add should have a distinct purpose for manipulating the sound in a certain way. You can save the effect chain by highlighting all of the effects, and grouping them together in your DAW. In Ableton, these effect chains can be saved in the User Library, so you can quickly recall them for future projects.
Start designing your sounds with Komplete Start
Now that you’ve learned these sound design tips using free Kontakt instruments, and free sound design plugins, it’s time to get started putting these techniques into practice! Download a copy of Kontakt Player and download free Kontakt libraries.
After following our tips, you’ll be able to design a few unique sounds that can be used in your productions to make your sounds stand out with movement and rich sounding tones. Best of all, there’s no cost to trying any of these tips out, as Kontakt Player, and all of the tools mentioned in this blog are free!
Related articles
-
An update from Nick Williams, CEO of Native Instruments
I want to share a direct update on the restructuring process underway here at Native Instruments. Business continues as usual…
-

NI producer spotlight: Women’s History Month 2026
Discover more than 30 women and nonbinary producers – including WondaGurl, Arca, and Tems – who are defining the modern…
-
Learn how Andre Samuel and Daylight kept Mon Rovîa’s Bloodline sounding natural and clean
Learn how production duo Daylight and Andre Samuel used iZotope RX and Native Instruments tools to capture the organic soul…
-

5 of the best vocal plugins for modern music production
Unlock the power of the human voice. Explore five distinct vocal plugins designed to bring emotion and character to every…
-
Speed, melody, and instinct: Will Bates on composing for streaming with Kontakt
Will Bates explains how Noire and Kontakt helped him score 'The Better Sister' with speed, emotion, and precision for Prime…
-

Best drum synths for electronic music
Discover the best drum synth VST plugins for electronic music. From professional sound design in Massive X to creative layering…
-
Richie Hawtin: deconstructing the dancefloor with Traktor
Go behind the scenes with Richie Hawtin to see how he uses Traktor, analog mixing, and live sequencing to create…
-

How Nova Wolf finds humanity in loudness with Ozone
Nova Wolf explains how iZotope Ozone helped him master Nomad Tapes: Africa with warmth, emotion, and cohesion, balancing intensity with…