French house is a well known genre that gained popularity in the 1990s and early 2000s that utilizes disco, funk and vocal samples, adding drum grooves and creatively processing these elements. Studio techniques like flanging, phasing, applying chorus and editing allowed producers to create full tracks from short loops.
Known for its upbeat rhythms, French house has left a significant impact on the electronic music scene.
In this tutorial, you’ll learn how to make French house using samples from Expansions, instruments and sounds from Komplete, effects plugins from Native Instruments, and iZotope Ozone 11.
Jump to these sections:
Follow along with this tutorial using Komplete, a go-to music production suite for producers, composers, and sound designers, loaded with every tool you could ever need.
What is French house music?
French house music is a subgenre of house music that emerged in France during the 1990s, characterized by its use of filtered disco samples, catchy melodies, and a distinctive, polished production style.
French house producers typically base their productions around one main sample.
Notable French house artists include Daft Punk, Fred Falke, Alan Braxe, Modjo, Louis La Roche and many others.
Today, French house music continues to evolve, blending its classic disco and funk influences with modern electronic elements and production techniques.
Contemporary French house artists, such as DJ Snake, Tchami, and Malaa, incorporate a wider range of genres like future house and bass house, maintaining the genre’s vibrant essence.
How to make a funky French house track
1. Find a sample
Start your track by finding a disco or funk audio sample that you can use as the main loop for your French house track. If you’d like to make funk-influenced French house music, Amplified Funk, Midnight Sunset, or one of the Funk and Soul Expansions are good places to start looking for a sample.
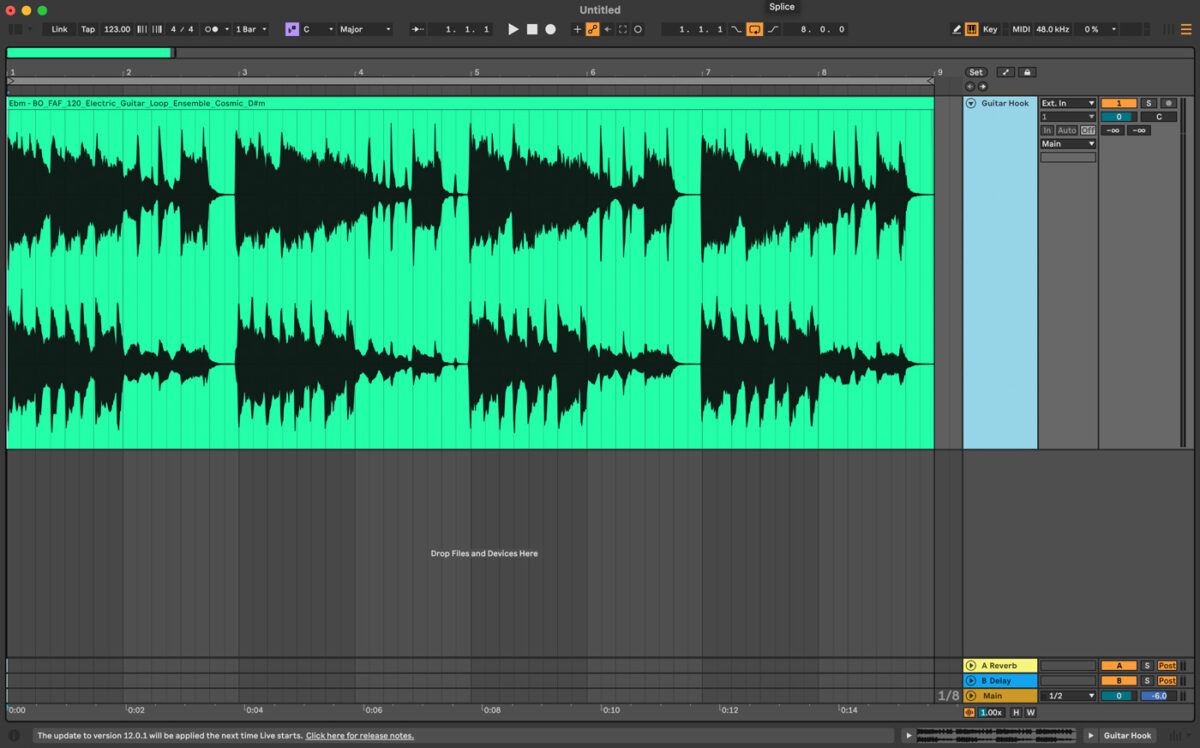
If you use Native Instruments Expansions, look through the construction loops for a two to four-bar sample. Once you’ve found a sample to work with, load it up on an audio track in your DAW. It may help to find out the key of your sample; many samples include the key in the sample name.
2. Add a kick
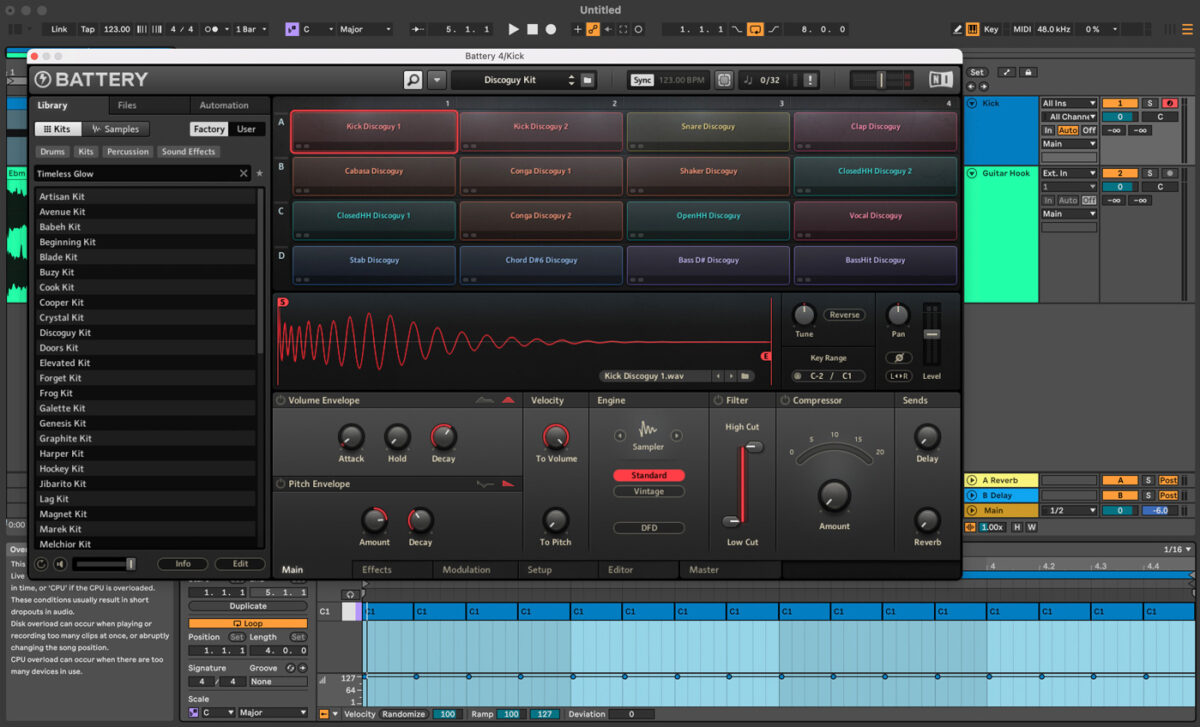
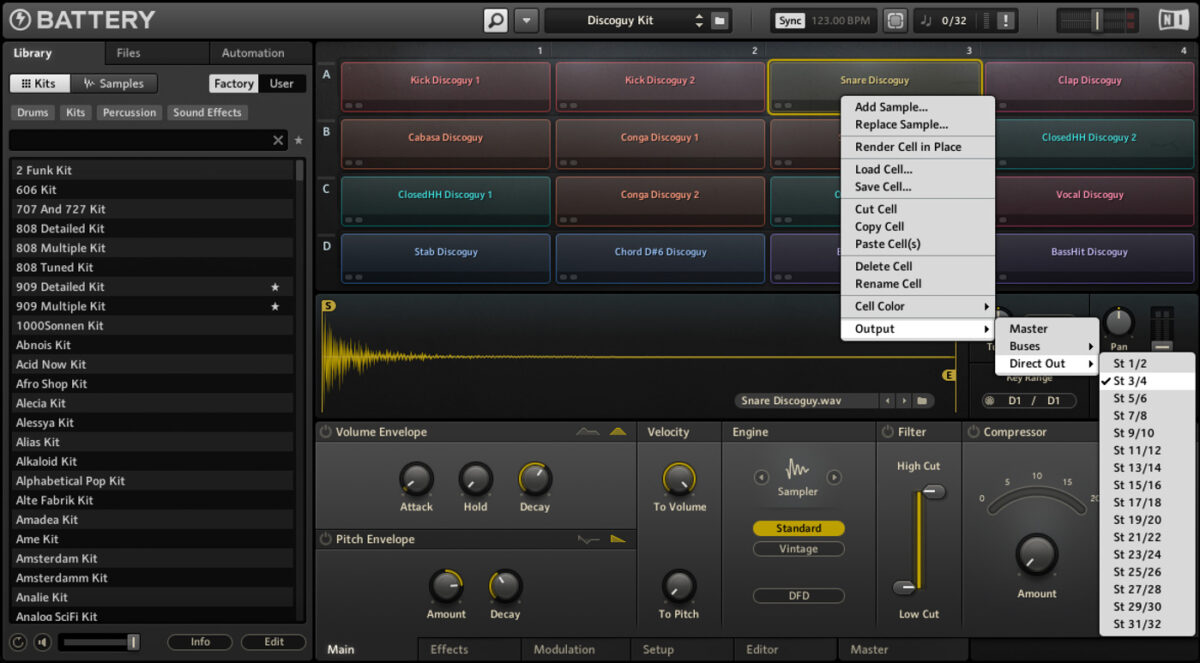
Create a new MIDI track and add Battery 4 to it. We’ll be using the Timeless Glow Expansion to create the drums. Navigate to the ‘Kits’ tab and type in Timeless Glow. All of the kits from this Expansion will be listed. Select the Discoguy drum kit. Create a blank four-bar MIDI pattern and program in a Kick Drum on MIDI Note C#1 on every beat. (1, 1.2, 1.3, 1.4, etc)
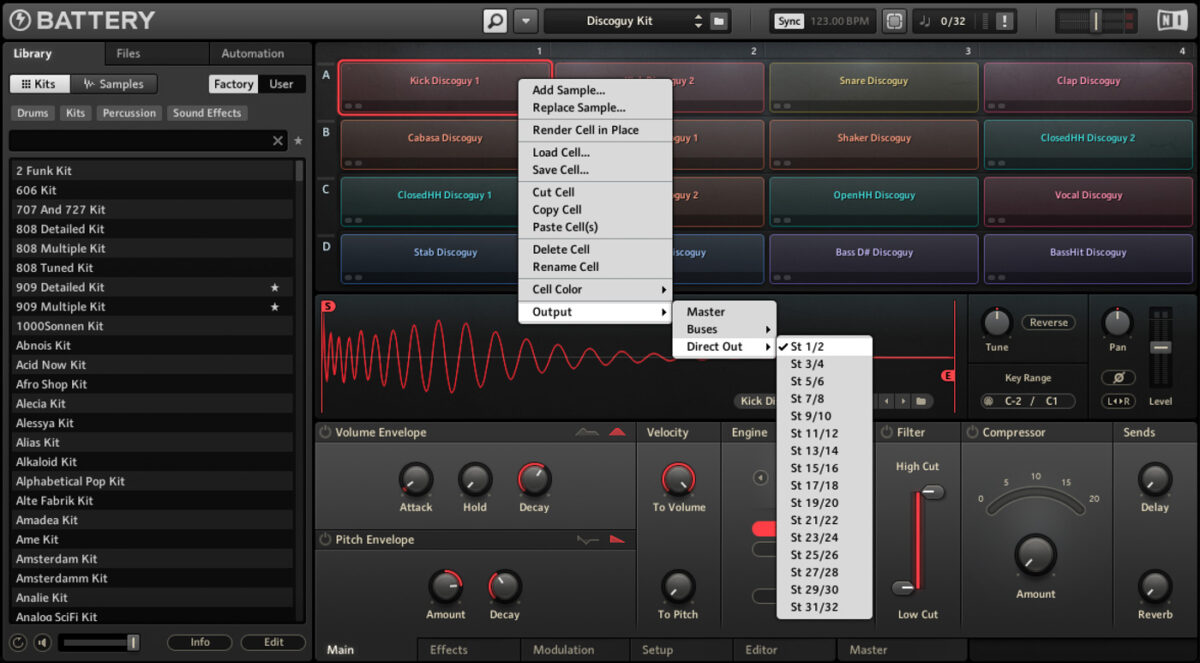
Instead of loading multiple instances of Battery 4, use Battery’s ability to route the drum samples to different audio channels. This will allow you to process and mix each drum sound individually. Right-click on the Kick Drum and select Output > Direct Out > Stereo 1 / 2. Right-click on the Snare and select Output > Direct Out > Stereo 3 / 4. Repeat the same steps, and assign the Clap to Stereo 5 / 6 and the Closed Hi-Hat 1 Discoguy 1 to Stereo 7 / 8.
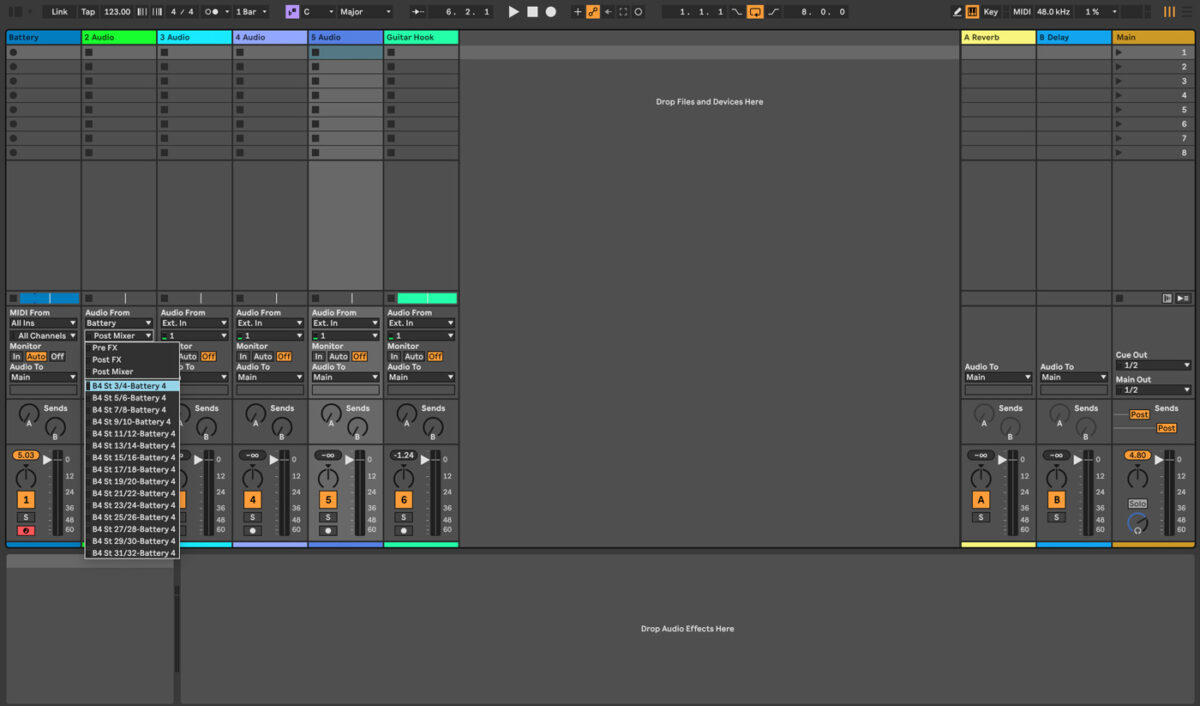
Create four audio tracks. In Ableton Live (or whichever DAW you’re using), switch to the session view. On the first new audio track (audio track 2), select audio from Battery. In the second dropdown, select Stereo 3 / 4 and set the Monitor to In. Repeat the same steps to assign audio track 3 to Battery St 5 / 6 and audio track 4 to Stereo 7 / 8.
3. Add a snare and clap
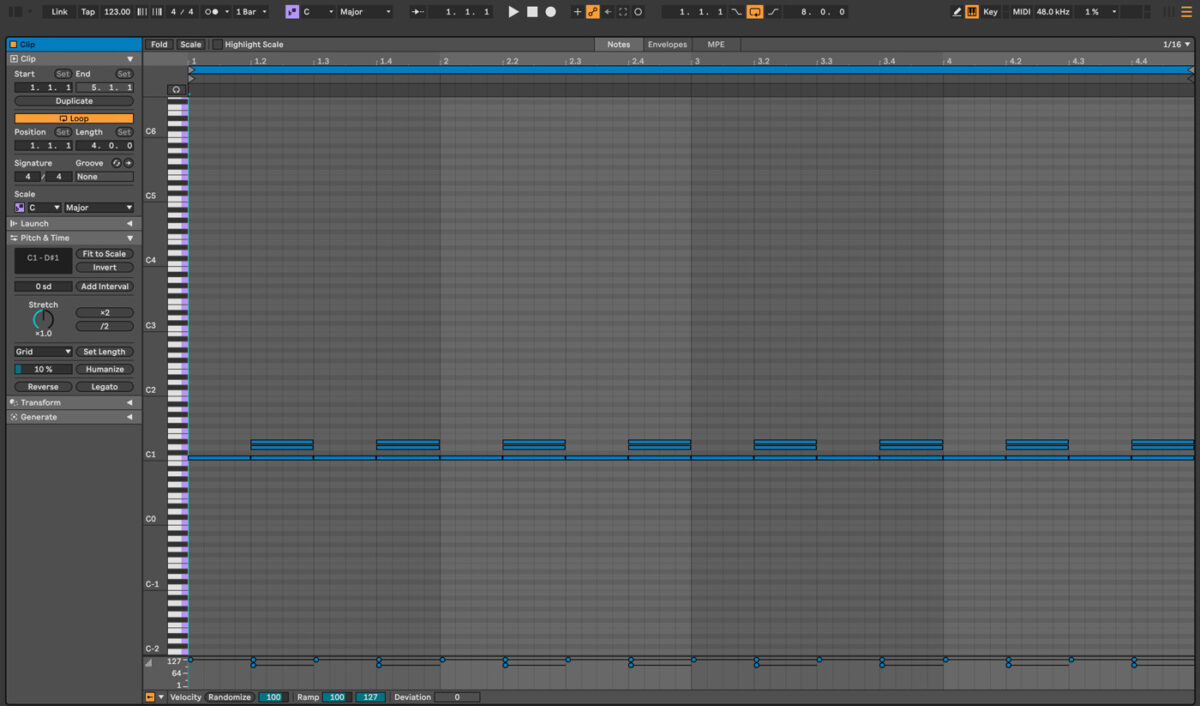
On the same MIDI track in Ableton, program a snare on the offbeats (beats 1.2, 1.4, 2.2, 2.4, etc) on MIDI note D1. Program in a clap using the same rhythm as the snare on MIDI note D#1.
4. Program a closed hi-hat
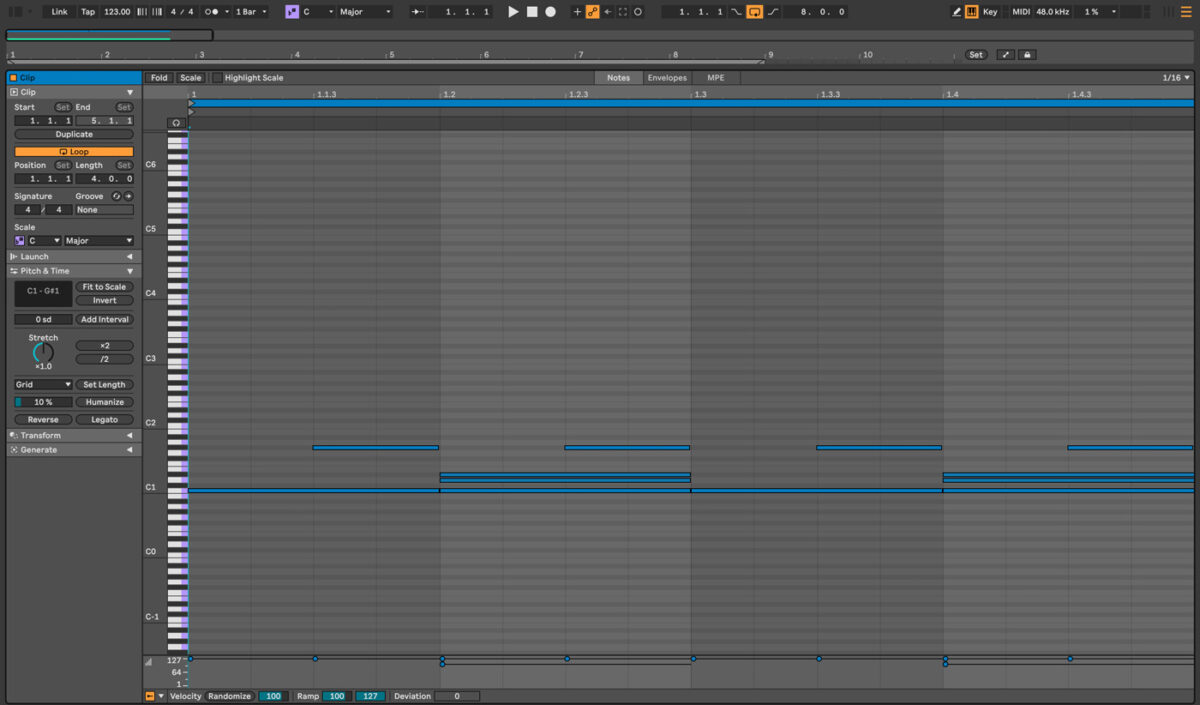
Add a closed hi-hat by using closed HH Discoguy 1. Add MIDI note G#1 to the MIDI pattern on beats 1.1.3, 1.2.3, 1.3.3, and 1.4.3 and continue this pattern for four bars. To give the hi-hats some swing, highlight all of the G#1 MIDI notes and drag them slightly forward off the grid. This adds a human feel to the hi-hat pattern.
5. Add a top loop
Add a top loop to the track by using the Construction or Percussion loops in the Expansions. Try to find a loop that’s mainly percussion, as we’ve already added a kick drum to the rhythm.
6. Process the snare
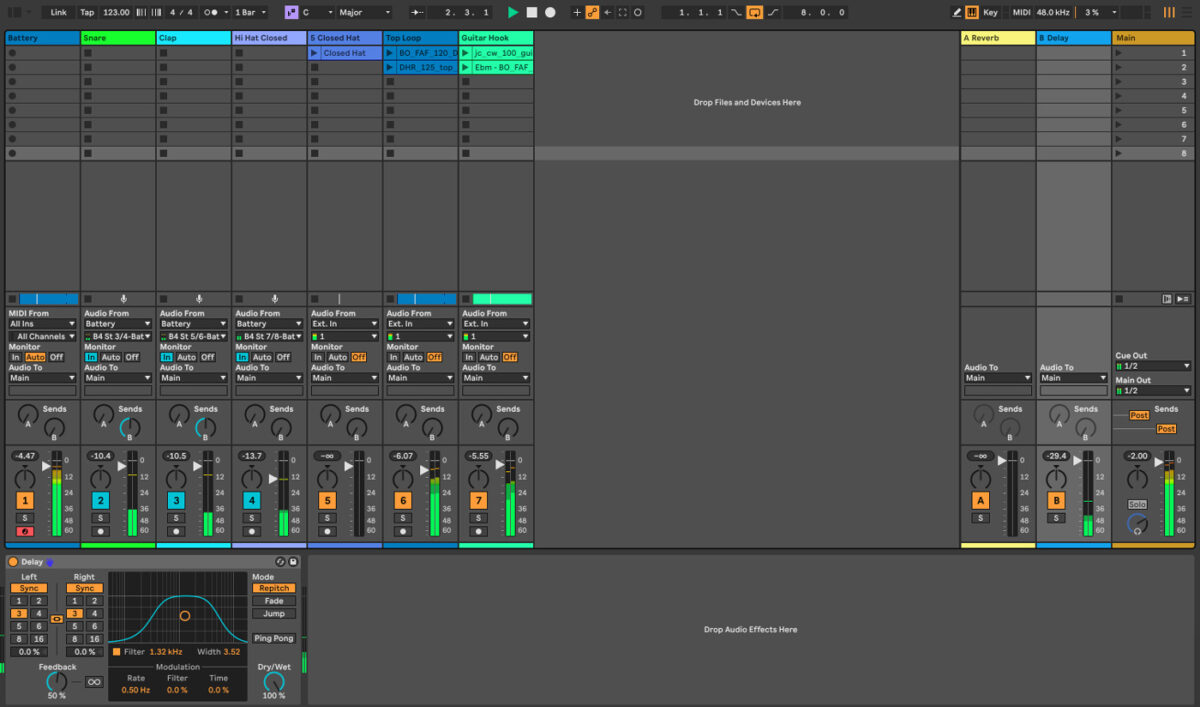
Use the Return Track in your DAW and add Delay to it. You could use a delay like Replika or the delay in your DAW. Send the snare and clap to the delay using the Send Bus, and set the dry/wet on the delay to 100%. Play around the settings in the delay until the snare and clap are sitting well with the loop.
7. Add a bassline
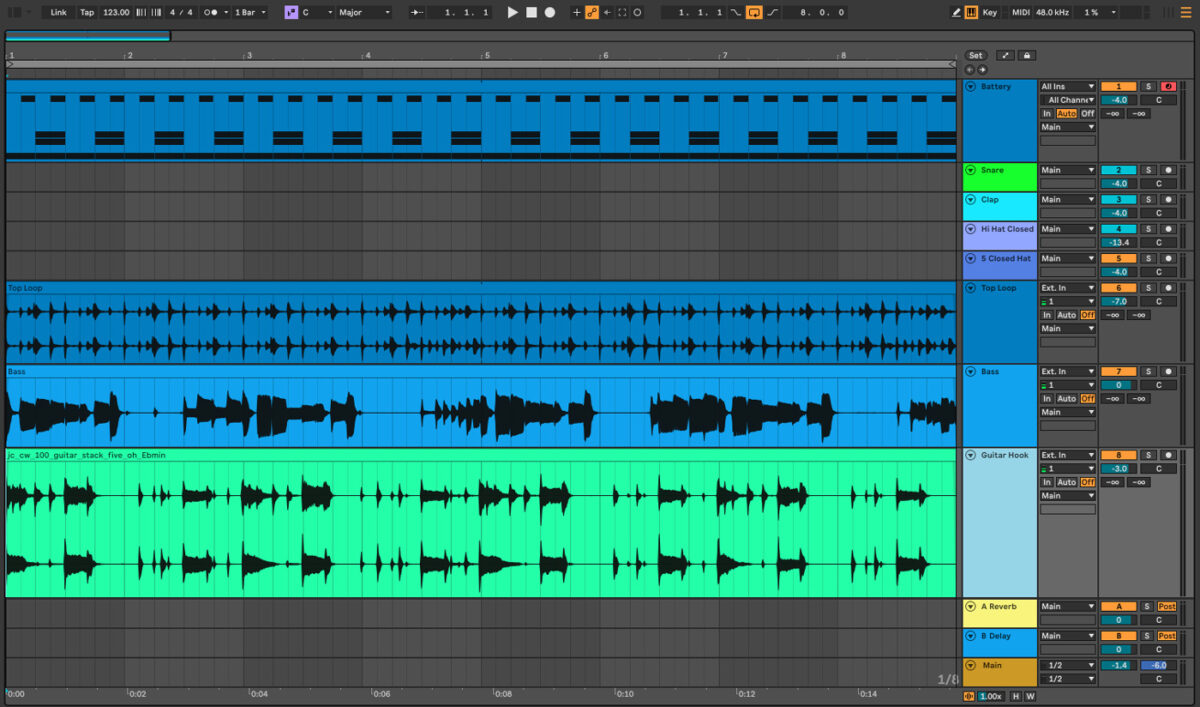
Add a bassline to your track, either by using a sample in the same key as your main hook or creating your own bassline using MIDI. If you used a sample from one of the Expansions for your main hook, you can create a MIDI pattern and write a bassline that suits the style of this sample. You may be able to find a bassline in the same key using the Battery Kits in the Expansions; there are a few good sounding bass samples in the Timeless Glow Expansion.
8. Make a short arrangement
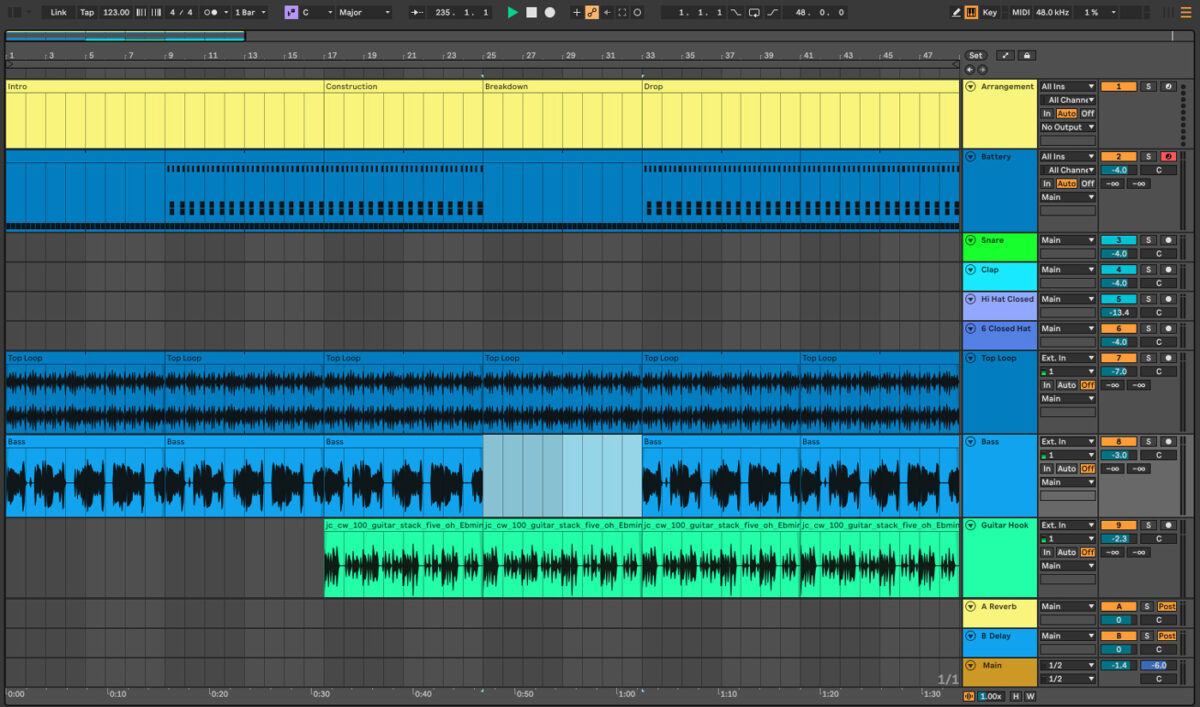
Make a simple arrangement by creating a sixteen-bar loop of the elements in your track. The first section will be the intro. For the first eight bars, mute the snare, clap, closed hi-hat and the main hook. Only the kick, top loop, and bass should play.
For bars 9 – 17, try adding the snare, clap, and closed hi-hat. Let’s refer to the next eight bars (17–25) as the construction section. During this section, bring in all the parts. Bars 25–33 will be the breakdown, so cut this part down to the kick, top loop, and the main hook. Bars 33–49 will be the drop, and you’ll want to have all of your tracks playing in this section.
Label the sections of your track by creating a new MIDI track with blank MIDI files that are eight or sixteen bars in length and name each section accordingly.
9. Process the main hook
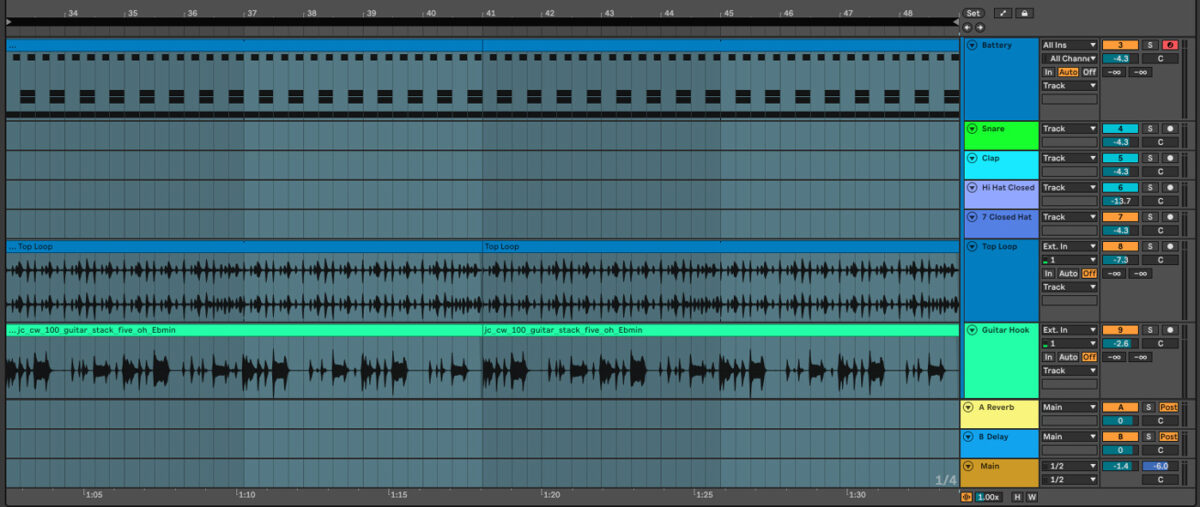
Give the main hook a phased out sound by adding Phasis from the Mod Pack Effects Series. Experiment with the presets, and select the one that sounds good with the hook of your French House music track. Add an EQ and cut the low end below 300 Hz.
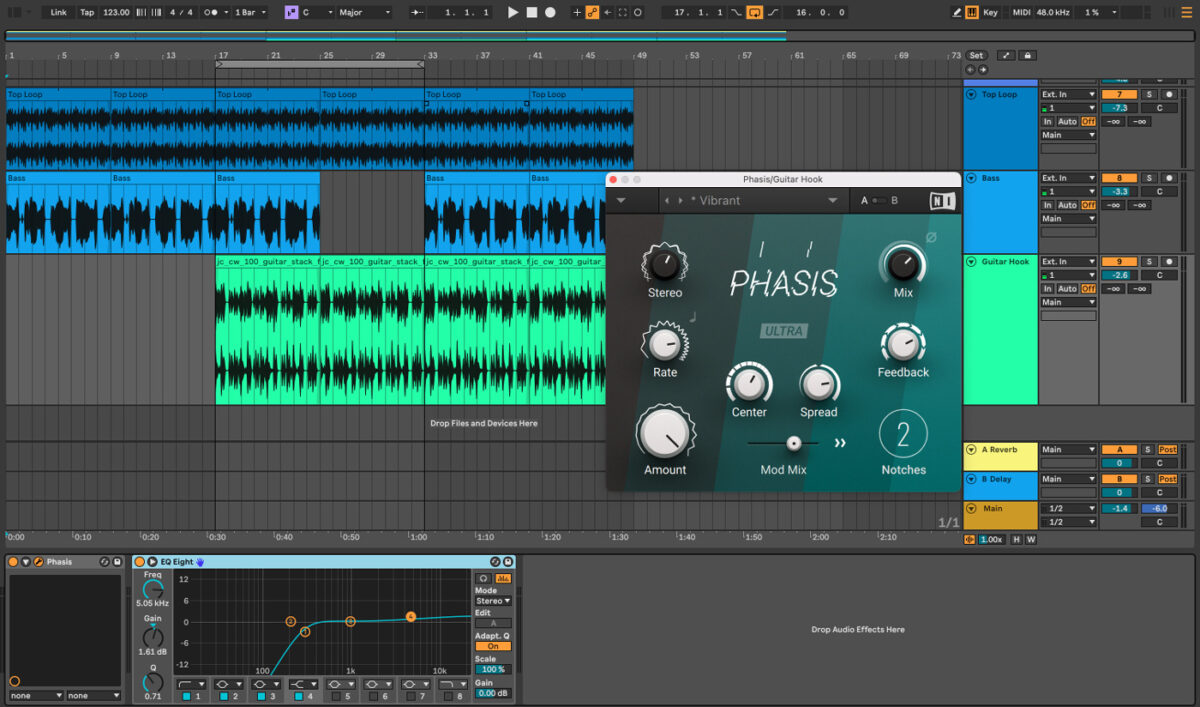
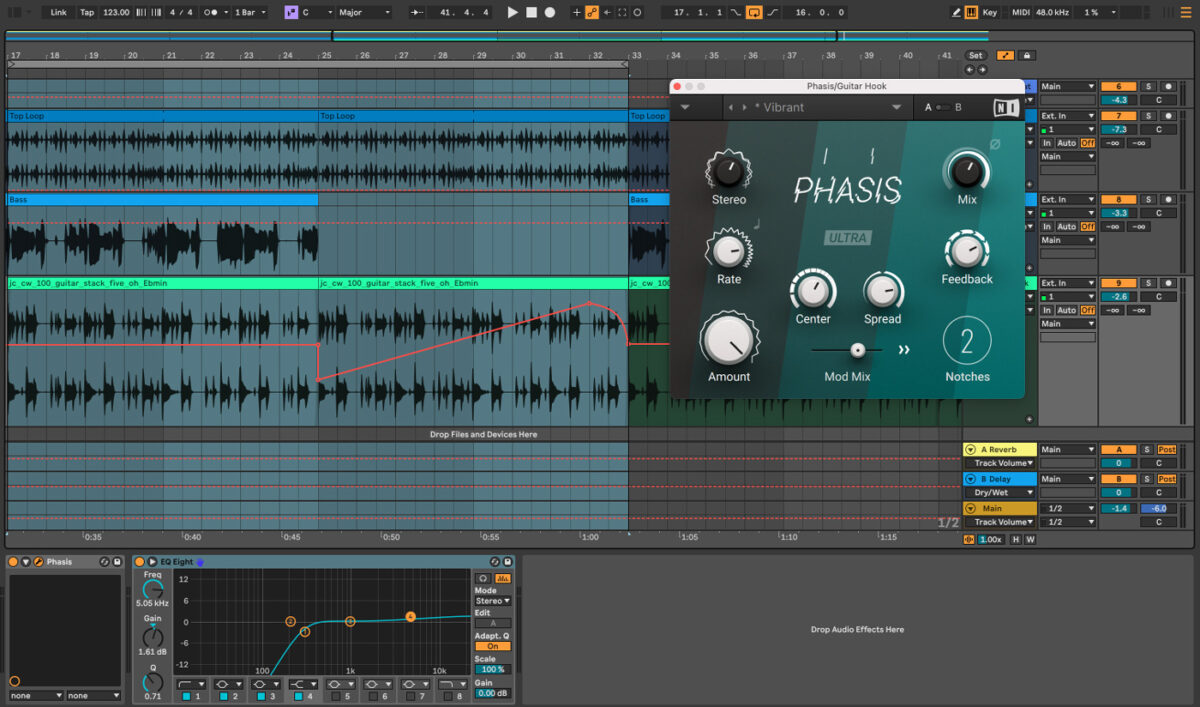
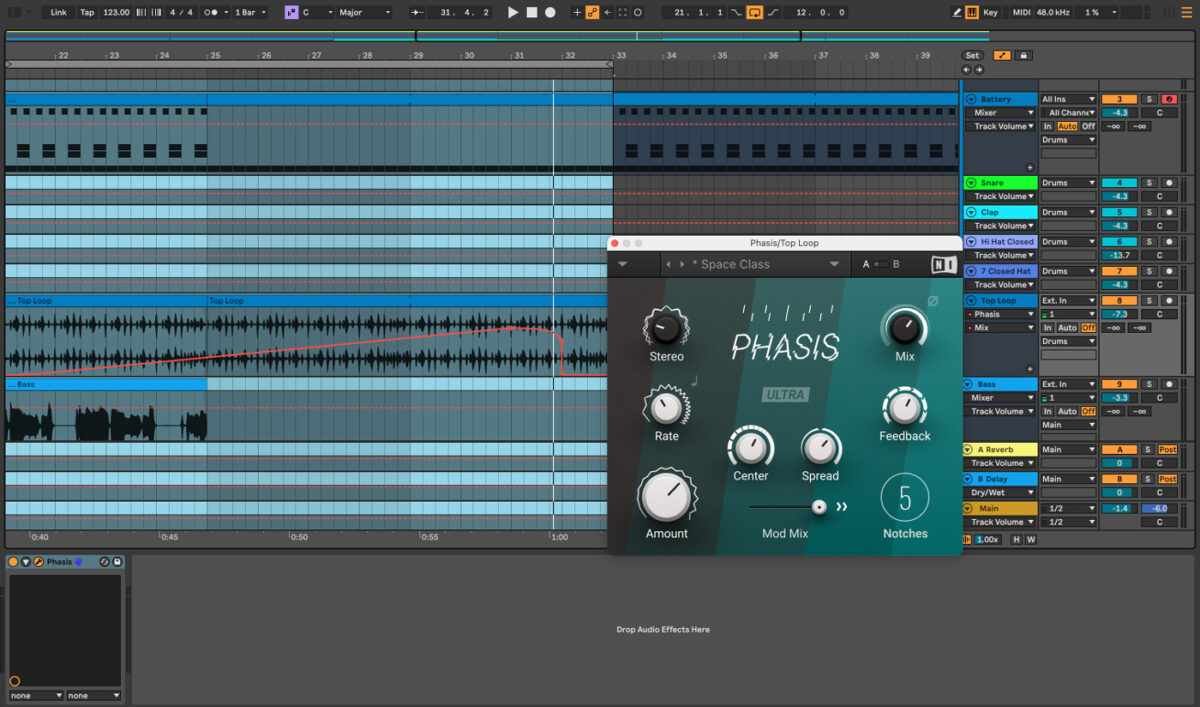
Automate the mix on Phasis by enabling Automation mode (View/Automation Mode in Ableton, or press the button on the top right). During the breakdown, automate the mix in Phasis by setting the mix to a low value and raising it up during the breakdown.
Experiment and try automating Phasis on the top loop for an additional creative touch. You can also add additional creative effects like a sidechain compressor to the main hook or top loop, or both.
10. Filter the track
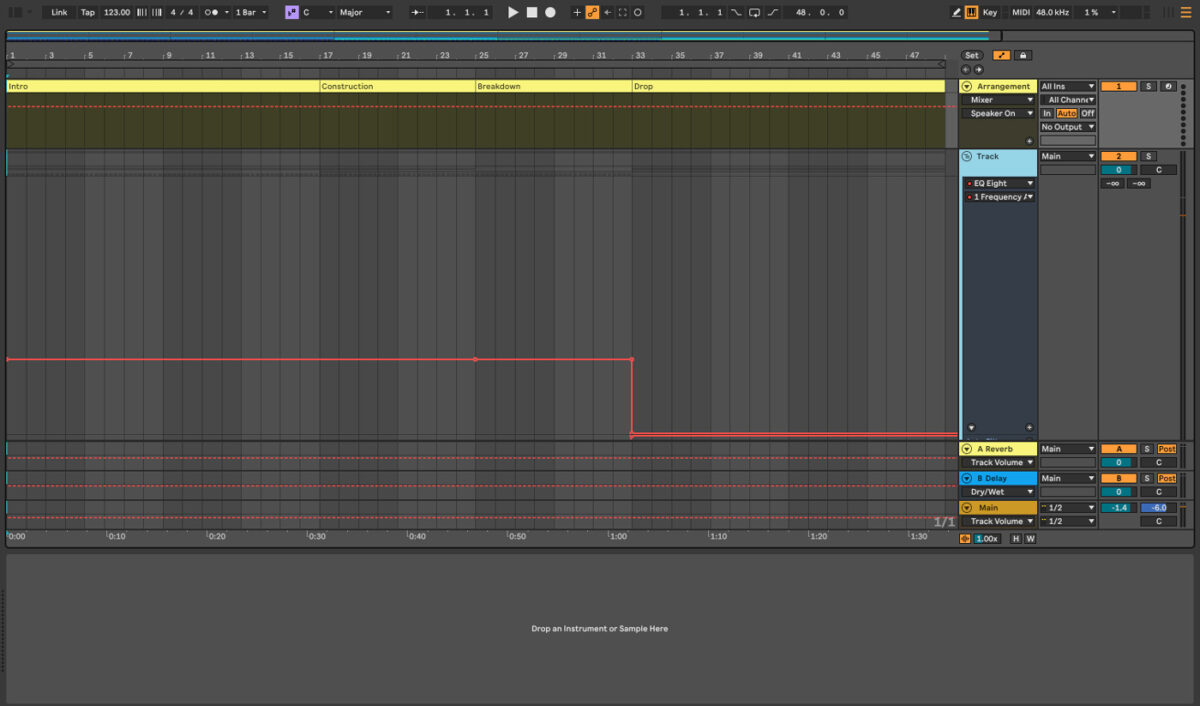
Group all of the tracks together and add a filter. Automate the filter to give your track the filtered French House music sound. Turn on the Automation Mode, and set the filter’s frequency to around 75 Hz to start off.
Gradually bring up the frequency and during the breakdown, set it to a constant level around 5 or 6 kHz. When the drop hits, set the filter’s frequency to 19.9 kHz or turn the filter off.
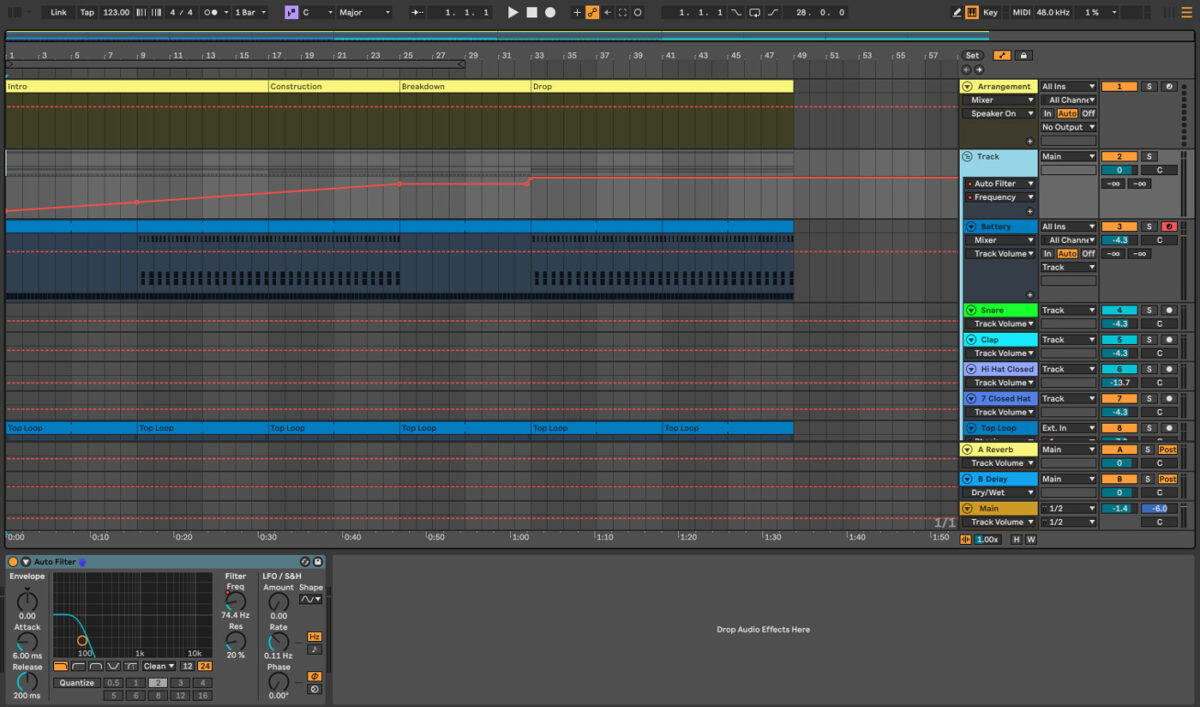
Take the automation one step further by automating an EQ. Add an EQ to the track group, and set a high-pass filter on the EQ to around 90 or 100 Hz to begin the track. During the drop section of the track, turn the EQ off (or bring the automation down to zero) so the drop hits harder.
11. Master your French house track
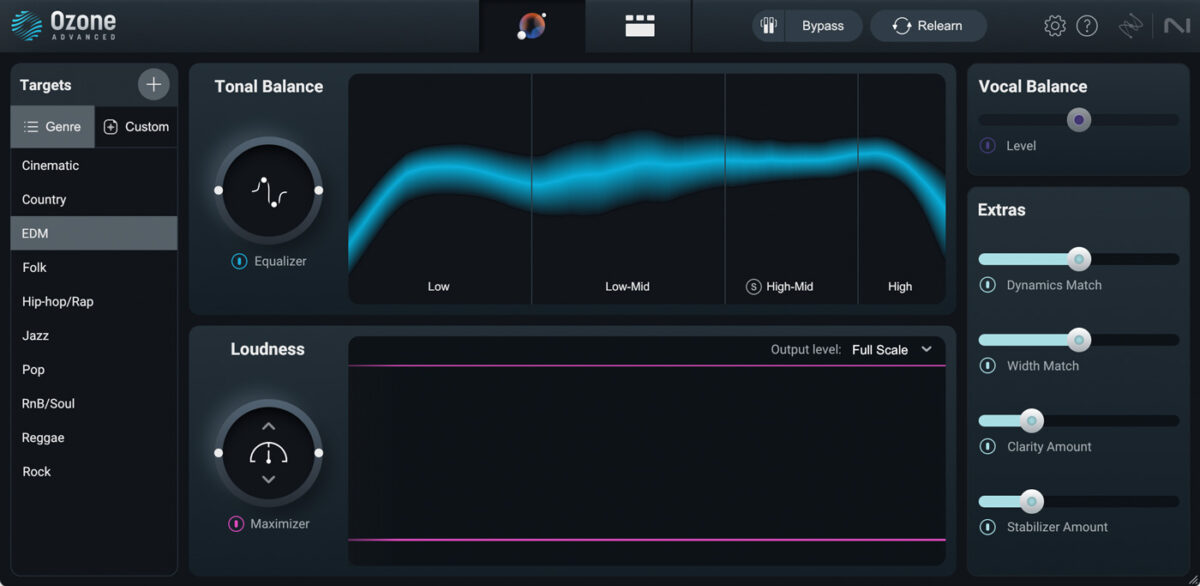
When it’s time for mastering, you can create a master using Ozone 11. Add Ozone 11 to your master track and press the Master Assistant button. Play your audio, and Ozone will begin its analysis and master your track. Once it’s finished, you’ll see a new Assistant View interface with powerful high-level controls that can be tweaked.
Start producing French house music
Now that you’ve learned how to produce French House music, it’s time to start producing your own funky, upbeat track! Start by checking out the Native Instruments Expansions; Amplified Funk, Midnight Sunset, or one of the Funk and Soul Expansions are all good places to find samples.
For drums, you’ll want to check out the house Expansions. Pick up a copy of Komplete and/or the Mod Pack, Ozone 11 and you’ll be set to create a French inspired production!
To learn more about producing electronic music, check out these guides on how to produce music, how to produce electronic music, how to produce house music and EDM.


