


Delay is a time-based audio effect that creates a repetition of the original sound. On the face of it, delay is simple: It’s the same sound, repeating. But this humble effect has had a profound influence on modern music. From the slapback of rock n’ roll to the cavernous sounds of dub and the artificial spaces of electronic music, delay has done more than almost any other effect to shape the sound of the music we love.
Using delay audio effect well in your own productions means understanding its power and versatility. So what is delay in music, exactly? In this article, we’ll answer this question in detail. We’ll explain the difference between delay and echo, and explore the different types of delay effect and common delay parameters. Then we’ll show you how to use delay effectively in your own productions.
Learn about delay in music:
- What is delay in music?
- What is the echo effect?
- Delay vs. echo
- Types of delay effects
- Delay parameters
- Tips for using delay
Follow along with this tutorial using REPLIKA XT.
What is delay in music?
Delay is a time-based audio effect that captures an incoming audio signal and plays it back after an allotted period of time. If the signal is delayed for more than about 30 ms, the listener will hear it as a distinct “echo” following the original (“dry”) sound. The delayed signal might repeat multiple times, typically reducing in loudness with each repeat. It might also have a different sonic character from the original signal, depending on the technology used to create the delay.
Delay has been a crucial effect in popular music and beyond since the 1950s. It can be used to add depth and dimensionality to a mix. It can also be put to more creative uses, from rhythmic “ping-pong” effects to abstract sound design. Particular delay techniques and technologies have been central to genres such as dub and ambient, and delay continues to be a central effect in modern music production.
Hear what a digital delay sounds like.
What is the echo effect?
Delay often mimics a phenomenon heard in nature known as echo. Sound in the real world bounces off objects and surfaces before it reaches our ears. When these reflections are numerous, short, and chaotic, we hear them as reverb. But if a sound bounces off a single distant surface and returns to our ears more than about 30 ms later, we will hear this reflection as a distinct repeat of the original sound: an echo. Just think of clapping your hands next to a cliff face or canyon wall.
Delay vs. echo
Understanding what echo is helps us clear up a common confusion. The terms delay and echo are often used interchangeably, but as we can see, they refer to different things. Echo is an acoustic phenomenon occurring in real life. Delay is an audio processing effect which can sometimes imitate an echo—typically when it uses a delay time of more than about 30 ms. But a delay can do many other things too, from adding space to a mix through to sculpting out-of-this-world sounds.
Types of delay effects
Since they were first used in music in the 1950s, delay effects have taken numerous forms. Each advance in music technology has brought new delay effects—whether tape machines, rack units, pedals, or software plug-ins – with their own flavors and limitations. Modern delay plug-ins often mimic these various delay types, giving producers a world of delays to choose from. Picking your delay type is the first step towards creating effective delay.
Let’s take a look at the main delay types, as featured in REPLIKA XT. This powerful, creative delay plug-in offers five different delay types, alongside a wealth of inspiring controls for creative use of delay.
Tape delay
The earliest delay effects used magnetic tape to record and play back the incoming signal. Units such as the Copicat (launched in 1958) and Echoplex (1959) offered low-tech but highly characterful delay effects. The tape used in these machines deteriorates over time, leading to a lo-fi sound that can be very pleasing to the ear. Mechanical imperfections in the tape machine, meanwhile, can lead to other distortion effects such as flutter and wow.
Modern delay plug-ins such as the REPLIKA XT emulate these imperfections. In this example, you can hear the warped, fuzzy sound of very old tape.
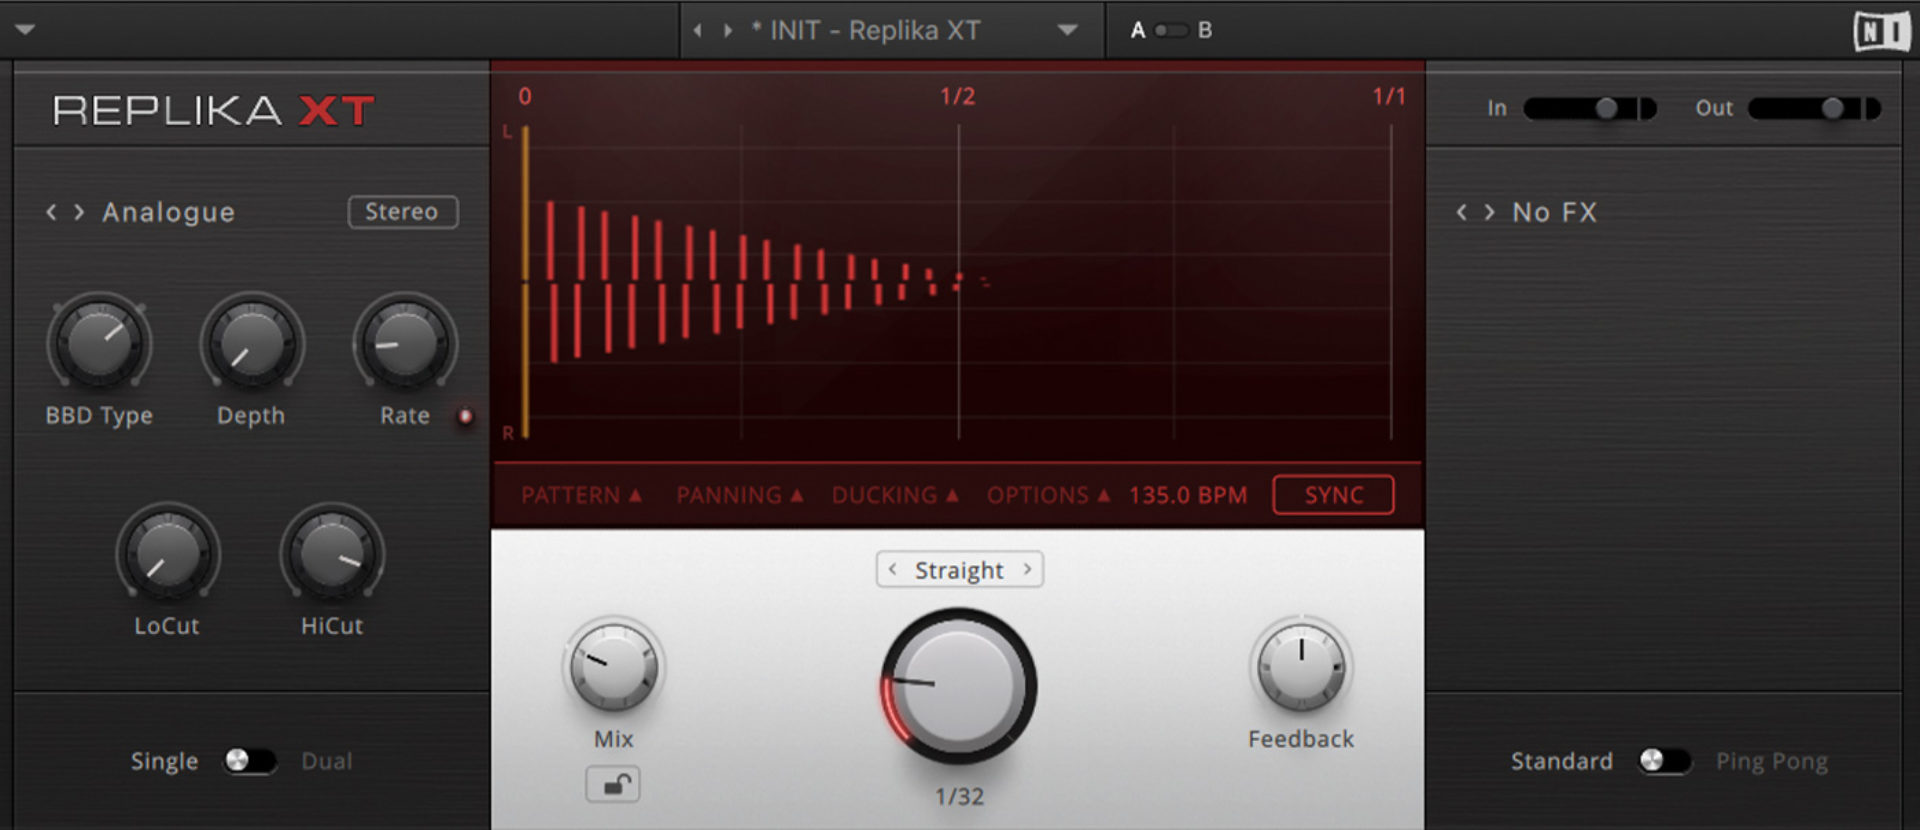
Analog delay
Though the technology was refined through the ‘60s and ‘70s, tape delay units remained bulky and inconvenient. Arriving in the 1970s, analog delays offered a less complicated way of creating delay. These typically use Bucket Brigade Delay (BBD) technology to capture and play back the incoming signal through solid-state components. The resultant sound is mellow and fuzzy, but with a more consistent fidelity than that of tape delays.
In the example, REPLIKA XT is set to BBD mode “Warm.”
Digital delay
Digital delays first emerged in the late 1970s and soon became the dominant delay technology. They work by sampling the incoming signal in the digital domain, storing it in a buffer and repeating it after an allotted time. Digital delays offer the most flexibility and reliability—and the highest fidelity—of any delay technology.
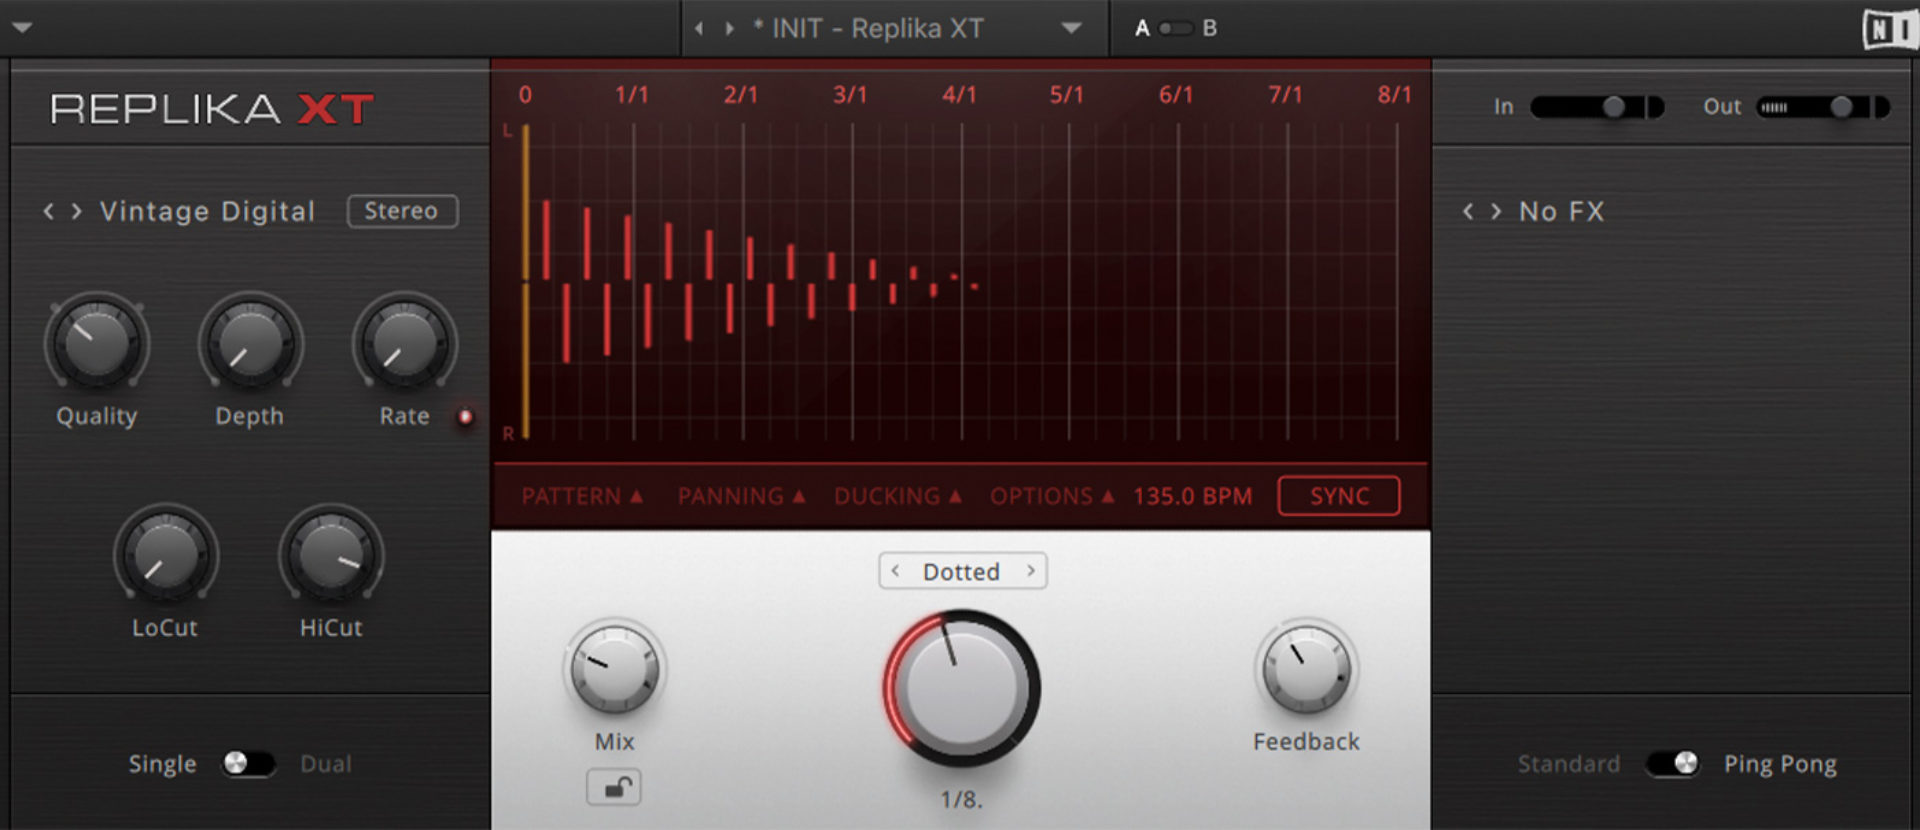
As digital delays developed through the ‘80s and ‘90s, each unit had its own character, shaped by processor power and other technical limitations. These days, modern delay plug-ins can produce complex delay effects with perfect fidelity. But perfection can sound a little dull sometimes. That’s why many modern delay plug-ins offer emulations of vintage digital delays.
In this example, you’ll hear a super clean, modern digital delay. But REPLIKA XT also offers a vintage digital mode, for when more personality is needed.
Diffusion delay
Delay and reverb are related effects: both create a sense of space by generating delayed repeats of an audio signal. Delay typically gives us a single, clear repeat of the signal, while reverb generates a complex cloud of reflections, mimicking the sound of audio waves bouncing around an interior space.
Alongside classic Tape, Analog and Digital modes, some modern digital delays such as REPLIKA XT offer a Diffusion delay mode. This mode blurs the boundaries between delay and reverb by applying a diffusion network to the delayed signal. This causes the delayed signal to fragment into numerous slightly different repeats—as if the signal is bouncing around a complex interior.
Use this intriguing mish-mash of delay and reverb to add some reverb-like space to your delay, or create complex atmospheric effects not possible using a conventional delay type.
Delay parameters
Picking a delay type is an important first step, but shaping your delay doesn’t stop there. It’s important to get to grips with the key parameters found in most modern delay plug-ins. Let’s take a look at them.
Delay time
Delay time sets the length of time it takes for the delayed signal to repeat. Very short delay times can add depth to a sound. With delay times longer than about 30 ms, the delayed signal will be heard as an echo distinct from the dry signal. Delays longer than a few hundred ms will start to have strong rhythmic qualities, and might be perceived as an independent sound.
In this example, you’ll hear the delay time change from longer durations to shorter ones.
Tempo/sync
Tempo/sync controls whether and how delay time is synchronized with the tempo of your track. With Sync turned on, you can set delay time to the length of a musical note, as dictated by the track’s tempo.
REPLIKA XT features three sync modes: Straight, Dotted, and Triplet. These offer different subdivisions of the global tempo. In Dotted mode, the notes last one and a half times the length of a “straight” note. In Triplet mode, beats are subdivided into three notes instead of the usual two.
Sync mode can be handy when working with longer delay times. But sometimes you just want to let your delay run free. Turning off sync allows you to control delay time in milliseconds, to create ultra short delays or off-the-grid rhythms.
This also allows for smooth changes of delay time. In the first half of this example, delay time is synced. Hear how, when the delay time changes, the delayed signal steps abruptly between two lengths. In the second half of the example, an unsynced delay (in ms mode) shifts smoothly between delay time values.
Feedback
Feedback controls how many times the delayed signal repeats. With delay feedback set to zero, the sound will repeat only once, creating a “slapback” effect. Higher feedback values will cause more repeats, until at 100% the delayed signal will repeat indefinitely. Lower feedback settings can be good for tight delays and controlled rhythmic effects. Higher feedback will give your delay a life of its own.
Some delay plug-ins allow you to turn feedback up beyond 100%. This will cause the delayed signal to get louder with each repeat—watch your ears (and maybe place a limiter at the end of your signal chain)!
In the example, you’ll hear a low feedback setting first, then a high one, with a medium-short delay time.
Low cut/high cut filter
Many delay plug-ins offer controls for low cut and high cut filters affecting the delayed signal. Turning up the low cut control means lower frequencies will be removed from the delayed signal, while turning up high cut will remove higher frequencies, creating a muffling or dampening effect.
Why is this important? Adding delay to an instrument doesn’t just color its sound, as with EQ or saturation. By creating repeats of the signal, a delay effectively adds a whole new signal to the mix. It’s important to control this signal like any other. Low cut and high cut filters allow you to tame the delayed signal, keeping your track’s low-end uncluttered and its high frequencies pristine.
In this example, a high cut filter is engaged on the first guitar chord, then a low cut filter on the second.
Dry/wet or mix
The Mix knob controls how much of the delayed signal you’ll hear relative to the dry (un-delayed) signal. When set to 100% Dry, you won’t hear any of the delayed signal; at 100% Wet, you’ll hear only the delayed signal.
Delays tend to work best at 50% Wet or less, so that the delayed signal doesn’t overwhelm the dry signal. One notable exception is when working with your delay plug-in on a bus; in this case, the Mix should always be set to 100% Wet.
In this example, you’ll first hear the delay mixed low, for a subtle effect. In the second half of the clip, the mix knob goes up towards 50% Wet, and then beyond—causing the delayed signal to sound louder than the dry signal.
Tips for using delay
Delay can be useful on almost any instrument in a track, from vocals through to drums and beyond. Once you know how to use it right, delay will be one of the most powerful tools in your production kit.
Let’s take a look at some ways to liven up a track with delay. First, let’s hear the track without any delay.
Create a sense of depth
The track’s guitar stab is nice, but a little dry. We can use delay to give space to this element and create a sense of depth in the mix.
We want a delay sound that blends smoothly with the dry signal, so let’s go for a warm analog delay type. Then set the Delay Time and feedback very low, so that the delay can’t be heard as a distinct echo, but more as a thickening of the original sound.
Here’s how it sounds. You’ll hear the guitar dry first, then the echo is added halfway through the clip.
Fill in the gaps
Now let’s look at the drums. The beat is a bit sparse. We can fill in the gaps between the hits by applying a subtle rhythmic delay to the drum group.

This time let’s choose the Tape delay type, with the Tape Age at maximum, for a scuffed, authentic sound.
Sync the delay time to the tempo and set the rate nice and slow—1/4 should do it—so that the delayed signal falls between the kick and snare hits.
Finally, turn up the high cut filter to around 200 Hz so that the delayed signal doesn’t clash with the thump of the kick drum.
Here’s how it sounds. The delay comes in halfway through the clip.
Generate rhythms
If the drum beat is still sounding too dull, there’s another way we can add more rhythmic interest to the track.
Let’s apply a bouncing delay to the guitar part so that it drags rhythmically against the drums.
This time we’ll choose Vintage Digital mode, set to Low Quality, to give a different character to this delay.
With the Delay Time synced and in Dotted mode, set it to 1/8 for a classic bouncing rhythm. Then set the delay to ping-pong mode, so that the delayed signal bounces between the left and right channels, to accentuate its movement.
In this clip, the rhythmic delay comes in halfway through.
Stereo widening
Delay can be great for adding width to elements without much stereo content. The track’s organ riff falls into this category: it’s currently in mono. Let’s use a delay to widen it out.
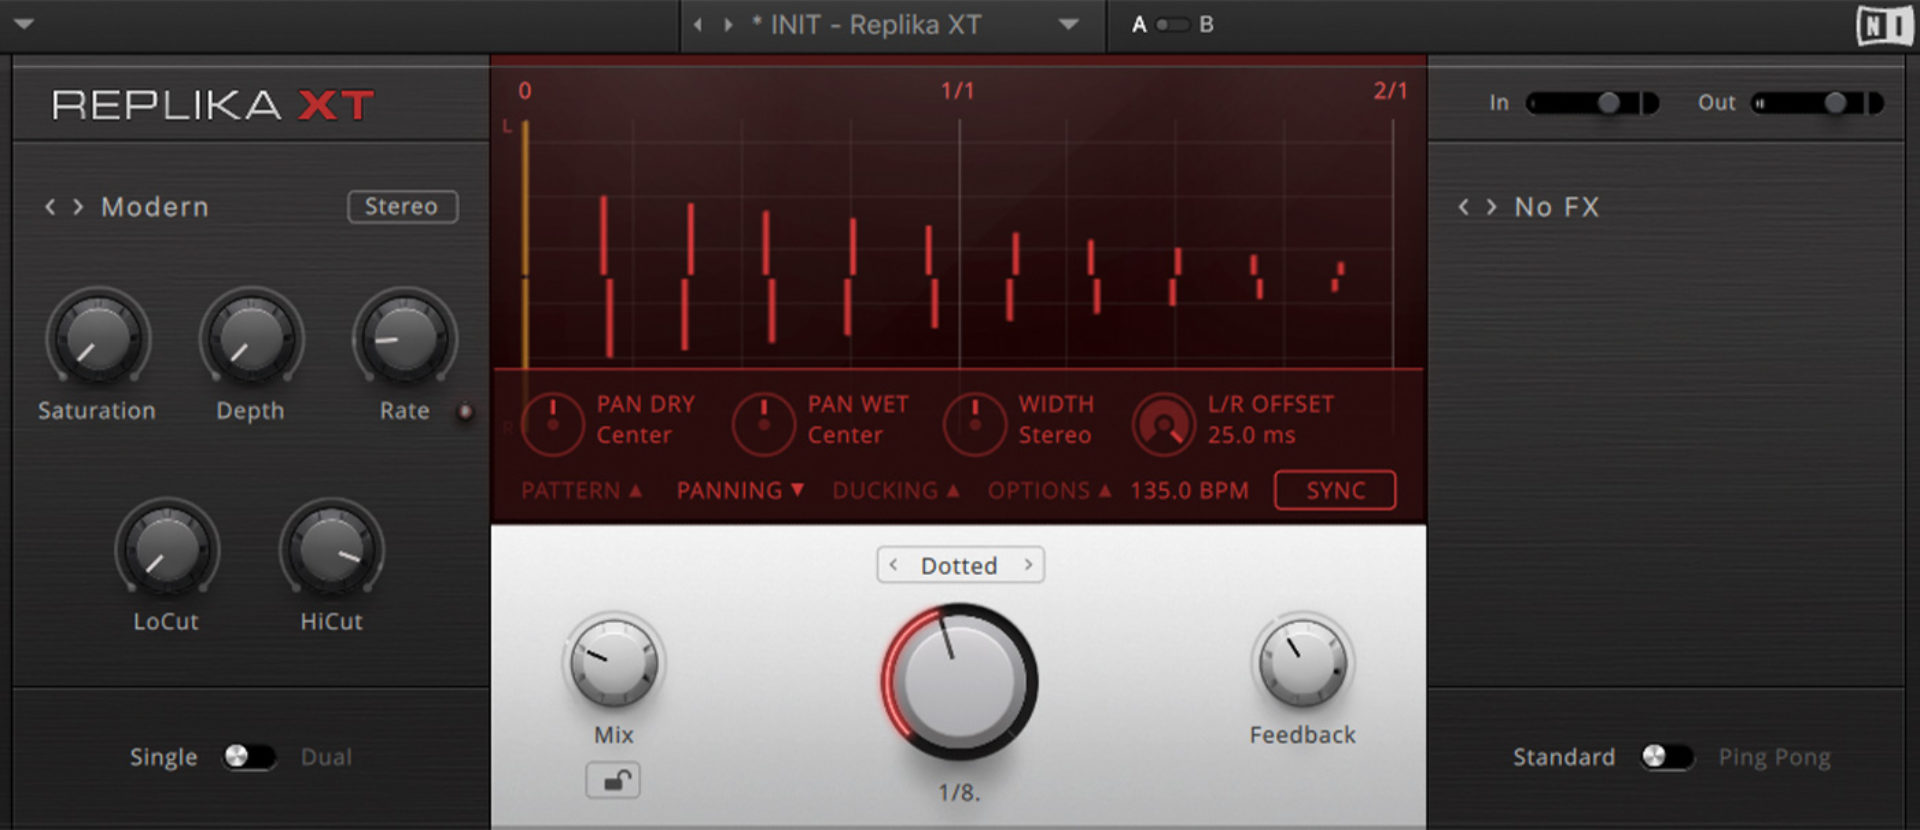
This time we’ll go for a nice clean Modern Digital delay—again with a Delay Time of 1/8 in Dotted mode.
The trick here is to tweak the L/R offset, under the “Panning” parameters. This creates a small difference in delay time between the left and right channels of the delayed signal, creating the illusion of width.
Let’s turn it to maximum—25 ms—to squeeze as much width as possible out of the organ part.
The delay comes in halfway through the clip.
Automate the parameters
Once you’ve found a delay setting you’re happy with, automating a parameter or two can give it extra life and movement. This can be particularly effective when the delay responds to shifts in energy or density in your track.
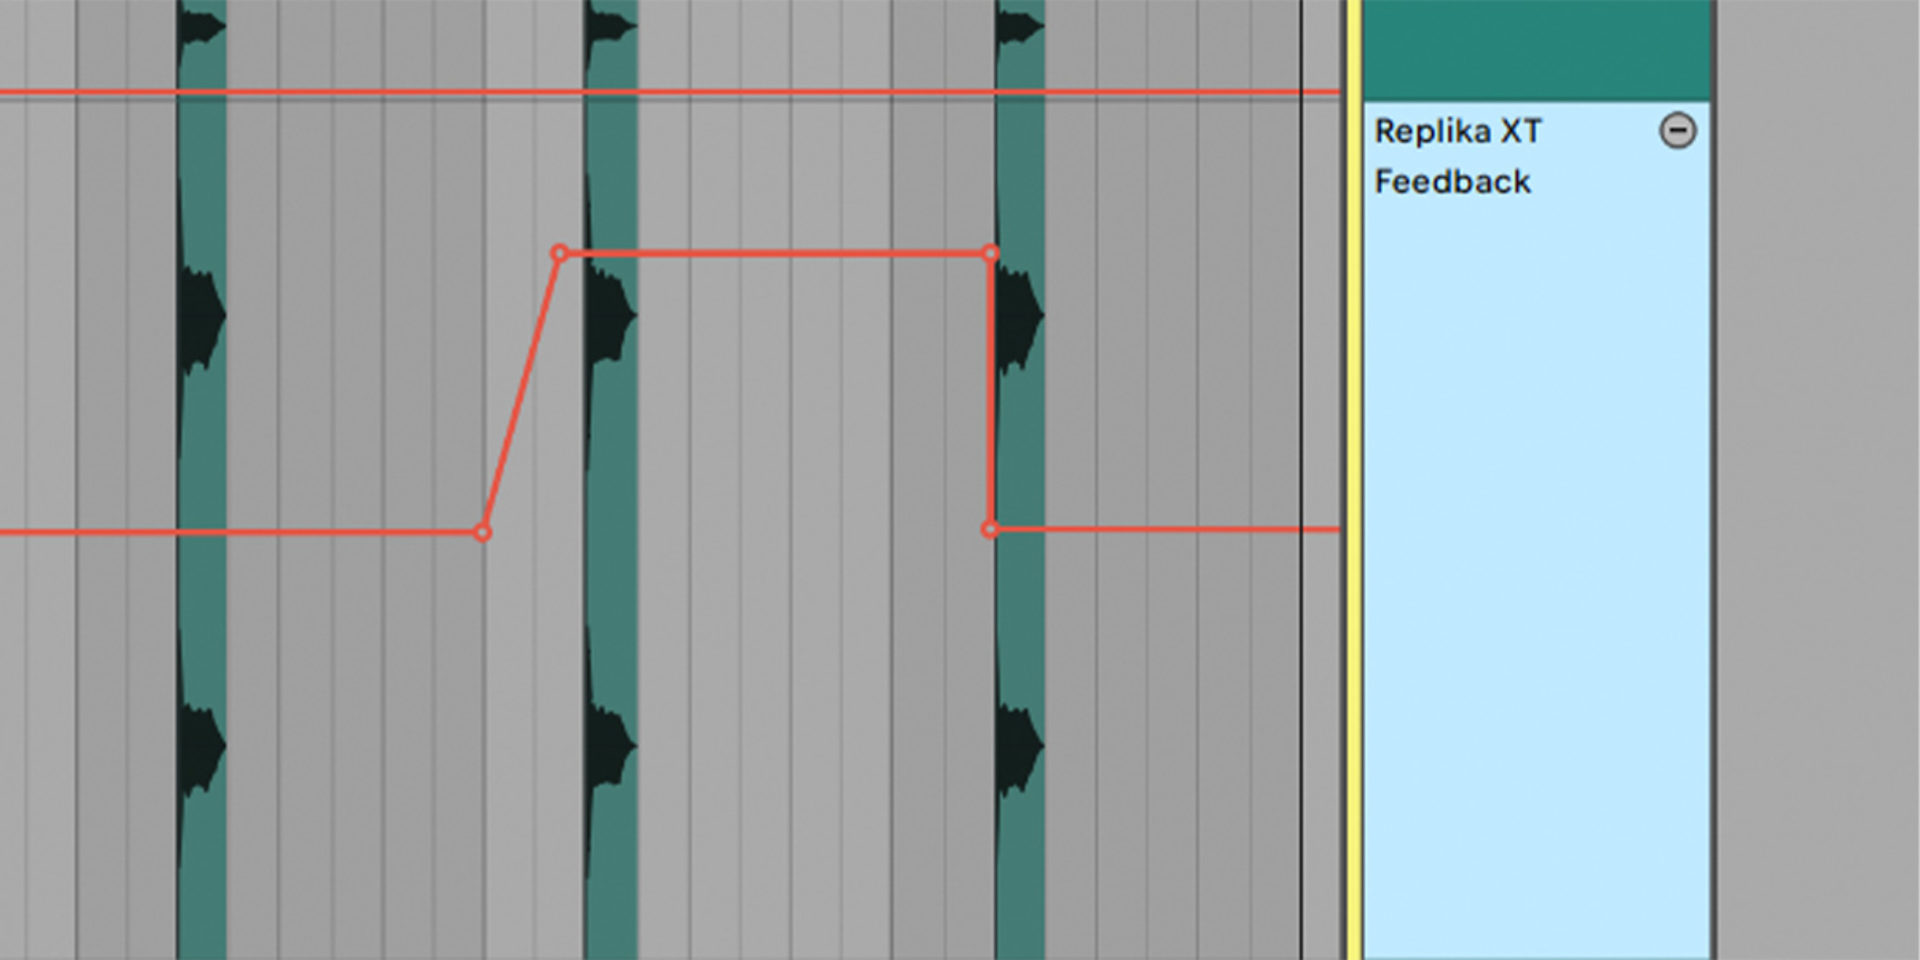
One classic example is to automate Feedback, so that the delay tails change character from moment to moment.
We can demonstrate this by going back to the short delay we added to the guitar stab to give it depth. Let’s automate the Feedback to go much longer once in every four chords. A listener might not notice this detail consciously, but it will add richness to the listening experience.
In the example, the feedback goes long on the third hit.
Run your delay on a bus
Adding delay to a track effectively means adding a new signal to your mix. It’s important to control this signal to avoid it clashing with other sounds.
The best way to do this is to deploy your delay not as an insert on a single channel, but as a separate bus or send-return channel. Just make sure the delay Mix is set to 100% Wet when doing this.
This also allows you to send multiple instruments to a single delay effect, to give your mix cohesiveness.
To demonstrate this, let’s combine a couple of the delay effects we’ve created into a single bus. A rhythmic, bouncing delay in ping-pong mode should be able to generate rhythms around the guitar stabs, as well as giving width to the organ part.

Once we’ve dialed in the settings and sent a signal from the guitar and organ parts to the delay bus, we can add additional processing to integrate the delay signal into the mix. Let’s add some sidechain compression so it ducks when kick and snare hit.
And there you have it. You can hear the delay bus in action in this example, along with the other delay effects we’ve added to the track.
Start using delay in your productions
In this article we’ve gone deep on delay. We’ve explored what delay is in music, examined the different delay types and parameters, and looked at ways to use delay effectively. Now you’ve got to grips with this crucial effect, it’s time to start using delay in your own productions.
REPLIKA XT is the perfect plug-in for all delay needs, offering everything from classic effects to futuristic sound sculpting.
Related articles
-

Behind the synth: A. G. Cook on stacked sawtooths and the creation of Super*Saw
Explore the extremes of stacked sawtooth waves with Super*Saw, a new synthesizer co-created with A. G. Cook. Learn how to…
-

Inside the evolution of orchestral sampling: an interview with ProjectSAM
Discover how ProjectSAM’s Lineage Series uses NKS and smart features to change orchestral sampling. Plus, save on instruments in our…
-

How New Constellations turn emotion into sound with Massive X
Go inside the studio with New Constellations. Learn how they use Native Instruments gear, happy accidents, and lifelong friendship to…
-

Citizen Kain on building emotion and space with Replika
Citizen Kain explains how Replika helped shape the rhythm, tension, and emotion behind his debut Eversun Records single “Moments.”…
-

The organic precision behind Calcou’s Anjuna release featuring Reaktor
Calcou shares how Reaktor, Monark, and Super 8 shaped the creative balance and live energy behind their new duo EP,…
-

14 NKS instruments that will change the way you create music
Discover 14 NKS instruments to freshen up your workflow. From lo-fi tape synths to cinematic strings, shop the Native Instruments…
-

Parallelle on crafting living basslines with Reaktor and TRK-01
Parallelle share how Reaktor and TRK-01 shape the bass and warmth in 11th Avenue, balancing analog depth with modern control.
-

Where will your sound lead you? Explore the Native Instruments Summer Sale
Save 30% on instruments, effects, and sounds in our Summer Sale. Find the tools to keep your tracks moving and…