


The Kontrol S-Series MK3 is an advanced MIDI keyboard controller that you can use to directly control your DAW (Digital Audio Workstation) to speed up your workflow and enhance your creativity.
Whatever DAW you use, the Kontrol S-Series MK3 will give you a more intuitive connection to your effects and instruments, thanks to its on-screen navigation and intelligent auto-mapping capabilities.
In this guide to setting up the Kontrol S-Series MK3 we’ll show you how to connect and set up your keyboard, integrate it with your DAW, use it to navigate and control your session, plus explore its customisation capabilities to create your most empowering music production environment yet.
We’ll use Ableton Live 11 for this guide, and Kontrol S-Series MK3 comes bundled with Ableton Live 11 Lite so you can get started right away even if you’re new to music making.
If you prefer to use a different DAW you’ll find more information about any operational differences in the Kontrol S-Series MK3 manual and the Kontrol S-Series DAW integration guide.
Jump to these sections:
- What does DAW integration in Kontrol S-Series mean?
- How to speed up your music creation with DAW integration
Follow along with this tutorial using the new Kontrol S-Series MK3 keyboard. For a limited time, you can save up to 66% on flagship Komplete suites when you buy one of our brand-new, premium S-Series MK3 keyboards.
Learn more
What does DAW integration in Kontrol S-Series mean?
The Kontrol S-Series’ DAW integration means you can control your music software directly from the keyboard itself. You can do things like search and audition presets, tweak instrument parameters, record MIDI, adjust track levels and much more directly from the hardware itself.
This immersive approach to music-making means that you can capitalize on your moments of inspiration more effectively than ever before, and make your best music ever.
For more information on the capabilities of the Kontrol S-Series MK3, check out Why upgrade to Kontrol S-Series MK3? Here’s what’s new.
How to speed up your music creation with Kontrol S-Series DAW integration
1. Connect and set up your keyboard
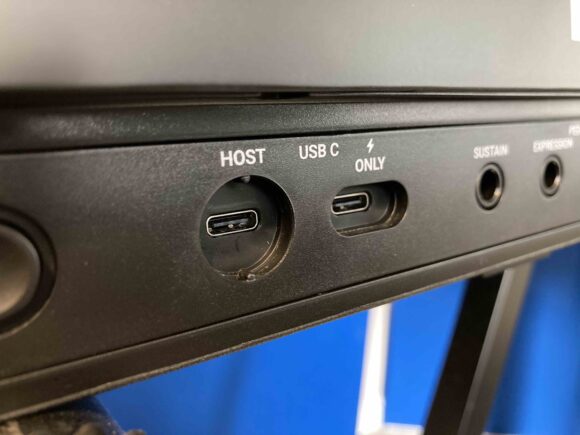
Your Kontrol S-Series MK3 keyboard comes supplied with a USB-C cable. To connect the Kontrol MK3 keyboard to your computer attach the round, “barrel-style” end of the included USB-C cable to the HOST USB-C socket on the rear panel of your keyboard.
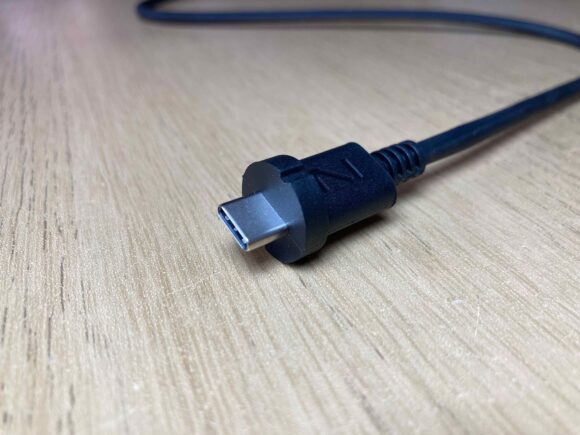
Attach the other end of the included USB-C cable to an available USB-C port on your computer.

Please note that you can also connect your keyboard to a USB-C hub, but you’ll need to make sure that the USB-C port on your hub can transfer both power and data.
If your computer doesn’t have a USB-C connector you can use a USB-A adapter, please see the Kontrol S-Series MK3 manual for more details.
Now, press the ON switch on the rear panel of the keyboard to switch it on.

The keyboard will power on and display a message about adding your serial number in Native Access.

Before we go any further, let’s make sure your keyboard is using the latest firmware. Visit ni.de/kontrol-update and download the appropriate firmware updater for your operating system.

Run the downloaded firmware updater application, and click the UPDATE button to update your keyboard’s firmware.

Your keyboard will now display a message indicating that the firmware update is taking place.

Once the process is complete the firmware updater application will display a message that lets you know the firmware has been updated successfully.

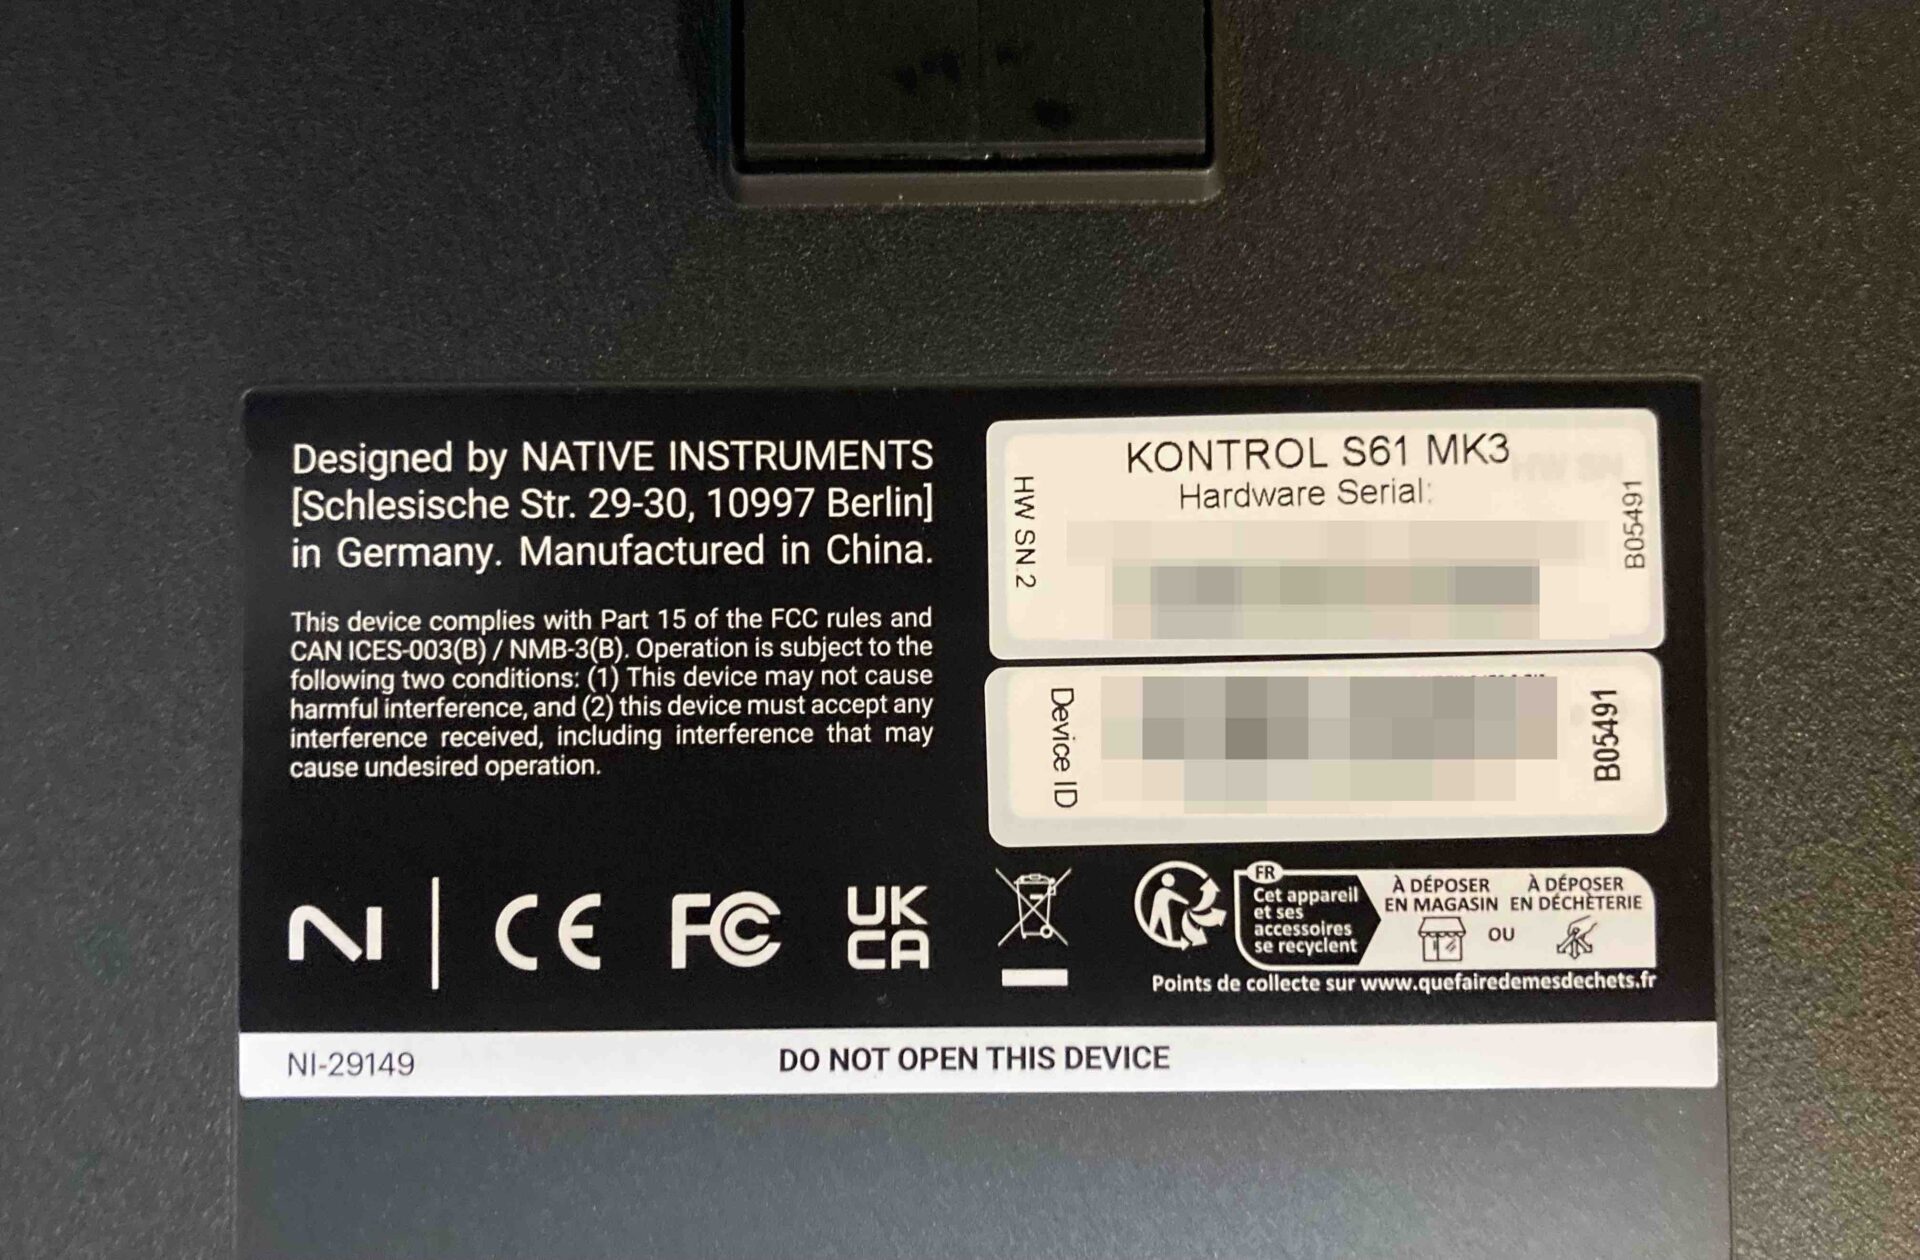
Now let’s register your keyboard in Native Access. You can find your keyboard’s serial number on the card in your product box, or on the underside of your keyboard.
Open the Native Access application on your computer and use the + Add Serial button to enter your keyboard’s serial number.

Once this is done you’ll receive an email from Native Instruments detailing the software included with your keyboard, including an Ableton Live 11 Lite license. You can find more information on accessing this in the email.

Now in Native Access’s New Tab you’ll find a new application called Hardware Connection Service. Click the Install button next to this to install it.

Once this has been installed your keyboard’s display will change to say “Default MIDI Template”. We’re now ready to use it with your DAW.

2. Enable DAW control mode
The Kontrol S-Series MK3 integrates with Ableton Live, Bitwig, Cubase, Digital Performer, Logic Pro, Pro Tools, and Studio One. Let’s see how it integrates with Ableton Live, if you’re not already an Ableton Live user you can follow along with the included Ableton Live 11 Lite license, and instructions for other DAWs can be found in the Kontrol S-Series MK3 manual.
In Ableton Live, open the Settings/Preferences menu, and select the Link/Tempo/MIDI tab.

Ensure that the first Control Surface row is set to the Komplete Kontrol S Mk3, with the Input and Output set to Komplete Kontrol S Mk3 (DAW).

Now activate Track for all the Kontrol inputs.

This tells Ableton Live that we want to receive MIDI information from the keyboard when we play it.
3. Navigate and control your session
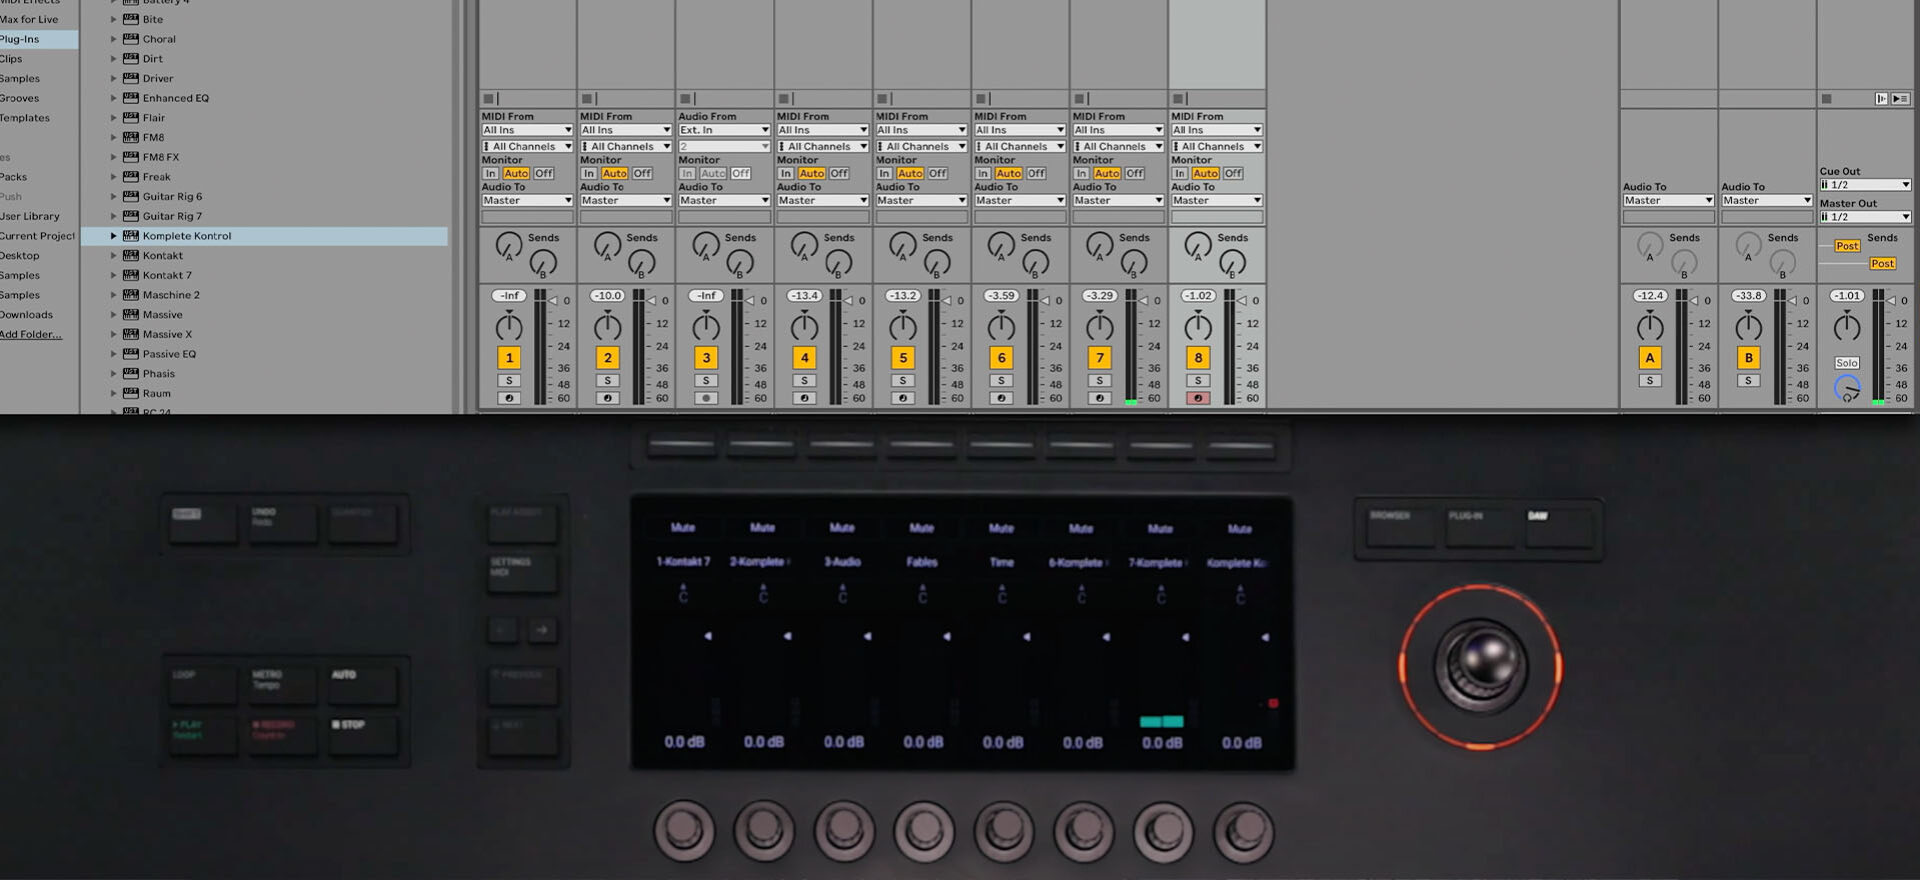
You’ll notice that now the DAW button is illuminated on the keyboard, and we’re now ready to control Live directly from the hardware.

Tap the DAW button, and the keyboard’s screen will change to show that it’s in DAW control mode, and display a virtual version of Ableton Live’s mixer.

You can now control Ableton Live’s channel mutes and levels using the buttons above and knobs below the screen respectively.
Holding the Shift button allows you to make fine level adjustments with the knobs, and use the buttons to solo individual tracks.

The Undo button will undo the last action you performed in Live, and holding Shift and pressing Undo will redo the last action you performed undo on.
The transport buttons control Live’s Play, Record, and Stop functions.

The Metro button activates and deactivates Live’s metronome. Holding Shift and tapping the Metro button puts Live in ‘Tap Tempo” mode, allowing you to control the project BPM directly from the keyboard.
Tapping the Loop button puts Live in loop mode. Holding the Loop button and turning the rotary encoder adjusts the position of the loop in the project.
You can also use the rotary encoder like a joystick, pushing it left and or right to select different tracks.
Holding Shift and pushing up on the rotary encoder puts the knobs in pan control mode. You can press Shift and down on the rotary encoder to revert to volume control mode.

4. More advanced controls
Some of the Kontrol S-Series MK3’s capabilities only become apparent once we start to record MIDI data. Let’s add Komplete Kontrol on a MIDI track. The keyboard will automatically bring up the Komplete Kontrol instrument’s interface on its screen.

You can use the knobs below the screen to filter the available patches by brand, production, bank, sub bank, type, sub type, and character. Using the knob on the far right will cycle through the available results, laying audition files for each sound if available. Clicking the rotary encoder in will load the selected preset.

When you load up a preset in Komplete Kontrol the screen will display the available macro controls that can be adjusted with the knobs below the screen.

Let’s try recording something into Ableton Live. Activate the Metro button and tap Record, then play a few notes. Press Stop when you’re done.

Tapping the Quantize button on the keyboard will quantize these notes, snapping them to the grid.

The Auto button on the keyboard activates Live’s Automation Arm button. If Live’s MIDI Arrangement Overdub button is active (this is the + button to the left of the Automation Arm button), this allows you to record automation over existing MIDI notes without erasing them when you hit record.

5. Customization
It’s possible to customize various aspects of the keyboard from the hardware itself. To bring up the Setting page, press the Settings button to the left of the display.

This brings up the settings menu, and the Hardware page will be selected by default.

Here you can control the screen brightness, LED colors and so forth. You can cycle through the available settings pages using the first two buttons above the screen, and through the sub-pages of each page using the arrow buttons below the settings.

In addition to the Hardware page there are pages for Keybed which allows you to tailor the velocity curve and polyphonic aftertouch settings, Pedals where you can alter the settings for any connected pedals, Touch Strip which allows you to adjust the MIDI CC settings for the touch strip above the pitch bend and modulation wheels, and Pitchbend where you can adjust the function of the pitch bend wheel itself.
Start using DAW integration to make music faster with Kontrol S-Series
Here we’ve covered the basic setup and usage of the Kontrol S-Series MK3 keyboards, looking at how you can use them to control your DAW and Komplete Kontrol plugins directly from the hardware.
Remember, you can find out about the Kontrol S-Series MK3’s parameters in more detail from the Kontrol S-Series MK3 manual.
Related articles
-

Behind the synth: A. G. Cook on stacked sawtooths and the creation of Super*Saw
Explore the extremes of stacked sawtooth waves with Super*Saw, a new synthesizer co-created with A. G. Cook. Learn how to…
-

Inside the evolution of orchestral sampling: an interview with ProjectSAM
Discover how ProjectSAM’s Lineage Series uses NKS and smart features to change orchestral sampling. Plus, save on instruments in our…
-

How New Constellations turn emotion into sound with Massive X
Go inside the studio with New Constellations. Learn how they use Native Instruments gear, happy accidents, and lifelong friendship to…
-

Citizen Kain on building emotion and space with Replika
Citizen Kain explains how Replika helped shape the rhythm, tension, and emotion behind his debut Eversun Records single “Moments.”…
-

The organic precision behind Calcou’s Anjuna release featuring Reaktor
Calcou shares how Reaktor, Monark, and Super 8 shaped the creative balance and live energy behind their new duo EP,…
-

14 NKS instruments that will change the way you create music
Discover 14 NKS instruments to freshen up your workflow. From lo-fi tape synths to cinematic strings, shop the Native Instruments…
-

Parallelle on crafting living basslines with Reaktor and TRK-01
Parallelle share how Reaktor and TRK-01 shape the bass and warmth in 11th Avenue, balancing analog depth with modern control.
-

Where will your sound lead you? Explore the Native Instruments Summer Sale
Save 30% on instruments, effects, and sounds in our Summer Sale. Find the tools to keep your tracks moving and…