


Melodic techno is a subgenre of techno that’s characterized by a unique mix of melodic progressions, atmospheric elements and subtle percussions. This genre is one of the most popular styles on the dancefloors around the world, as it perfectly blends mesmerizing soundscapes with expressive melodies and powerful drops.
Melodic techno has an atmospheric and hypnotic sound, and a gradually progressing track structure. It uses chords that are cinematic sounding, and these are complemented by rolling bass lines and expansive pads.
In this tutorial, you’ll learn step-by-step how to create your own melodic techno track using plugins and tools from Komplete 14 and Native Instruments Expansions that can sound like this:
Jump to these sections:
- What is melodic techno music?
- What are the elements of melodic techno music?
- How to make a melodic techno song
Follow along with Komplete 14, the ultimate bundle of production tools and virtual instruments to inspire your music.
What is melodic techno music?
Melodic techno began to be recognized as a distinct genre in the mid to late 2010s. The pioneers of this sound include Tale of Us, Mind Against and Agents of Time. Other notable melodic techno artists include Stephan Bodzin, Patrice Bäumel and Yotto.
Melodic techno’s hottest labels include Diynamic, which was founded in 2006 by Solomun and Adriano Trolio and Afterlife Records, established in 2016 by artists Carmine Conte and Matteo Milleri (Tale Of Us). Afterlife Records is known for its unique sounds and festival events.
What are the elements of melodic techno music?
Melodic techno emphasizes melodies, harmony and evolving musical arrangements and is typically written with tempos of 120 – 130 BPM. The elements in a melodic techno track includes cinematic chord progressions, atmospheric pads, intricate lead melodies and stripped down beats.
The chords are created by layering instruments to create a thick sound, and chord progressions often change once every two bars. The chord progressions create a foundation for the lead melodies and provide contrast for the drop.
Lead melodies in melodic techno have a unique rhythm and feature short stutter notes and pitch bends to add variation.
Automation and effects like long reverbs and delays are used to create space and build lush soundscapes. The drops in melodic techno release the full energy of the song, and are the dramatic highlights of the piece of music. The percussion in melodic techno tends to be minimal, stripped down beats.
How to make a melodic techno song
Let’s take what we’ve learned about melodic techno and apply to a melodic techno song, step-by-step.
1. Program your drums
Start off by setting the BPM in your DAW to 122 BPM. Create a blank MIDI track and add Battery 4, which is also available in Komplete 14. Download and install the Deep Matter Expansion.
To load an Expansion in Battery 4, switch to Kits in the Library tab of the Browser. Type Deep Matter (the name of the Expansion) in the search bar, and Battery will show only the Kits belonging to the corresponding Expansion. For further reading, here is a detailed guide on how to load an Expansion Kit in Battery 4. In Battery 4, choose the Cina kit from Deep Matter Expansion.

Next, route each of the drum sounds from Battery 4 to its own individual audio track, as it’s easier to process each sound individually.
Create four audio tracks. On each track, in the Audio From drop down menu, select Battery 4 and set the monitor to In.

Go to the track with Battery 4 on it and open the VST. In Battery’s Output Section, the Direct Outputs 1/2 are routed to the master, so we will not assign any drums to Stereo 1/2. Right click on Cina Kick 2, select Output, Direct out and Stereo 3/4.

Right click on Clap Cina DS 1, select Output, Direct out and select Stereo 5/6. Right click on Shaker Cinema, select Output, Direct out and select Stereo 7/8. To finish the routing, Right click on Closed HH Cina, select Output, Direct out and select Stereo 9/10.
Next, let’s create the kick drum. Start out by programming a kick drum using the sample Kick Cina 2 from Deep Matter Expansion.
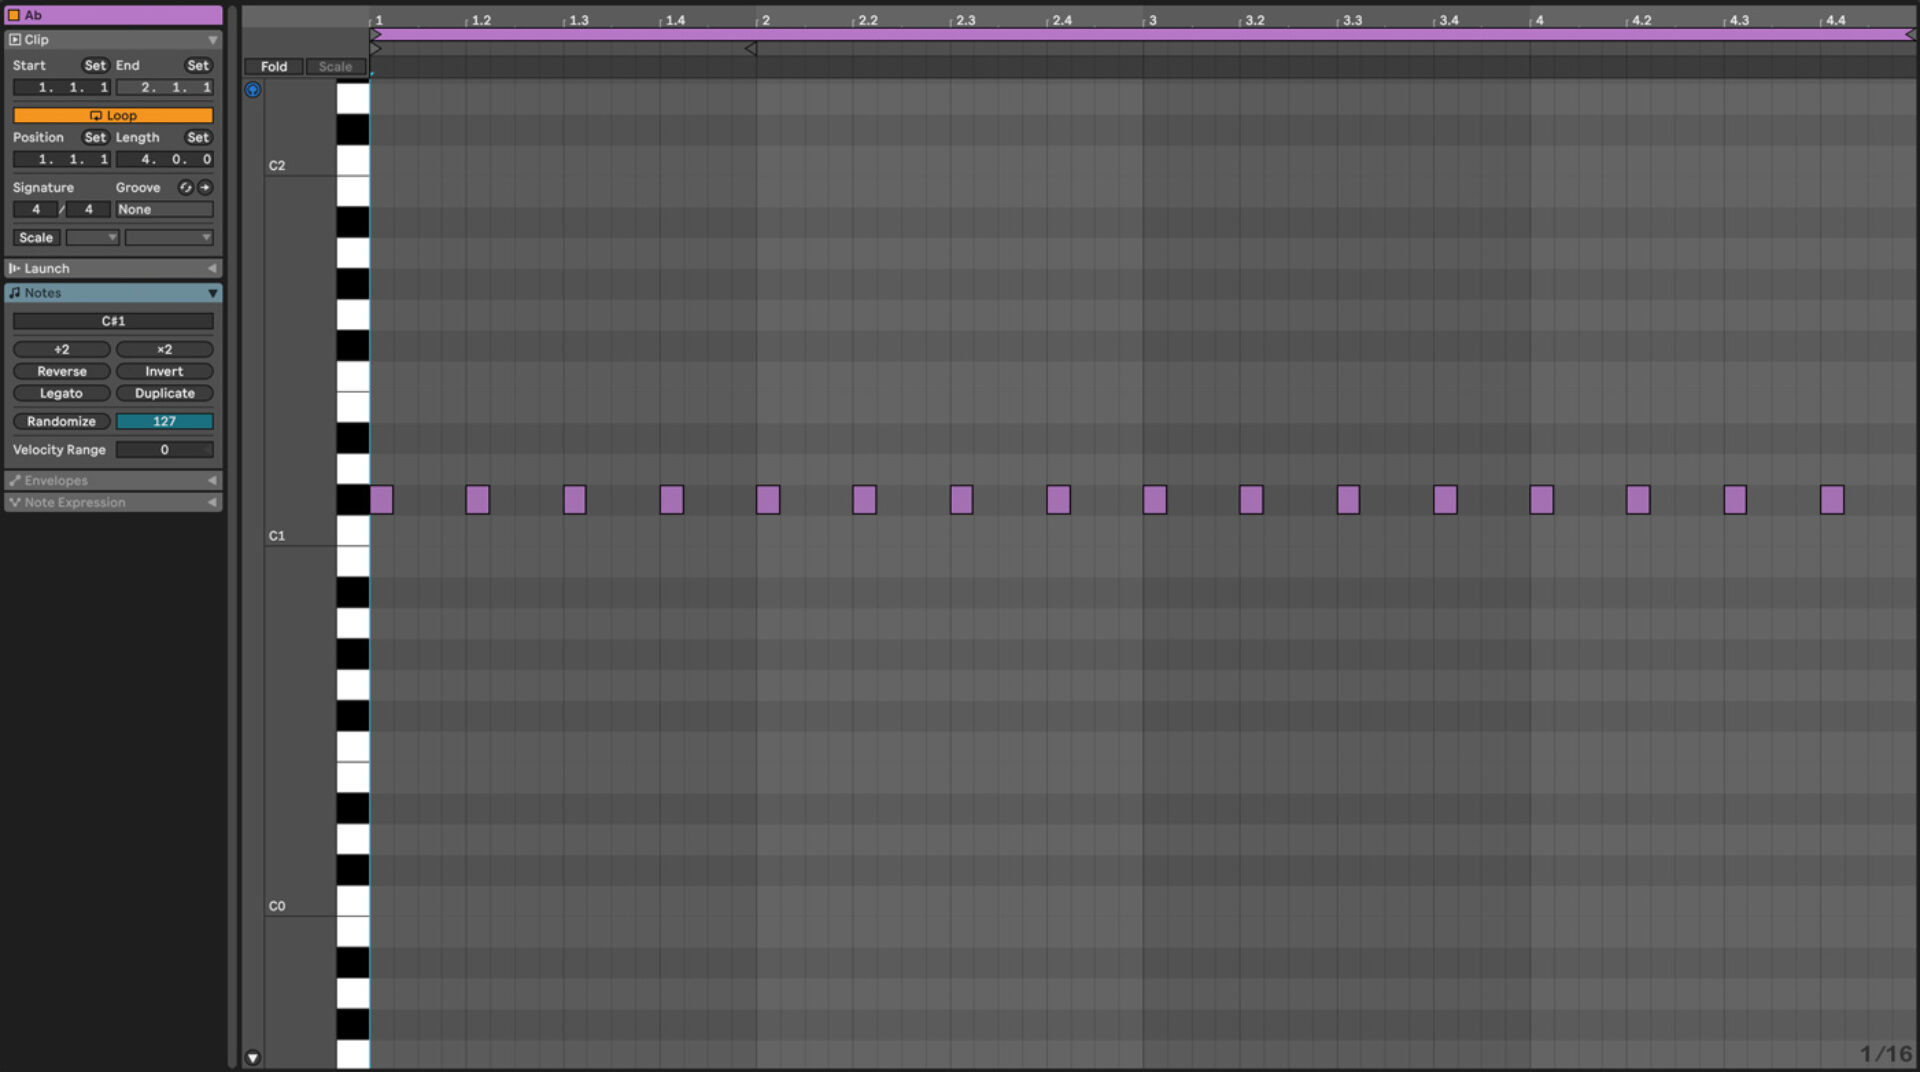
On MIDI track one with Battery 4 on it, create a blank MIDI clip that’s four bars in length. In the MIDI clip, on the note C#1, draw in a MIDI note for the kick drum on 1, 1.2, 1.3, and 1.4. Repeat the MIDI note pattern in every bar to create the kick drum loop. Play on the MIDI clip, and you should see the kick drum playing from the second audio track. Label the 2nd audio track Kick.
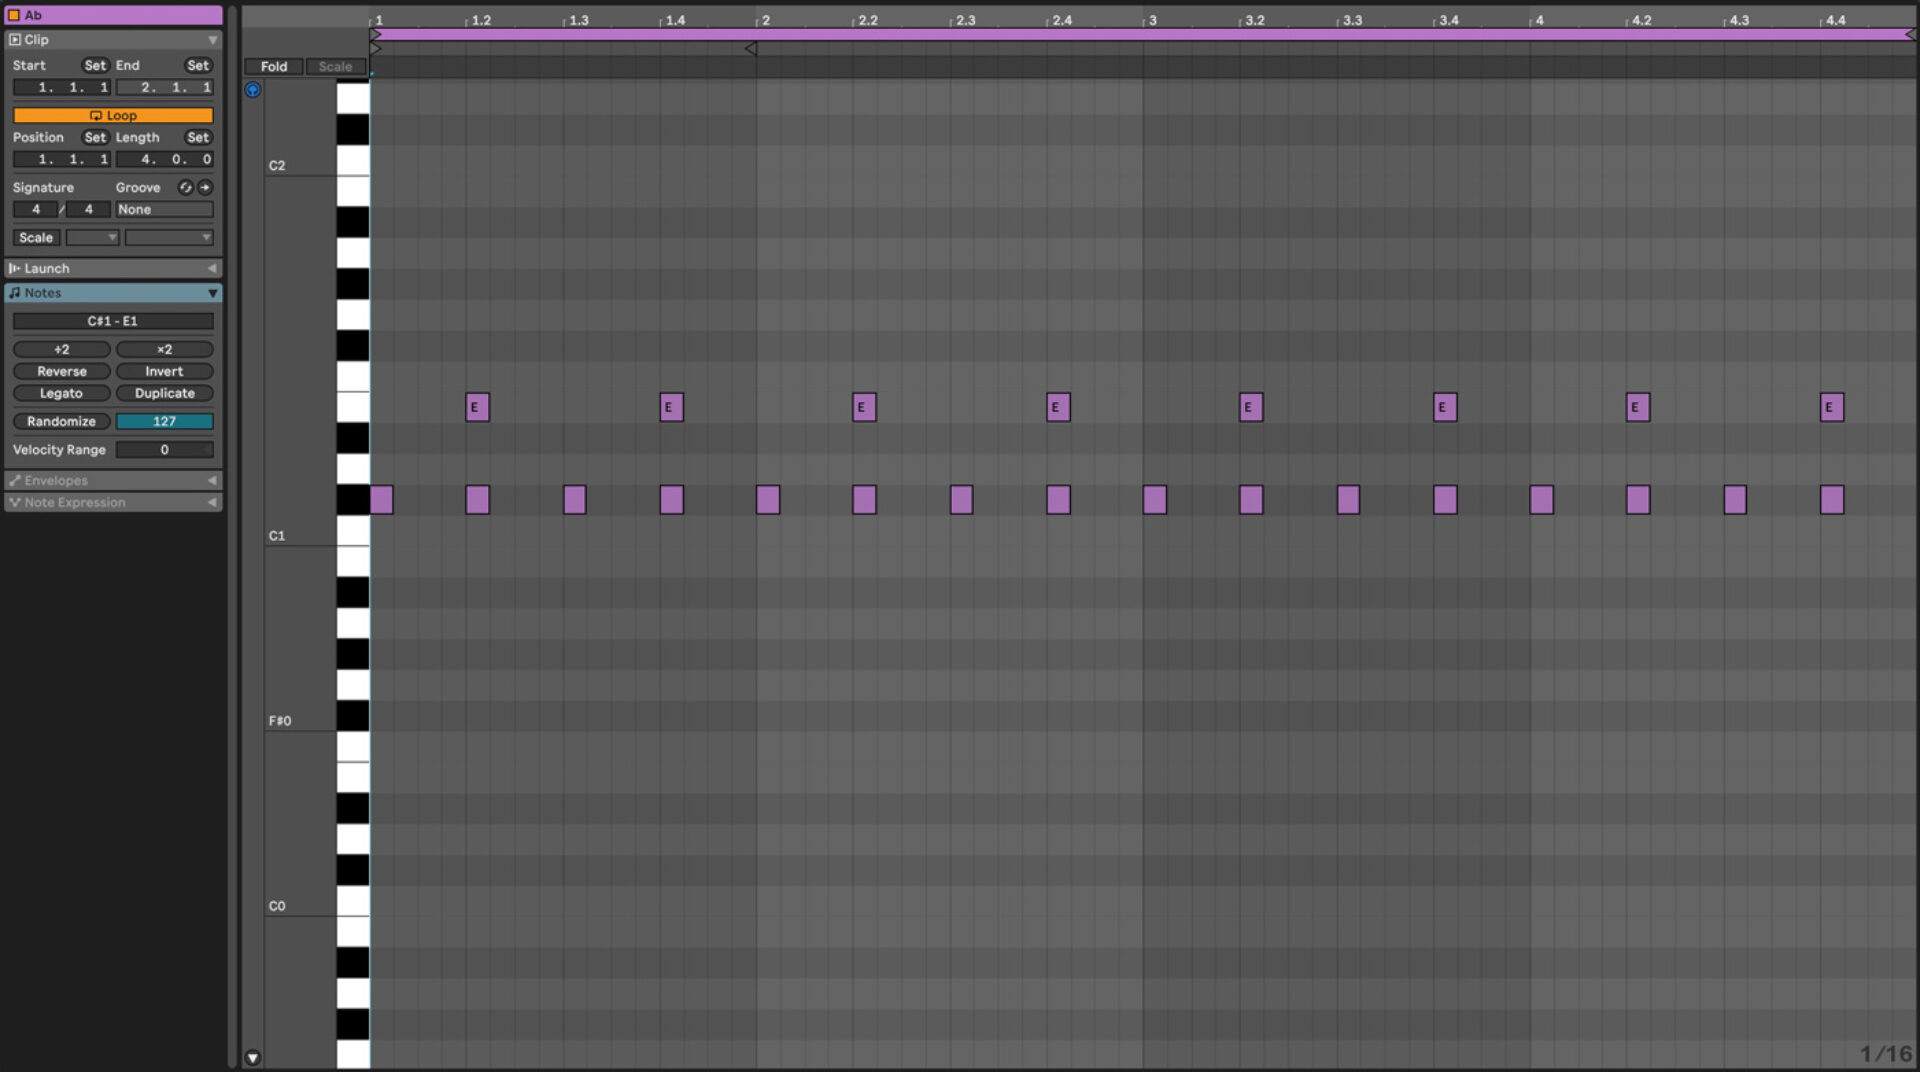
Next, add a clap using the sample Clap Cina DS1 from Deep Matter Expansion. Using the same MIDI clip used for the kick, program in the clap on MIDI note E1 on beats 1.2, 1.4, 2.2, 2.4, 3.2, 3.4, 4.2, 4.4.
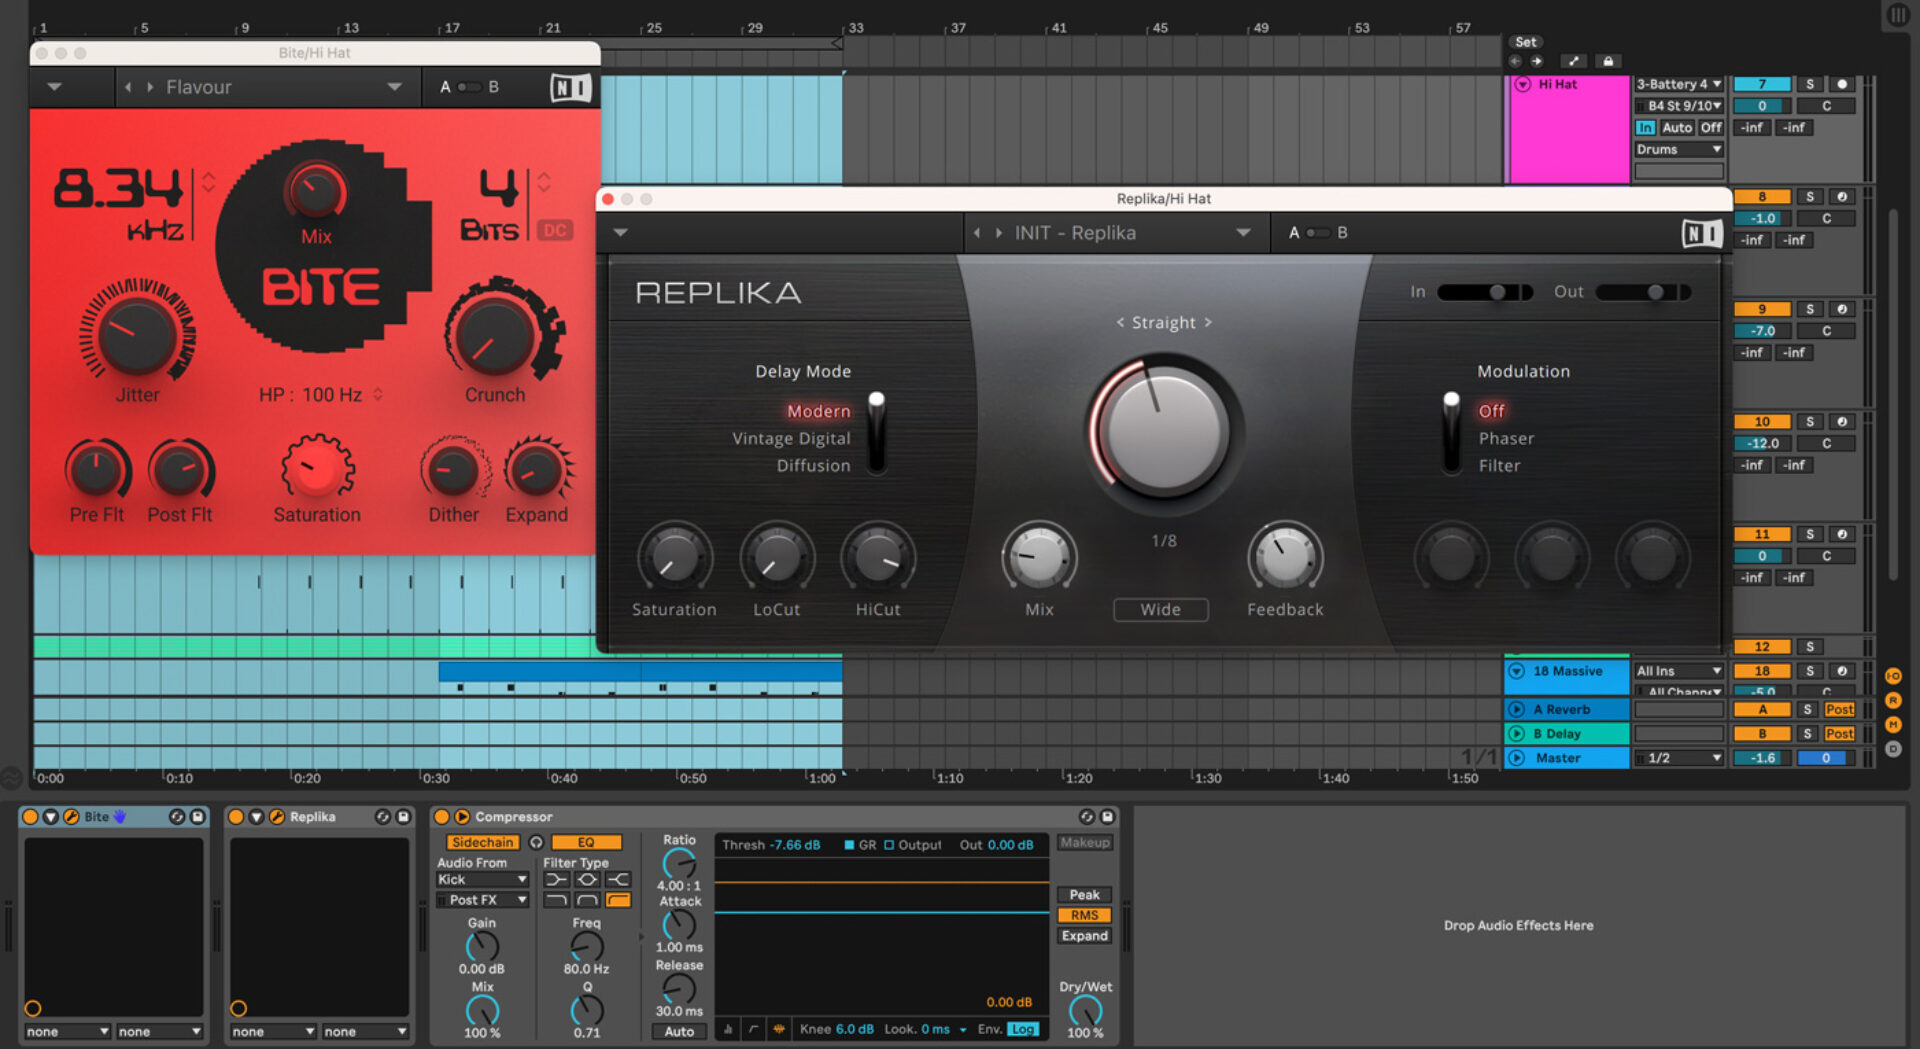
Play the MIDI clip and the clap will play on your second audio track. Give the clap extra character by adding the Bite plugin from the Crush Pack to the clap audio track and selecting the preset Gentle Push. Set the Mix to 50%.
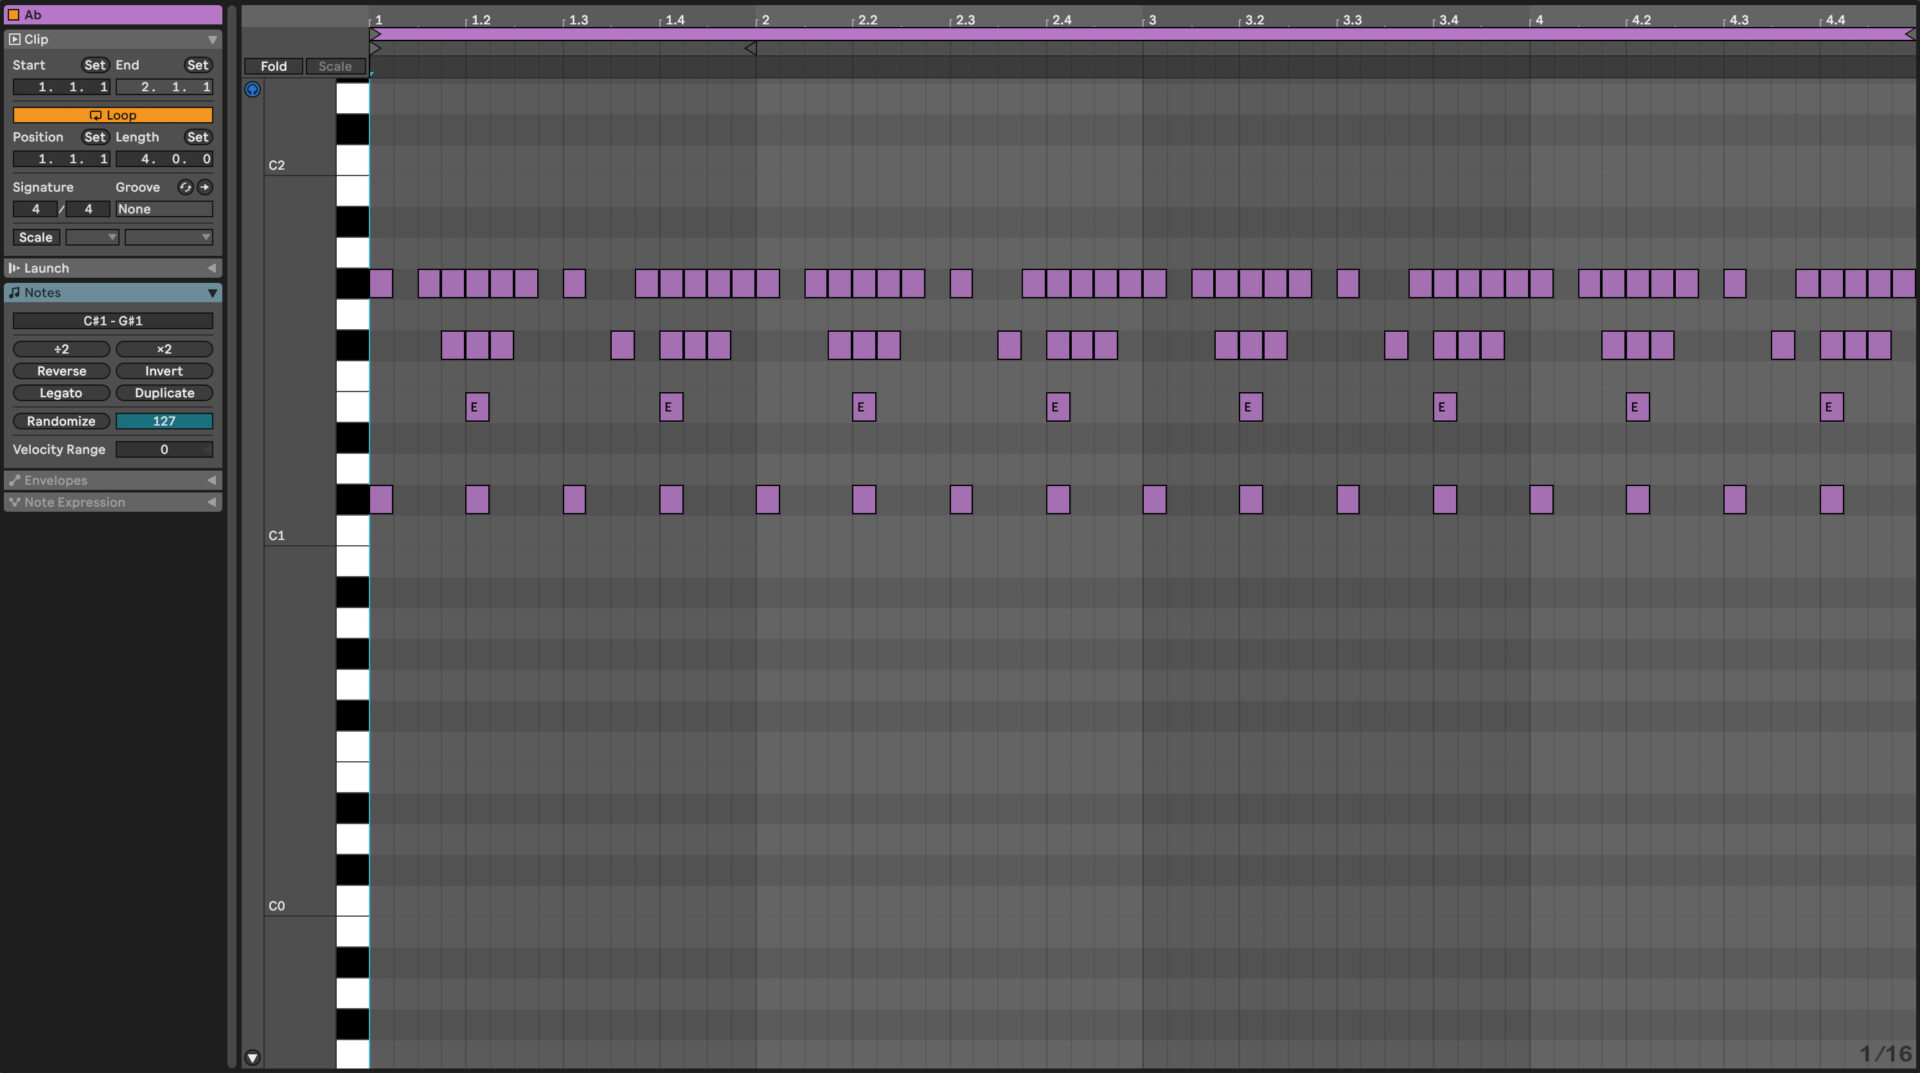
The next percussive element we’re going to add is a shaker. Open the MIDI clip used for the kick and clap, and add a shaker pattern using the sample Shaker Cina from Deep Matter Expansion by programming a rhythm on MIDI note on F#1.
Add a shaker on beats 1.1.4, 1.2, 1.2.2, 1.3.3 and 1.4, 1.4.2, 1.4.3. Use the same rhythm in the second bar on beats 2.1.4, 2.2, 2.2.2, 2.3.3, 2.4, 2.4.2, 2.4.3. Copy the pattern created in bars 1 and 2 to bars 3 and 4.

Next, program in the hi-hats using the sample Closed Hi-Hat Cina. In the same MIDI pattern used for the rest of the drums, create notes using MIDI note G#1 in bar one on beats 1, 1.1.3, 1.1.4, 1.2, 1.2.2, 1.2.3, 1.3, 1.3.4, 1.4, 1.4.2, 1.4.3, and 1.4.4. Copy this same rhythmic pattern to bars 2, 3 and 4.
Add the Bite plugin from the Crush Pack to the closed hi-hat audio track. Choose the Flavor preset and set the mix to 33%. Add movement to the hi-hat by adding delay with Replika, and select a ⅛ note delay. Add a compressor and sidechain the audio to the kick by selecting Audio From Kick in the dropdown menu. Set the threshold to around -7.6 or to taste.
Create a percussive noise sound by creating a blank MIDI track. In Ableton, go to the Instruments (on the left hand side) and choose Simpler. Navigate to the Deep Matter Expansion pack on your sample hard drive, and go to Samples, One Shots, Noise and select Noise Angela 1.
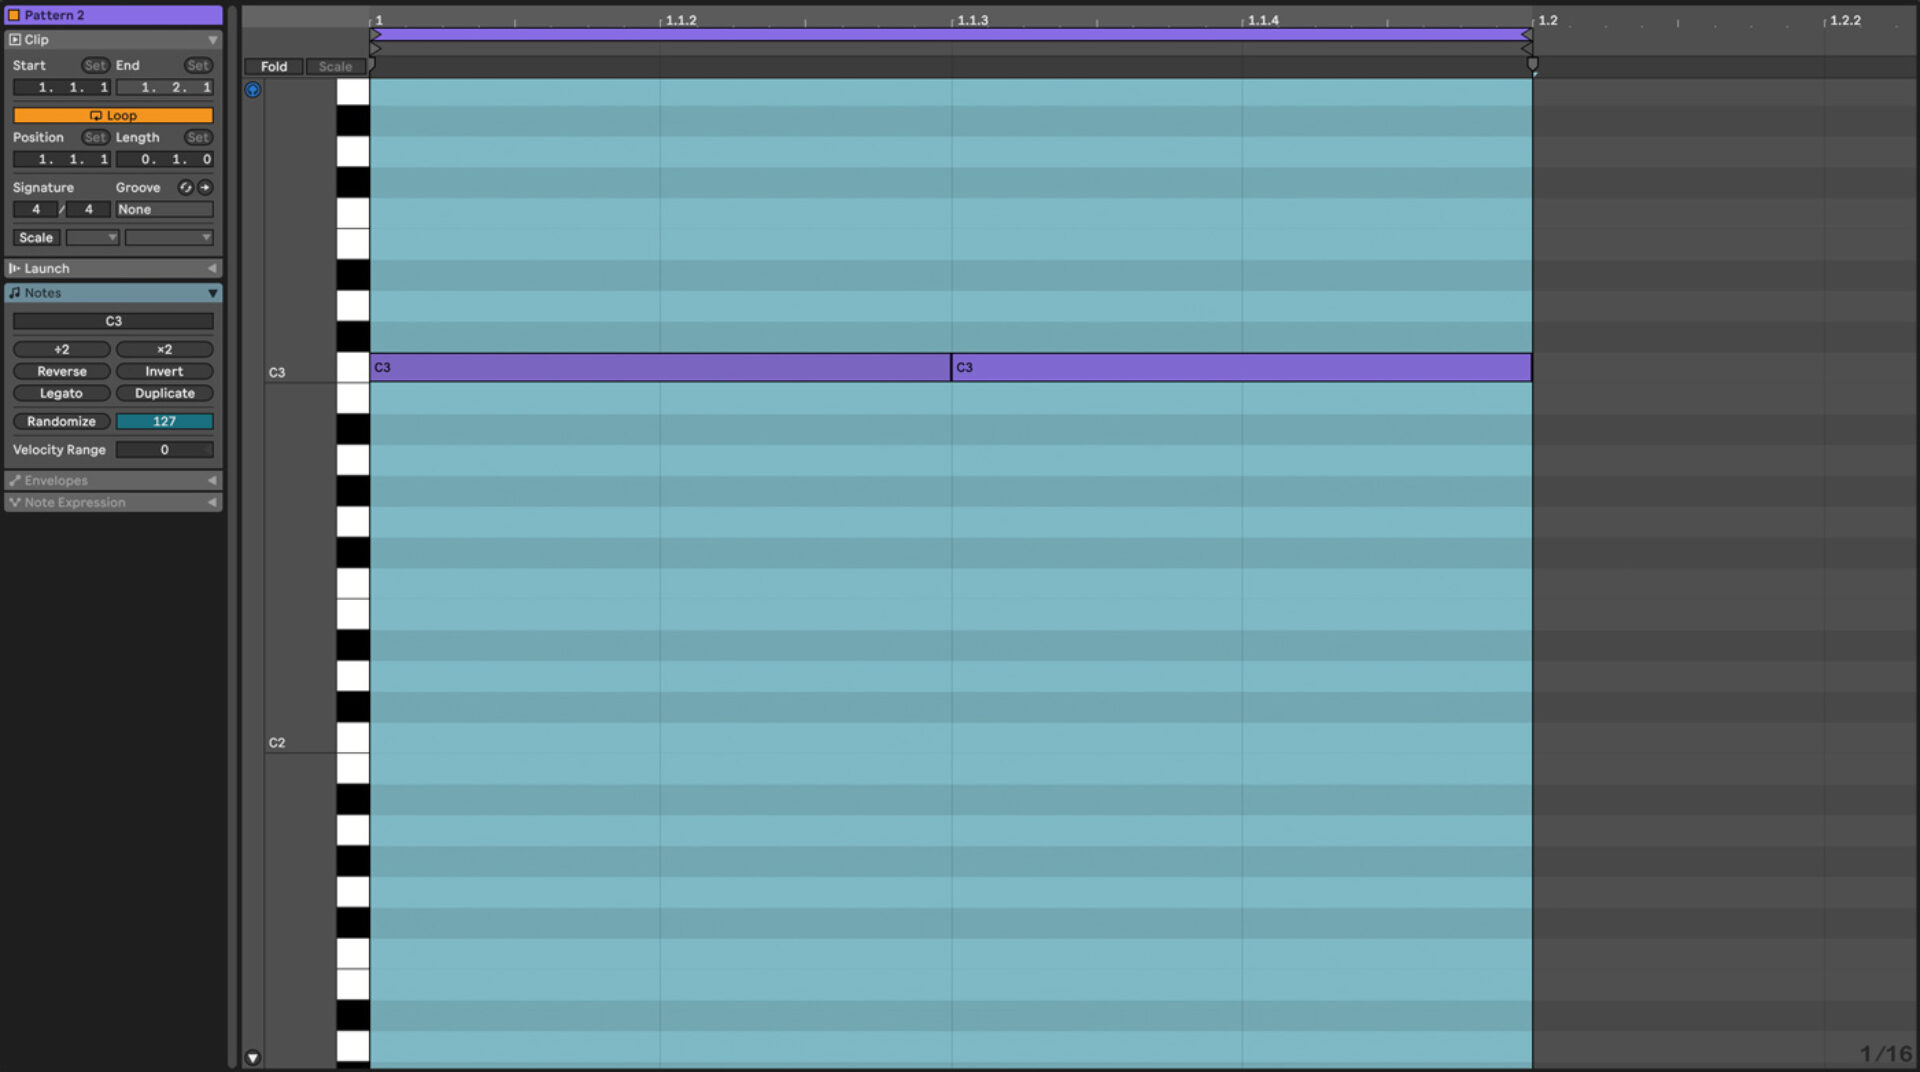
Load the sample by dragging and dropping it onto Simpler and create a blank MIDI clip that’s 1 bar in length. Create notes on MIDI note C3 on beats 1, 1.1.3, 1.2, 1.2.3, 1.3, 1.3.3, 1.4, and 1.4.3.
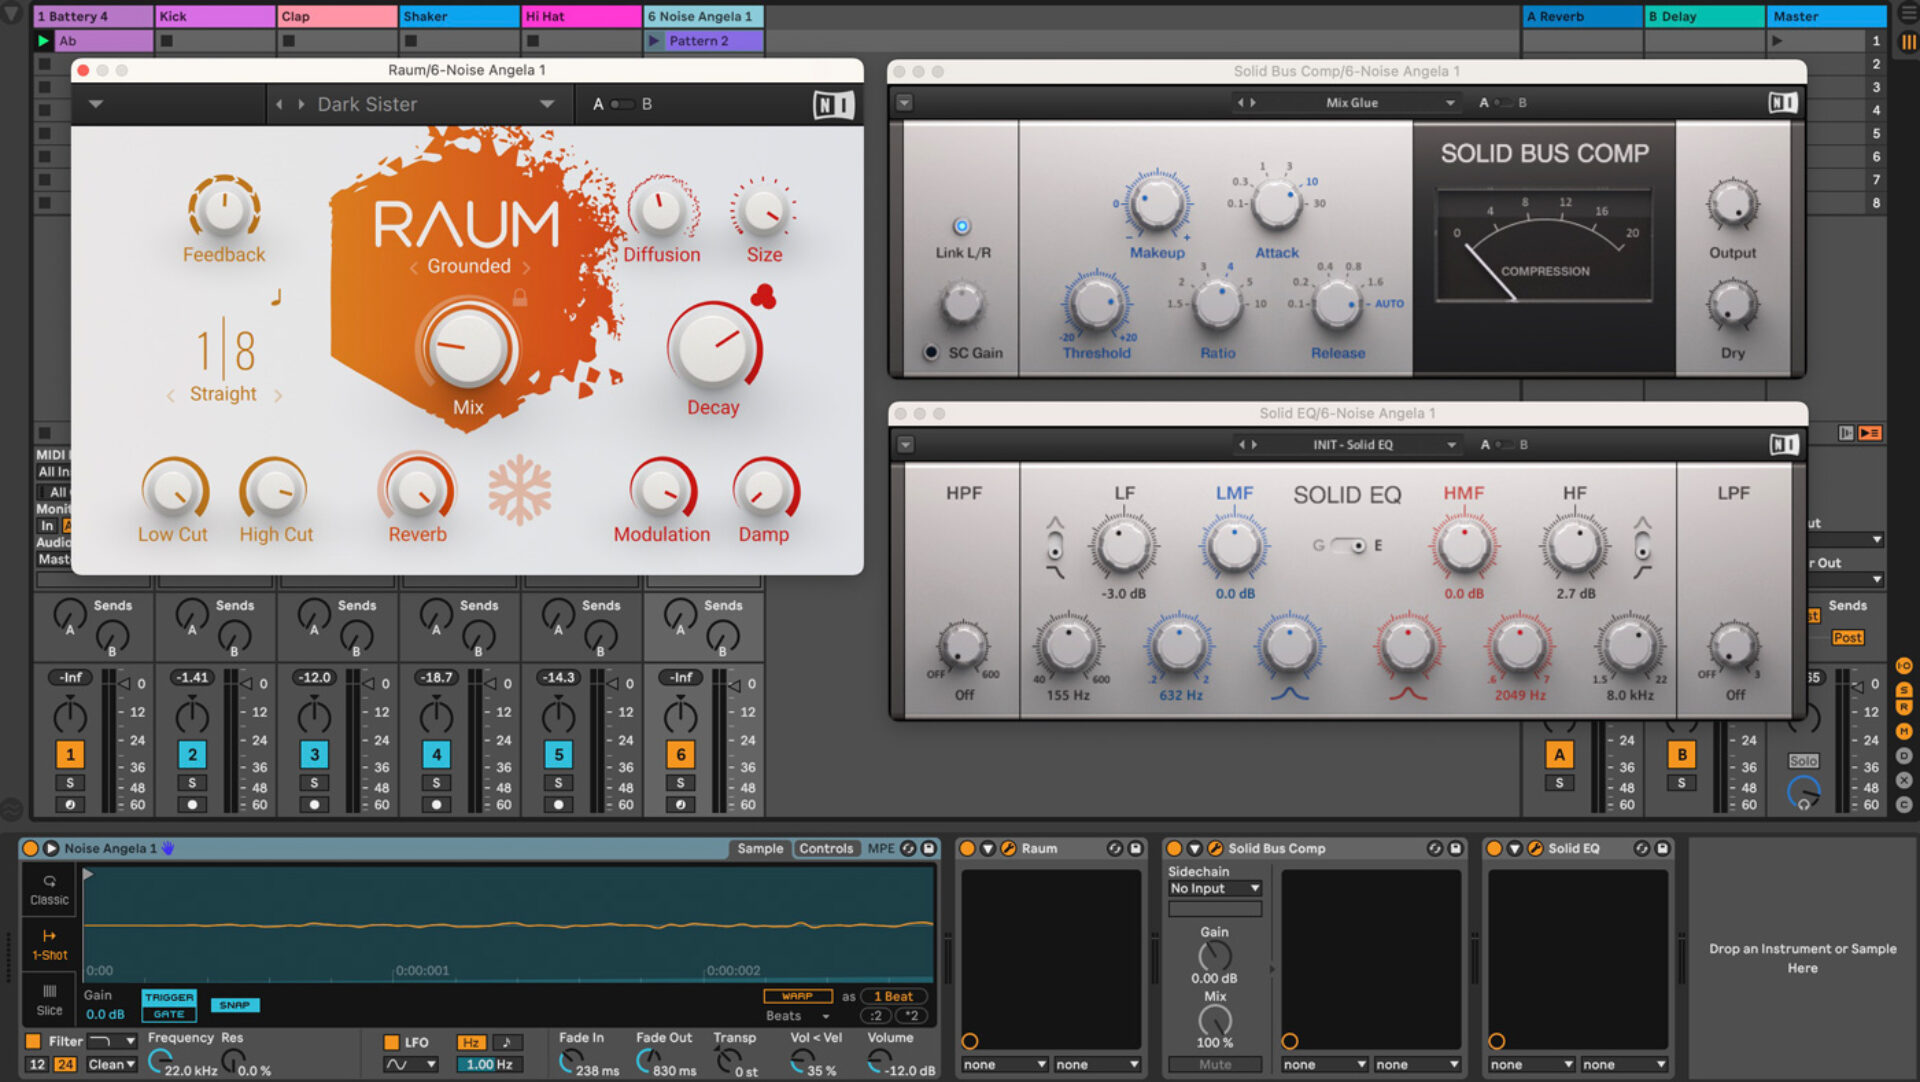
Next, add reverb by adding Raum, and selecting the Preset Dark Sister. Set the mix to 20%. Give the sound a bit more edge by adding Solid Bus Comp, and selecting the Preset Mix Glue.
Lastly, EQ the sound by adding Solid EQ, and cut the Low Frequency (LF) at 155 Hz by -3.0 dB. Boost the high frequencies (HF) at 8.0 kHz by 2.7 dB.
Finish off your percussion by adding a rim shot that will help to drive home the rhythm of the track. Use the Deep Matter Expansion pack samples by navigating to the Samples, then click on the folders Drums/Snares and find the Rim Evolet sample.
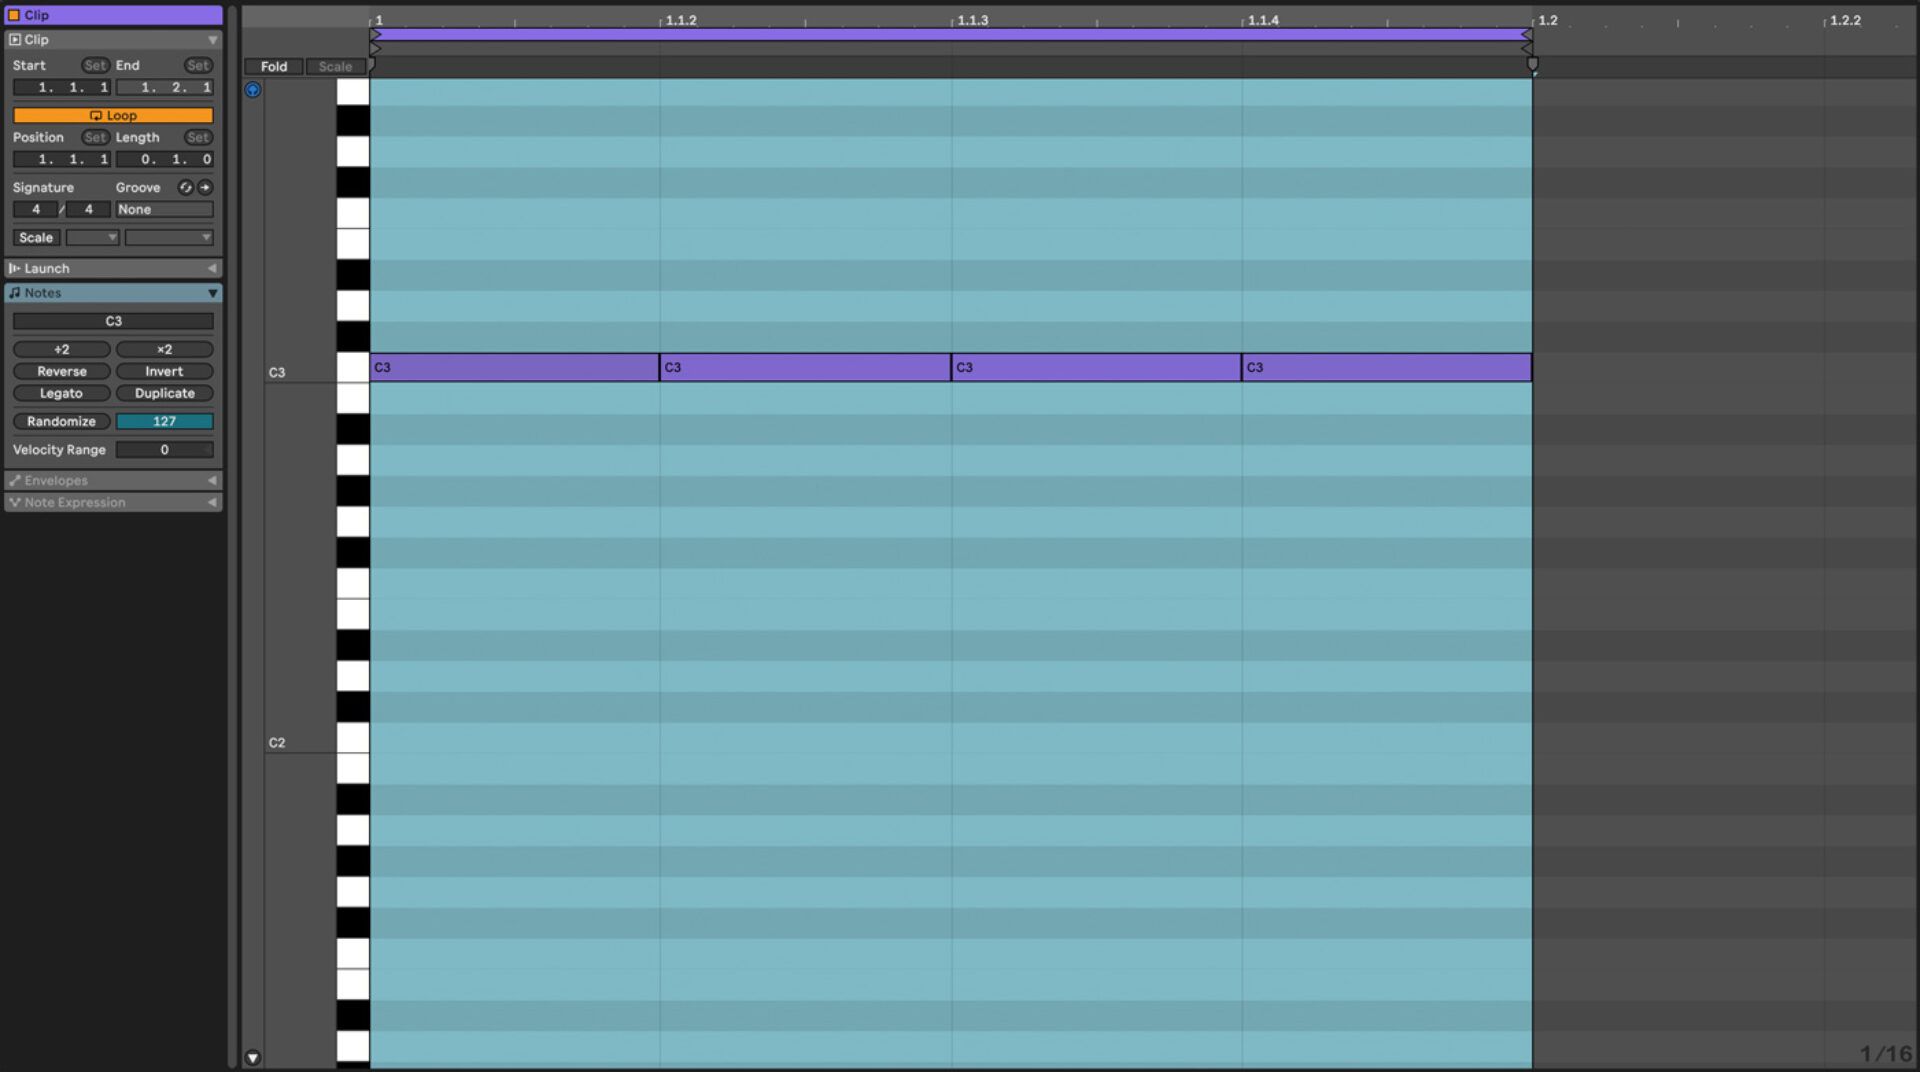
Create a blank MIDI clip that’s 1 bar in length, and create notes on MIDI note C3 on beats 1, 1.1.2, 1.1.3, and 1.1.4.
Add the Solid EQ and cut low frequencies (LF) at 155 Hz by -3.7 dB. Add Replika and select the 1/8 delay, with the mix knob set to 11% wet.
Once you have the EQ in place, add the Solid EQ and cut low frequencies (LF) at 155 Hz by -3.7 dB as well as Replika and select the 1/8 delay, with the mix knob set to 11% wet.

Additional drums and percussion parts can be added using Polyplex. You can learn more about creating techno rhythms with Polyplex in this guide.
2. Add a chord progression
Melodic techno features cinematic chord progressions, most often the chords are created by layers of sound.
Start out by creating a chord progression in the key of your track. Choose a key to work in, if you haven’t chosen one already. If you’re new to creating chord progressions, try using Playbox or Captain Chords Epic.
Create a MIDI track and a blank eight bar MIDI clip. Start by creating pads and add FM8. In the FM8 browser search menu, choose the Warmer preset. Compose a chord progression for your track, or copy the one below. The chord changes will need to take place every two bars.

Create a fuller sound for the chords by layering the same chord progression with other Kontakt instruments. To do this, in the title bar for the FM8 MIDI track, press command-C (on a Mac) to copy the track, and command-D to duplicate it.
On the new MIDI track, delete FM8 and replace it with Kontakt and load the Vintage Organs instrument. In the House and Disco preset section, select the Mousse preset, or another preset that appeals to your ears.
If you have more time, continue to duplicate the original MIDI track with FM8 and replace it with different Kontakt instruments. For the chord layers, try these Kontakt instruments:
- Kontakt Factory Library/Orchestral/VSL Brass, Brass Ensemble
- Kontakt Factory Library/Orchestral/VSL Strings, String Ensemble
- Kontakt Factory Library/Orchestral/VSL Strings, Cello Ensemble
3. Write a bass line
The next piece we’re going to add to our melodic techno track is the bass line. Start by creating a blank MIDI track, and load Reaktor onto it. Load Monark into Reaktor by selecting Player, clicking on Monark, then double click on Monark.ens. Load the Lunar Echoes Expansion pack in Monark. If you need help, refer to this guide for detailed instructions on how to load an Expansion Pack in Monark.

Select the Electrotechnika preset. Create a blank MIDI clip four bars in length, and compose a rolling bass line by using the root note of the key you’re in. The example track is in Ab minor, and the bass line is programmed on Ab1. (G#1) Program in bass notes on 1, 1.1.2, 1.1.3, and 1.1.4.
Copy the first four notes, and duplicate them for the remainder of the bars.

To add variation to the bass line, in the first two bars program the bass MIDI notes on G#1. In bars three and four, move the notes to B1. In bars six and seven, program the notes on C#2 and return to G#1 in the seventh and eighth bars.

4. Add a bass accent
Create an accent for the bass note by creating a new MIDI track and loading Massive on it. Use the Lunar Echoes Expansion, and load up Memory Dump 3.
Learn how to load an Expansion Pack into Massive here.
Select Lunar Echoes, go to the Bass section and choose Memory Dump 3. Create a two bar MIDI clip and using the same note you used for the rolling bass, program a single MIDI note on 1.4.3.

5. Create the synth lead
Create a blank MIDI track and load Massive on it. Using the Ignition Code Expansion Pack, in the Synth Lead section, locate and load the Catarina preset. If you prefer to use your own preset, check out these Massive presets for techno.
Reaktor is another great VST for creating lead sounds; here’s a helpful list of free Reaktor ensembles for techno to inspire you.
Let’s create a blank eight bar MIDI clip. Melodic techno melodies have a unique rhythm, and include short ‘stutter’ notes to make the rhythm more interesting. Write a melody that’s one bar in length and make the first two notes very short. These will be the ‘stutter’ notes.
Copy the rhythm into the third bar, but change the notes to match the chords. Copy the melody into the fifth and seventh bar, changing the notes once again so they work with the chords.

6. Arrange your track
To create a simple arrangement, start with the kick, hi hat and percussion playing from bars 1 – 9. Add the pad (or the layered pad, depending if you chose to layer your pad or not). In bars 9 – 17, add all of the drums from Battery 4 (kick, clap, shaker, hi hat), the percussion noise and the rim. Add the bass and the bass accent. In bar 17, bring in the melody from Massive. In bar 25, start to bring down the energy by removing the shaker and the rim.

Following this one minute section, copy and paste the different sections of the track to create the break. To create a drop for melodic techno and an effective breakdown, you’ll need to add more elements and automation. This short arrangement is the beginning of a track, as creating a full track requires additional parts and production time. For more ideas about how to create and arrange techno, refer to this guide.
7. Master your track/loop
It’s easy to create a master using Ozone 11, included in Komplete 14. Load the plugin on the master bus, and play back the loudest part of the track. Ozone 11 will analyze the input, and use its AI-powered technology to enhance your track. Select the EDM target, and Ozone 11 will customize its settings according to the target you choose.

Here’s what our final mastered melodic techno track sounds like.
Start creating melodic techno music
It’s a great time to begin writing melodic techno tracks, as this style has a beautiful sound that’s attracting the attention of audiences globally. Start exploring your creativity and experiment with creating melodic techno; you could be the next producer getting signed to the labels of your dreams!
Native Instruments Expansions specifically created for writing melodic techno and techno make it easy to find the right sounds to use in your tracks. Pick up a copy of Komplete 14 and a few Expansions, and start writing inspiring melodic techno tracks today.
Related articles
-
The best sound design plugins from Native Instruments
Discover the best sound design plugins for music, film, and games, including top synths, effects, and creative tools from Native…
-

Taming the monster: behind the soundtrack of K-Pop Demon Hunters
Discover how GRAMMY-nominated engineer Curtis Douglas and producer Lindgren used iZotope Ozone, RX, and Kontakt to craft the high-impact, polished…
-

The best DJ effects: a complete list for beginners and pros
Discover the best DJ effects for every mix, from essential filters and delays to creative tools like the Beatmasher. Learn…
-

Weird by design: HAAi on the limitless potential of Absynth 6
Discover how the Australian artist HAAi uses the new engine in Absynth 6 to create layered atmospheres and immersive soundscapes…
-

$0 to pro studio: your first 5 music production tools that replace $3,000 of gear
In this blog, you’ll learn how to replace hardware gear with VST plugins and get a cheap pro home studio…
-

Noha on groove, texture, and using Guitar Rig to shape emotion
Italian producer Noha explains how Guitar Rig, modulation, and subtle distortion shape his minimal yet emotional sound in “The Place.”…
-

Junaco on DIY recording, Sonic Ranch, and the subtle power of RX
Junaco share how RX helped shape In Motion, keeping the album’s warmth and intimacy intact while refining every detail of…
-

Inside Oli Julian’s rhythmic approach to Netflix’s The Twits
Oli Julian breaks down how Abbey Road Vintage Drummer helped him score Netflix’s The Twits with rhythm, humor, and personality.