


Time stretching is the process of manipulating audio files to play more slowly or quickly without changing their pitch. Time stretching is used in music production to make tempo adjustments to loops or samples, or to fit vocals or samples into a project with a different tempo. Additionally, time-stretching can be used to create new textures and sounds from samples for unique and creative effects.
In this tutorial, you’ll learn techniques for time stretching in Kontakt 7 and iZotope RX 10, as well as how to time stretch in Ableton Live and Logic.
Jump to these sections:
What is time stretching?
Time stretching changes the playback speed of audio by using complex algorithms to change the speed of a sample without changing a sample’s pitch. To make a sound longer, duplicate samples are inserted throughout the sound, and to make it shorter, samples are removed. Time stretching can be used to adjust the tempo of loops or samples that are a different tempo than the session tempo, or time stretched audio can be used in a track as an effect.
Time stretching became used as a creative technique by drum n bass producers in the early 1990’s. Tracks like 4Hero ‘Journey From the Light’, Amazon II / DJ Aphrodite ‘Beat Booyaa!’ Remix, Manix ‘The X Factor’ and Dillinja ‘In the Mood’ are great early examples of time stretching techniques used in production.
How to time stretch in Kontakt 7
Time stretching is commonly used to make tempo adjustments to a loop or sample so that it will match the master tempo of the session. This type of technique is used in all types of music production and remixing and can be easily accomplished using Kontakt 7. Kontakt is a sampler that plays back pre-recorded sounds that are mapped to specific keys. You can load samples into Kontakt and put them into zones and onto specific keys.
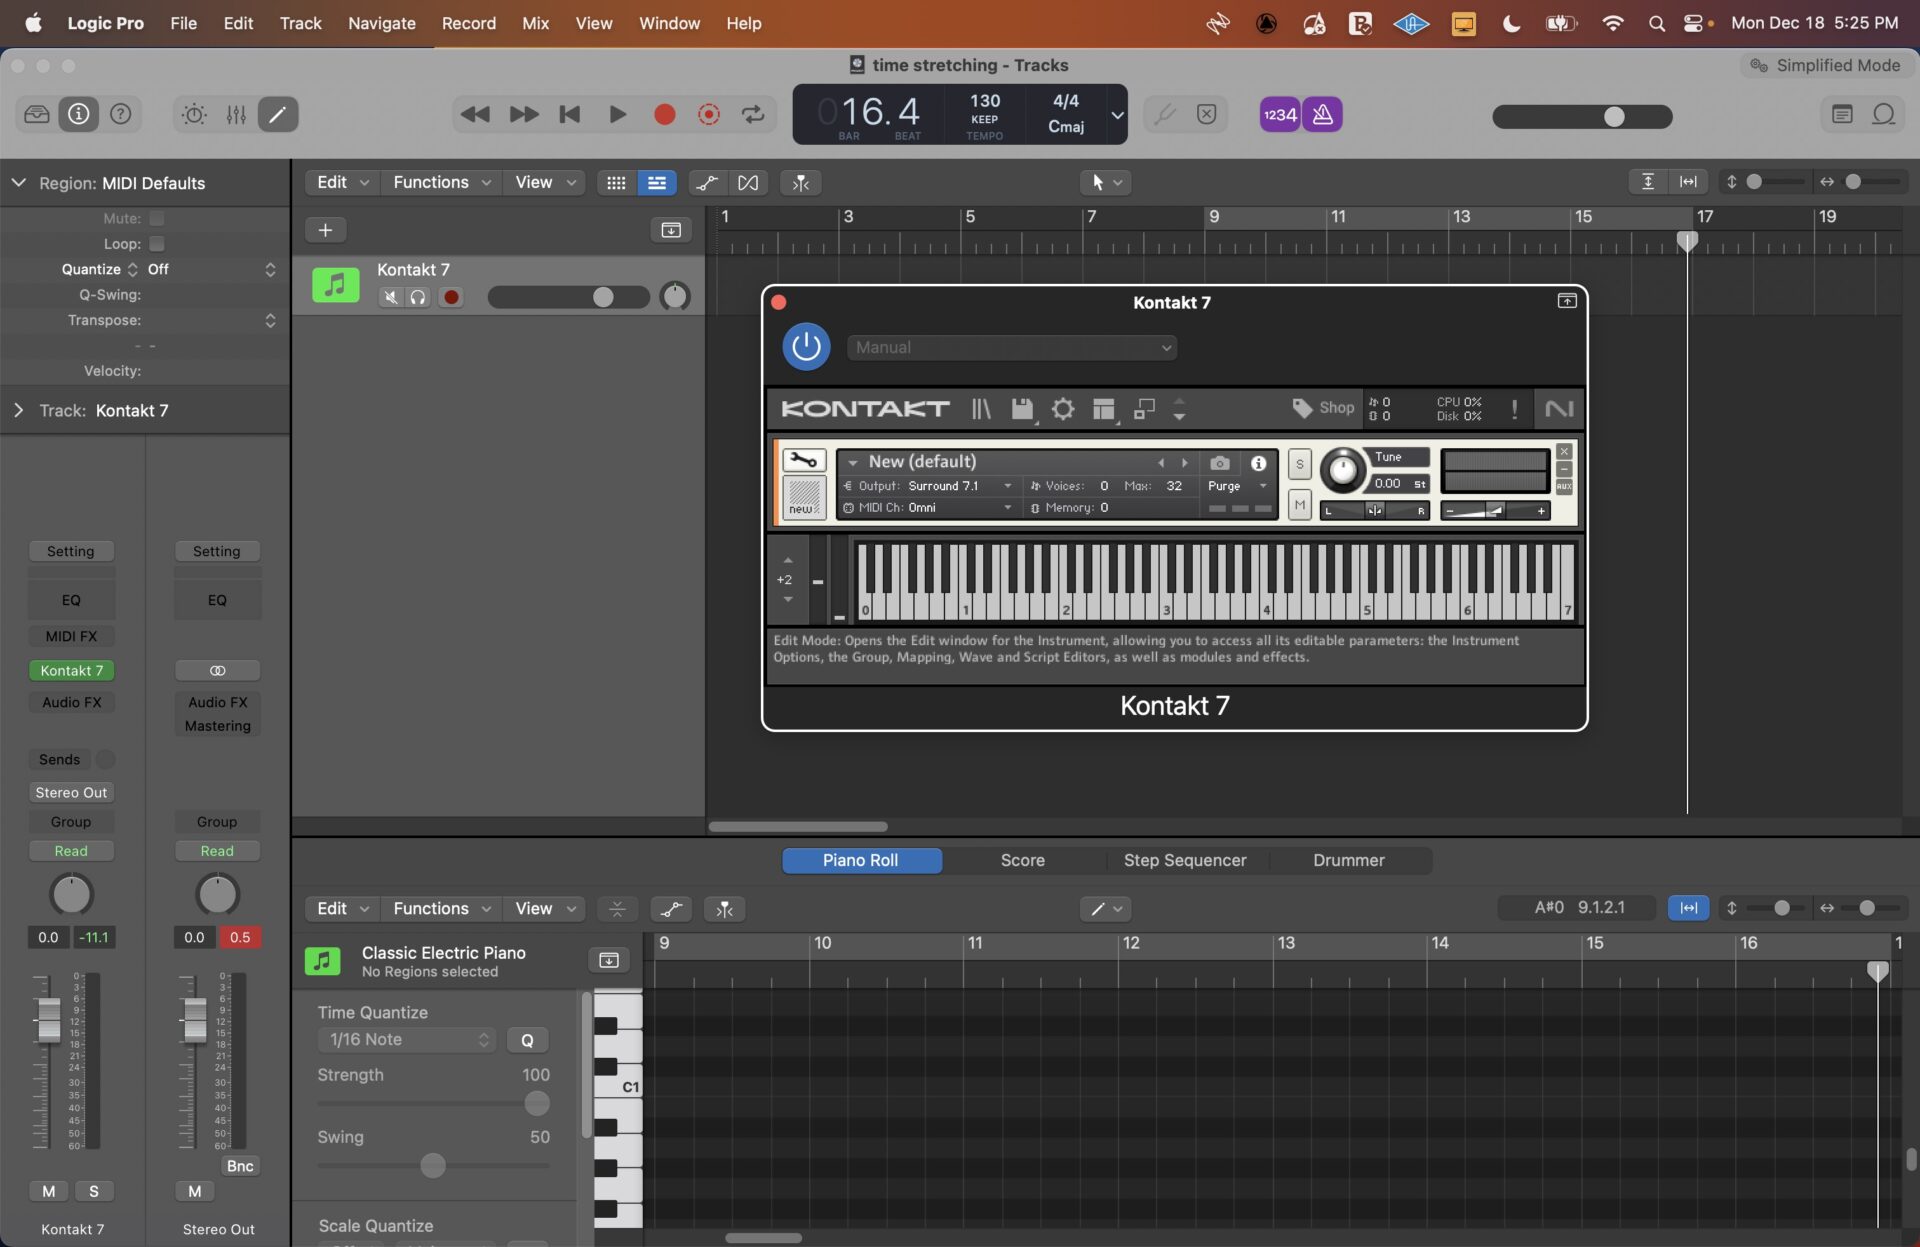
Start by creating a blank MIDI track and add Kontakt 7. Click the floppy disk Icon, and select New Instrument.

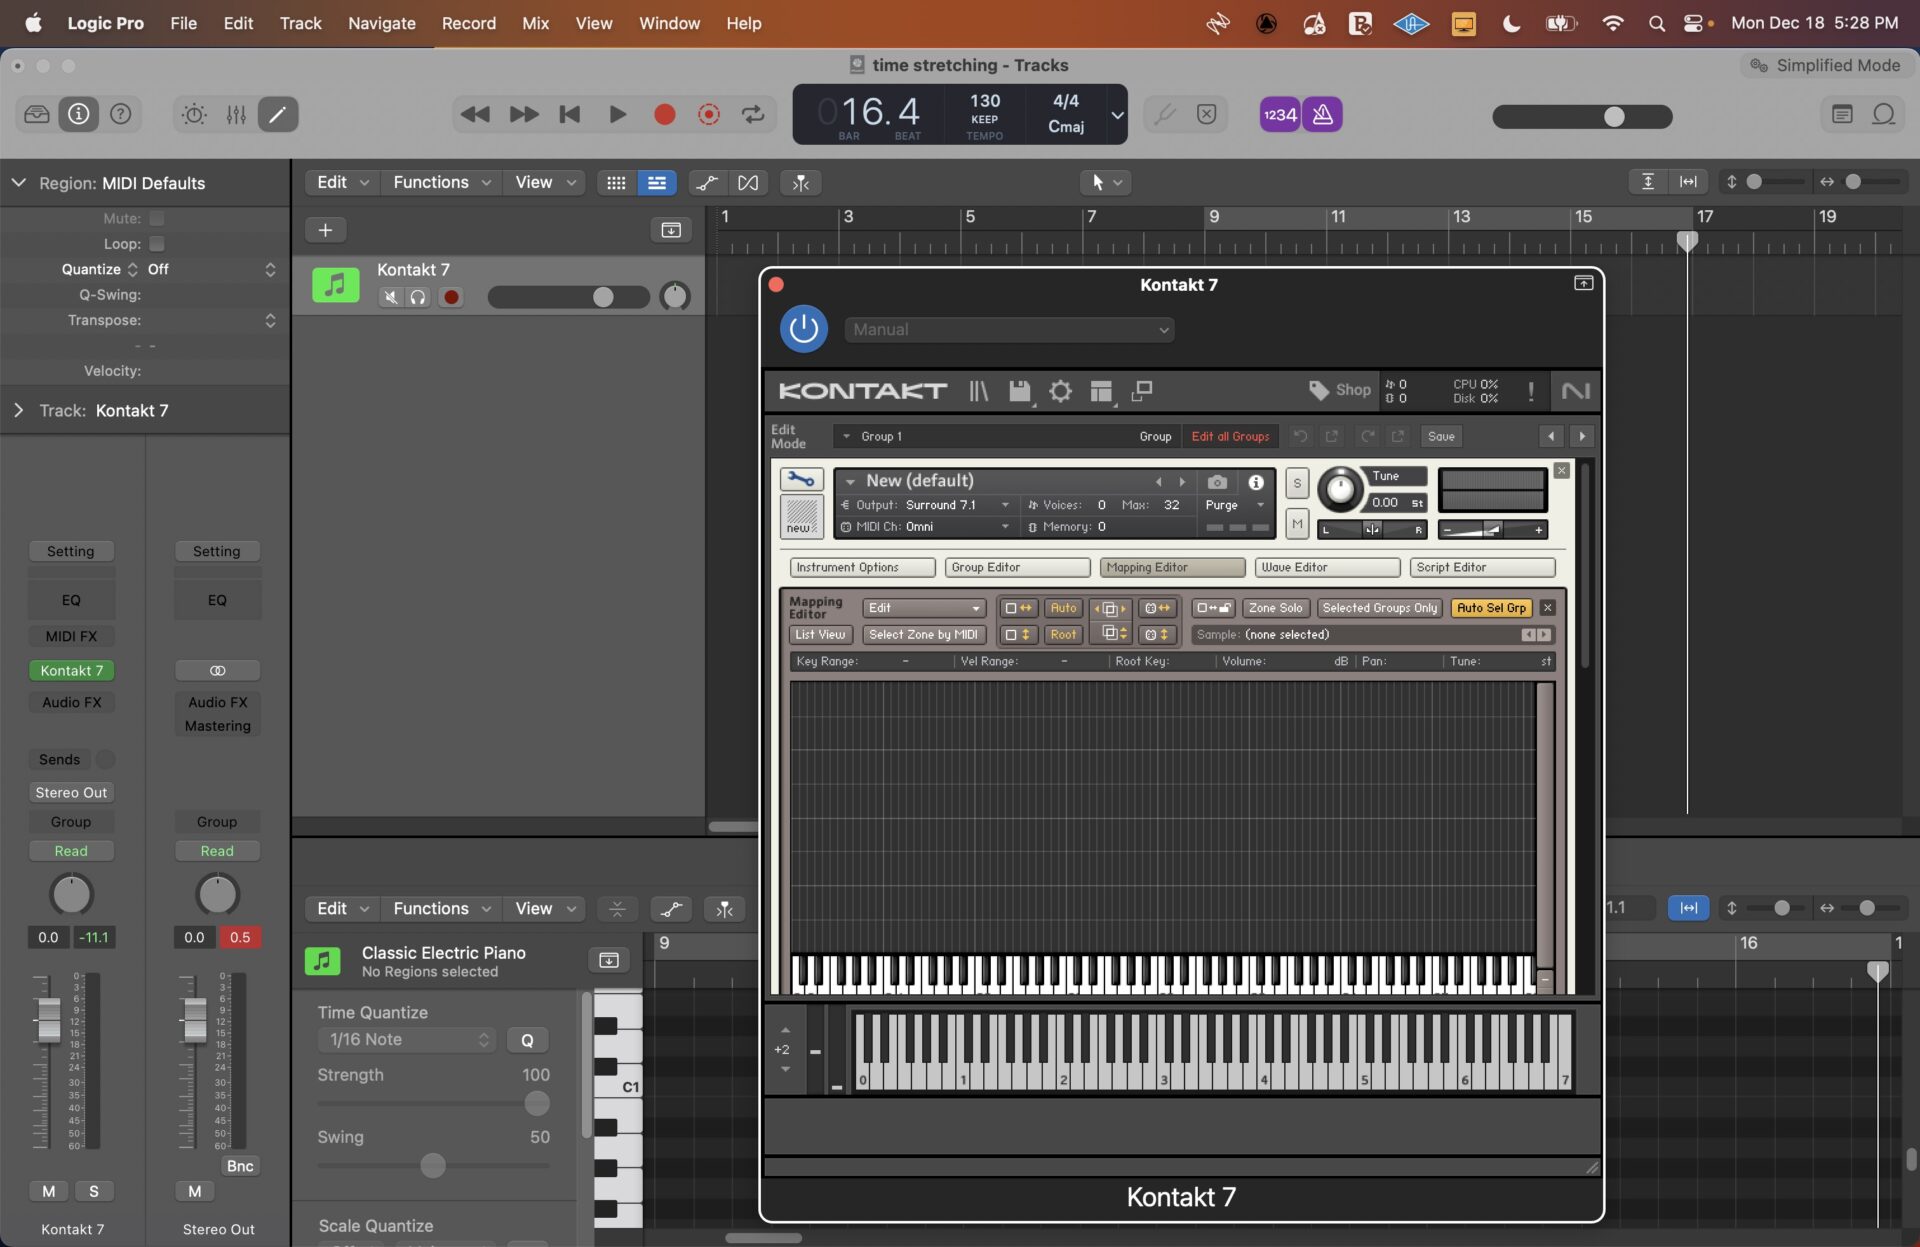
Click on ‘Edit Mode’ (the gear icon in the upper left) and this will open the Edit Window for the instrument.
Click on Mapping Editor to load a sample. The Mapping Editor is where a sample can be loaded in with a zone, and you can decide where it’s going to appear and the keys and velocity that will play it.
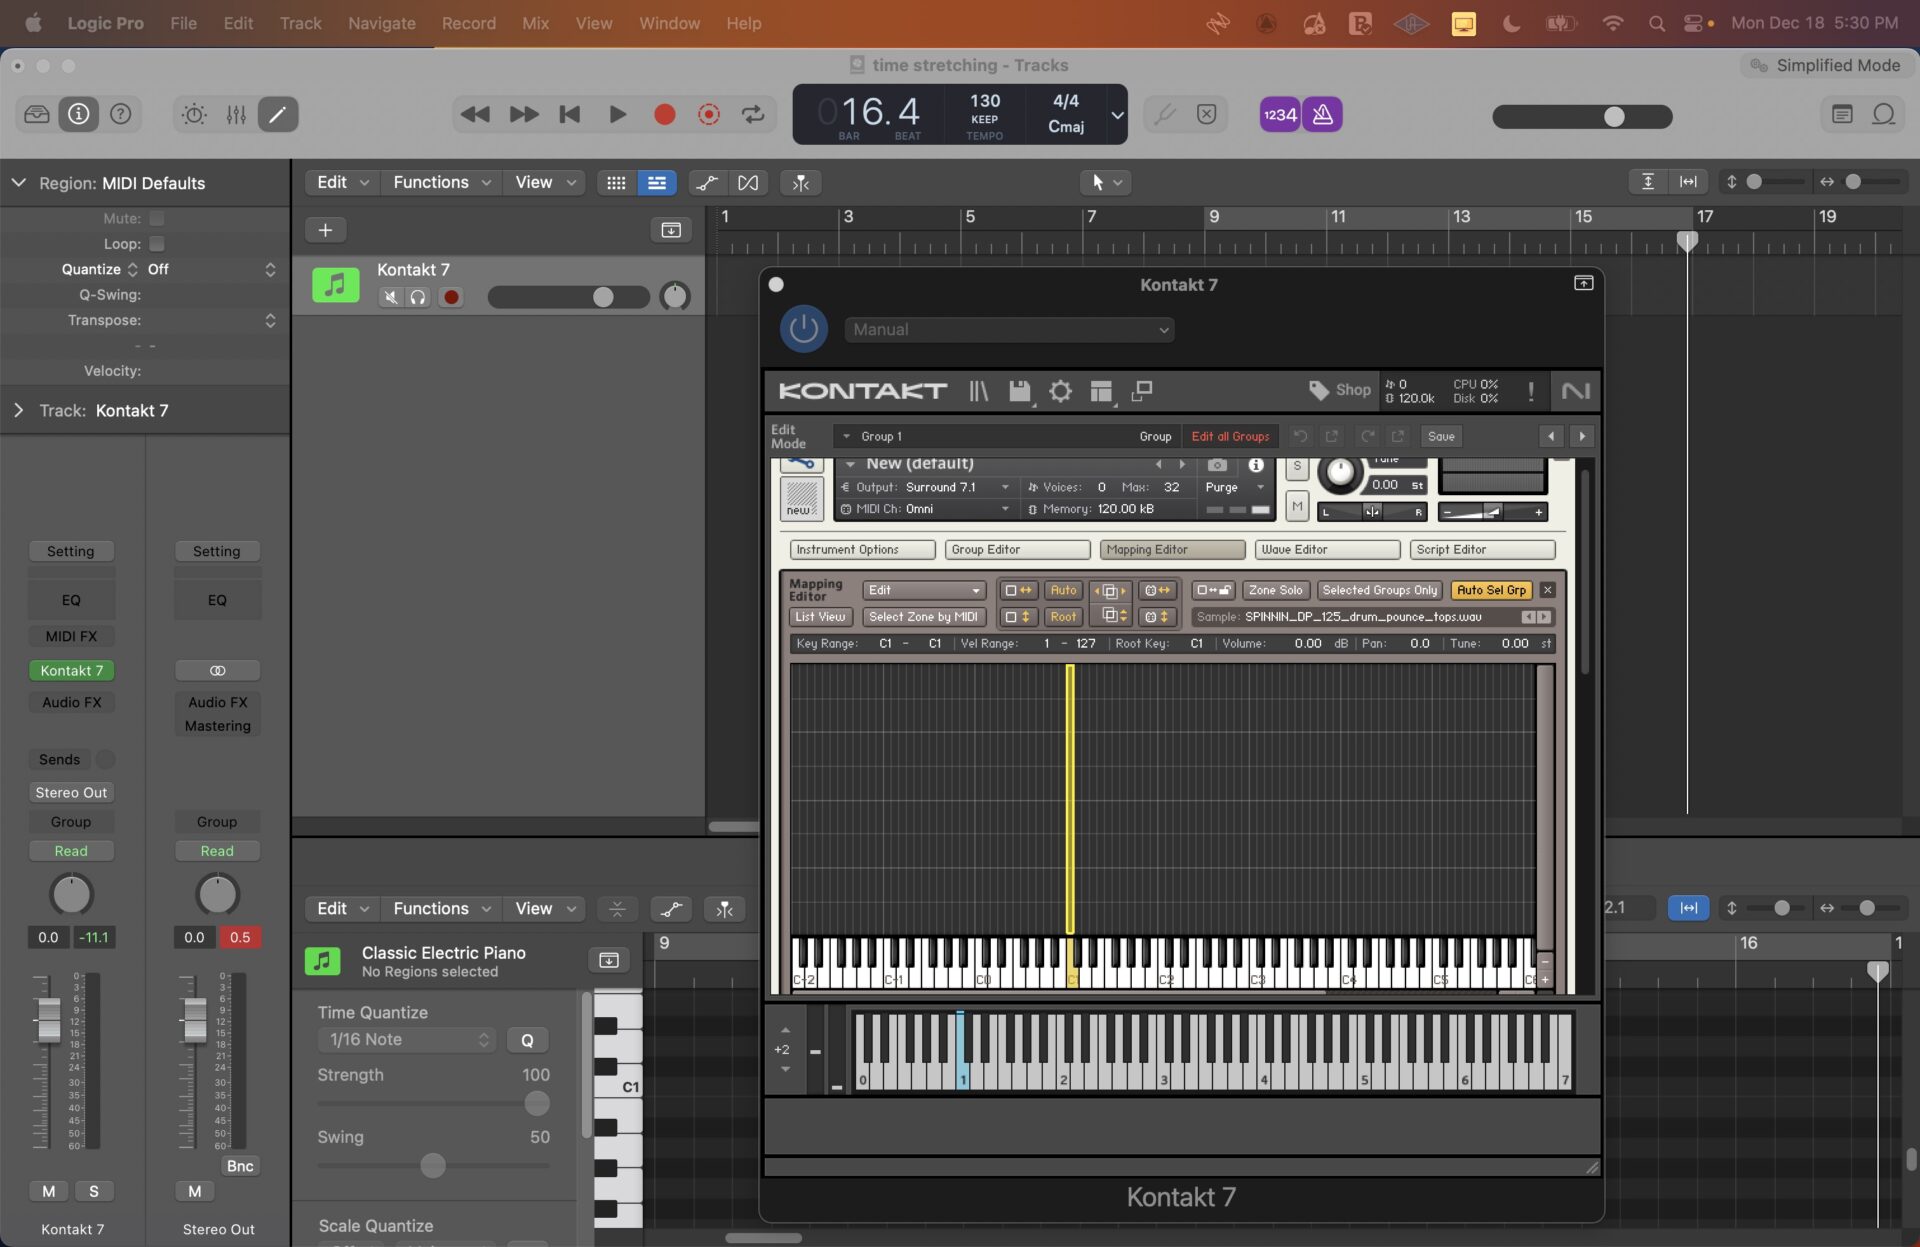
Select a drum loop for a sample and set the BPM of your DAW to a different tempo than the tempo of the loop. To load in the loop, click and hold on the sample and drag it onto C1 in the Mapping Editor. You may need to scroll down slightly to see the names on the piano keys in the Mapping Editor.
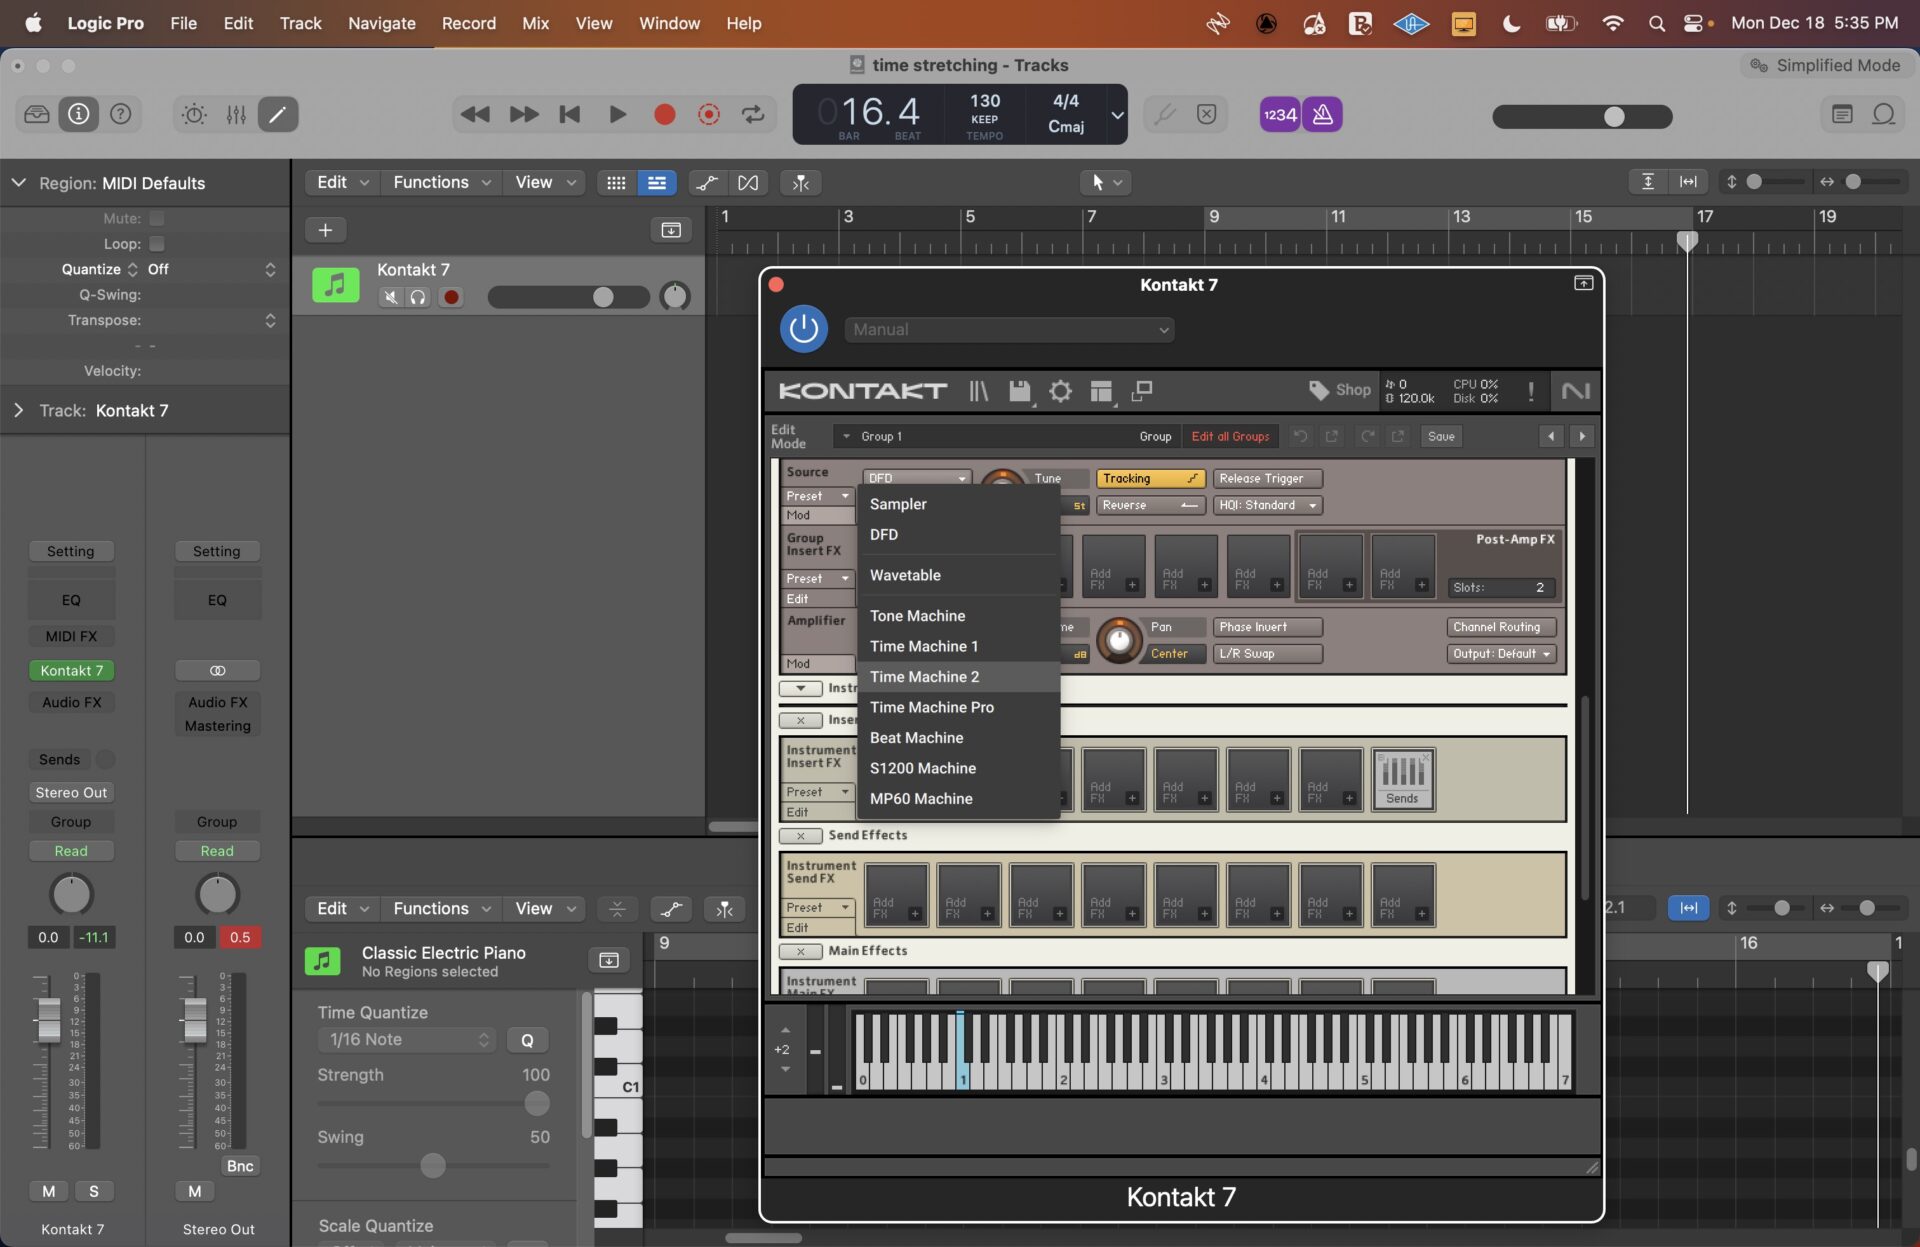
Scroll down to the Source module, and select Time Machine 2 from the drop down menu. Time Machine II uses enhanced algorithms that provide better time quality stretching and pitch shifting.
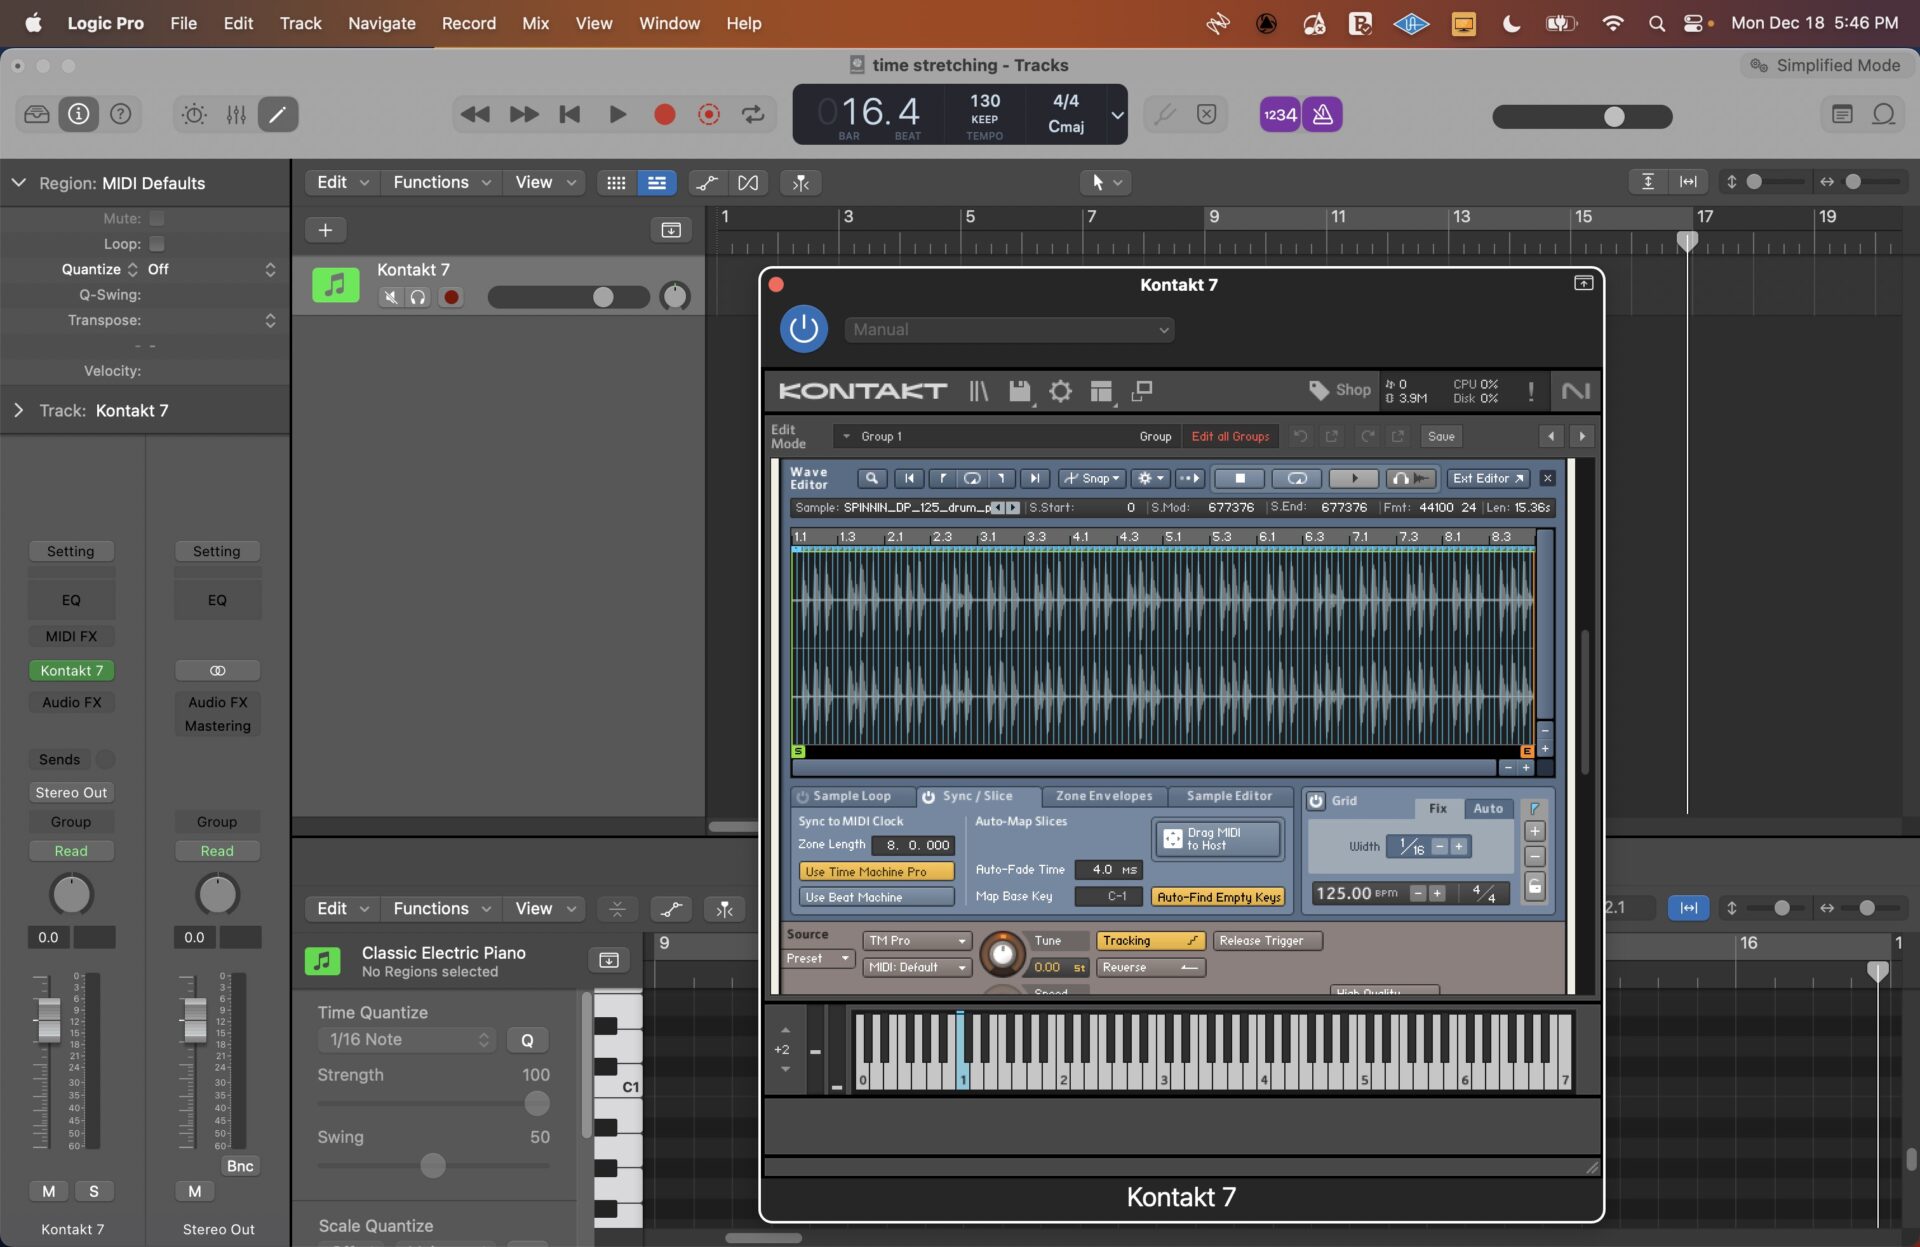
Scroll back up to the top of the Mapping Editor, and select Wave Editor. The Wave Editor allows you to see the sample inside the Zone.

Scroll down to see your sample in the Wave Editor. In Wave Editor, click on the Sync / Slice Menu (below the loop) and then click Use Time Machine Pro. On the right hand side, turn on the Grid. Occasionally you may need to enter in the original BPM of the sample, if it’s not listed. When you turn on the Grid, this will lock in the sample to your DAW’s tempo.
In Logic Pro, on your MIDI track, right click to create a MIDI region and extend the region by dragging the right hand corner to bar 9. In the Piano Roll, click the pencil tool and draw an eight bar note on C1. Press play in Logic and your loop will be synched to the BPM of your DAW.

Sample manipulation in Ableton
Using sample manipulation, you can fit a sample into a different tempo without changing its pitch. Ableton Live and Logic Pro both offer built-in time stretching features in their software that allow you to perform time stretching in this manner. Ableton Live’s Warping feature slices audio into small snippets, then replays the sequence in the same order at different speeds. Ableton’s warping uses granular resynthesis to reduce samples into tiny grains, then puts them together in a new form depending on how the warp markers are set.

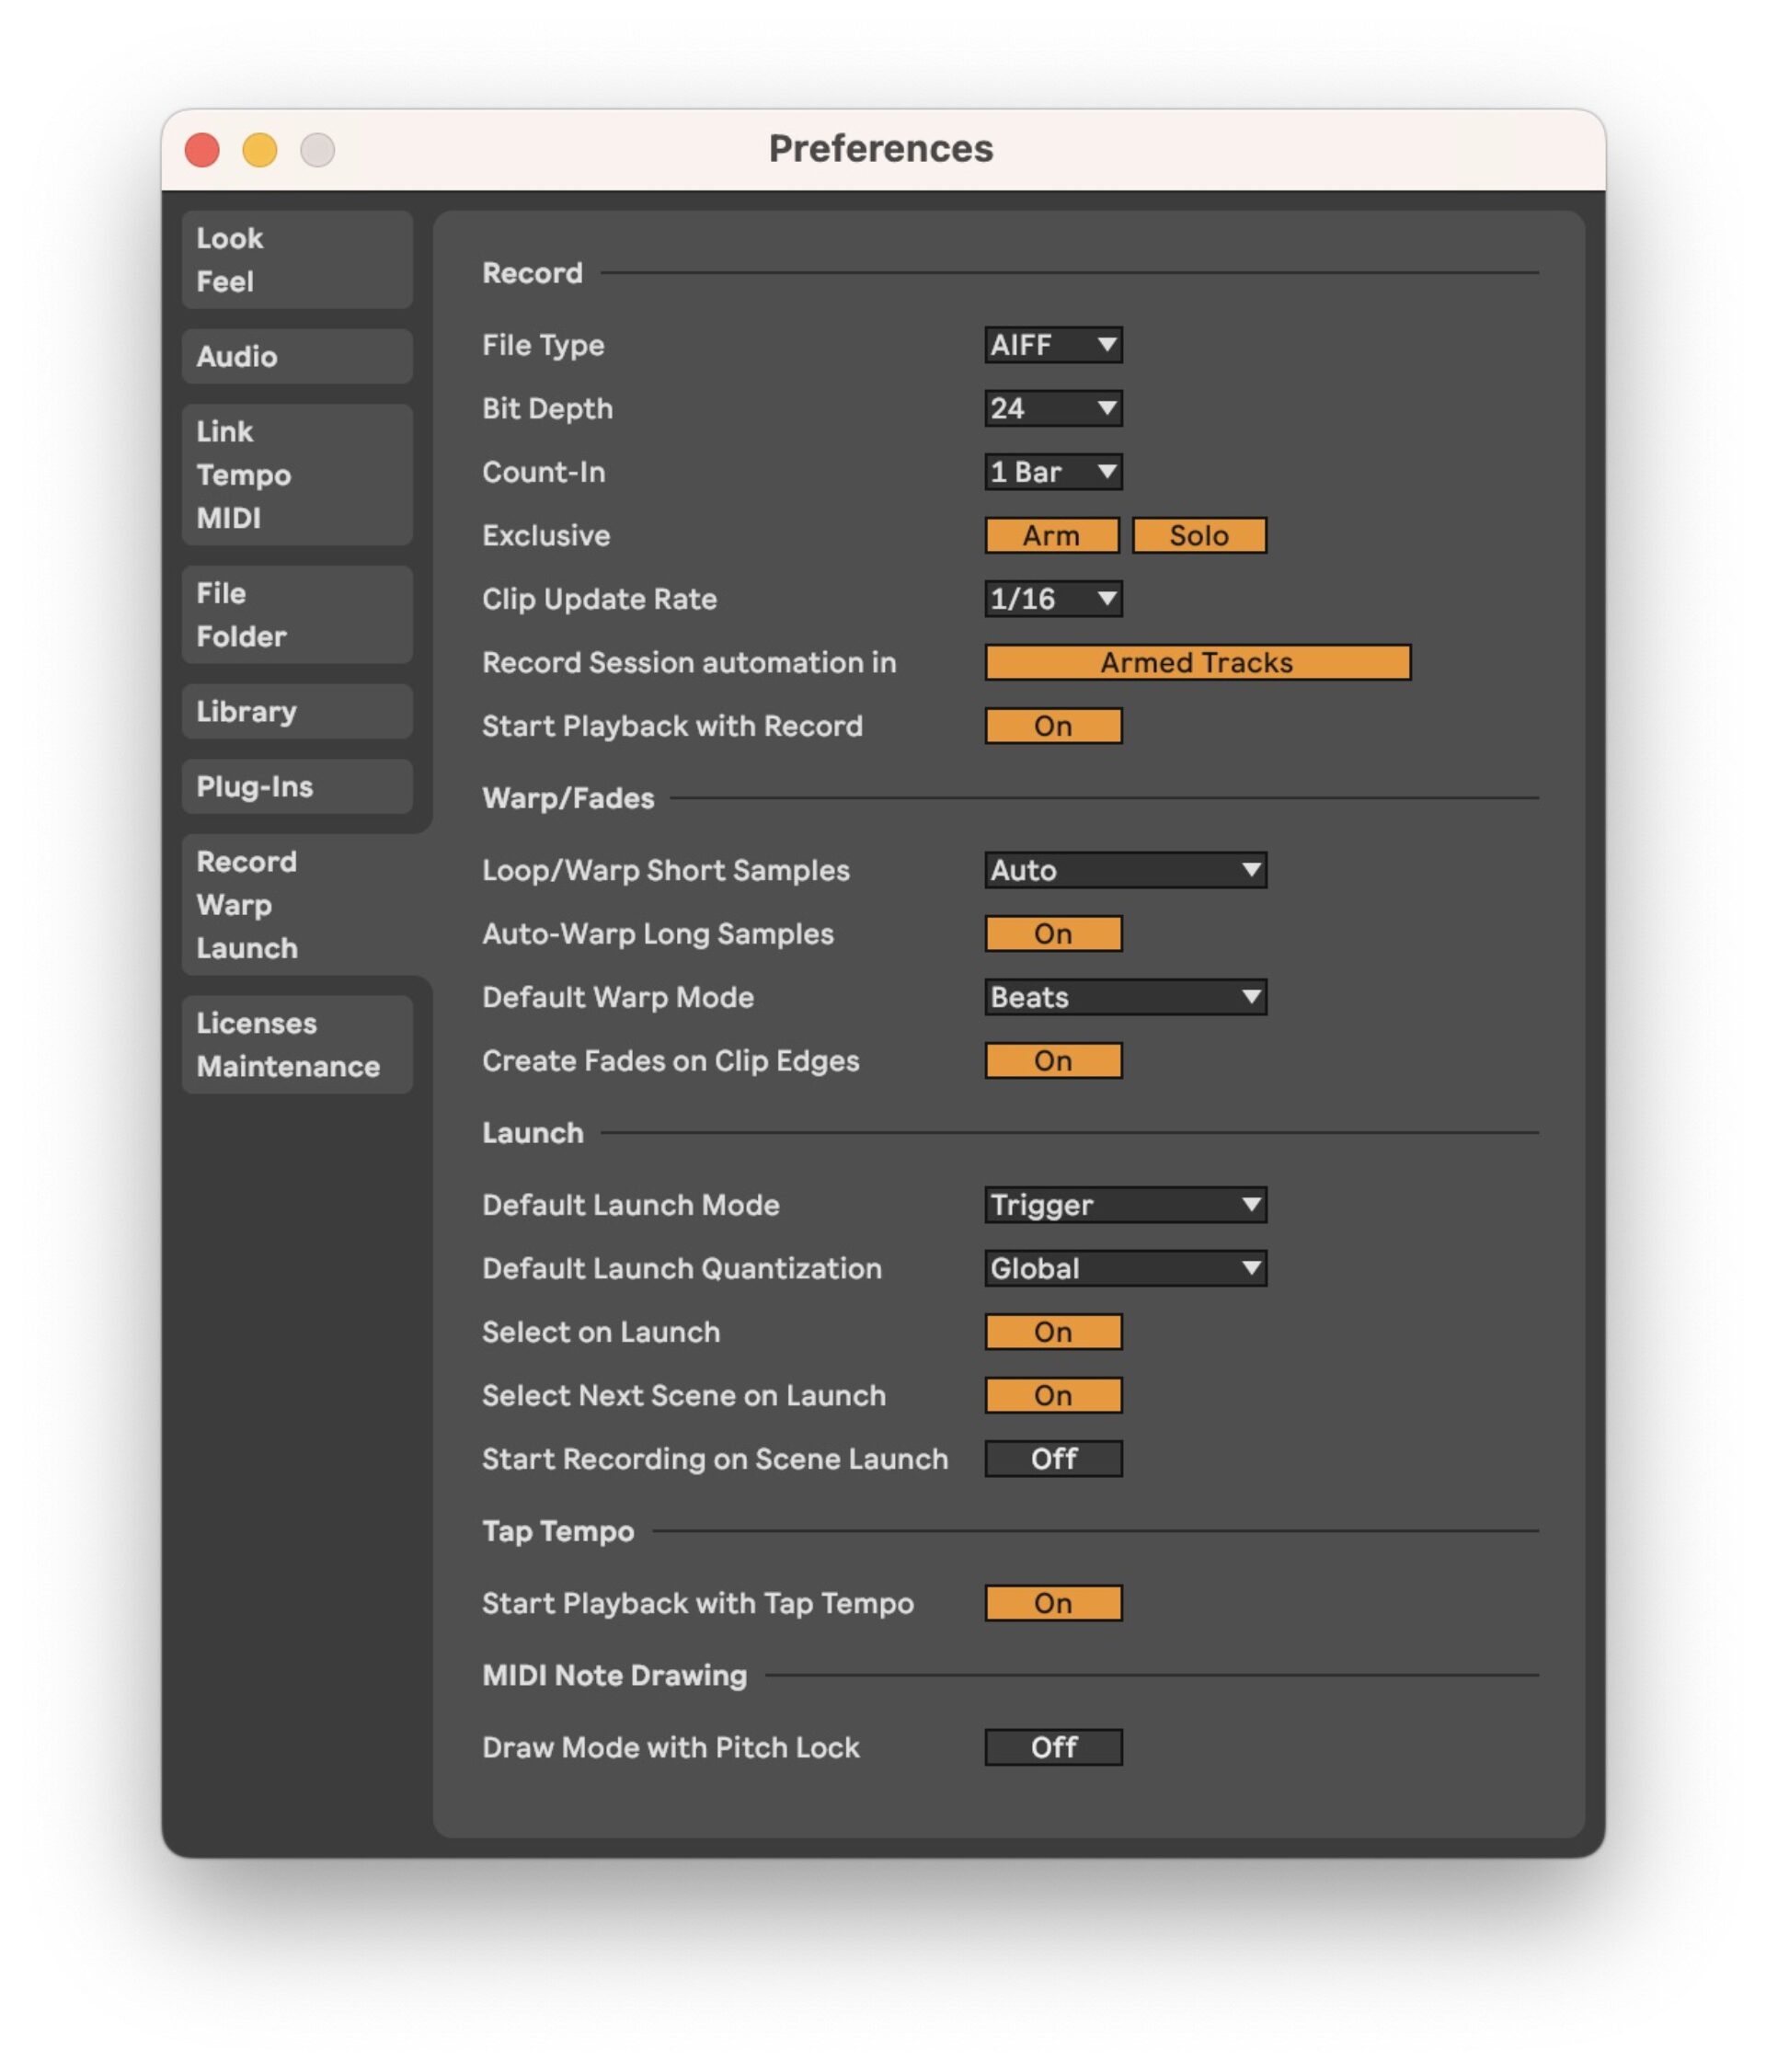
If you drag a sample into Ableton’s timeline or a clip, it’s automatically warped if Auto-warping has been turned on in Preferences. In Ableton’s Preferences, navigate to the Warping section to ensure Auto-warping is turned on.
With the Warp button on, an audio sample will play at the same bpm as the DAW is set to. The Warp button must be on to use any of the Warp controls. With the Warp button off, the sample will play exactly as it was recorded.

Time stretching in Ableton Live: Warp Mode
There are several different time stretches modes, from Beats to Textures to Complex.For drums and percussion, choose Beats in the drop down menu. For polyphonic samples, choose Complex Mode. Complex Pro mode is the most taxing on CPU, but it’s the best mode to use when you want to transpose the audio and keep its quality.

Warping vocals
One of the most practical ways that Ableton’s warping can be used is for vocals in remixing. When remixing a track, you may receive vocals and you’ll most likely want to change the bpm of the vocals to fit them into your remix.
To use this Warping method, you’ll need to know the bpm (tempo) of the vocals. You can check the bpm by analyzing the audio file in a program like Mixed In Key, or checking the BPM of the original track.
Unclick warp, then click it again and write in the original bpm of the vocals. Ableton Live may ask you if you want to keep the current timing of the clip, press yes to keep the timing if you wish.
Choose Complex Pro from the Dropdown menu, as it’s the smoothest warping mode. If the position of the vocals are slightly out of time, you may need to drag the audio clip to where you want the first transient to be. Right click the beginning of the clip to and set 1-1-1.

If you notice the vocals are slightly out of time, and repositioning them does not fix this, find the first ‘downbeat’ of the bar in the vocals, and double click to create a Warp Marker. Right click the Warp Marker and select ‘Set 1.1.1 Here’ to set the point where Live will begin warping. Right click the Warp Marker and choose ‘Warp From Here’.

Turn on the metronome (the double dots located on the left hand side of Ableton) and play the vocal with the Metronome to hear if it is in time. From the Warp Mode drop down menu, Choose Complex or Complex Pro. Manually drag the Warp Markers if you need to make adjustments.

Time stretching in Logic Pro
To time stretch audio in Logic Pro, the easiest way is to hover your mouse over the end of an audio file and hold down the option key. (⌥) You will see the time stretch icon appear. Click and drag your audio with this icon to the nearest bar. This is the best method to use when you want to time stretch an entire region of audio.
To change the time of individual sections of audio within a region, use Flex Time. Using Flex Time can create artifacts within the audio when sections are stretched too much. It’s recommended to use Flex Time on elements of a track that are in the background.

To enable flex time, click on the Flex Time icon. Choose the Flex Mode from the drop down menu, and choose ‘Automatic’. Inside the audio region, click on a point to create transient markers. Add transient markers on either side of the section you want to stretch. Click and hold the transient marker to move it.

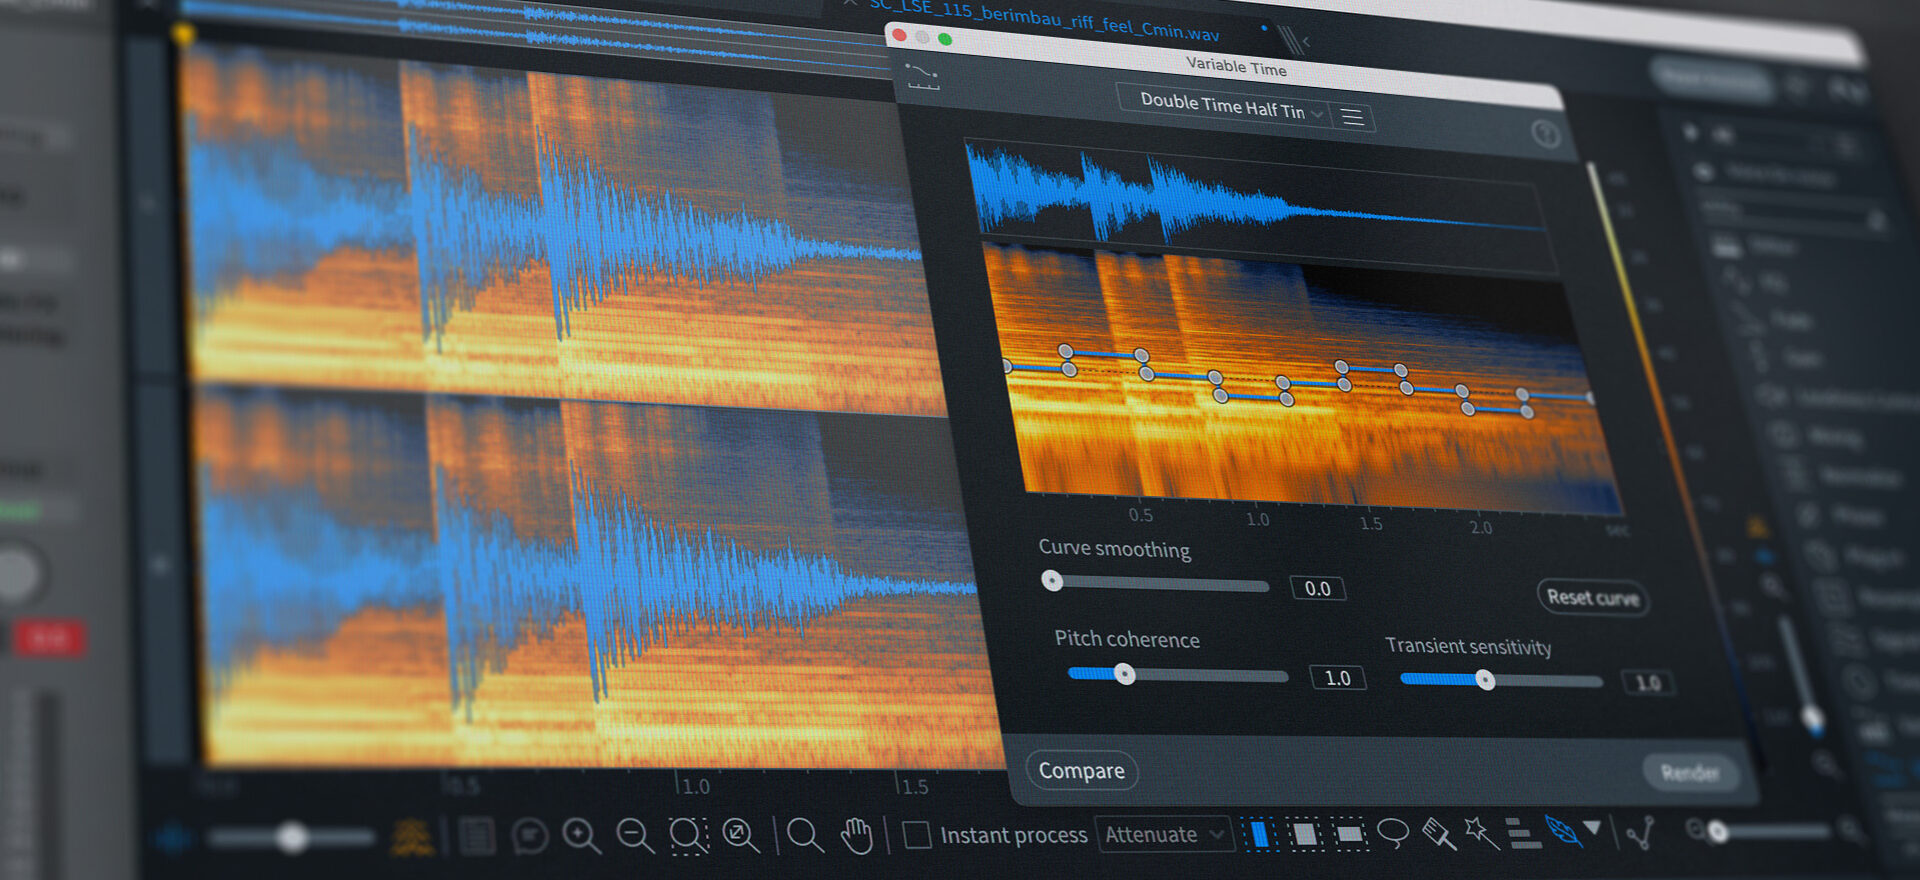
Time stretching for sound design in iZotope RX 10
Time stretching can be used for creative sound design. iZotope RX 10 Variable Pitch can be used to time stretch a sample in your track. You’lll need to set up iZotope RX 10 as an Audio File Editor in Logic before you can use the Variable Pitch feature.
To edit audio from your Logic Pro session in the RX standalone audio editor:
Select an audio clip in the Logic timeline.
Click Edit, then Open in iZotope RX (the Logic keyboard shortcut is Shift + W) and RX will automatically open. This method below is a destructive edit, and it’s recommended to make a backup copy of your original audio file before overwriting the edit. This is the sample used (I unfortunately didn’t back it up before the destructive editing method below).

Select the portion of the audio that you want to stretch. Once your desired part is selected, delete the unwanted audio by pressing Edit, Invert and Edit, Delete
Then select the audio in the main RX 10 Editor that you want to stretch. From the menu on the right, double click on Variable Time. Choose a Preset shortcut or double click to create nodes, and drag them vertically on the axis.

Press Render to Render the Clip. If you wish to replace the original audio file, click File -> Overwrite Original File to save the edit.

Close RX, and navigate back to Logic Pro. Logic will automatically update the audio file to reflect your edit. The changes will not take effect until you quit RX. Trying adding effects to your time stretched file for a unique sound!

Start using time stretching in your music
Now that you’ve learned all about time stretching and how it can be used in productions, it’s time to start using these techniques in your own tracks! Try Kontakt 7 and experiment time stretching your loops and samples.
If you’re feeling adventurous, demo iZotope’s RX 10 (which is also helpful for cleaning up audio!) and experiment with the Variable Time feature.
If you’d like to learn more about making music, be sure to check out our tutorials about music production and how to produce house music. Whether you choose to use time stretching to match audio files to the tempo of your tracks, manipulate samples to fit your track’s tempo or as a creative effect, time stretching is an essential technique for music producers to master.
Related articles
-

Behind the synth: A. G. Cook on stacked sawtooths and the creation of Super*Saw
Explore the extremes of stacked sawtooth waves with Super*Saw, a new synthesizer co-created with A. G. Cook. Learn how to…
-

Inside the evolution of orchestral sampling: an interview with ProjectSAM
Discover how ProjectSAM’s Lineage Series uses NKS and smart features to change orchestral sampling. Plus, save on instruments in our…
-

How New Constellations turn emotion into sound with Massive X
Go inside the studio with New Constellations. Learn how they use Native Instruments gear, happy accidents, and lifelong friendship to…
-

Citizen Kain on building emotion and space with Replika
Citizen Kain explains how Replika helped shape the rhythm, tension, and emotion behind his debut Eversun Records single “Moments.”…
-

The organic precision behind Calcou’s Anjuna release featuring Reaktor
Calcou shares how Reaktor, Monark, and Super 8 shaped the creative balance and live energy behind their new duo EP,…
-

14 NKS instruments that will change the way you create music
Discover 14 NKS instruments to freshen up your workflow. From lo-fi tape synths to cinematic strings, shop the Native Instruments…
-

Parallelle on crafting living basslines with Reaktor and TRK-01
Parallelle share how Reaktor and TRK-01 shape the bass and warmth in 11th Avenue, balancing analog depth with modern control.
-

Where will your sound lead you? Explore the Native Instruments Summer Sale
Save 30% on instruments, effects, and sounds in our Summer Sale. Find the tools to keep your tracks moving and…