


If you’re a beatmaker or a producer, what comes to mind when you think of Kontakt? You might picture realistic orchestras, cinematic pads, and detailed sampled instruments. That’s all accurate: Kontakt uses meticulously sampled and creative instruments. But Kontakt is actually an extremely flexible sampler. Under the hood is a powerful sound design platform, packed with deep modulation and automation tools that can transform your sounds into something truly unique.
If you have the full version of Kontakt, which is also included with the NI 360 Pro subscription, you can take full advantage of these modulation features and get deep into tweaking. In this blog, we’ll break down advanced automation and modulation tips to help you master Kontakt 8’s rich modulation features.
Jump to these sections:
Follow along with this tutorial using Kontakt 8 – also included in a free trial of the NI 360 subscription.
What is modulation?
Before we get into Kontakt’s advanced features, it helps to understand what modulation actually is. In simple terms, modulation is when you dynamically change properties of a sound over time. Those properties could be something like pitch, volume, tone, or effects.
Instead of leaving sounds static, modulation adds expression or transformations as the sound goes on. It creates movement, variation, and makes sounds feel organic and engaging. In the context of a sampler like Kontakt, modulation could make instruments feel more realistic, like vibrato on a violin. It could also take things into a totally weird and creative realm that isn’t realistic at all.
You can hear extensive use of modulation in “End of Summer” by Tame Impala. Listen out for moments when sounds are filtered quickly with resonant filters, and span across the stereo image, like at 0:42:
The modulation options in Kontakt are extensive and can be applied in multiple ways. We’ll be highlighting some of the best methods. If you’re looking to dive even deeper, you can explore the modulation section of the Kontakt manual.
Tips for advanced Kontakt modulation
Kontakt’s modulation capabilities allow you to dynamically shape sounds by controlling various parameters over time.
Let’s explore how you can use these tips to elevate your sound design, starting on a more basic level and progressing through to more advanced modulation options.
1. Macro level control with Performance View
Starting at the top, the Performance View is what you’re probably already familiar with in Kontakt. This view offers immediate control through macro knobs that simultaneously modulate multiple parameters under the hood. This makes it easy to create expressive shifts in your music without having to manually automate individual parameters in your DAW.
Suppose you’re using any of the official libraries included with the 360 Pro subscription. All of these instruments will have a custom Performance View mode with a user-friendly UI that makes it easy to change the parameters of an instrument.

Many of these instruments have easy-to-use modulation options, or you could use external LFOs or sequencers to control these macros.
2. Deep dive into the modulators tab
If you’re ready to get deeper into Kontakt’s internal modulation, you’ll have to move into Classic View, which you can select from the View menu on the top left of the window.

Here is where you can really begin to employ advanced automation tips.
Before you get deep into modulation, make sure you’re affecting the correct sound or sounds by opening the group editor and checking whichever sound you would like to control. If you want to affect all of them at once, select “edit all groups”. Be warned, though, editing all groups can be CPU-heavy.
Once you’ve done that, you can head down to the Modulation tab and start treating Kontakt modulation similarly to how you would design envelopes for a synth. On the top left of each modulator, you can see which parameters you are affecting.
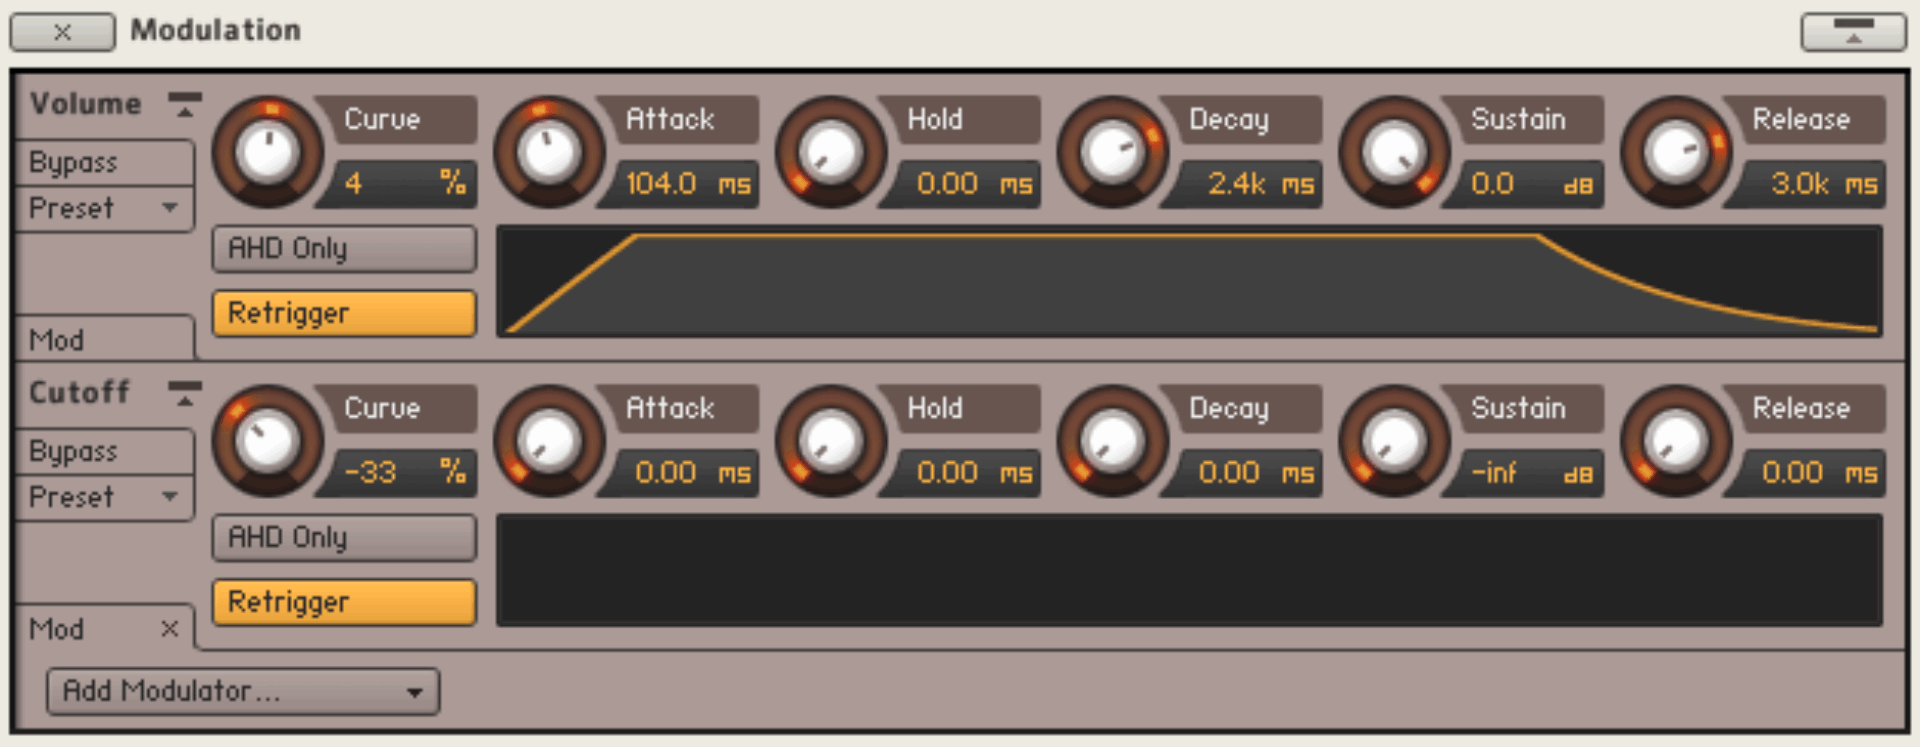
You can click on the quick-jump buttons next to each of the modulators to be taken straight to the relevant modulation destinations and control their intensities, MIDI assignments, and more.
3. Use Kontakt modulation sources for dynamic shaping beyond ADSR
Standard ADSR envelopes (Attack, Decay, Sustain, Release) offer basic modulation. Our version of that is called AHDSR (the H standing for ‘Hold’). But Kontakt lets you go much deeper. Using multi-stage envelopes, you can create evolving shapes that can become complex and multilayered quickly.
You can assign an envelope to a parameter by right-clicking on it and choosing a modulation source. These can be arranged into four broad categories:
- Envelopes are adjustable curves that shape how a parameter changes over time, typically in response to a MIDI note. For example, opening and closing a filter after a key is pressed.They create non-repetitive, time-based modulations and are often used for shaping volume, pitch, or filter movement. They typically start and end with each MIDI note.
- LFOs generate repeating waveforms (like sine or square waves) at low frequencies, which can be used to modulate parameters rhythmically. Kontakt also includes a complex LFO that blends multiple wave shapes.
- External sources are modulation inputs from outside Kontakt itself, like MIDI CC messages or random values.
- Other includes unique modulation types that don’t fit into these other categories. They offer specialized modulation, including rhythm-based or audio-reactive controls. In this category, you’ll see the step modulator, envelope follower, and glide.
- Existing lets you assign other parameters to modulation sources you’re already using in your sound.

You can combine multiple LFOs and modulation sources to create complex, evolving textures.
4. Get deeper control with the Modulation Shaper
Kontakt’s Modulation Shaper gives you precise control over how modulation sources affect your sounds. This powerful feature lets you draw custom shapes or create detailed curves using a graphical table.
Just click the ‘Active’ button on the left-hand side of the modulator to activate it.
Now you can map the behavior of incoming modulation signals. Quickly create shapes by clicking and dragging bars or drawing smooth curves with the intuitive editing tools.
Additional parameters like Modulation Intensity, Invert, and Lag (Smoothing) provide nuanced control. This allows for subtle refinements that can give an organic “humanized” element to your sound.
On the other hand, they can provide ways to make dramatic changes to the sound. Let’s apply an extreme amount of random pitch shifting to this sound and see what happens.
This is ‘A Cute Piano’ – a preset on Playbox.

After applying this modulation, we’re left with this:
The Modulation Shaper is one of the keys to taking Kontakt’s modulation possibilities to even further heights.
5. Know your Kontakt modulation assignment possibilities
In Kontakt, almost every Group-level module, including Source, Amplifier, and Group Insert Effects can have their parameters modulated. You can assign multiple modulators to a single parameter for complex layered effects, or modulate multiple parameters simultaneously from one source.
Keep in mind that some modules don’t support modulation. These are Instrument Insert Effects, Send Effects, and Main Effects.
Understanding these possibilities and limitations helps you fully leverage the internal Kontakt modulation system and will let you experiment within the possible parameters.
Get started with advanced automation in Kontakt today
With these advanced tricks, you have everything you need to start exploring the deeper side of Kontakt modulation.
Experiment with these features in Kontakt 8 standalone, included in Komplete 15 or as part of your NI 360 Pro subscription, and you’ll see how deep and creative your sound design can get.
Related articles
-

Hardt Antoine explains his fast, tactile studio process with Maschine
Hardt Antoine breaks down how Maschine helped capture the rhythm, energy, and creative flow behind his Kompakt release “Let Me…
-

From Napoleon Dynamite to Cyberpunk 2077: How NI shaped Brian McNelis’s story
Brian McNelis discusses how Native Instruments tools shaped his workflow across decades of film, game, and soundtrack production.
-

How Darin Epsilon’s workflow with Massive X and Monark keeps Perspectives Digital moving forward
Darin Epsilon reflects on 15 years of Perspectives Digital, exploring how his production evolved with tools like Massive X and…
-

The 110 best free Kontakt instruments in 2026
Explore the ultimate list of the best free Kontakt instruments and libraries. Discover new sounds and add them to your…
-

Ryan Lott on the living sound of LCO Producer Strings
Son Lux’s Ryan Lott shares how he uses LCO Producer Strings to find the living gradients in his music and…
-
2026 NI community roundup: from the studio to the stage
See how the community is using Maschine, Traktor, and Kontrol keyboards to find their flow in 2026. Get inspired by…
-
An update from Nick Williams, CEO of Native Instruments
I want to share a direct update on the restructuring process underway here at Native Instruments. Business continues as usual…
-

NI producer spotlight: Women’s History Month 2026
Discover more than 30 women and nonbinary producers – including WondaGurl, Arca, and Tems – who are defining the modern…