


Bus compression is a dynamics processing technique that can quickly help resolve level inconsistencies within your mix. Understanding how and when to use bus compression can make your drums sound fatter, vocals smoother, and your overall mix tighter. Dive into this comprehensive guide to discover the secrets of bus compression and learn how to bring cohesion, control, and impact to your tracks.
Jump to these sections:
- What is bus compression?
- Ways to use a bus compressor:
Follow along with all of the plugins mentioned in this tutorial by starting a free MEGA Bundle trial. This will give you access to every Plugin Alliance product for 30 days.
What is bus compression?
Within your digital audio workstation, a bus is a virtual channel that allows you to sum multiple audio tracks together. You can use a bus to apply the same processing to multiple tracks, treating the group like a single element in your mix. Busing or grouping tracks together also allows you to solo, mute, and adjust the volume of the bus.
A compressor controls the dynamic range of audio material, making the difference between quiet and loud sounds less significant. Typically, it achieves this by reducing the volume of loud sounds, leaving the level of quiet sounds unaffected. You can think of a compressor as an automatic volume controller.
The process of applying compression to a bus is called bus compression. Bus compression can add a sense of cohesion to the separate elements of a bus, control dynamics, and add punch and impact to sounds.
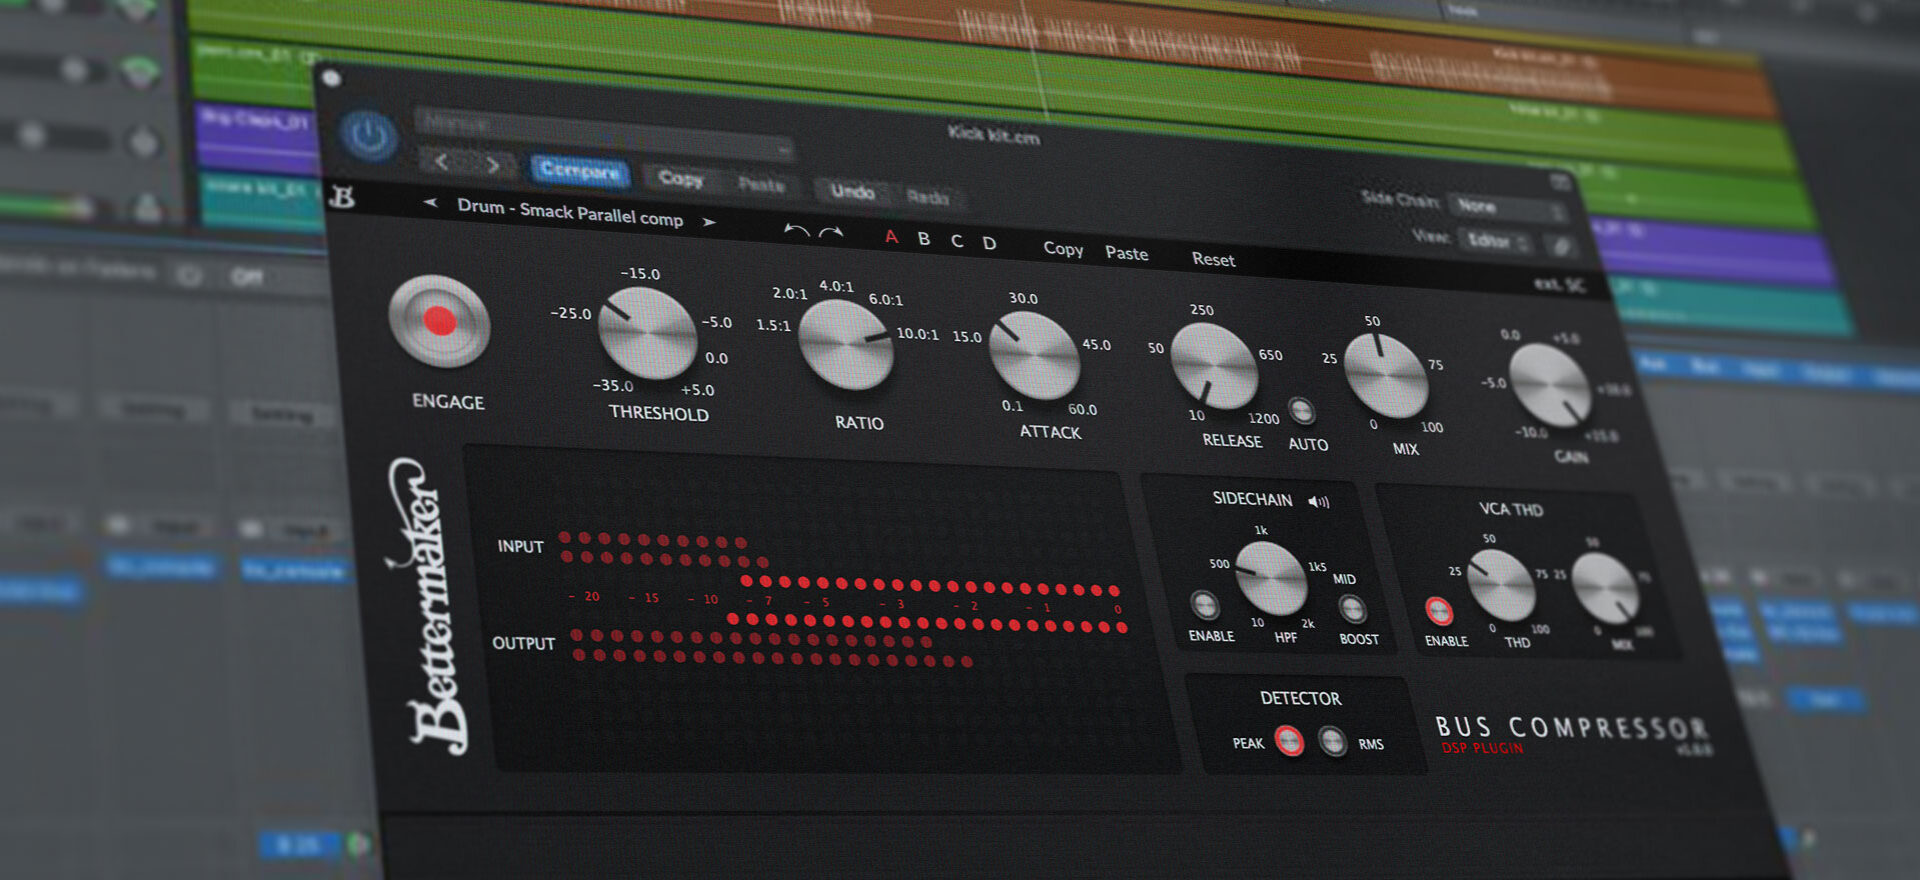
A voltage-controlled amplifier (VCA) bus compressor, like the Bettermaker Bus Compressor, often includes a threshold, ratio, attack, release, and makeup gain control. Combined, these parameters allow you to affect the way in which gain reduction is applied to audio signals. Perhaps you want to apply quick and responsive gain reduction or take a slower and smoother approach; the nature of the audio content you’re processing will inform this decision.
Buy Bettermaker Bus Compressor
- Threshold: The threshold parameter affects the level at which gain reduction is applied to the signal.
- Ratio: Adjusting the ratio affects the intensity of the compression applied.
- Attack: Modifying the attack setting affects how quickly gain reduction is applied when the signal breaches the compressor’s threshold level.
- Release: The release knob modifies the speed at which gain reduction stops being applied to the signal when it drops below the threshold.
- Makeup Gain: Using the makeup gain control, you can add a static gain boost to the signal to make a loudness-matched A/B comparison.
An optical compressor like the NEOLD U2A can also be used to apply bus compression. Many LA-2A style optical compressors provide a simple design that revolves around a peak reduction (threshold) knob, a makeup gain knob, and a switch that allows you to toggle between compression and limiting.
Optical compressors are usually simple to use and can be a great choice for certain types of bus compression. They typically have a slow attack that helps maintain the snappy character of sounds and a relatively slow, non-linear release that sounds natural.
The Bettermaker Bus Compressor includes plenty of controls that allow you to fine-tune the sound of compression applied, while the NEOLD U2A, though easier to use, requires you to match it to an appropriate processing task. The compressor you choose can also have a drastic effect on the tonal character of your bus.
Throughout the remainder of this blog, you’ll discover six ways to use a bus compressor in your mix, gaining comprehensive insight into when and how to apply various types of bus compression. Additionally, you’ll learn about selecting an appropriate type of compressor for different scenarios.
1. Glue compression
It’s quite common to apply bus compression to the stereo bus or master track of your mix. Doing this can “glue” your mix together, providing all of your sub-groups with a sense of togetherness. If your vocal bus sounds like it’s living in a different space than your guitar bus, some gentle stereo bus compression might be the answer.
You don’t want to use extreme compression settings when applying bus compression in this way. A little compression goes a long way. The effect should sound subtle but noticeable when bypassed. Select a ratio setting of 2:1 for laid-back tracks or 4:1 for more aggressive songs.
Set the attack time around 30 ms to allow transient material to pass through the compressor. If the drums in your mix sound too pokey or stabby, you can reduce the attack time to massage them into the mix.
Use a release time between 100–1,200 ms so that the compressor breathes with the tempo of the music. Choosing a release time that’s too fast can lead to pumping effects, distortion, and killing the natural dynamics of your mix. Too slow, and you’re at risk of volume inconsistencies and reduced clarity.
You can apply some makeup gain to loudness match the signal running in and out of the compressor to make an accurate A/B comparison. On the topic of loudness, the main purpose of glue compression isn’t necessarily to maximize loudness. That’s sometimes a byproduct of glue compression, depending on how fast you’ve set your attack time, but its main function is to provide your mix with a sense of cohesion.
The Bettermaker Bus Compressor is well suited for master bus compression because it has a musical sound that manages to maintain clarity, which can be desirable when mastering. One of the most interesting things about this bus compressor is that regardless of how fast you set the attack, it manages to maintain the perception of clear and punchy transient material, which is usually what you want when applying glue compression.
2. Drum bus compression
Applying bus compression to your drum bus can enhance the impact and energy of the drums in your mix. This process is particularly effective in bringing together the various elements of a drum kit, such as the kick, snare, hi-hat, and toms. Drum bus compression can make the difference between drum kit recordings that sound raw and lifeless versus polished and powerful.
To achieve a sound like this, you’ll want to use an extremely fast attack time and a slow release time. In this audio example, the Brainworx bx_townhouse Buss Compressor was used to compress the drums with a 4:1 ratio, 0.1 ms attack time, and 600 ms release time. Additionally, 12–16 dB of gain reduction was applied to the signal. When applying drum bus compression in this way, you’re more at risk of not applying enough compression rather than too much.

If you want to take this aggressive drum sound a step further, consider adding a limiter to your drum bus and driving your signal into it. You’ll be able to achieve an even thicker and fatter drum sound by applying 2–4 dB of limiting. In the following example, the Brainworx bx_limiter True Peak is applying 3 dB of gain reduction.

Not every genre of music calls for this much compression, but it can work for raw drum recordings in aggressive genres like rock and metal. Keep in mind that this is also a good way to increase the loudness potential of your mix, which may or may not be important to the genre you produce.
Another option is to use a slow attack (around 10 to 30 ms) and a moderate release (around 100 to 300 ms). The slow attack time allows more of the initial drum transients to pass through uncompressed, which helps preserve the punch and clarity of the drum hits. This is particularly beneficial for genres that rely on a crisp and dynamic drum sound, like certain types of rock, pop, and EDM.
Meanwhile, the fast release time ensures that the compressor quickly stops affecting the signal after it drops below the threshold. A rapid release prevents the compressor from overly influencing the tail end of drums, maintaining their natural decay and preventing pumping effects. This combination of settings can add punch and presence to drums, lightly tightening up your drum bus. The effect is more subtle and transparent than the previous form of drum bus processing.
While the settings you choose to use are the primary factor in the sound of the compression applied, the compressor you select also affects the sound. For example, when using the same compression settings, the Bettermaker Bus Compressor will deliver a snappier sound than the bx_townhouse Buss Compressor. This is particularly apparent in the balance between the snare and the rest of the drums.
3. Vocal bus compression
When dealing with multiple vocal tracks, such as lead, backing, and harmony vocals, bus compression can help them sit better in the mix. It ensures that all vocal elements are consistent in level and meld together.
Vocal bus compression can create the illusion of a single widespread lead vocal to untrained ears. When you compress a lead vocal together with doubles panned left and right, you benefit from the width created by channel-to-channel variances and the central focus of the lead vocal.
You can hear the effects of vocal bus compression in Taylor Swift’s song “Cruel Summer.” She uses dense stacks of doubles and harmonies to fill out the mix while keeping all her vocals controlled using compression.
One of the interesting things about Taylor’s vocals is that they’re tightly compressed, but the articulation is maintained. To achieve this effect yourself, use a slow attack time or choose a compressor with a naturally slow attack time like the NEOLD U2A; it excels at vocal bus compression for several additional reasons.
A unique characteristic of the NEOLD U2A is that it applies more intense compression to louder parts of the signal instead of using a constant 4:1 ratio like a digital compressor might. This unique form of processing allows it to behave very smoothly and musically. The NEOLD U2A is an optical compressor with a naturally warm and open sound. However, it includes a Recovery knob that allows you to affect the release behavior; this provides you with more control than a run-of-the-mill LA-2A emulation.
To shape the tone of your vocal bus further, you can use the NEOLD U2A’s Drive and Aging knobs. Adjust the Drive knob to increase the amount of soft clipping/saturation introduced by the tube amplifier; this can be used to increase the density of your vocal bus. The Aging knob, when set to “New,” will provide the clear sound of a new opto cell, while the “Old” setting will deliver a richer vintage tone, emulating an optical compressor with an old opto cell that has seen heavy usage.
4. Parallel bus compression
Parallel compression, also known as “New York” compression, involves blending a compressed version of a signal with an uncompressed version. It’s common to parallel compress drums and vocals, which can help enhance quiet details while maintaining impact. Parallel compression is used to add body to a sound without completely squashing the dynamics.
When parallel compressing your drum bus, you’ll want to create an aux track and add a compressor with fast and release settings to it. The Purple Audio MC77 is a great choice for this purpose. It’s an FET compressor that provides ultra-fast attack and release options and aggressive ratio values.
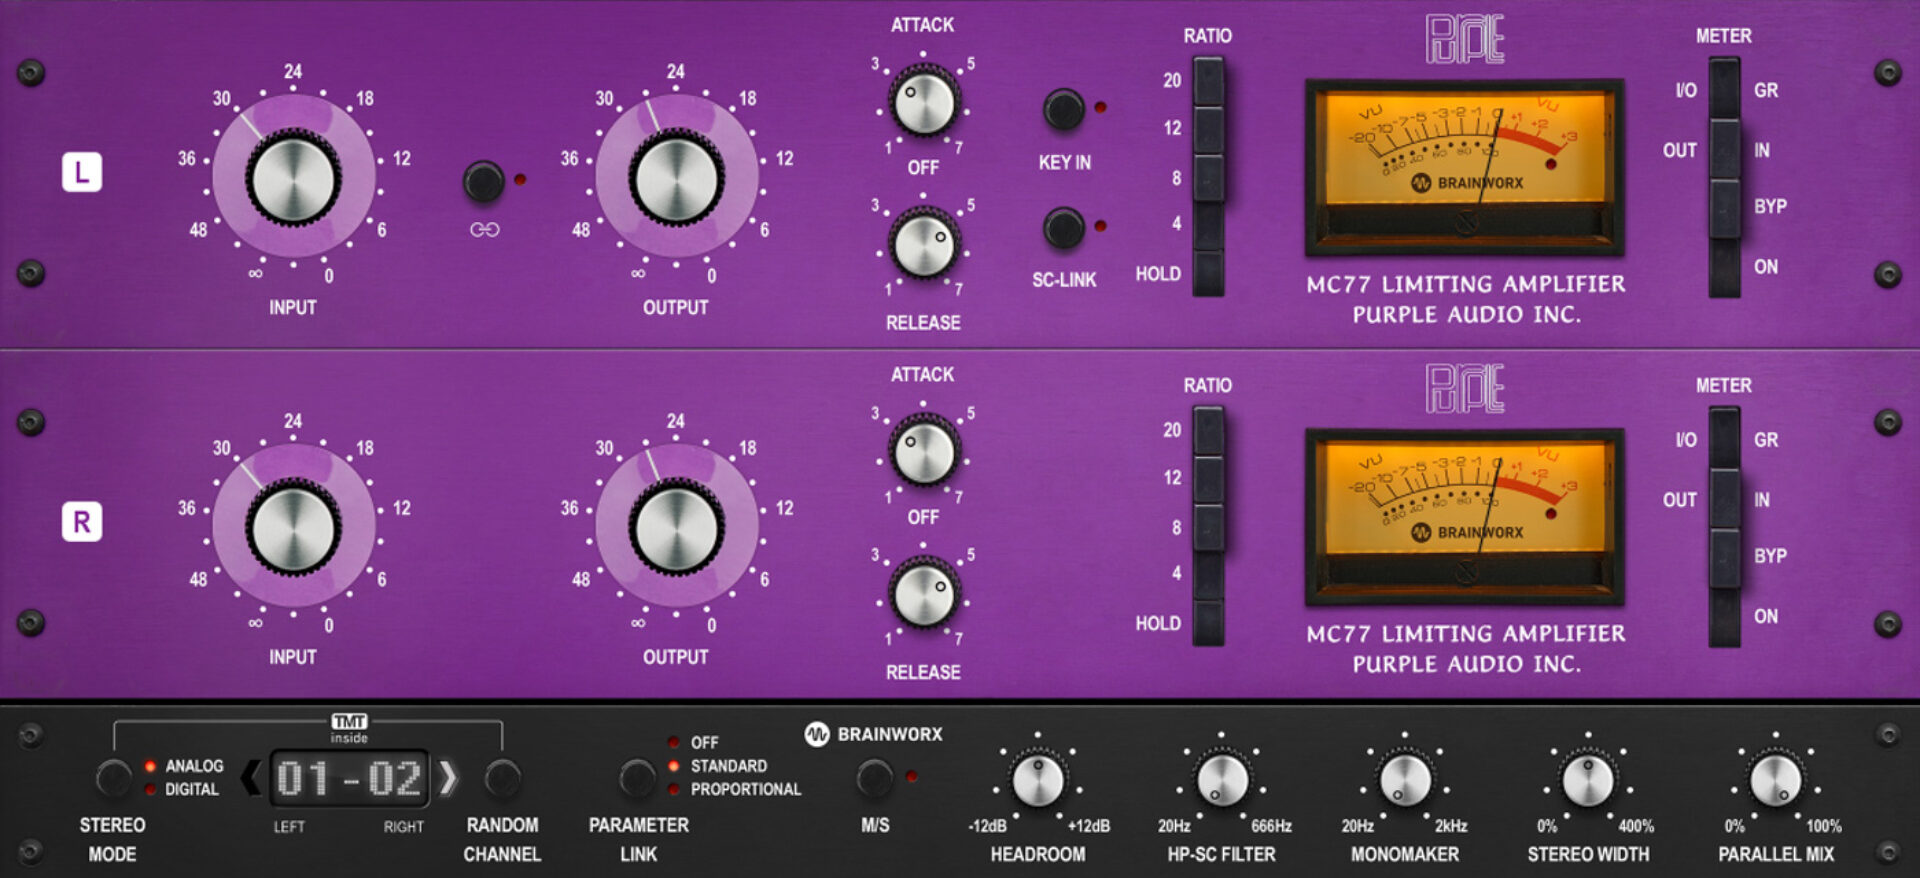
The MC77 has two peculiar features, making it a go-to choice for parallel drum bus compression. The first is that it generates a type of distortion when using extremely fast attack and release settings that can add grit to drums; it gives them an aggressive and blown-out character. On top of that, you can push all the ratio buttons in at once and obliterate your signal with compression. These features may sound overwhelming by default, but they can help thicken up your drum bus when applied in parallel.
Purple Audio’s MC77 includes a Parallel Mix knob that allows you to apply parallel compression directly within the plugin. Add the MC77 to your drum bus and adjust the blend between the dry and wet signal to taste. The goal is to strike a balance between the snap of the dry signal and the rich and full tone of the compressed signal.
Here’s an example of the Lindell Audio SBC being used to parallel compress vocals. It’s an aggressive American-style compressor that sounds big and punchy. You’re not limited to solely parallel compressing drums.
5. Bass and low-end management
Compressing your bass, or the entire low end of your mix, can lead to a more pleasant listening experience. You can avoid situations where the bass sounds too dominant in certain parts of a song while barely being noticeable in others. If you’d like to apply this effect to the low end of your entire mix, you can use multiband compression to achieve the effect.
Multiband compression allows you to selectively apply compression to the low end of your mix, leaving midrange and top-end content unaffected. If you’re working with prearranged stems, haven’t set up a dedicated low-end bus, or you’re mastering a track, reach for a multiband compressor like the multiband module included in iZotope Neutron 4.

Set your multiband compressor’s low-end crossover to around 300–500 Hz. When compressing bass, opt for a moderate ratio (around 4:1) to balance control with a natural sound. Set the threshold to engage during louder sections. Use a medium to slow attack (50–100 ms) to preserve the instrument’s punch or a faster attack for a more controlled sound. The release time should align with the track’s tempo, typically between 100–300 ms, allowing the compressor to reset between notes without stifling sustain and decay.
Neutron’s multiband compressor works a little differently than most. It provides a Learn feature that intelligently sets the crossover frequencies for you. At that point, you just need to select a compression mode: Punch, Modern, or Vintage. From there, you can tweak the Ratio, Attack, and Release settings to taste.
6. Mid/side bus compression
The mid/side technology found in many Brainworx plugins allows you to independently process the center and sides of your stereo image. For example, the elysia alpha compressor is a master bus compressor with mid/side functionality. If the drums in the center of your stereo image appear to jump out of the mix, you can apply gentle peak compression to the center of the mix, leaving the sides unaffected; this can help prevent noticeable pumping effects.
You can apply the same concept to compressing the sides of your mix. Perhaps there’s a stereo recording of a plucked guitar panned hard left and right. Target these transients while leaving centered elements, like lead vocals, unaffected.
The elysia alpha compressor includes an M/S Mode that is toggled on by default. You’ll need to deactivate Channel Link to affect the mids and sides separately. White Sea Studio is a big fan of the alpha compressor and dives deep into the plugin’s features in the following video.
It’s usually best to apply dynamics processing at an individual track level or bus level, but this isn’t always possible. Sometimes, you’ll receive an instrumental from a client that they’re unable to modify on their end. Mid/side compression provides a surgical solution for moderate dynamic issues.
You can use the Music Rebalance feature within iZotope’s RX to fix more severe level inconsistencies and then tighten up the mix afterward using compression. RX allows you to independently adjust the level of vocals, bass, percussion, and other elements baked into a stereo file. For example, you could completely remove the vocals from a mix to create an instrumental track or make them more present than in the original track.
Demo the bus compressors mentioned in this blog
At this point, you should better understand how to use bus compression in your mix. You can demo all of Plugin Alliance’s bus compressor plugins by starting a free MEGA trial. This will give you access to every Plugin Alliance product for 30 days. You can compare multiple bus compressors to get a sense of how they sound and try them out in different contexts.
Related articles
-

Behind the synth: A. G. Cook on stacked sawtooths and the creation of Super*Saw
Explore the extremes of stacked sawtooth waves with Super*Saw, a new synthesizer co-created with A. G. Cook. Learn how to…
-

Inside the evolution of orchestral sampling: an interview with ProjectSAM
Discover how ProjectSAM’s Lineage Series uses NKS and smart features to change orchestral sampling. Plus, save on instruments in our…
-

How New Constellations turn emotion into sound with Massive X
Go inside the studio with New Constellations. Learn how they use Native Instruments gear, happy accidents, and lifelong friendship to…
-

Citizen Kain on building emotion and space with Replika
Citizen Kain explains how Replika helped shape the rhythm, tension, and emotion behind his debut Eversun Records single “Moments.”…
-

The organic precision behind Calcou’s Anjuna release featuring Reaktor
Calcou shares how Reaktor, Monark, and Super 8 shaped the creative balance and live energy behind their new duo EP,…
-

14 NKS instruments that will change the way you create music
Discover 14 NKS instruments to freshen up your workflow. From lo-fi tape synths to cinematic strings, shop the Native Instruments…
-

Parallelle on crafting living basslines with Reaktor and TRK-01
Parallelle share how Reaktor and TRK-01 shape the bass and warmth in 11th Avenue, balancing analog depth with modern control.
-

Where will your sound lead you? Explore the Native Instruments Summer Sale
Save 30% on instruments, effects, and sounds in our Summer Sale. Find the tools to keep your tracks moving and…