


Distortion is an essential production tool, but a risky one. In the right hands, it can add color and sparkle to a mix, shape dull sounds into powerful ones, and make your tracks sound loud and uncontrolled. But distortion and saturation are easy to misuse, leading to a sludgy, rough-textured mess.
In this article, we’ll show you how to get the most out of distortion and saturation. We’ll answer the question: what is distortion in music exactly? We’ll explore the science behind the effect, and survey the range of distortion and saturation tools available. Finally, we’ll show you how to use distortion in your own music.
Jump to these sections:
NEW distortion plugin
Check out the new Trash distortion plugin that lets you mangle and transform your sound, featuring over 600 distortion types and impulse responses.
What is distortion?
Distortion is the alteration of a signal’s waveform. In the broadest sense, any kind of audio signal processing—like EQ, compression, or reverb—could be considered distortion. But in music production, the term distortion usually refers to a particular kind of change to a signal.
Distortion, in this more narrow sense, typically involves clipping. Audio clipping happens when a signal’s level goes beyond what a given processor or system can handle. In the analog domain, this happens when you send a piece of a gear a louder signal than it’s designed to take. In digital production contexts, clipping can occur when a signal exceeds 0 dBFS (decibels relative to full scale): in other words, when the meter in your DAW goes above zero.
However, most modern DAWs operate at floating-point bit depths, meaning that your signal won’t clip even when you push it above zero. The exception is if you bounce audio out of the DAW from a channel that’s clipping: then you’ll hear distortion in all its glory.
(It should be noted that there are a few forms of creative distortion that don’t involve clipping. We’ll get onto those later.)
Why is distortion desirable?
Distortion is desirable because it can add character, richness, and color to a sound. But it wasn’t always seen this way.
In the analog era, distortion of various kinds was an unavoidable feature of recorded music. Any and all components in a signal chain might introduce distortion to a sound. Audio engineers went to huge lengths to keep distortion to a minimum and achieve the cleanest sound possible.
With the advent of digital recording, the situation flipped. In digital contexts, it’s possible to handle audio with effectively zero distortion. This is useful, but it can also lead to a lifeless, dull sound. It turned out that—in moderation—that pesky distortion helped give sound its charm.
As such, modern producers use many tools and techniques to reintroduce (the right kinds of) distortion into a signal. This might mean running sound out of your DAW into a prized piece of analog gear for authentic coloration. Or it might mean using a distortion plug-in—whether hardware emulation or newfangled creation—to give life to an in-the-box mix. Either way, distortion is an essential tool in modern music production.
What does distortion sound like?
Put simply, distortion through clipping adds additional harmonics to a sound, giving it richness and color.
To understand how this works, imagine the smooth curve of a sine wave. As we push this sine wave above zero through a given processor or system, the extremes of the waveform will be clipped, or chopped off (because the processor simply can’t reproduce them; they are beyond its limits). The smooth sine curve will get a flat top and bottom, making it look (and sound) more and more like a square wave.
This changes the harmonic content of the sound. A sine wave contains just one frequency, which is why it sounds so “pure.” A square wave, on the other hand, features numerous higher frequencies that are multiples of its lowest, or fundamental, frequency. These higher frequencies are called “harmonics,” and are crucial to the timbre of a sound. The more we clip a signal, the more of these harmonics are added.
With a sine wave, this process is easy to hear and understand. With more complex signals—like a bass part, a vocal, or a whole track—clipping can have complex and sometimes unpredictable results. This process underpins most forms of creative distortion.
Harmonic vs. inharmonic distortion
The kind of distortion we’ve just described is called harmonic distortion. As mentioned, this means that the additional frequencies added to a signal are multiples of the frequency (or frequencies) in the original signal. So if our sine wave is at 100 Hz, then distortion might add additional frequencies at 200 Hz, 300 Hz, 400 Hz, and so on. The precise distribution of these additional harmonics varies depending on the distortion tool used.
Harmonic distortion tends to work in concert with the original signal, adding richness and excitement. However, some kinds of distortion add new content to a signal that is not related to its original frequency (or frequencies). Such distortion is called inharmonic distortion, and it tends to lead to a dirtier, less immediately pleasing sound. Sometimes this grubbiness is desirable, but it should be used with caution.
The aliasing that occurs in low sample-rate sounds, and the truncation effect caused by low bit-depths, are examples of inharmonic distortion. These effects can be achieved using a bitcrusher, as we’ll see below.
Distortion vs. saturation
The terms distortion and saturation are often used interchangeably in music production, but they aren’t quite the same.
Audio distortion is a catch-all term describing alterations to an audio signal that change or add harmonic content. Saturation, historically, refers to a situation where analog components reach the edge of their operating capability. This can lead to the clipping distortion described above, but saturation can alter a signal in other ways too.
For example, tape or valve saturation (or digital plug-ins that imitate these analog processes) tend to compress the signal as well as adding harmonics. When you use saturation, it’s worth bearing in mind that you’re not only distorting your sound.
To make things even more confusing, the terms distortion and saturation can also be used to refer to different extremes of processing. In this parlance, distortion is a brasher tone-shaping effect—great for creative sound design—while saturation is a subtler kind of enhancement used in mixing and mastering contexts.
Types of distortion effects
You may encounter many different distortion effects, and it’s important to understand what makes them different (or not).
Let’s take a look at some common distortion effects and hear how they sound. However, be aware that these effects come in many flavors, depending on the plug-in (or hardware) design. The best way to get to grips with distortion is simply to explore the tools you have.
The below audio examples feature deliberately extreme settings so that you can hear the effects clearly. In most real-world applications, a milder setting would get better results.
Tape saturation
Tape saturation is the result of driving a hot signal into a (real or emulated) tape machine. In this case, the “saturation” occurs because the magnetic tape reaches its magnetic potential; it can’t hold any more amplitude.
This produces specific effects that can be pleasing to the ear: harmonic distortion, gentle compression, and the “slicing off” of sharp peaks or transients. Tape saturation is a great tool for gently taming a signal. It can also be used for more extreme lo-fi effects.
In the audio example, you’ll hear the original drum loop first, before the tape saturation kicks in halfway through.
Valve or tube saturation
Valve or tube saturation occurs when a vacuum tube (or valve) amplifier is overloaded. Such amplifiers were ubiquitous in the early decades of recording technology, meaning that—like tape —this form of saturation has an appealing “vintage” character. Its particular flavor is quite different from tape, though. It’s worth experimenting with both to learn their strengths and weaknesses. SUPERCHARGER GT is an example of a tube compressor with saturation capabilities as well.
Guitar distortion, overdrive, and fuzz
You could argue that guitar distortion was the first creative use of distortion. While audio engineers were sweating over the cleanest signal possible, blues musicians were turning up their vacuum tube-powered amplifiers to get a raw, distorted sound.
This means that guitar distortion, in its original form, was a kind of tube distortion. These days, any number of processes might be used to get those power chords chugging. Guitar distortion effects can work great on synths—or even drums, as in the audio example below.
In the guitar world, “overdrive” is used to refer to a more extreme (higher-gain) form of distortion, while fuzz refers to a particular kind of extreme distortion developed in the 1960s. In the below example, the drums are first heard clean, then run through a distortion, overdrive, and fuzz pedal in turn.
Clipper
A clipper is a tool for clipping a signal in a controlled way. You might argue that this description could apply to any of the distortion tools we’ve discussed so far, since they all work through clipping of one kind or other. And you’d be right. The difference with a clipper is the intended goal.
Where saturation tools might be used to subtly enhance a sound, and distortion effects might encourage more radical tone-shaping, clippers are typically used to make things loud.
Loudness is a desirable byproduct of many distortion effects. By slicing off the peaks of a signal, clipping distortion makes it possible to squeeze more perceived loudness out of it. Of course, such distortion can also add harmonics and alter the sound in other ways. That’s the trade-off.
Clippers might feature the kinds of distortion effects we’ve discussed elsewhere, but they are specifically designed with the goal of achieving loudness in mind. If you want to make your music loud, they’re an essential tool in your box.
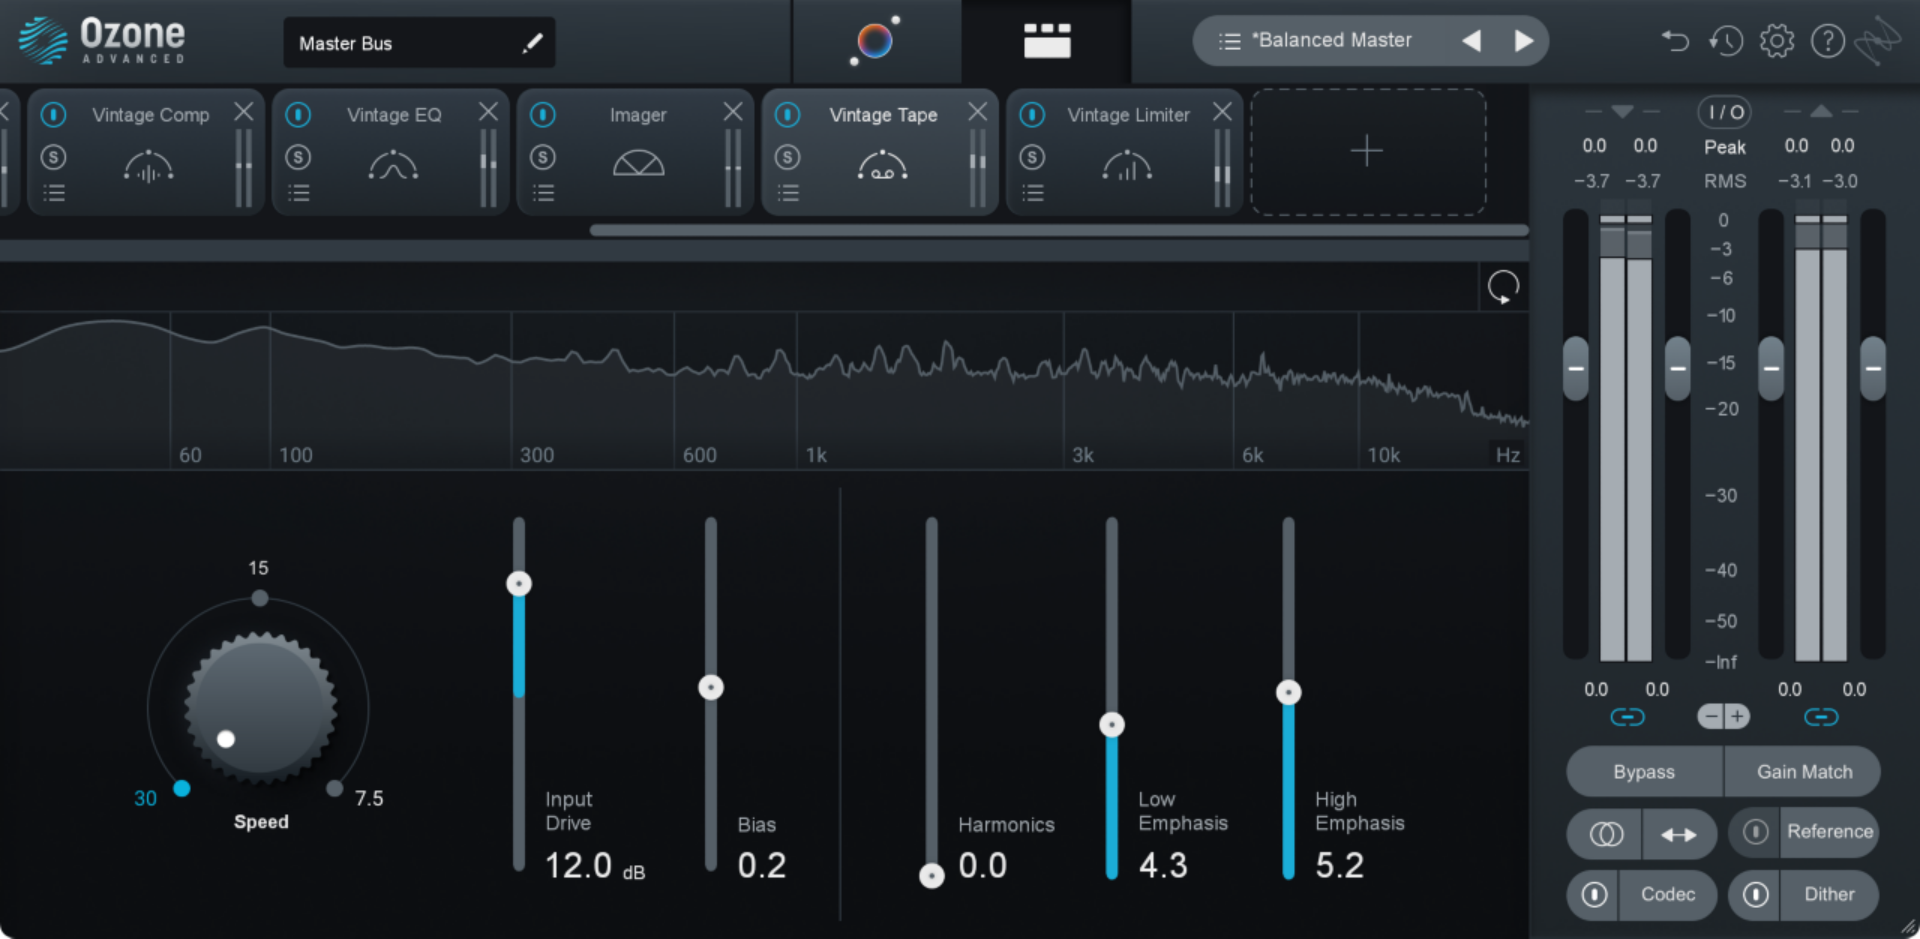
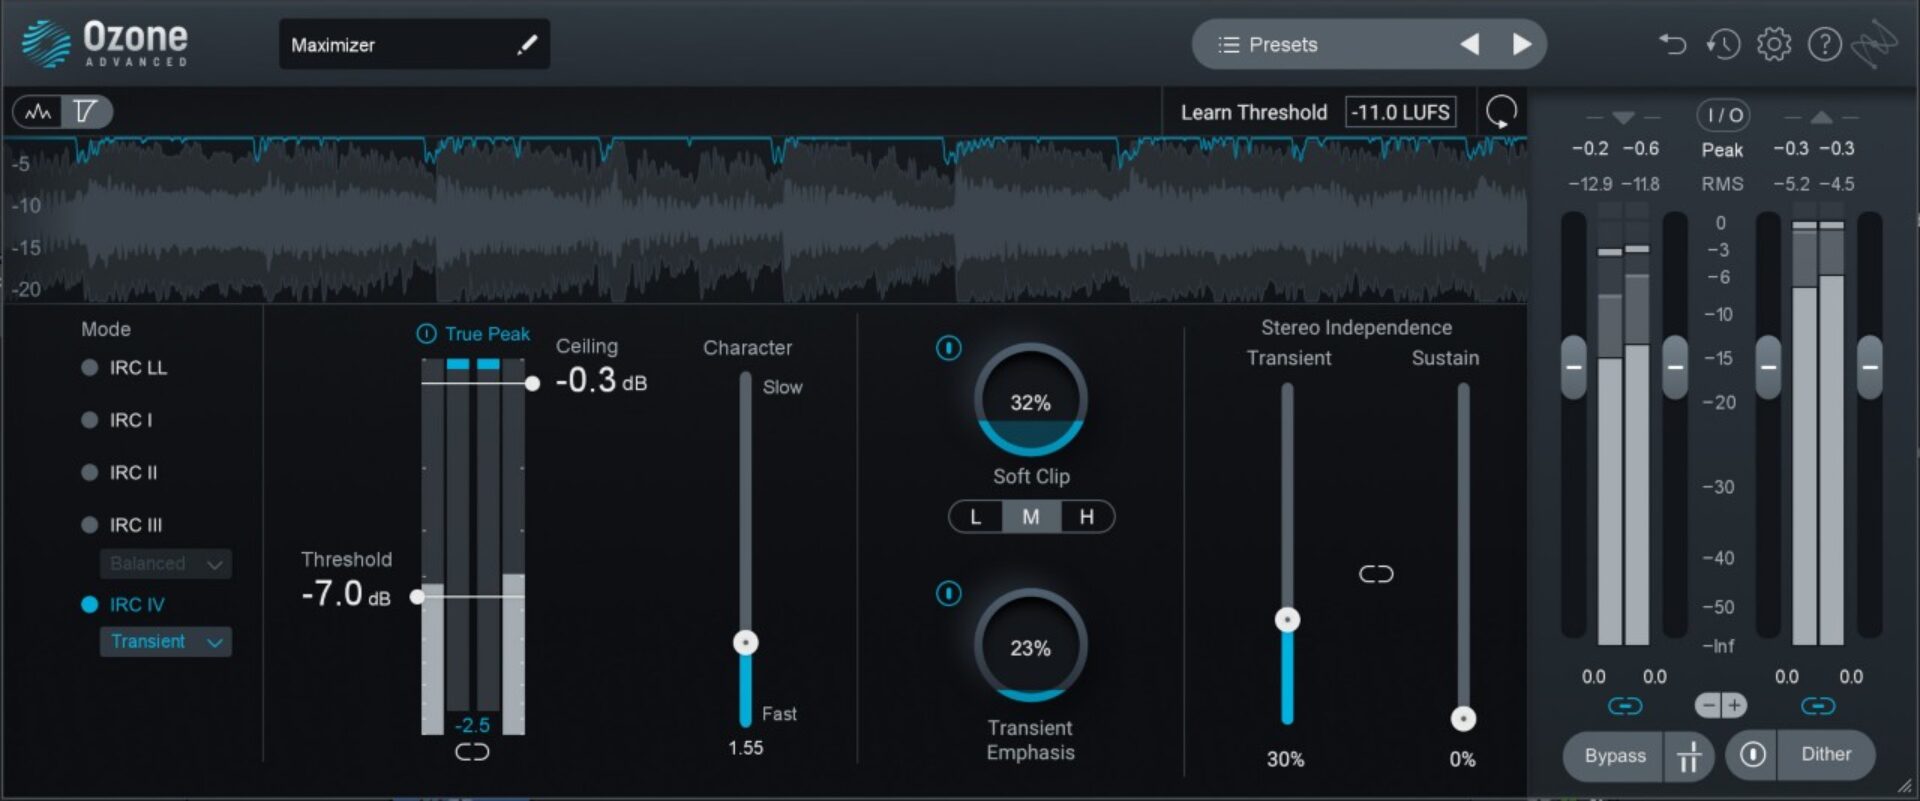
iZotope Ozone has a Soft Clipper that can be used in the mastering process to add warmth and subtle loudness to a track. If you’re interested in learning more, explore the differences between soft and hard clipping.
Waveshaping and wavefolding
So far, we’ve mostly looked at distortion processes that emerge from—or emulate—the analog domain. Tape and tube saturation are what happens when certain analog components are fed too much signal. But things don’t work this way in the digital world.
Waveshaping is a digital method for altering waveforms to create distortion effects. Digital emulations of effects like tape and tube saturation tend to use waveshaping to mimic their analog counterparts.
You’ll also find plug-ins specifically offering waveshaping. These usually contrast with the “authentic” flavor of hardware emulations, glorying in ultra-digital distortion effects.
Wavefolding is an even more extreme tool based on these principles. In this case, the signal isn’t clipped when it reaches the threshold, but is instead flipped back around and added to the original signal. The result is chaotic, and good for extreme sound design.
In this example, you’ll hear the dry signal first; then waveshaping, followed by more extreme wavefolding.
Bitcrusher
The bitcrusher is the odd one out in our lineup. Why? Because it doesn’t rely on clipping to distort the signal. Instead, it messes with the fundamentals of digital audio to introduce inharmonic distortion to a sound.
By reducing the sample rate of a signal, higher frequencies will create angular “aliasing” distortion. And reducing the bit-depth produces a crushing effect called “truncation” distortion.
Used in moderation, these effects can imitate the samplers and audio processors of early digital audio, which operated at low sample rates and bit-depths. At more extreme settings, a bitcrusher produces wild, distinctive sounds.

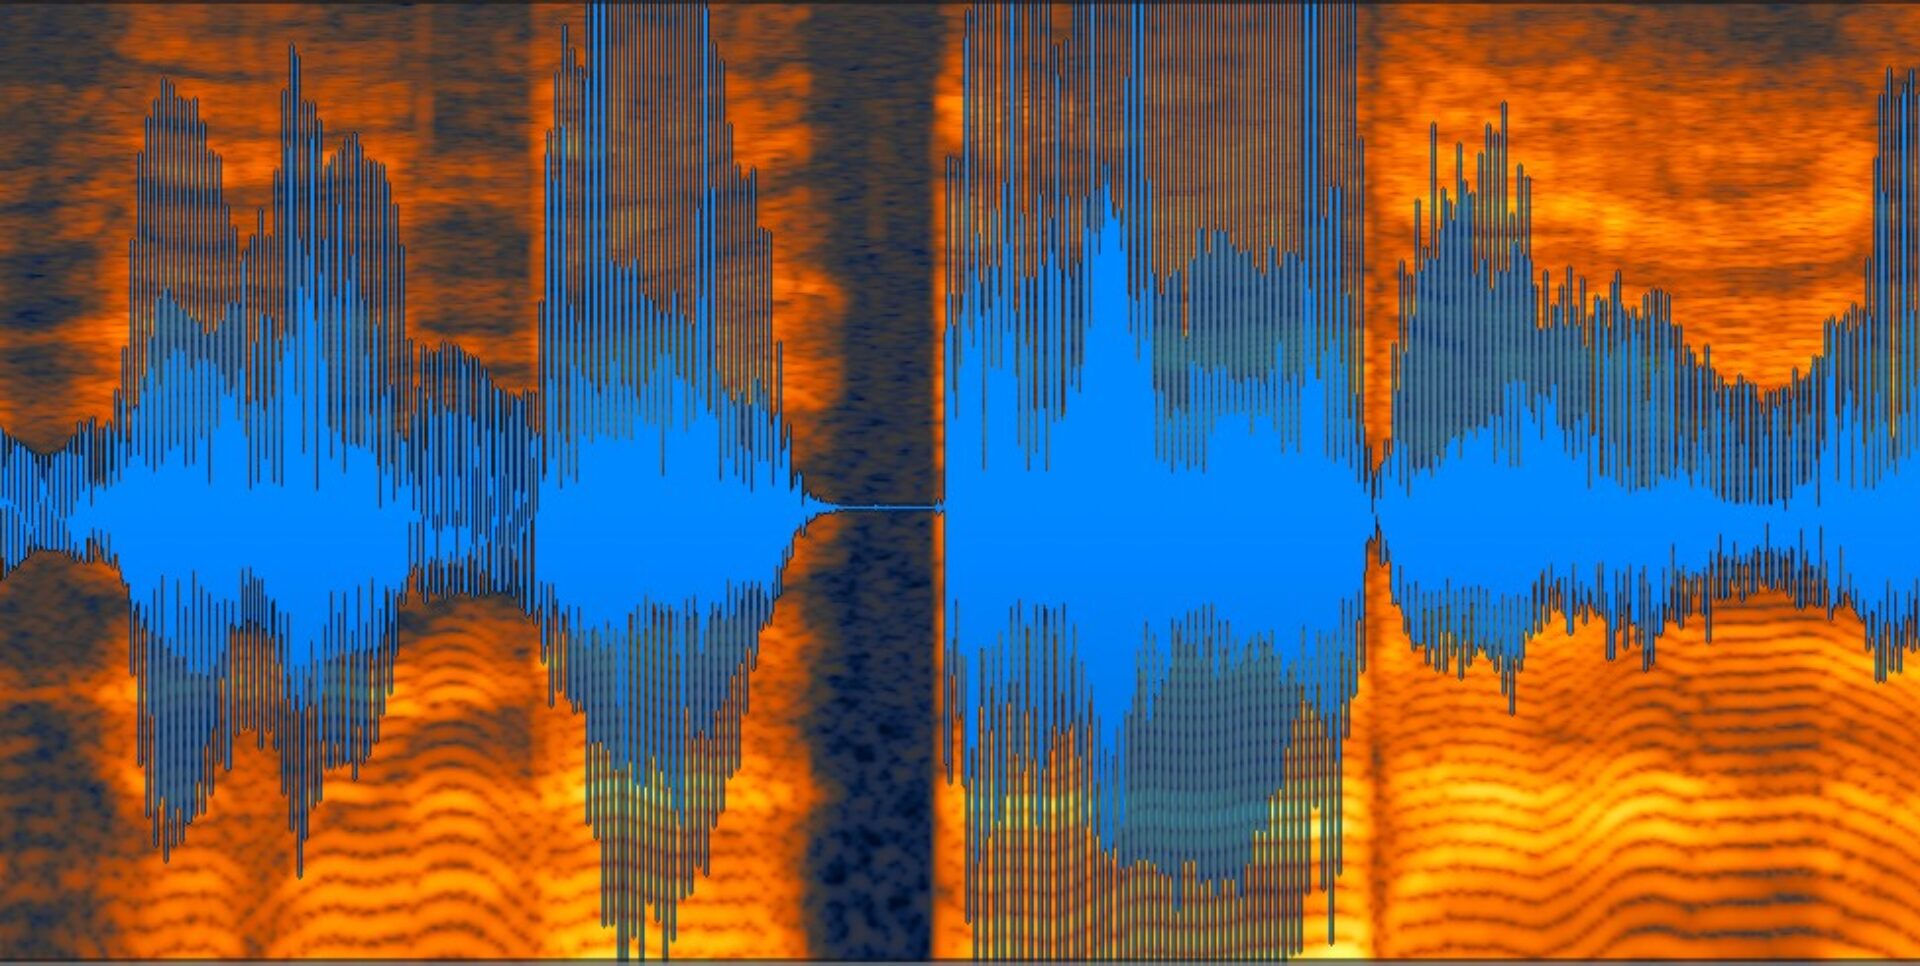
In the first half of this example, the sample rate is steadily reduced, introducing aliasing. In the second half, the bit-depth is reduced, to produce truncation distortion.
Techniques for using distortion
Now you’ve got a good grasp on how distortion works and the kinds of distortion tools that are available. But how should you use these distortion effects in your music? First, let’s look at some basic techniques and approaches.
Where do you put distortion in the signal chain?
It’s usually wise to place distortion after EQ in your signal chain. This is because the distortion will add harmonics to the frequencies that are present in the signal. If there are unwanted resonances in your sound, the distortion will add harmonics to these resonances, making them more difficult to remove later.
It’s also best practice to place distortion before any time-based effects such as chorus, delay, or reverb. However, this rule was made to be broken. Try distorting a heavily reverbed signal for a chaotic effect.
Parallel processing with distortion
Distortion effects can alter a sound in extreme ways. Often, the effect sounds exciting when you first dial it in, but soon becomes tiring on the ear. Adding distortion can also compromise the clarity and punch of the original “dry” signal, even as it adds color and excitement.
The solution is to find a compromise between your dry and distorted signals. The best way to do this is through parallel processing: in other words, by featuring both the distorted and the dry signal at once, in parallel. Most distortion tools offer a Dry/Wet or Mix control that allows you to do this.
Just get your distortion sounding good, then pull back the Mix control until it’s blended with your dry signal. Et voila: The best of both worlds.
Using distortion on a bus
When it comes to parallel processing, sometimes the Mix knob doesn’t cut it. Perhaps you want to add another effect—such as EQ—to your distorted signal while leaving the dry signal untouched. The answer is to work with distortion not as an insert on a single channel, but as a separate bus or send-return channel.
When doing this, set the distortion Mix to 100% wet. You can then send signal to the distortion bus from other channels in your project, and control the Wet/Dry mix by adjusting the volume of the distortion bus.
Working in this way opens up another powerful use of distortion: processing groups of sounds. As with compression, distortion can help glue sounds together, giving them a unified character and energy. In particular, try using subtle distortion on your drum bus to add grit, tame aggressive transients, and boost overall loudness.
How to use distortion in your music
At this point, you know the fundamentals of audio distortion. Let’s demonstrate how this knowledge can be applied in your own productions.
Here’s a sketch of a track. It’s sounding promising, but it lacks some character, and there are some issues with the mix.
Let’s look at how distortion can be used to solve these problems.
1. Harmonic enhancement for vocals
First, let’s look at our vocal. In terms of dynamics and spatialization it’s working fine, but a little harmonic enhancement in the high end could help it to sparkle.
Here, we want to use distortion as a subtle tool. By introducing extra harmonics in the right frequency zone, we can make the voice sound richer and more pleasing.
This is distinct from EQ, which would boost frequencies that are already present in the sound. Distortion adds new harmonics, thickening up the sound.
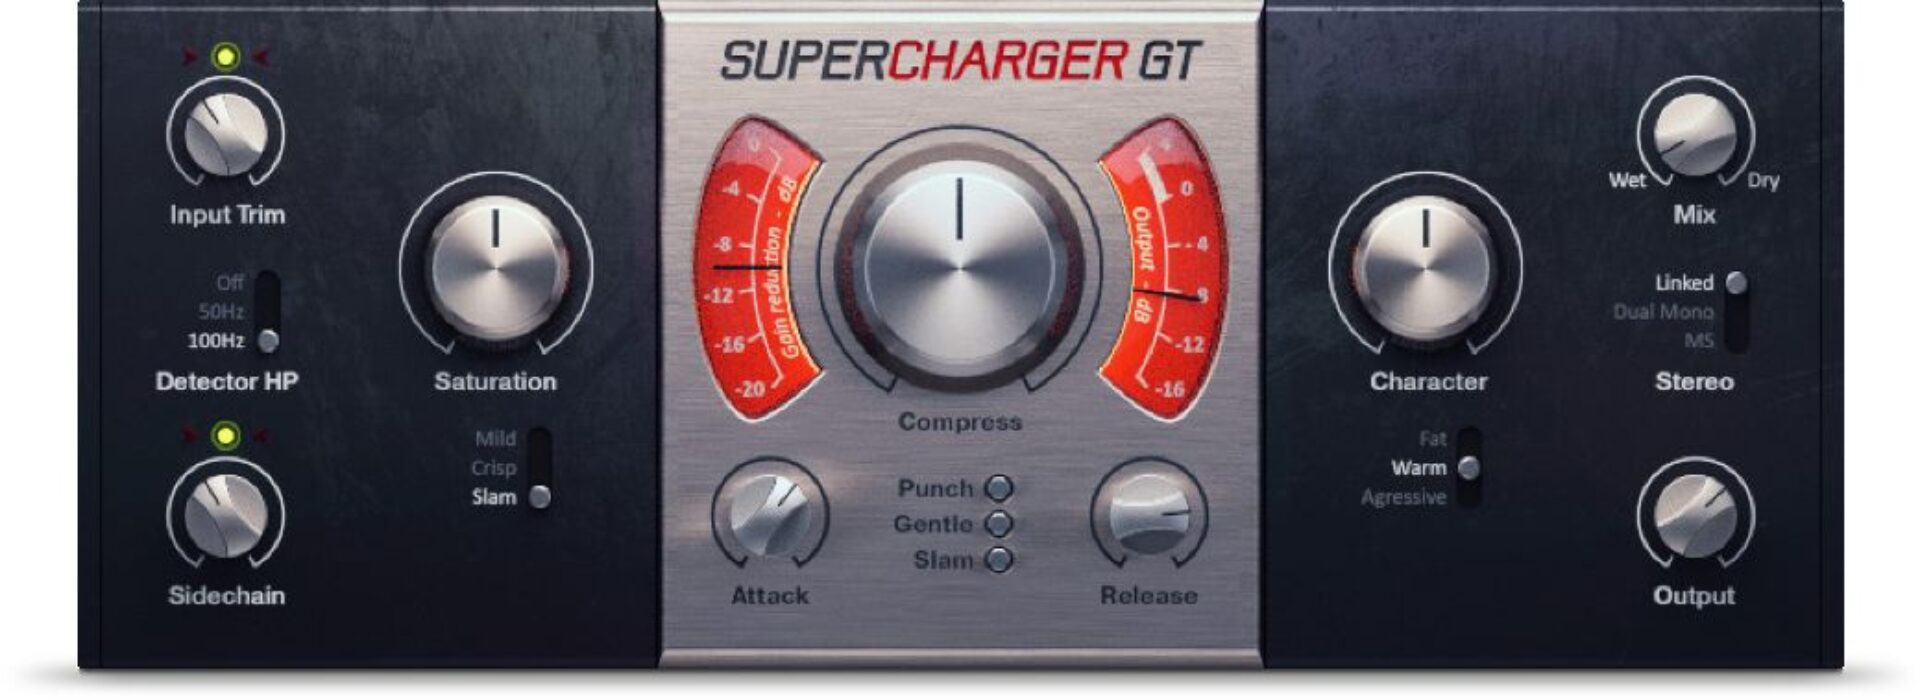
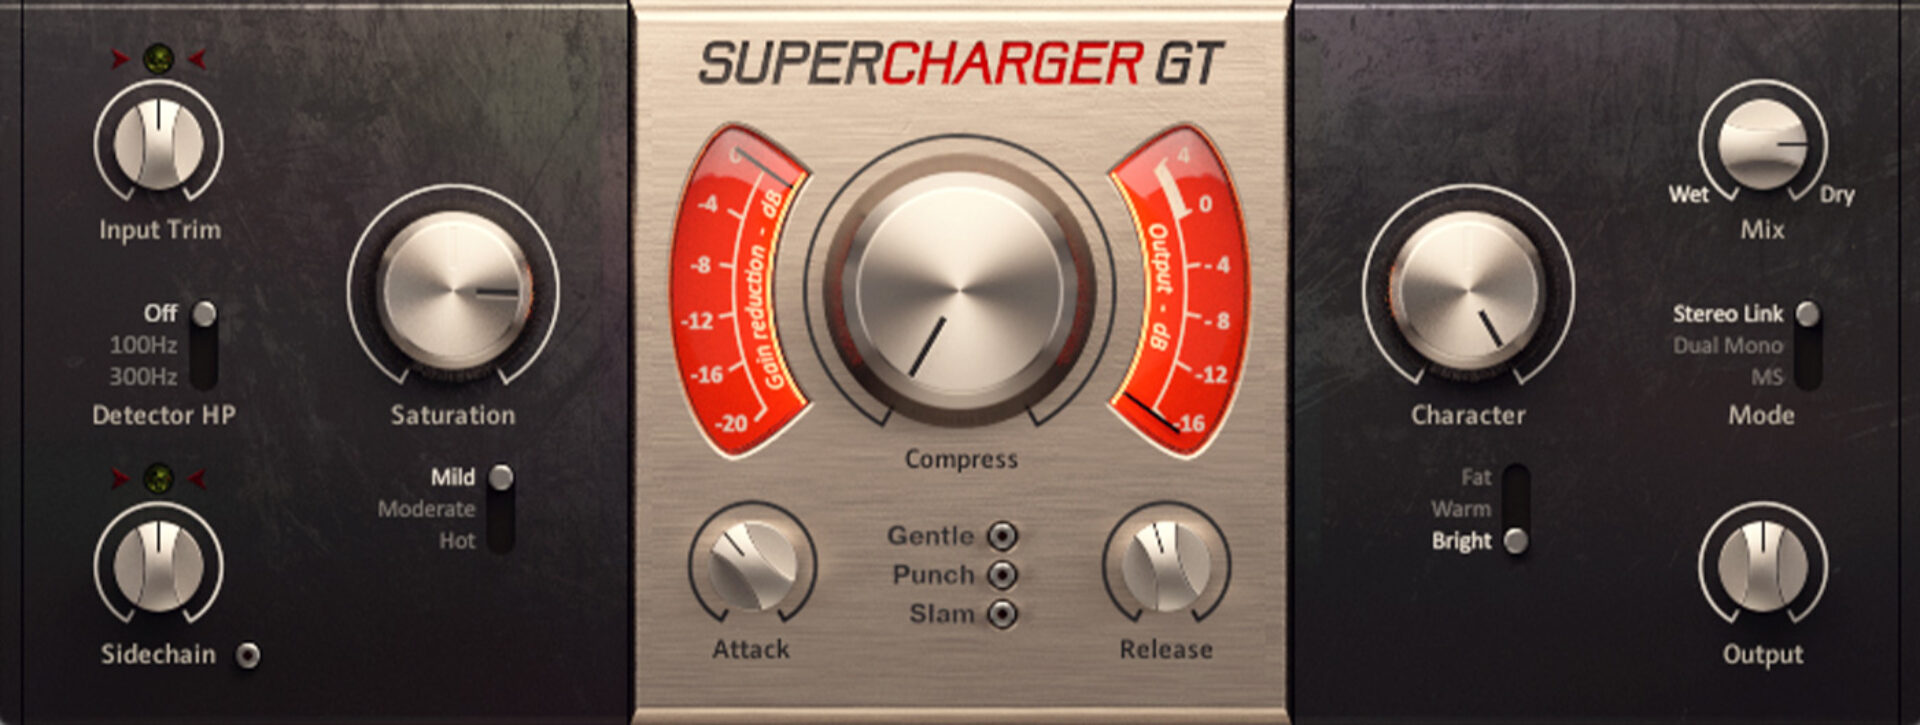
Let’s use warm valve distortion to get the effect we want. Native Instruments’ SUPERCHARGER GT is a valve-based compressor emulation that’s great for adding subtle color (as well as more extreme crushing effects when the time is right).
In this case, we won’t touch the compression side of the plug-in, but focus only on its saturation capabilities. Here’s how to do it.
- Turn up the saturation. We want a fairly subtle effect, so keep it in “mild” mode, but turn up the saturation knob to around 3 o’ clock. You should hear the voice get a little crunchy.
- Use the Character section to shape the sound. We want to add harmonics specifically to the higher frequencies. By turning up the character knob to maximum and switching to bright mode, we can apply a filter to the signal that reduces low frequency content and emphasizes the highs.
- The effect is nice, but way too extreme on its own. Use the Dry/Wet knob to reintroduce the unprocessed signal. Set it to around 80% dry, 20% wet.
- The final effect should be very subtle, adding just a tiny bit of sparkle to bring the vocal forward in the mix.
Here’s what that sounds like.
2. Giving drums grit and loudness
Next let’s take a look at the drum bus.
The drums are sounding clear, but perhaps a little too clean. They could use some grit.
There are also issues with the dynamics: the kick drum is too loud, while the higher percussion is mixed very quiet.
Here, SUPERCHARGER GT comes in double handy. We can use the saturation controls to dial in some grit, while adding compression to tame the dynamics.
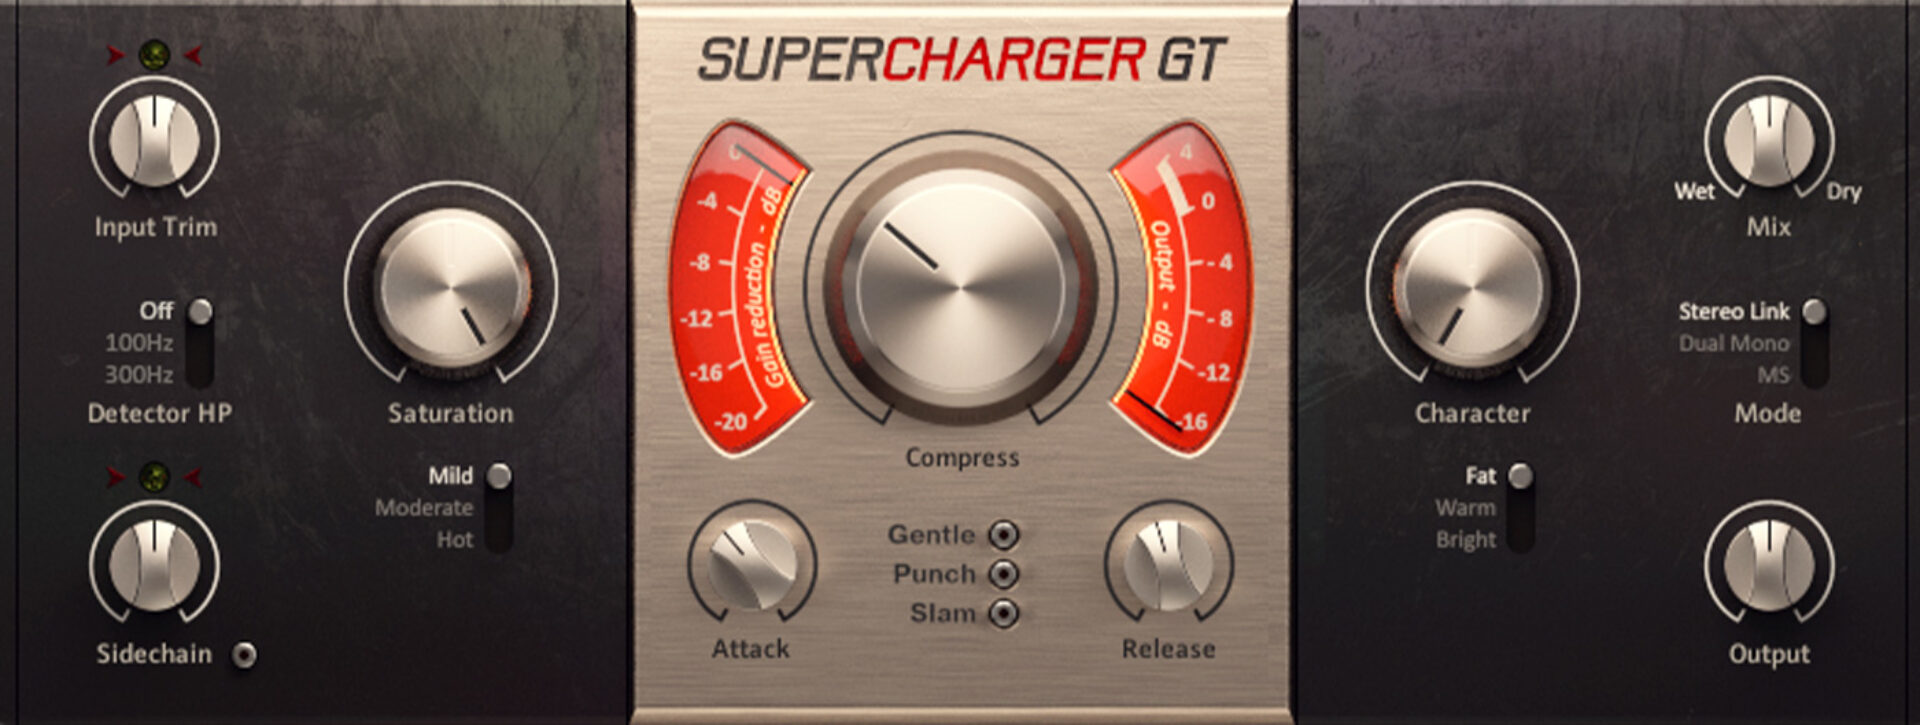
Here’s how to add distortion to drums:
- Add the compression first. The default attack and release settings are looking good, so simply turn up the Compress knob until the kick is firmly under control. There should be quite a lot of gain reduction—perhaps around -10db—because we’ll mix the compressed signal back in with the dry signal later.
- Now it’s time for saturation. Turn the Saturation knob up to maximum to give the kick a hefty crunch. You’ll hear more excitement in the hi-end of the cymbals and finger clicks, too.
- Finally, bring the dry signal back in. A 50/50 Wet/Dry balance should do it.
Here’s what the distortion sounds like on drums.
3. Shaping bass tone
So far we’ve used distortion for subtler coloration. But, of course, it’s possible to shape sounds in more extreme ways.
Let’s explore this with the bass. Here’s how it sounds for now:
That’s because it’s often the first few harmonics of a bass sound—occupying the low-mid range, between around 100 and 500 Hz—that make it sound “heavy” or “full.” Let’s use distortion to add in these harmonics.
Native Instruments’ DIRT should do the trick. This organic-sounding distortion offers flexible signal routing and versatile parameters for extensive tone-shaping control.

Here’s how to apply distortion on the bass:
- Turn up the drive on the first of DIRT’s two distortion circuits and you’ll hear the bass thicken. The further you go, the more distorted it will become, until it starts to sound pretty fried. (Switching from ‘saturation’ into ‘fold’ mode using the Amount knob will make the tone-shaping even more extreme). Extreme distortion wouldn’t suit the mellow mood of our track, so let’s stop at around 40% Drive.
- DIRT features a second distortion circuit, arranged in series with the first, opening up yet more tone-shaping possibilities. Turn up the Drive knob for circuit B and hear how it further boosts the lower harmonics. Just a small touch will do: perhaps around 20%.
- Finally, blend the distorted signal back in with the dry signal using the Mix knob. A 50/50 blend should work.
Giving synths a lo-fi sound
Finally, let’s use distortion to add some warmth and lo-fi character to our synths.
Our synth part is nice but a little dull, and it’s lacking top-end.
Let’s use BITE, a bitcrusher that can emulate the sound of vintage samplers. In a couple of quick moves, we can give our synth some teeth—and a pleasing lo-fi character, too.
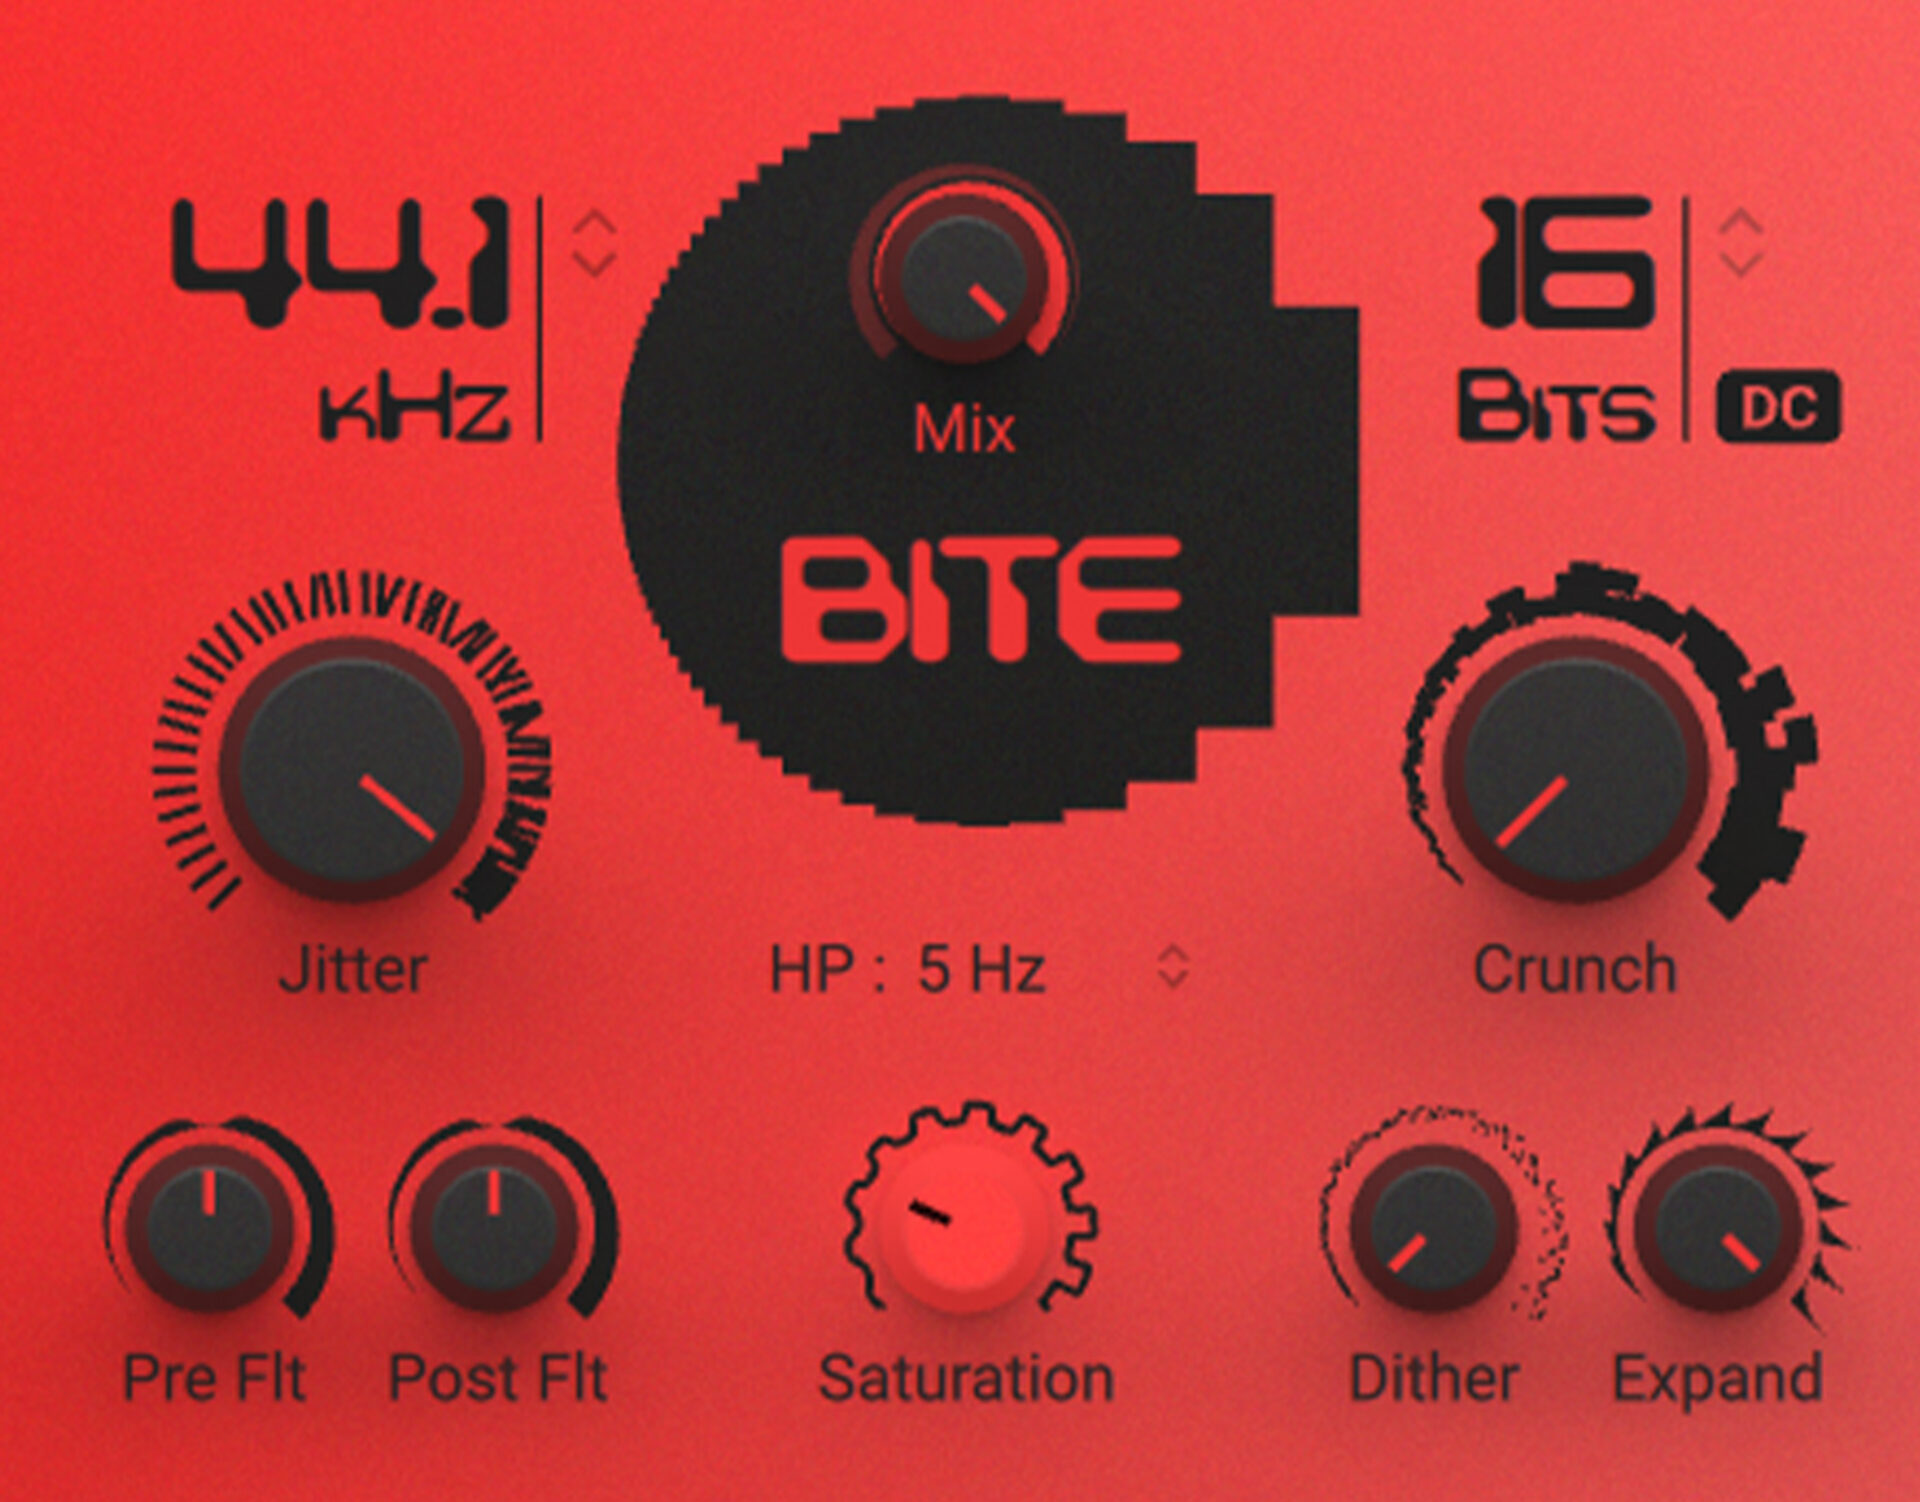
This is how we’ll apply distortion on the synth:
- Turn up Jitter to make the sample rate jump around erratically, introducing noise into the signal. As you turn it up close to 100%, you’ll hear noise in the higher frequencies.
- For a little more warmth and color, drive the signal into a saturation circuit by turning the saturation knob up to around 6 dB.
Here’s what that effect sounds like.
Finally, here’s the whole track with the effects added. Hear how they’ve added color, character, and shine.
Start using distortion in your music
In this article we’ve gone deep on distortion: what it is, how it works, and the range of distortion tools available. Now it’s time to start using distortion in your own music.
Thicken up your mixdowns with the rich sound of valve distortion using SUPERCHARGER GT, a powerful valve-based compressor emulation.
Related articles
-

Inside the evolution of orchestral sampling: an interview with ProjectSAM
Discover how ProjectSAM’s Lineage Series uses NKS and smart features to change orchestral sampling. Plus, save on instruments in our…
-

How New Constellations turn emotion into sound with Massive X
Go inside the studio with New Constellations. Learn how they use Native Instruments gear, happy accidents, and lifelong friendship to…
-

Citizen Kain on building emotion and space with Replika
Citizen Kain explains how Replika helped shape the rhythm, tension, and emotion behind his debut Eversun Records single “Moments.”…
-

The organic precision behind Calcou’s Anjuna release featuring Reaktor
Calcou shares how Reaktor, Monark, and Super 8 shaped the creative balance and live energy behind their new duo EP,…
-

14 NKS instruments that will change the way you create music
Discover 14 NKS instruments to freshen up your workflow. From lo-fi tape synths to cinematic strings, shop the Native Instruments…
-

Parallelle on crafting living basslines with Reaktor and TRK-01
Parallelle share how Reaktor and TRK-01 shape the bass and warmth in 11th Avenue, balancing analog depth with modern control.
-

Where will your sound lead you? Explore the Native Instruments Summer Sale
Save 30% on instruments, effects, and sounds in our Summer Sale. Find the tools to keep your tracks moving and…
-

How Mr. Bill builds sonic worlds in Massive X
Mr. Bill explains how Massive X and instinctive sound design shaped the storytelling process behind his new downtempo album, Mr.