Chorus does things that other effects can’t. Whether it’s lending sparkle to a vocal, thickening up a synth pad, or adding that unmistakable shimmer to guitars, chorus is a godsend for shaping colorful, characterful audio. Even drums can sometimes benefit from a little chorus. But this humble effect is easy to misuse, and even easier to misunderstand.
So what is the chorus effect in music, exactly? How does chorus work, and what distinguishes it from other effects such as flanging and phasing? In this article, we’ll launch off from these questions to explore the shimmering world of chorus. We’ll learn why chorus sounds the way it does, and explore famous uses of chorus in recorded music. Then we’ll show you how to use chorus in your own music, explaining the key parameters of your chorus plug-in and demonstrating how to use it to enhance guitars, vocals, and more.
Jump to these sections:
- What is the chorus effect?
- What songs use the chorus effect?
- Chorus parameters
- How to use the chorus effect
Follow along using CHORAL in the MOD PACK EFFECTS SERIES, a versatile chorus effect that allows you to add width, movement, sheen, and shimmer to any signal.
What is the chorus effect?
Chorus is an audio phenomenon that occurs when multiple similar sounds happen at the same time. Think of the massed voices of a choir, or the thick, sparkling sound of a string orchestra. When these similar sounds come together, they blend into one sound with a distinctive, shimmering quality that’s pleasing to the ear.
The above examples show how the chorus effect occurs in acoustic (i.e. non-electronic) contexts. So what does a chorus effect do in music production? Put simply, it tries to emulate this sound using studio tricks. It does this by duplicating a sound and changing the copies in subtle ways, to create the impression that we’re hearing multiple “voices” at once. This adds thickness and sparkle to the original sound, making it seem “larger” than it otherwise would.
Let’s take a listen to what the chorus effect sounds like on a guitar. In the audio example below, you can hear a few seconds of a guitar without any effects, then you can hear guitar with the chorus effect applied.
Do you hear the depth and shimmer that’s added with this effect? Let’s dig deeper into how this works.
How do you get the chorus effect?
The chorus effect works by making a copy (or copies) of a signal and delaying this copy by a small amount (around 15–35 milliseconds). An LFO (low frequency oscillator) causes the length of this delay to change over time. This also alters the pitch of the copied signal, making it slightly out of tune with the original signal. The processed signal is then recombined with the original signal, creating the illusion that multiple instruments (or voices) are playing.
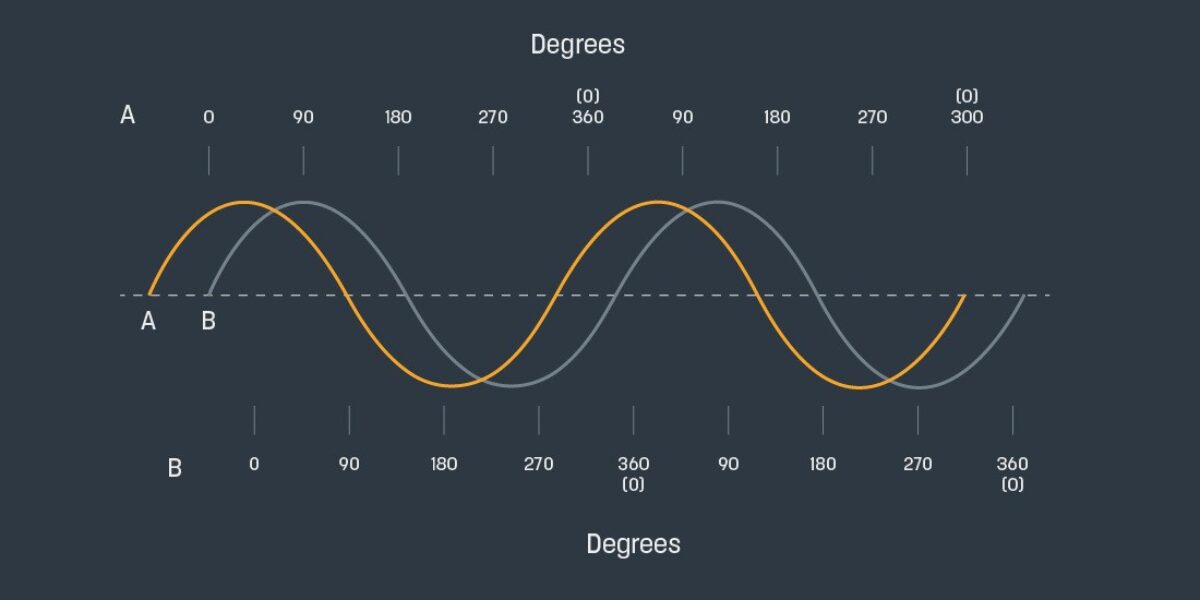
That’s not all. When the dry and processed signals combine, they produce a distinctive shimmering effect. This is because of phase interference between the two signals. We described phase interference in more detail in our article about flanging.
To recap: when two identical (or nearly identical) signals are played slightly out of time with one another, their phase relationship causes them to interact in unpredictable ways. Some frequencies in the sound will be boosted and others canceled out. Because the delay amount in a chorus effect is constantly changing, this phase relationship changes from moment to moment. This ever-changing phase relationship creates the distinctive shimmering effect of chorus.
The difference between chorus, flanger, and phaser
Now that we know how the chorus effect works, it’s time to clear up a common confusion. Chorus often gets mixed up with two other effects: flanging and phasing. This is understandable: The three effects have a similar sound, and are often used in similar situations. That’s because they are all based on the phase shifting principle described above.
However, there are important differences between them. A flanger uses much shorter delay times than a chorus (usually less than 20ms). This heightens the phase interference, leading to a more drastic “jet engine” sweep—quite a contrast to the mellow sweetness of chorus.
A phaser, meanwhile, doesn’t use delay at all. Instead, it achieves the phase shifting effect through an all pass filter. Phasers have a more ethereal feel than flangers, and are thinner-sounding than chorus.
What songs use the chorus effect?
Chorus has been a staple in music production for decades. It’s most famously used on guitars, but finds its place on other instruments too. Let’s look at some classic uses of chorus.
The Beatles helped popularize the chorus effect. Some years before the first chorus guitar pedals hit the market, the band were using innovative studio techniques to get similar results.
On “Tomorrow Never Knows,” from 1966’s “Revolver” album, Abbey Road sound engineer Geoff Emerick ran John Lennon’s vocals through a Hammond Organ’s Leslie speaker to create a tremolo and chorus effect. The song also makes use of automatic double tracking, or ADT: an early form of chorus effect using tape delay to duplicate a signal.
Chorus has been a fixture on guitar pedalboards since the ‘70s. But few guitarists have made the effect their own quite like Andy Summers of UK band The Police. Summers’ shimmering tone is the cornerstone of the band’s sound, and helped set the stage for the chorus-drenched 1980s.
You can hear chorus used to fantastic effect on the band’s 1979 single “Walking On The Moon.” Listen out for those gorgeous chords in the intro.
Chorus doesn’t always bring shine and sparkle to a track. In Kurt Cobain’s hands, the effect sounds blurry and distant, conjuring a darker sound world. Cobain used chorus more often than you might think given Nirvana’s grungy reputation. His use of the effect is well demonstrated on 1992’s “Come As You Are.”
Chorus parameters
Now you have a sense of what chorus is and how it’s been used, it’s time to tackle the technical stuff. Chorus plug-ins come in numerous forms, and their character and capabilities vary widely. But most feature the same basic parameters. Mastering these controls will enable you to pick up any chorus effect and get good results right away.
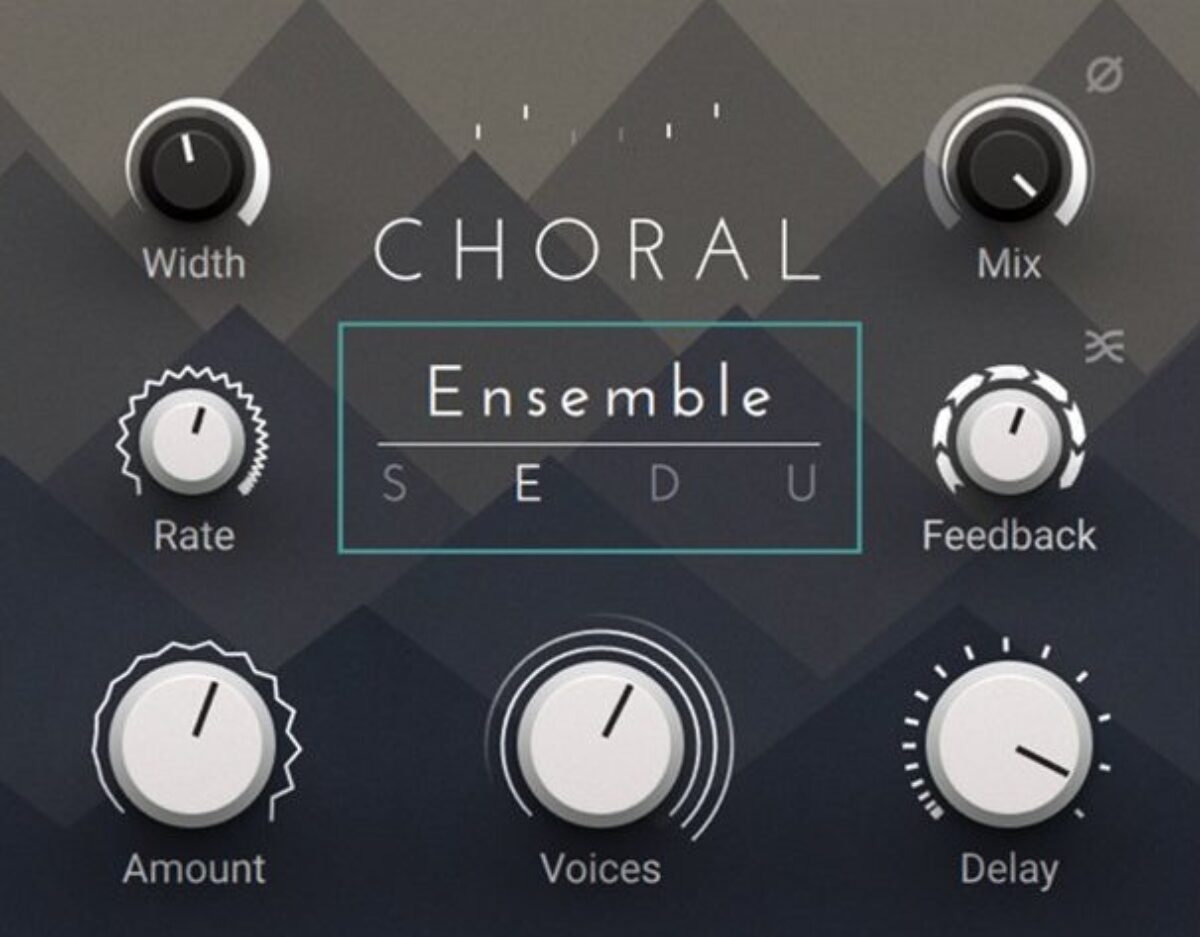
Let’s take a look at them. To demonstrate these parameters, we’ll be using Native Instruments’ CHORAL, a versatile plug-in taking inspiration from prized chorus effects of the last 40 years.
Rate
Rate controls the speed of the LFO that modulates the chorus delay time. Remember: the processed signal in a chorus is constantly shifting in time (and pitch) thanks to this undulating LFO. With a lower rate, the change happens slowly, creating a gentle swaying feel. Faster rates create a more noticeable warbling effect.
Here’s how it sounds. The Rate is low in the first half of the clip, before getting fast (and then faster) in the second half.
Amount
Amount controls how extreme the time (and pitch) modulation of the chorus is. In other words, it dictates how far the pitch of the chorused signal sweeps up and down. Lower settings create subtle, mirage-like shifts. Use higher settings for more dramatic seasick sounds.
In this example, you’ll hear a low Amount first, followed by a high Amount.
Delay
Delay controls the amount by which the processed signal lags behind the dry signal. Of course, the delay amount in a chorus is always changing, thanks to that undulating LFO. Delay control dictates the approximate length of this variable delay: is it generally shorter, or longer? Not all chorus effects feature this control (CHORAL does).
At lower Delay amounts, the chorused signal sits tightly behind the dry signal, meaning its effect is mainly timbral. At higher Delay settings, the affected signal starts to sound like a delay or reverb tail, adding space to the sound.
It’s easier to hear how Delay changes the sound when Feedback is turned up a little, as in this example. You’ll hear low Delay settings first, then high settings.
Feedback
Feedback controls how much of the chorused signal is looped back into the signal chain to be processed again. Higher feedback settings amplify the behavior of the chorus effect, creating metallic resonances. Boosting this parameter opens up a whole world of sound design techniques.
In this example you will hear zero Feedback first, followed by increasingly high Feedback settings.
Mix
Mix or Dry/Wet balances the relative volumes of the dry and processed signals. Chorus is a rich and pleasing effect when used in moderation, but can become tiring on the ear if it’s mixed too loud. Use the Mix knob to blend the chorus smoothly.
In this example, you’ll first hear the chorus effect mixed at 100% Wet. In the second half of the clip, it’s balanced 50/50 with the dry signal, creating a more palatable sound.
Width
Width controls the stereo width of the processed signal. Chorus can be a powerful tool for adding stereo content to a sound, and the Width knob is where the magic happens. In CHORAL, boosting Width causes the chorus voices to be panned in opposite directions, widening the stereo image. When Width is set to 0, the signal’s original stereo image is preserved.
In the first half of this example, Width is set to 0. Since the original guitar sound is in mono, this means that the processed signal is in mono, too. In the second half of the clip, Width is boosted to 100%, giving us glorious stereo.
How to use the chorus effect
Now you know the ins and outs of your chorus plug-in, it’s time to put it into action.
Chorus can serve your productions in numerous ways. It can add depth and ambience to a pad or atmospheric sound, thicken up a vocal, or widen out the stereo image. It’s best for adding smoothness and ambience, but it can also produce wilder sonic effects (particularly when Feedback is set high). It can even be used to process beats.
The important thing to remember is that, where chorus is concerned, it’s easy to overdo it. A chorus effect that sounds exciting at first might become tiring on the ear. And what seems like a seductive shimmer on first listen might just be a messy blur, sapping the clarity from important instruments. If in doubt, always reach for the Mix knob to blend the chorus effect back into your dry signal.
Let’s look at how to apply chorus to some specific instruments.
Guitar
The chorus effect is instantly at home on a guitar. We can use it to add sheen, depth, and intrigue to this guitar riff.
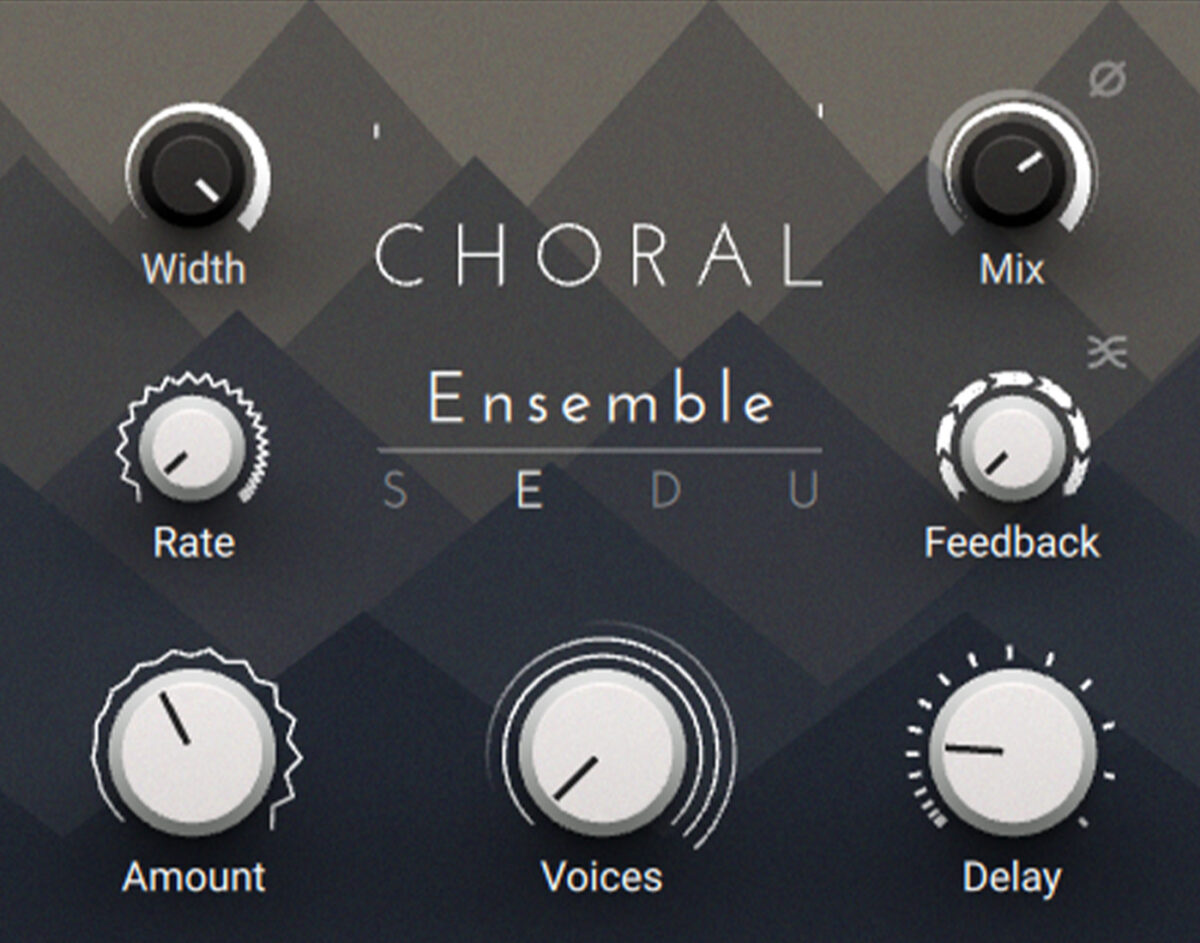
First, let’s choose a chorus mode. CHORAL features four modes. Universal offers a clean modern digital sound, while the other three are inspired by classic hardware choruses. Each has its own distinctive vibe; flick between them to see what works best with the material at hand.
In this case, our ear is drawn to the juicy Ensemble mode, which takes inspiration from the chorus section in a late ‘70s string synth.
With the settings at default, it’s a bit too wobbly, so notch the Amount down to 40%.
We want our guitar to fill out the stereo field, so boost the width to 100%.
Finally, use the Mix knob to bring some of the dry signal back in, while keeping the processed signal dominant. 70% Wet seems about right.
Here’s how it sounds. The chorus effect kicks in halfway through this clip. Hear how it adds depth and width to the part.
Synth pads
Chorus is great for thickening up supporting parts such as synth pads. Here’s how our pads sound right now.
As with the guitar example above, we can use the chorus effect to enhance depth and width. This time, we’ll also use the Feedback control to heighten the eerie, metallic quality of the synth part.
Pick a mode first. This time let’s go for Synth, which is modeled on the lush “unison” chorusing function of a series of ‘80s synthesizers. Boost the width to 100% for a full stereo image.
Now get some feedback involved. Turn the Feedback knob up a little—perhaps 20%—until you hear the chorus effect becoming more tangy. At higher settings the chorus will overwhelm the source material. That can be fun sometimes, but it would be a bit excessive here.
Finally, bring in some of the dry signal to balance out the effect. Around 40% Wet should do it.
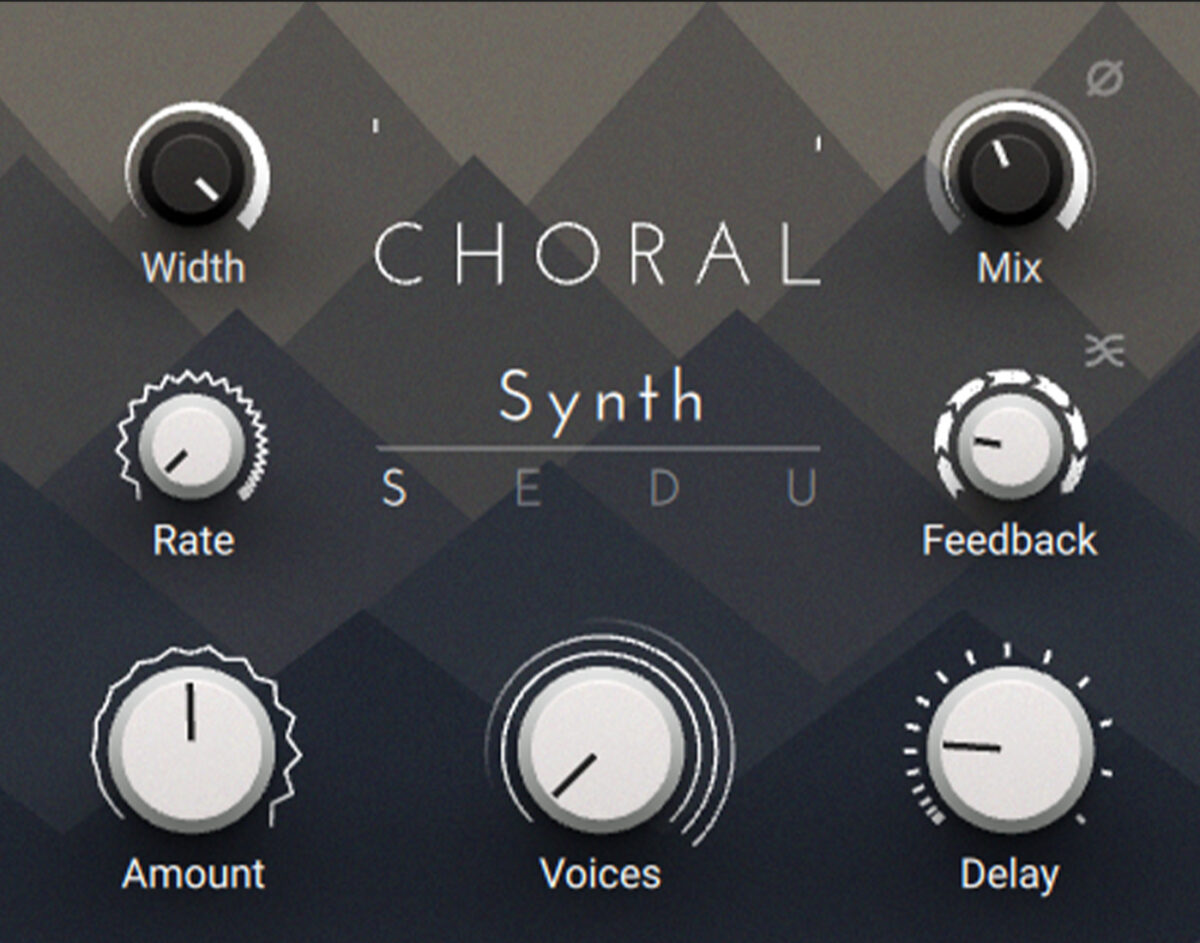
Here’s how it sounds. The chorus effect is applied halfway through the clip.
Vocals
Let’s look at using the chorus effect on vocals. Chorus can enhance vocals in a few different ways. A subtle amount can thicken up a lead vocal. More extreme settings can be used on backing vocals or ad libs to push them into a supporting role.
Here’s a vocal and backing vocal that need some attention:
There’s currently no spatialisation to these parts: they sound pretty dry. We could fix this with reverb and delay, but chorus can get us there, too.
The second problem is that the lead and backing part are bunched up together. We can use a chorus on the backing vocal to push it to the sides of the stereo field, clearing space for the lead vocal.
Let’s look at the lead vocal first.
First, choose a mode. Dimension, based on a popular early ‘80s rackmount chorus, should work. To enhance the chorus effect, turn up the Voices knob to maximum. This introduces further instances of the chorus effect into the signal, thickening up the sound.
Now turn up Delay. The higher the delay, the greater the sense of separation between the dry and processed signals.
Now raise the Feedback to about 20%. As the affected signal is fed back into the chorus, you’ll hear the signal start to repeat in a manner almost like reverberation. Suddenly, our chorus effect is an idiosyncratic reverb.
Finally, balance the “reverb” signal with the dry signal using Mix. Around 40% wet should do it.
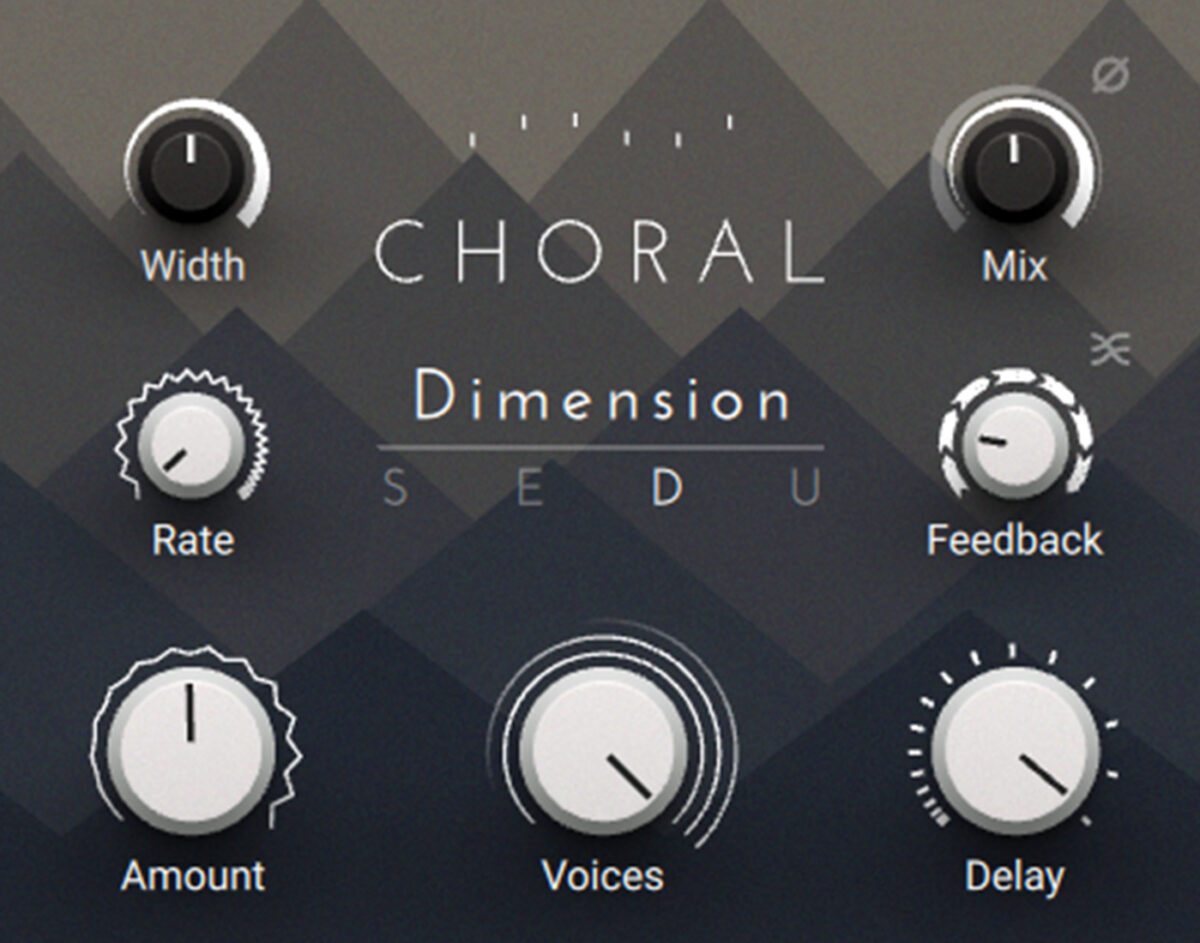
Here’s how it sounds. The chorus effect appears halfway through the clip.
Now let’s look at the backing vocal. We want to use chorus to push this part to the sides, saving the middle of the stereo field for the lead vocals. We can do this quickly using the chorus effect in Nectar 3, iZotope’s vocal mixing plug-in.
Load up an instance of Nectar 3 and drop in a Dimension module to access the chorus effect.
With the module in Chorus mode, make sure the width is at maximum and play with the Rate, Depth, and Feedback until you get a subtle, pleasing sound.
Now increase the mix of the Dimension module to 100% wet. This means that only the chorus signal is coming through—no dry signal at all. If we were working with a lead part, this would take too much clarity out of the signal. But it’s perfect for pushing a supporting part into the background.
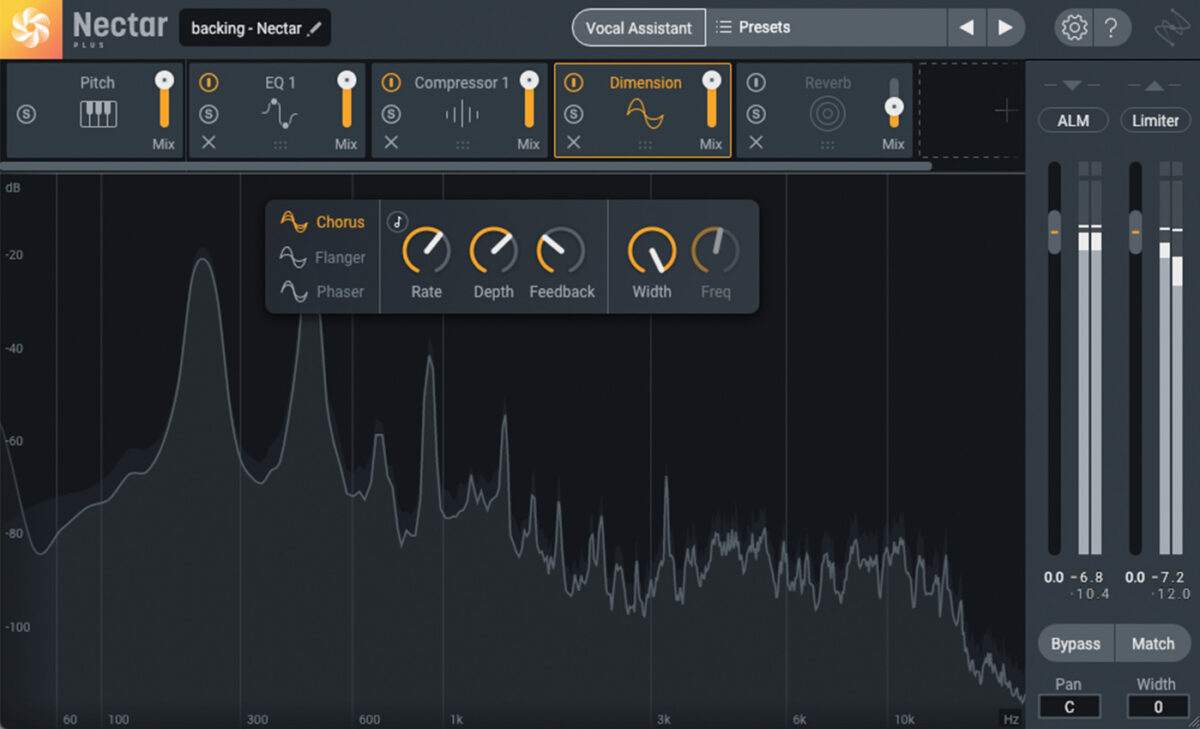
Here’s how the backing vocal sounds before and after the chorus is applied:
And here’s how both our vocal parts sound together. The chorus effects enter halfway through.
Start using chorus in your music
In this article we’ve explored the shimmering world of chorus. We’ve learned what chorus is, how it works, and how chorus has been used in music. We then showed you how to make the best use of your chorus plug-in, explaining important chorus parameters and demonstrating how this effect can be used on key instruments.
Now it’s time to start using chorus in your productions. CHORAL is a one-stop shop for your chorus needs, offering luscious vintage modes alongside powerful modern controls.


