


All music is based on some rhythm, and when you’re producing music, your drums will be at the heart of that. It doesn’t matter the genre, nearly every form of music is anchored by drums. When it comes to producing music, knowing how to program drums to push your song to full effect requires knowing key tools for using them properly.
In this tutorial, we’ll explore how to add groove and variation to your drum patterns, how to quantize or humanize your drums, and how to add musical fills to take your music to the next level.
Jump to these sections:
Follow along with Kontakt, our flagship, do-it-all instrument platform.
What is drum programming?
Drum programming refers to the process of creating and sequencing rhythmic patterns using electronic or digital drum sounds. It is a fundamental aspect of music production, particularly in genres like electronic dance music (EDM), hip-hop, and pop, where precise and repetitive drum patterns play a crucial role. Instead of using physical drum kits, producers and musicians utilize software or hardware-based drum machines and sequencers to craft intricate and diverse beats.
How to program drums
While a skilled live drummer is always a great source for drumming, the practicalities of recording them can be out of reach for most producers. Drum machines have birthed many genres that don’t need live drums. Luckily, beat makers and producers who want the sound of a live drummer have incredible new options that can deliver that sound when programmed properly.
We’re going to show you ways to program your drums in order to make them feel powerful and alive, whether you’re aiming to make beats with an electronic sound or an acoustic “live” effect.
One of the helpful aspects of all drum programming is that most drum kits follow a standard set of choices, including drum machines. Drum machines are normally set up following the foundations of a drum kit:
- Kick or Bass drum
- Snare
- Hi-hat (open and closed)
- Toms and or congas (generally 1-4 toms at different pitches)
- Cymbals (crash and or ride)
- Other percussion, which can include cowbell, shaker, woodblock, guiro etc.
We can find all those options in several of the tools we’re going to use in this tutorial. We’ll show you options with an electronic kit from Battery 4, as well as with some of the great emulations of acoustic kits available as Kontakt instruments, such as DrumLab and Studio Drummer.
Let’s talk about some of the steps for quality drum programming.
1. Choose the right drum samples
When you’re going to start programming drums for your music production, you will want to choose the right drum sounds to fit the genre and sound of your track. It’s probably unlikely you’ll want electronic drums for a country song, or acoustic drums for an electro track, so it helps to listen and choose a set of sounds that fit your project. A great place to start is to look for a sampled kit—this is often a package of samples that follow the drum kit format we outlined above. When you’ve found a kit you like, you can customize it to suit your tastes by adding or swapping samples.
Let’s load up a kit in Battery 4 for our electronic track. This is Kayla Kit, and it has multiple choices for kick drums, snares, hi-hats and everything else we’d want in a kit.

Here’s how some of those sound.
Make sure that you’re finding samples that are high quality audio, and that they’re organized using a program that allows you to control the trigger, velocity, and articulation for each sample. This will go a long way towards helping your drums feel active and interesting.
Here’s an example of a kit we’ve loaded in Studio Drummer. This Session Kit Lite—and it’s made up of drum samples using a drum set like the one pictured in the Kontakt instrument.
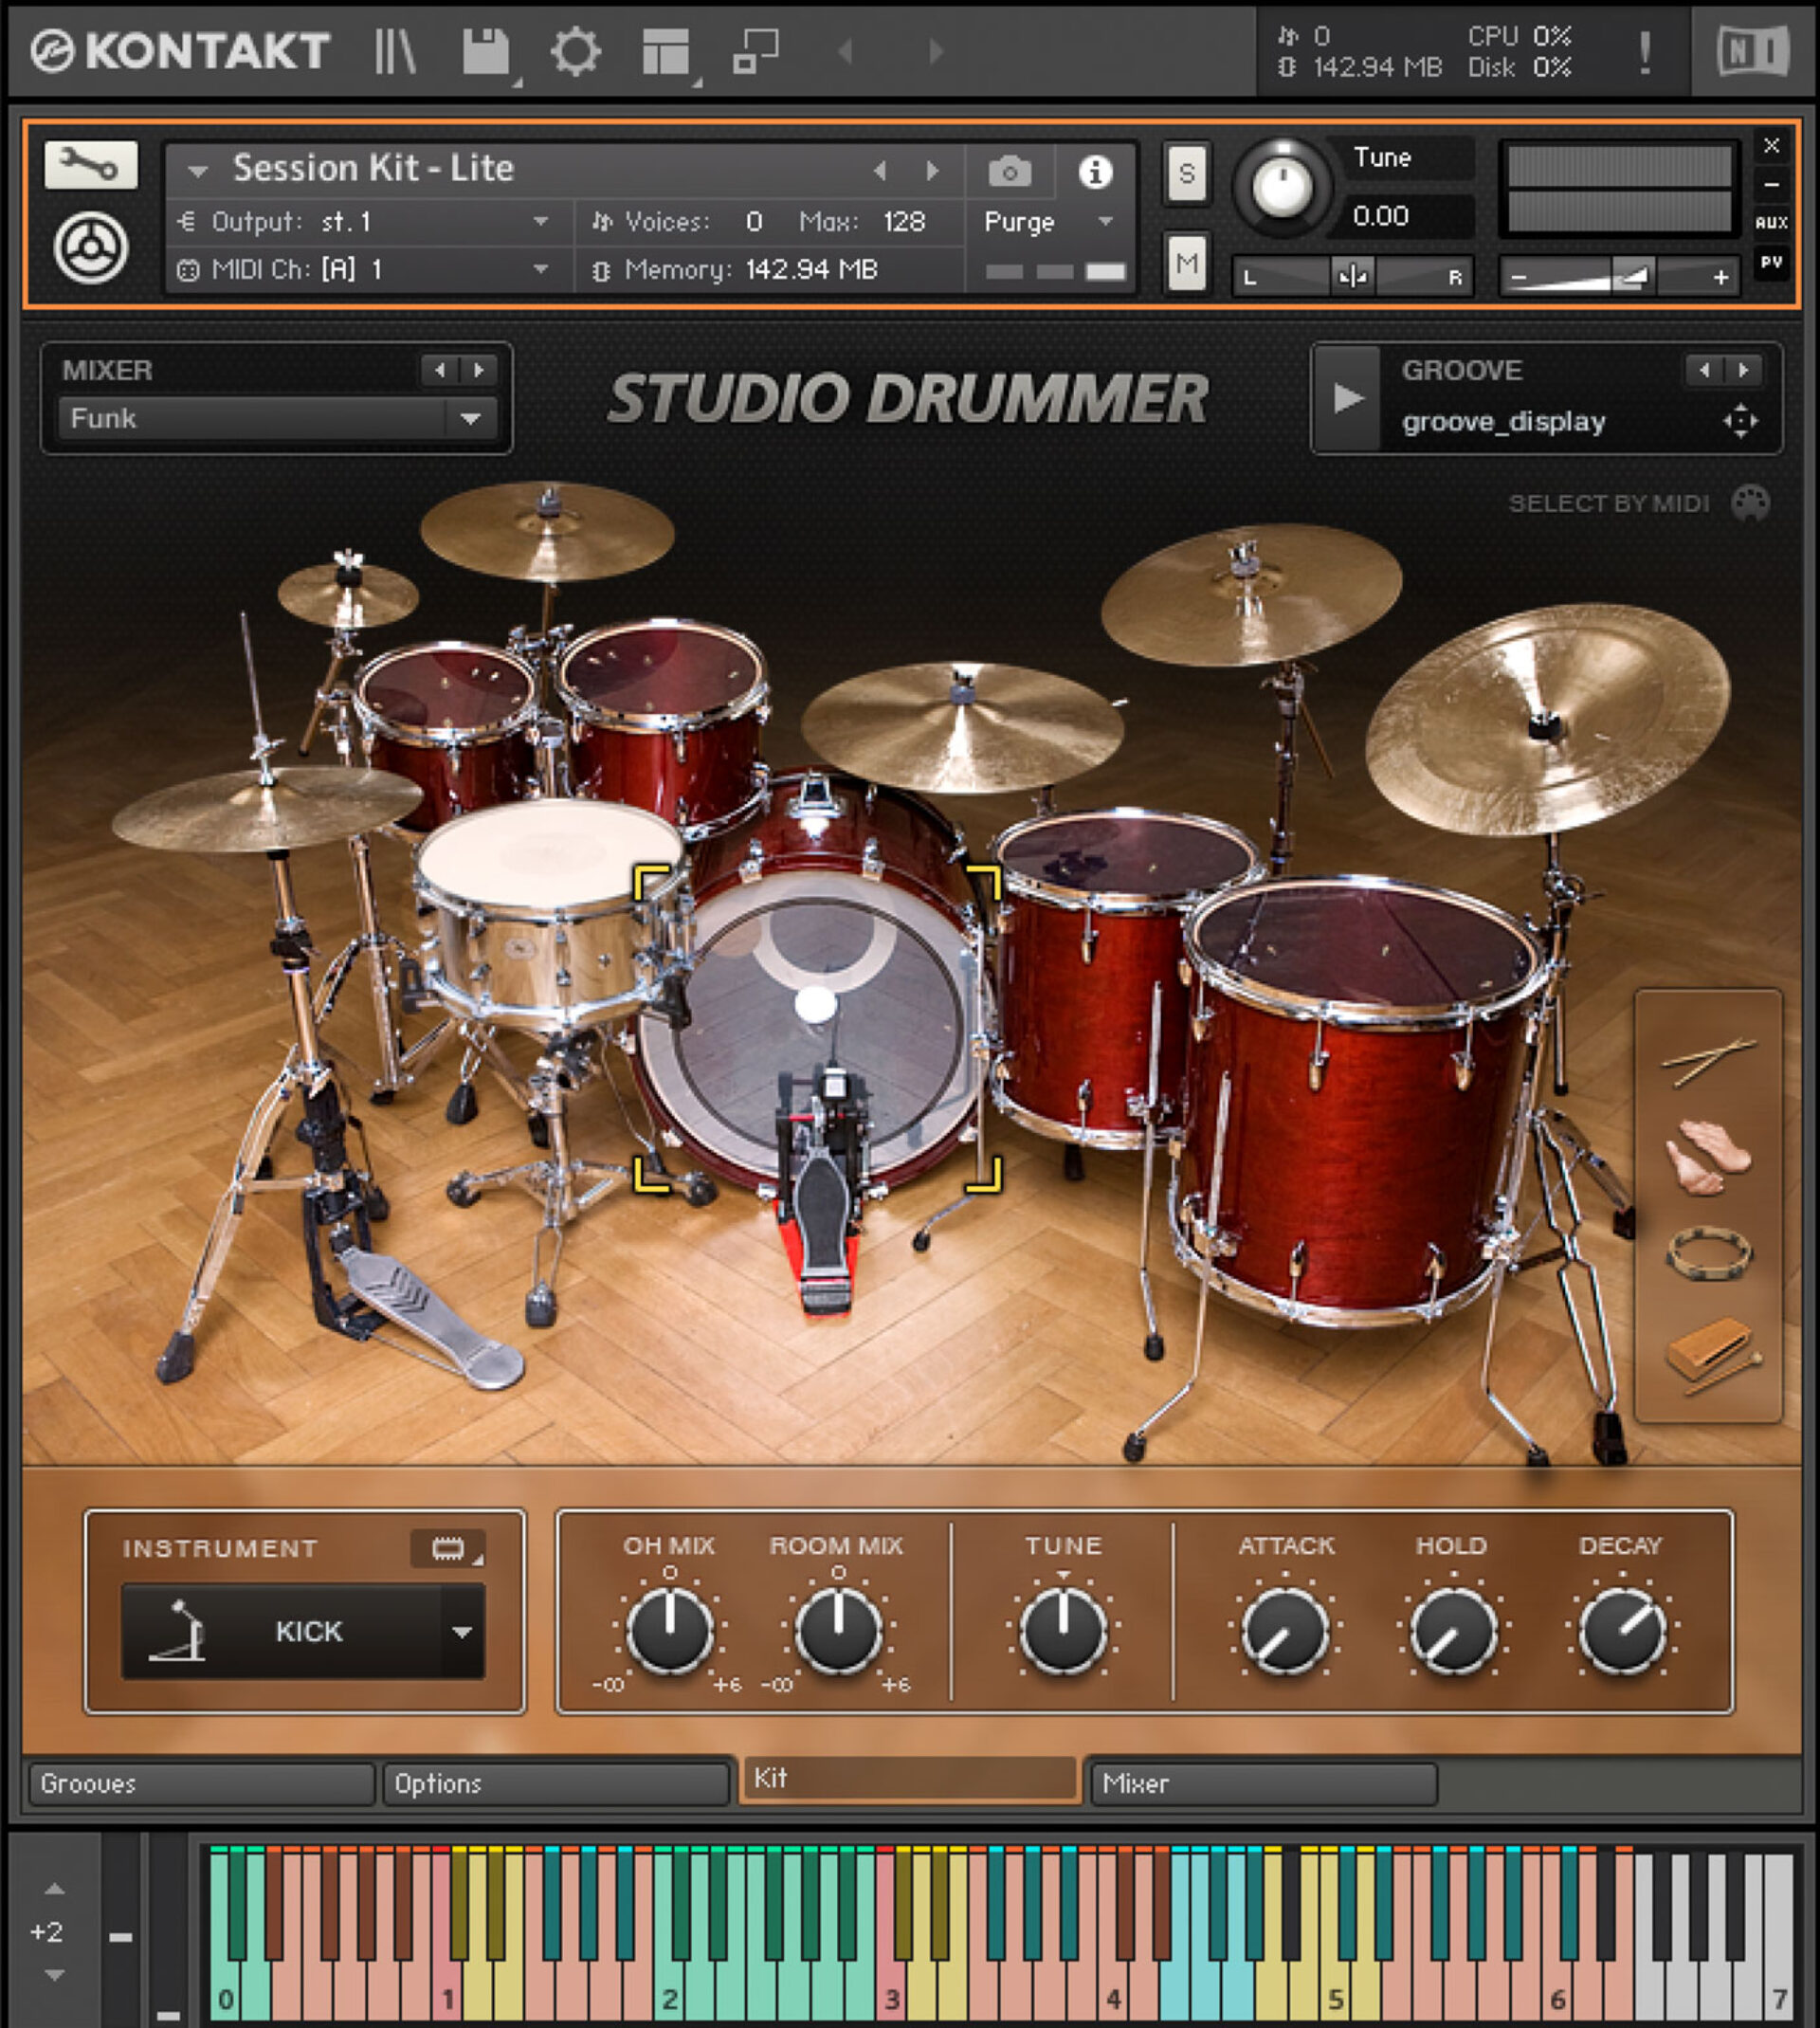
And here are some of the sounds of that kit.
Now that we have some sounds we can work with, it’s time to create a drum pattern.
2. Create a drum pattern
In the same way that every song has a harmonic and melodic structure, it also has a drum groove and that groove is set by the drum pattern. Since we’re programming these drums in our DAW, we want to create a pattern that will work with the kind of track we’re making.
For our acoustic kit, let’s lay down a very basic pattern that resembles a classic soul pattern that’s been the base of tons of grooves over the years. We’re going to program our kick drum on the 1st and 3rd beat of each bar, and our snare on the 2nd and 4th beat. We’ll also add a repeat of the kick drum directly after the first hit of each bar. Here’s what the pattern looks and sounds like:

Let’s do something simple as well with our techno kit in Battery. We’re going to get the basics of a techno pattern set down. We’ll put a kick drum on the 1st, 2nd 3rd and 4th beat of the bar, and we’ll add some hi-hats on the beats in between them. Here’s how that looks and sounds:

Interested in learning more about music production?
Join our community of more than 75,000 music creators and receive expert insights, tips, and tricks that will help you become a better producer.
3. Accent your groove with different velocities
Now that each of these basic patterns are set, we can start to improve them. First we want to add different accents at different velocities. This will fill the pattern while keeping the groove.
Some of the small notes we’re going to add are sometimes known as “ghost notes,” unaccented notes that add to a groove. The term is better explained in the video below by the legendary drummer Bernard Purdie. This may be the best 5 minute drum lesson you’ll ever watch.
Let’s start to add some extra flavor and groove to the acoustic drum kit pattern we’ve made. We’ll add a few light hits on the drums in additional parts of the pattern. This works best with drum patterns that have a looser, open groove.

We’ve filled in some of the space in this pattern, as you can see from the MIDI clip. But these notes are at much lower velocity settings than the accented notes of our pattern. This allows us to keep the core parts of the pattern accented, while accentuating the groove in quieter notes. This helps support the other instruments in the mix without overpowering them. We’ve added notes, but we’ve also taken a few of them away. This adds a bit of motion and surprise to the groove, making it feel fluid and alive.
Let’s see how that sounds now.
4. Layer your drums for fuller sounds
One thing DAW drum programming offers is that we can do more than what a drummer could do with two arms and two legs. Multiple sounds can be triggered at the same time to layer and create accented sounds together. This can be extremely effective in electronic genres, because we’re not trying to emulate a specific sound. Electronic sounds often stick to very simple beat structures, as with our techno beat. But we can offer a lot of subtle variation and movement
For our techno kit, we’re going to layer our pattern using the sampled kit from Battery, and add some lower velocity notes as above. These will subtly fill out the energy of this pattern, giving it a more rolling, propulsive energy. Our main accented notes are there, but the background is filled in, and things are moving. The layers make a difference when they appear and disappear, keeping this loop interesting.
Here’s how it sounds with the extra layers:
And here’s how that pattern looks in our DAW.

5. Quantize or humanize your drum pattern
When we’re setting up rhythmic patterns for drums, we are using the musical formula for dividing time into whole notes, half notes, quarter notes, eighth notes, etc. When we use a computer or DAW to set those divisions, they will divide the time exactly, and each note will correspond to the precise division of time we’ve set. Locking our notes and rhythms to exact divisions of time is known as quantization. When our drums are quantized, they can give a solid, locked-in feeling that is fantastic for dance music, and extremely useful to DJs. Most digital drum machines and samplers default to standard quantization. Older analog drum machines are still quantized, but they sometimes exhibit a bit of “drift” that is almost imperceptible.
Humans, however, are not always precise. Even our heart beats don’t lock into exact timing, they shift and vary depending on many factors. While some drummers have excellent timing, they also have a fluid ability to shift tempo, or play notes within the tempo at different timing. These little variations in timing can give drum patterns a more “humanized” feel, differentiating them from quantized digital tools.
Our studio drum pattern can definitely benefit from feeling a bit more humanized. We’re going to move a few notes off the quantization grid to give it a more human feel. One thing to remember is that the accented notes are much better when quantized. The smaller notes in between can give some variation and groove, while the heavier accented notes provide an anchor for the beat to stay steady. This combines with the velocity variations we added above, and our drum pattern feels more subtly “human.”
Here’s how the pattern sounds now with some subtle timing variations.
And here’s how the notes look in our DAW.

In our techno example, we want to keep the drums very computerized and reliable. But we can add a bit of programmed “swing” to enhance the groove. This will keep the whole notes and quarter notes quantized to the grid, but shift everything slightly later. This “swing” time innovation was pioneered by African American musicians and is a core feature in jazz, soul, rock and most other popular music in the 20th century. Allowing a DAW to program our swing offers a perfect balance of familiar groove and the locked-in propulsive energy of machine drums.
And here’s how the notes look.

6. Add drum fills to keep things moving
When you’re producing, it’s very easy to get lost in the little details, but it’s important to look at how your patterns repeat over time. Small variations in every note and bar are helpful, but we also need parts of our pattern that change on larger cycles as well. This is where fills become essential to arranging drum patterns. At the end of a series of bars, it’s really helpful to make a small change before going back to repeating the pattern again. Drummers and musicians call this a “fill” because it literally fills in a pattern with a small variation to indicate the end of a series of bars or sections of a song.
A great way to think of a fill is as an opportunity to get a little wild and shake out of the pattern you’ve set down. You can repeat your pattern for several bars, and at the end of a four-bar sequence, you can shake up the pattern and change things for one last bar. You want to stay in the groove of the pattern, but you can change the order of notes, hit some other samples and signal that something new has happened.
With our techno kit, we’re going to copy and paste the pattern for 4 bars. Then we’ll shift a few of the notes around to make the end of the last bar have some variation. We’re taking away notes in some places and adding them in others. It’s not super fancy, and it’s not over-the-top dramatic, it just gives a quick signal that we’ve completed a cycle. Here’s how that sounds:
And here’s how those MIDI notes look in our DAW.

With our studio kit, we’re still trying to keep the feel of a live human drummer doing this, so we’ll really add some variation here. More accented velocities, different note placements, and we’re going to hit some sounds we haven’t used yet—namely the ride and crash cymbals. These are favorites for many drummers to use in a fill, because they last longer into the next bar and really emphasize that turnover in the cycle of our pattern. Here’s how that sounds:
And here’s how those MIDI notes are written into the DAW.

Drum patterns make your music move
These tips show a few ways to write or improve drum patterns in your productions. Each artist or producer will find more individual ways to distinguish their own style and approach to drum pattern making.
Spend some time writing patterns yourself and discover which kits and samples you like, whether you prefer quantized or looser humanized patterns, what kinds of accents or layers do you want to add, and what sorts of fills do you want to add? All of these decisions will help you develop your own unique style and sound. And check out all of the sampled drum sounds we used in this tutorial included in Battery 4 and Kontakt.
Related articles
-

Behind the synth: A. G. Cook on stacked sawtooths and the creation of Super*Saw
Explore the extremes of stacked sawtooth waves with Super*Saw, a new synthesizer co-created with A. G. Cook. Learn how to…
-

Inside the evolution of orchestral sampling: an interview with ProjectSAM
Discover how ProjectSAM’s Lineage Series uses NKS and smart features to change orchestral sampling. Plus, save on instruments in our…
-

How New Constellations turn emotion into sound with Massive X
Go inside the studio with New Constellations. Learn how they use Native Instruments gear, happy accidents, and lifelong friendship to…
-

Citizen Kain on building emotion and space with Replika
Citizen Kain explains how Replika helped shape the rhythm, tension, and emotion behind his debut Eversun Records single “Moments.”…
-

The organic precision behind Calcou’s Anjuna release featuring Reaktor
Calcou shares how Reaktor, Monark, and Super 8 shaped the creative balance and live energy behind their new duo EP,…
-

14 NKS instruments that will change the way you create music
Discover 14 NKS instruments to freshen up your workflow. From lo-fi tape synths to cinematic strings, shop the Native Instruments…
-

Parallelle on crafting living basslines with Reaktor and TRK-01
Parallelle share how Reaktor and TRK-01 shape the bass and warmth in 11th Avenue, balancing analog depth with modern control.
-

Where will your sound lead you? Explore the Native Instruments Summer Sale
Save 30% on instruments, effects, and sounds in our Summer Sale. Find the tools to keep your tracks moving and…