Make yourself comfortable. We’ve already met David Alexander and his Toybox Audio project on the NI blog, and now we’re digging deep into his REAKTOR toolkit. Here, CDM‘s Peter Kirn takes a long-form look at two distinct offerings – the Toybox Free Pack and the (not free, but substantially-discounted-at-the-time-of-writing) Nano Pack.
There’s a lot to take in here, so if you’re pressed for time, here are some handy links:
- Part one is Peter’s follow-along guide to creating a versatile synth patch from Toybox’s free Blocks – complete with audio examples
- Part two is a deeper look at how the Nano Pack connects REAKTOR to TidalCycles and LiveCore, opening up the fascinating world of live coding. Be warned, though – this is the tip of a very deep iceberg.
It’s called “Toybox” for a reason – for all the deep and expressive tools available, patching is all about play. It’s your chance to dive in, paint outside the lines, twist and mangle sounds, and get into the joy of modular. The surprise – you can start for free.
REAKTOR BLOCKS gives you access to an array of software modules that can sound and function like hardware Eurorack devices (or even work in combination with them) – this much you might know. What you might not know is, you can add on dozens to hundreds more modules without spending any money at all, including using the free, community, and demo modules in the Toybox series. You can even build patches using the free REAKTOR 6 PLAYER and the Toybox Free Pack.
When you are ready to go deeper, the full Reaktor 6 – and Toybox’s Community Edition and relatively inexpensive add-ons – open still more sound, interaction, and connectivity possibilities. You can even hop between patching and live coding.
It’s all a great gateway to futuristic and experimental sounds and it’s a ton of fun. So, let’s take a look, as there’s plenty here for beginners, advanced users, and folks in between.
First, let’s get installed
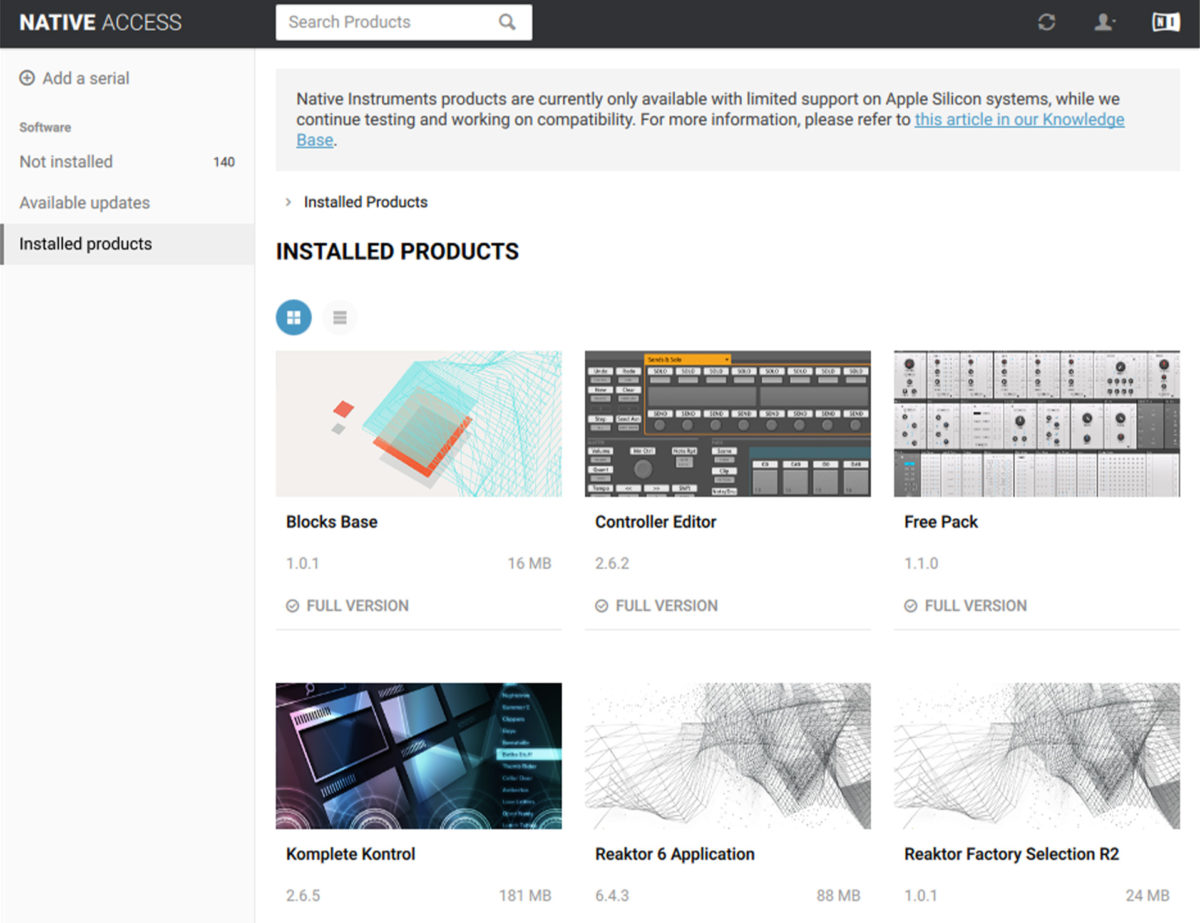
A full copy of REAKTOR 6 is the ideal, of course. But if you want to just get started, try the free KOMPLETE START, which includes both REAKTOR 6 PLAYER and BLOCKS BASE. Sign up and receive a license to install via Native Access.
Toybox has a bunch of packs. Start with Toybox Free Pack – it’s the prerequisite to everything else, and it runs in REAKTOR Player even without a REAKTOR 6 license. From there, feel free to add on anything marked “free” or “demo” to get started. Be sure to read the installation instructions inside each archive. Licenses for the Toybox Free Pack, for instance, also make use of Native Access.
For more advanced users, LiveCore is another tool from Toybox creator David Alexander, working together with Jack Armitage (aka PC Music artist Lil Data). It’s a playful, low-level “live coding” environment built natively in REAKTOR Core. It’s open source but requires the full REAKTOR 6; download or clone the GitHub archive and you’ll get a REAKTOR ensemble file to open.
Part one: Make a versatile, edgy synth patch for free
Here’s what we’ll be making in part one.
Let’s get wiring, because with even just a single oscillator you’ll find some nice sonic possibilities. Toybox have done some deep work on details like waveshaping and distortion models, plus filter modeling using a technique called Zero Delay Feedback. (ZDF makes digital filters behave more like analog ones. REAKTOR Core patchers, here’s a tutorial to try building with that technique yourself).
In REAKTOR 6 or REAKTOR 6 Player:
- Choose File > New Rack or select Patch from the welcome window.
- Click Show Hints (Option+I/Alt+I) so you get tooltips for modules, parameters, and input and output jacks – they’ll come in handy.
Try an oscillator
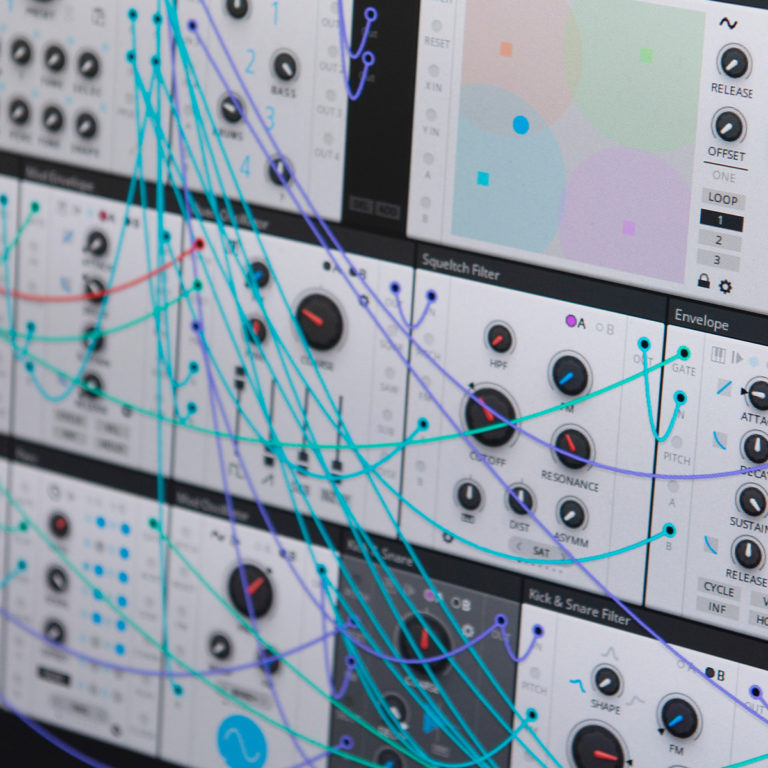
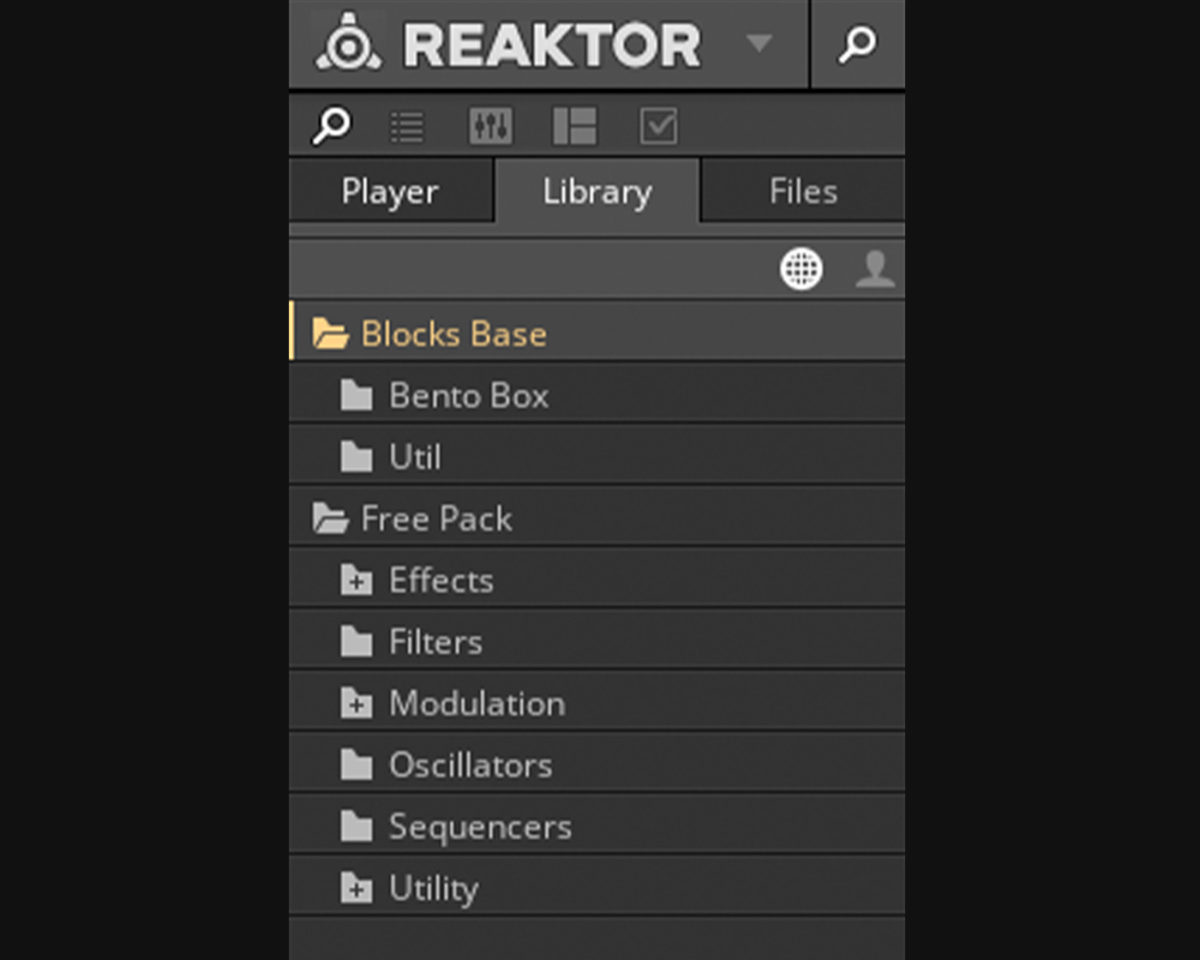
Open the Library, and look for the Free Pack, then Oscillators > OSC-Mini Oscillator. Connect it to IN L and R of Util Level Stereo (marked LEVEL S) – that gives you a meter and a draggable volume fader so you don’t destroy your ears. Connect the Util Level Stereo’s outputs to the left and right ports of the Audio Out at the top to send sound to your audio interface or host.
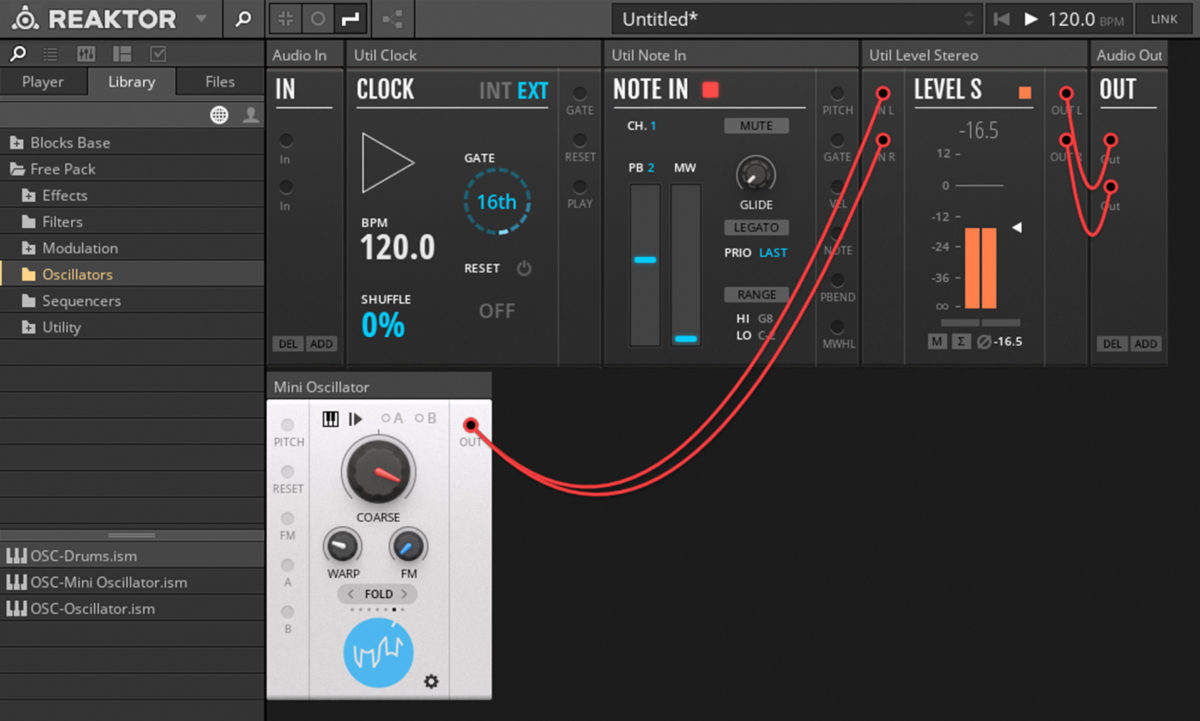
These oscillators pack some seriously aggressive sounds. Turn up the COARSE knob, then drag on the wave shape to warp and bend it. (You can also drag left to right from just outside the circle to adjust phase.) Turn up WARP and try the different tools for waveshaping/folding, sync, and other wave techniques. This single module contains many complex oscillators and waveshapers all in one, even in the “mini” version.
Gate and sequence
Add Sequencers > Gate Sequencer and Modulation > Envelope. The Envelope doubles as a VCA (Voltage Controlled Amplifier), meaning it can both generate an envelope shape and can modify the amplitude of an audio signal. That is, if you use the ENV output, you get a control signal – an envelope you can use to control something else. If you route a signal like the oscillator into the Envelope module, the output labeled OUT will pass that signal. It avoids having to use two modules — one module to generate the envelope, and another module to adjust the volume of the sound.
Connect the Util Clock’s GATE output to the Gate Sequencer’s GATE input and hit PLAY on the transport of REAKTOR (or your DAW) to begin a sequence. Click some of the circles to toggle individual steps.
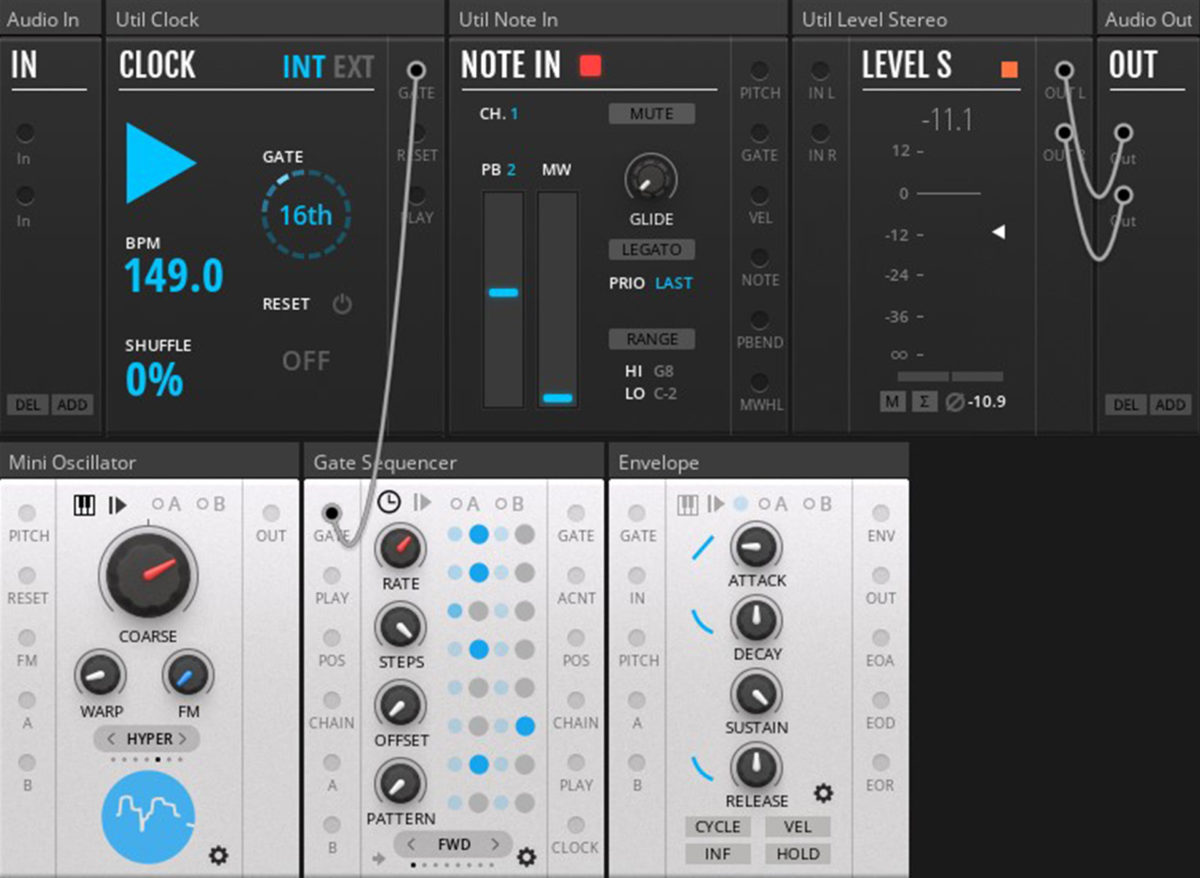
Connect the GATE output from the Gate Sequencer to the GATE input on the Envelope. This will trigger an envelope with each enabled step. (Don’t forget to switch on some steps – they light up blue – or you won’t hear anything.)
Route audio from the Mini Oscillator OUT to the IN on the Envelope and from the Envelope OUT to the Util Level Stereo. Now you’ve got the gate triggering the envelope, and then shaping the volume of your oscillator signal according to the attack, decay, sustain, and release settings.
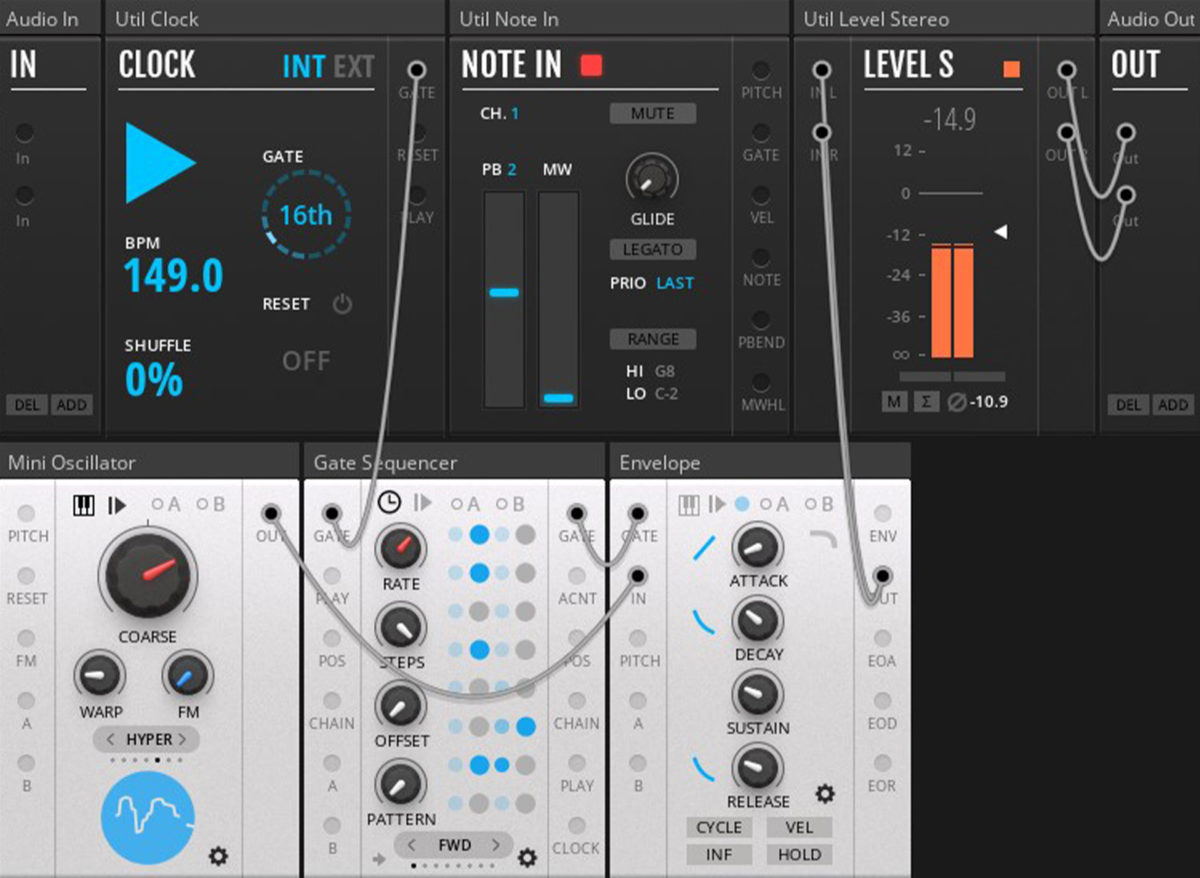
Adjust the ADSR envelope, and we already have a basic bassline going here.
Add a filter with gate and distortion
Now let’s really get into what makes this library special. Add Filters > FLT-Filter. It’s both a versatile, analog-sounding multimode filter and a distortion/shaper module.
Reroute the audio output from Envelope OUT into the Filter IN and then again out to LEVEL S.
We’re using the Envelope now as a VCA, but we can also route the envelope signal from module. Connect the Envelope’s ENV output to Filter input A. The combination of the envelope adjusting both the amplitude and filter gives you a really aggressive, punchy sound. (You could assign a second envelope if you wanted to get more control.)
To make use of that envelope, we need to route it as modulation. Click on A at the top of the module, and you’ll notice gray rounded rectangles appear next to each parameter. If you drag up and down on these areas, you can choose the amount and direction of modulation applied to each setting. Turn the CUTOFF knob to zero to close the filter, and then increase the modulation amount of A to CUTOFF. That way, the filter cutoff will follow the envelope.
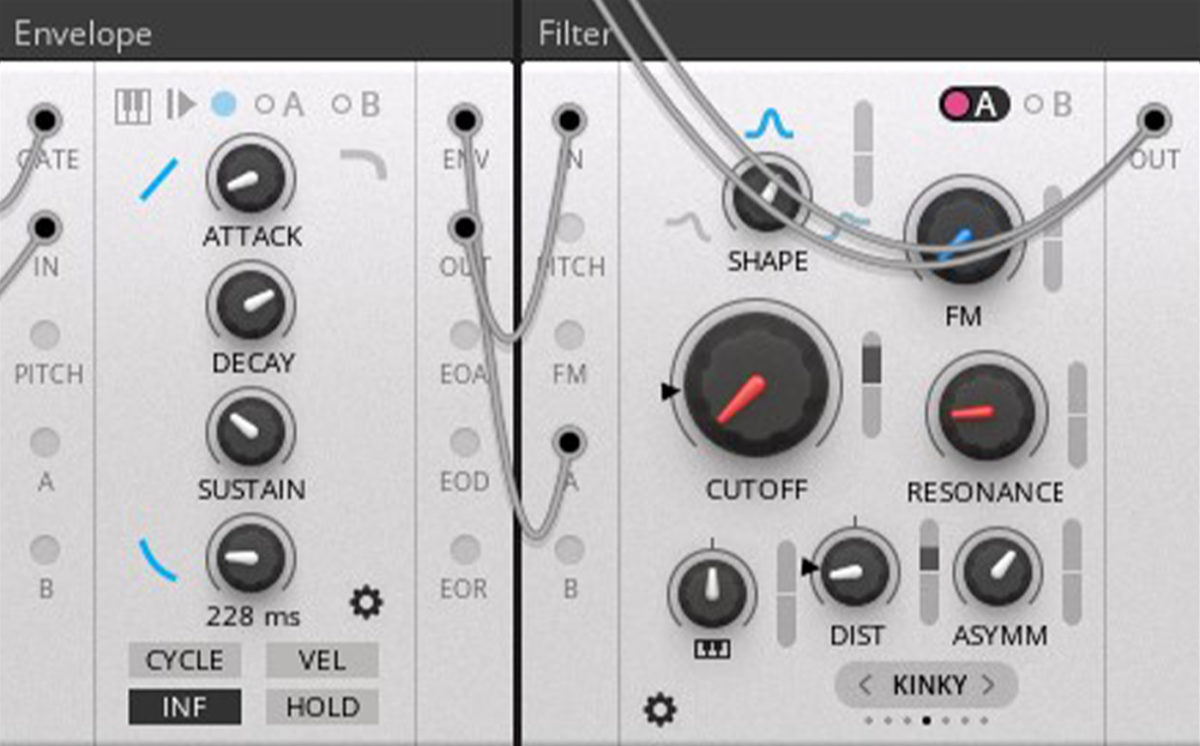
Try adjusting DIST and changing distortion modes. Turning DIST to the left increases distortion before the filter, and to the right distortion after the filter.
You can also apply a little bit of the envelope to the distortion by increasing the A modulation amount next to DIST. Turn the knob at top to modulate shape, and you get lots of short, cutting sounds in different combinations.
(For one last advanced touch, trying routing audio signal from oscillator OUT to the Filter’s FM input and then turning up the FM knob. Now you’ve got filter frequency modulation.)
Add pitch
Modulate the frequency of the Mini Oscillator, too, by adding a second sequencer. We could use a Note Sequencer but that’s a little vanilla; try Sequencers > SEQ-Level Sequencer instead. (Drag each step for horizontal faders showing pitch.) Connect GATE out from the Gate Sequencer to the GATE input on the Level Sequencer, then route Level Sequencer OUT to PITCH input on the Mini Oscillator.
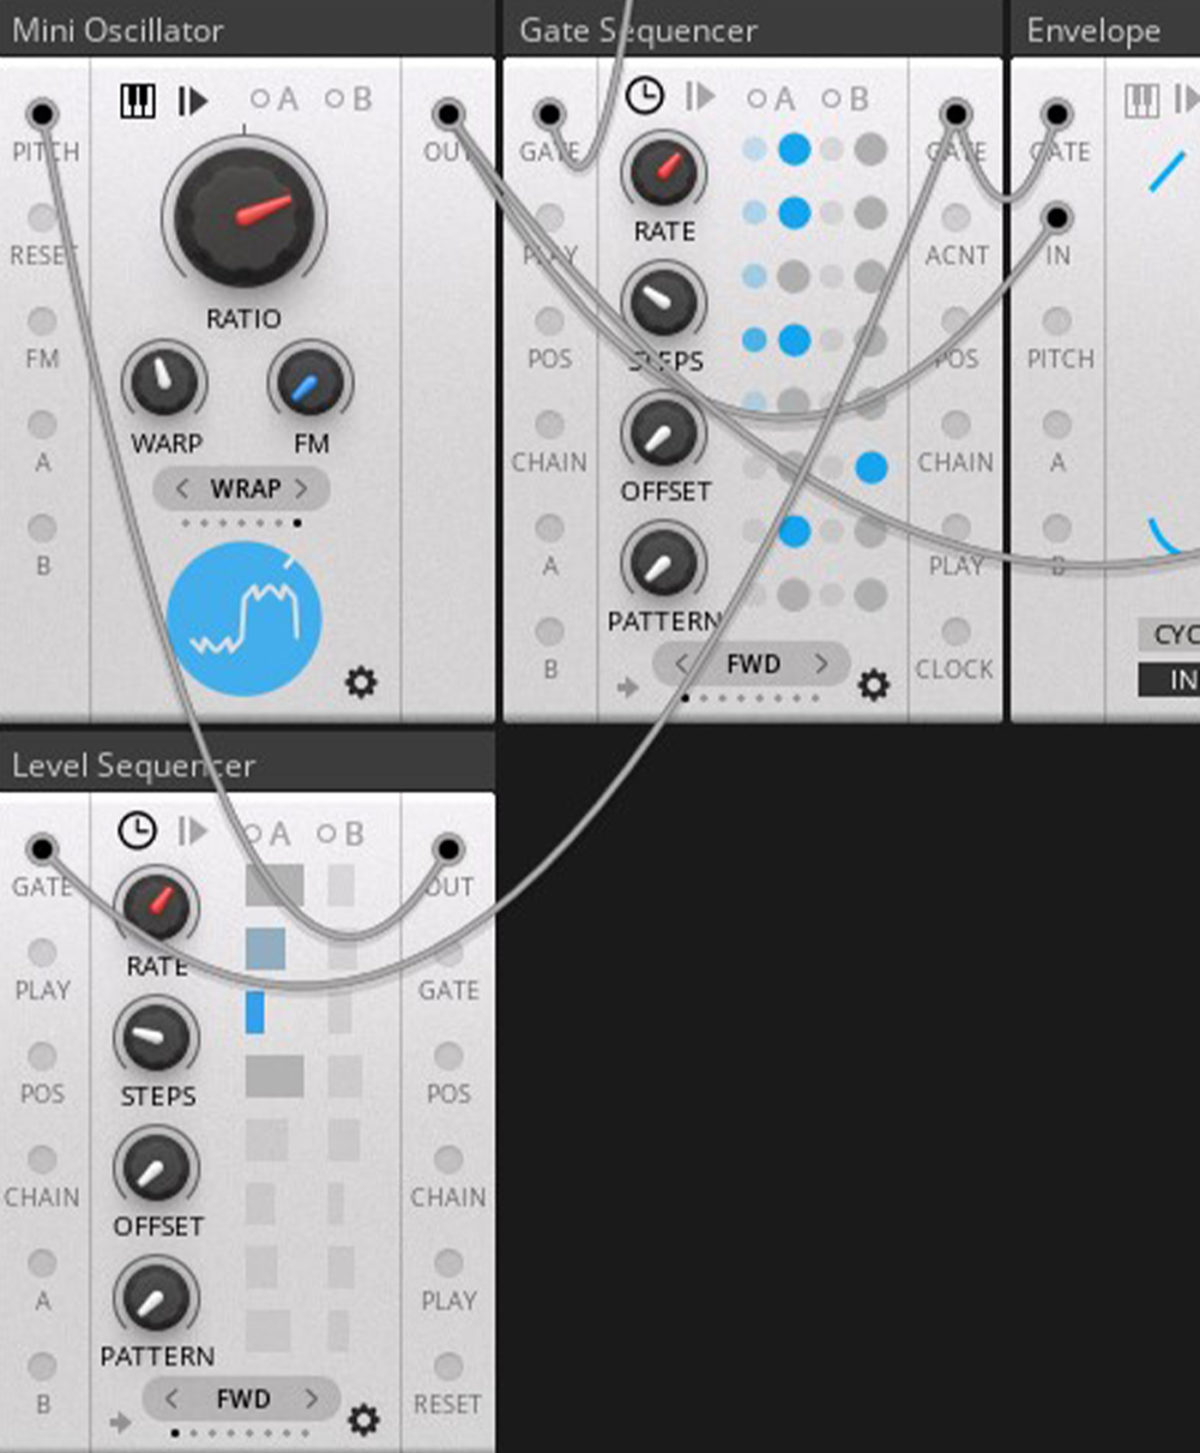
You can quantize pitch in different ways on the Mini Oscillator – click the cog wheel to see an alternate panel and choose PITCH SNAP.
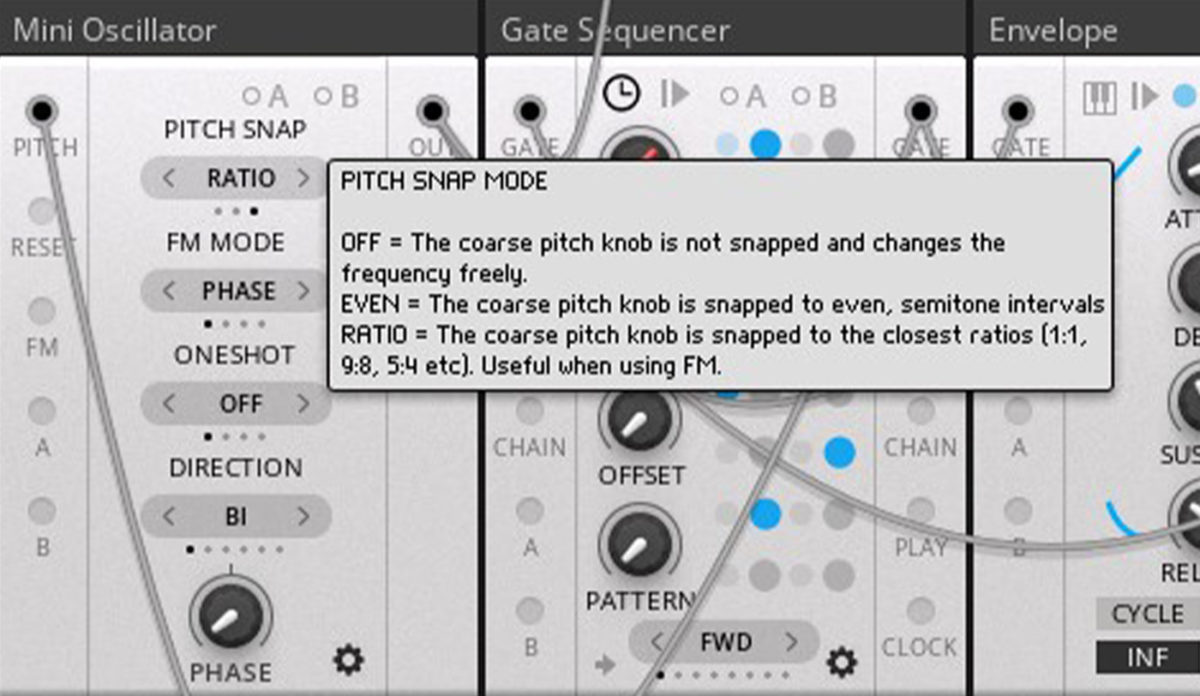
Here is a fun opportunity, too, to play with the number of STEPS on the Gate and Level Sequencers. (Hint: set them to different levels for hocketing between pitch and gate patterns.)
Go play
We now have a fantastically versatile rig in just a few modules. You can get a range of sounds by playing with different complex waveforms on the oscillator, adjusting the envelope, and then morphing the filter between low pass, bandpass, and high pass while adjusting modulation and FM. Even on the compact sequencers, there are more options. And as you find parameters you like, you could also add LFOs to modulate them automatically – or assign external control to twist knobs, or both.
Still want more? Try adding a second Mini Oscillator, set its PITCH SNAP to RATIO, and route OUT to the first Mini Oscillator FM input – then adjust FM amount on the second oscillator.
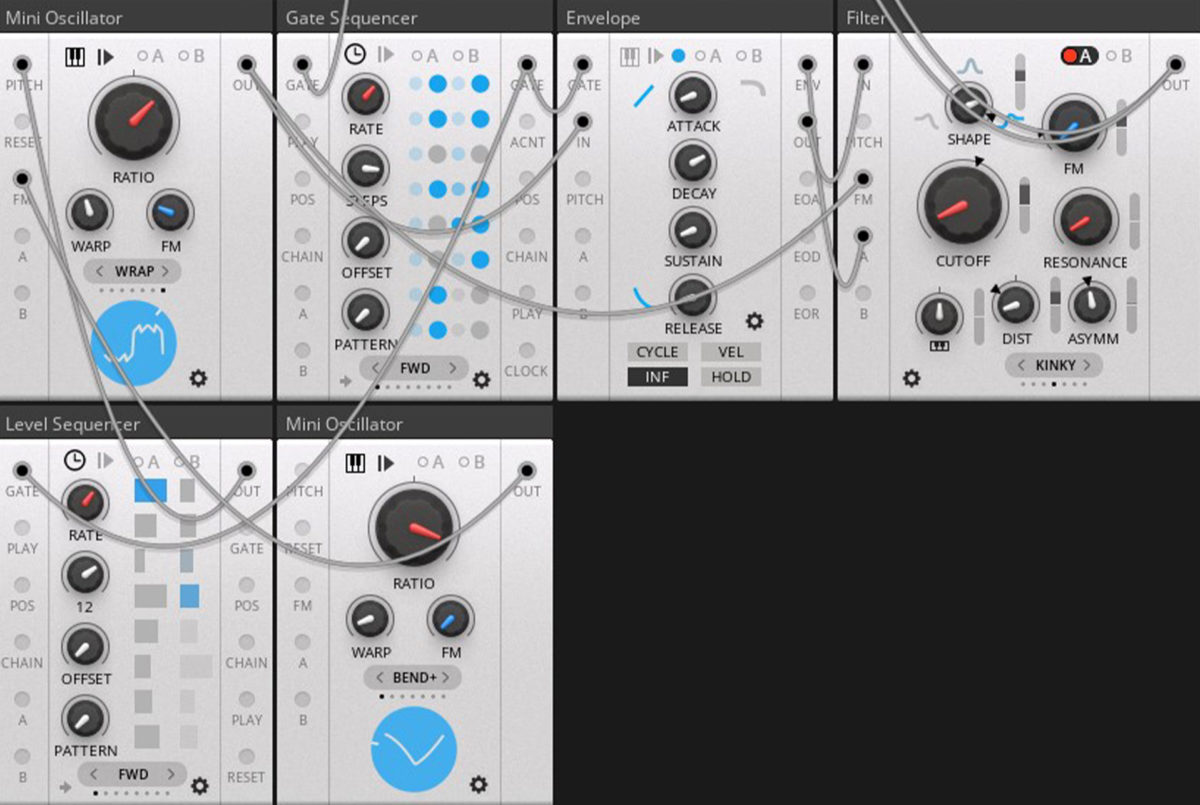
You can make melodies this way, pitched and unpitched percussion, and lots of stuff in between. For percussion, try adding FM and then short envelopes and tightly controlled filters. (You can build up more tracks while staying in the Free Pack – there’s a drum module and mixers, for instance. Your next club track awaits.)
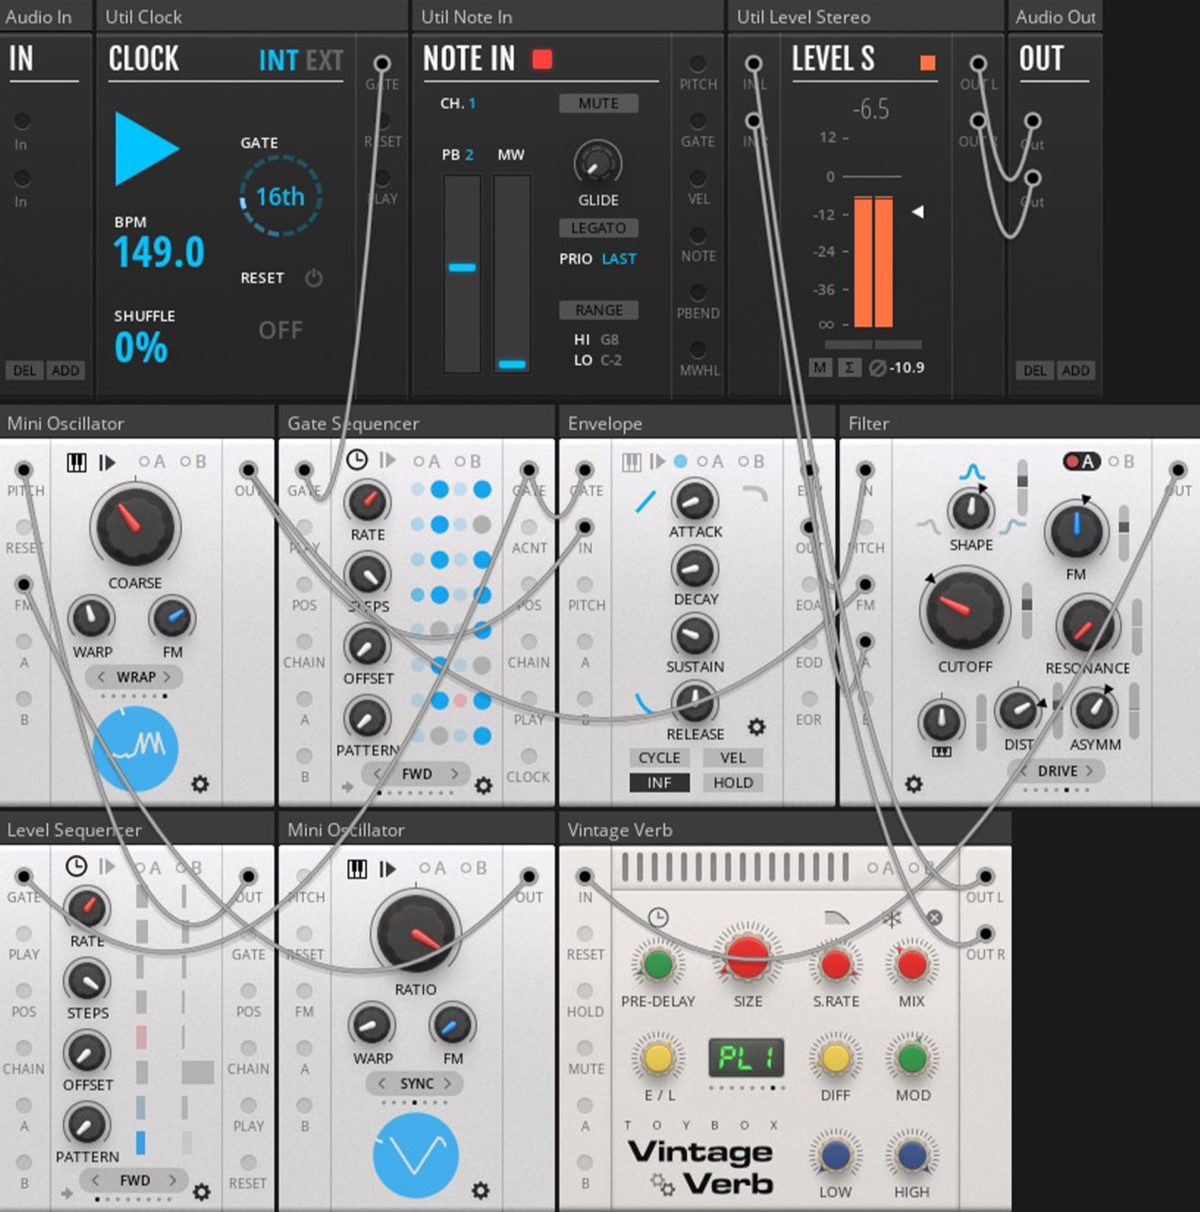
And then you can dig into the other packs. For instance, here’s that same patch with a Vintage Verb from the free User Pack. Don’t be afraid of extreme settings here, either – just shorten the envelope and tune the filter, and you can get some great percussive sounds, especially with short plate reverbs.
Save some gems
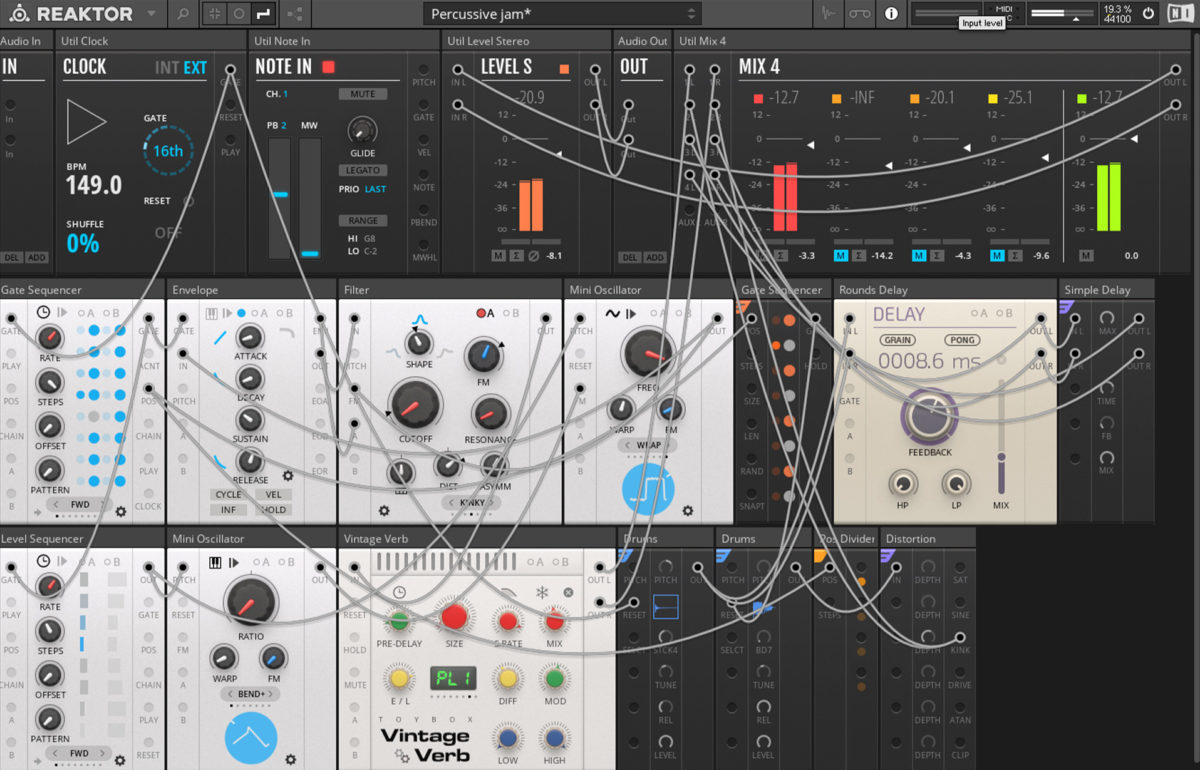
One of the major advantages of using REAKTOR is that you’re always free to load it into your DAW of choice – which is one way to save snapshots and bits of sound you like.
You can also save presets, accessible from the Presets pane. These recall the full rack, patch, and parameters. There’s a little pause as it loads, so it works for recalling different songs or ideas but not for changing between snapshots mid-performance. Other Toybox libraries offers more advanced snapshots per-module. (You can also try loading Racks into Maschine, for instance.)
Part two: Explore live-coding with the Nano Pack
Toybox’s Nano Pack series can be overwhelming at first – there are just so many modules. But it’s that variety that lets you get creative, in a way that would never be as easy in hardware (at least not without spending a lot of money). The Nano modules are numerous in ideas, but compact. You get tons of individual modules with deep but focused feature sets, and you can combine as many as you want. You’ll find bread-and-butter modules, basic utilities (the kind you’re often missing in both hardware and software), but also esoteric stuff (try it and twist the knobs to see what happens) — and powerful convolution reverbs and effects, too.
Even the Community Edition has a lot to play with. (If you don’t have a REAKTOR License, you can set yourself a time limit of half an hour and still make something.)
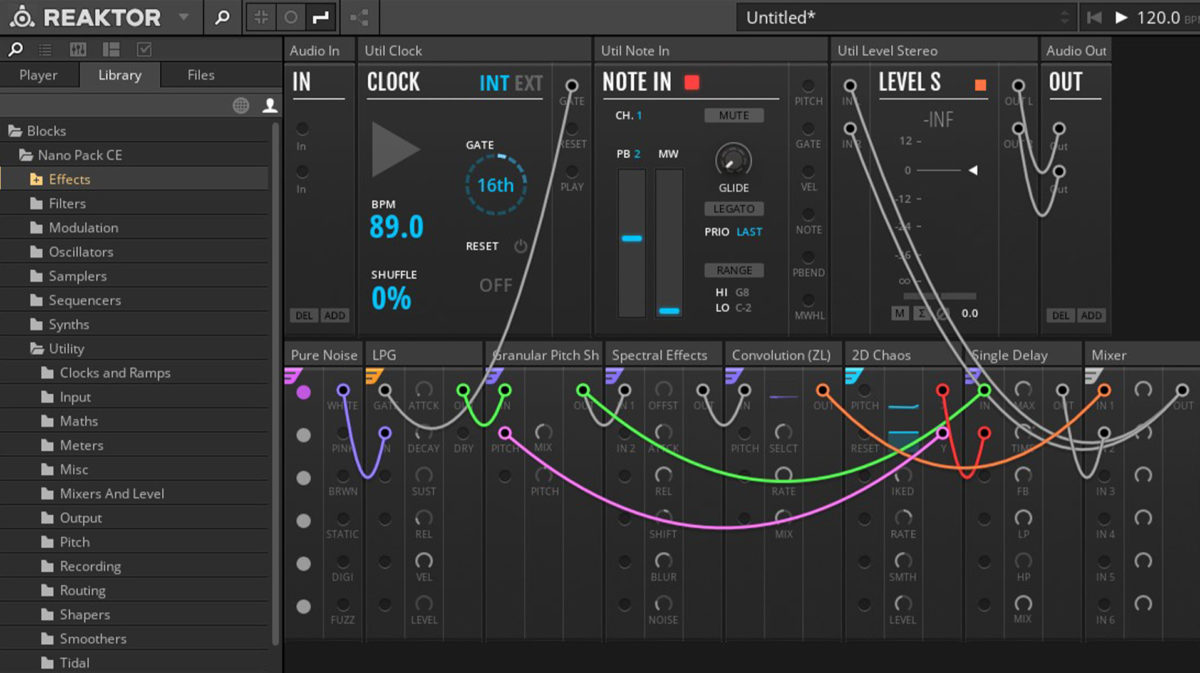
Don’t forget to turn tool tips on, and then go explore. Remember you can also color-code Blocks cables by right-clicking them and disconnect them by clicking once on their destination jack.
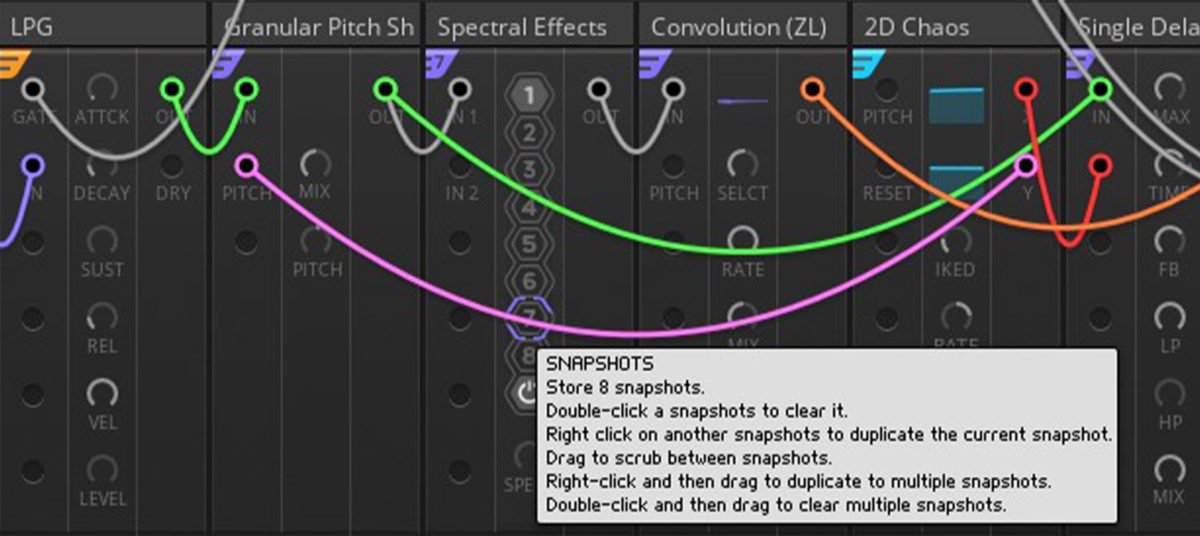
The Nano Pack modules also offer some features you didn’t get in the Free Pack. In the upper right-hand corner of modules, you’ll see a colored banner. You can click and drag to color-code your modules to tell them apart more easily. Clicking once also brings up a display with eight numbered hexagons – snapshot storage for each module.
Work with TidalCycles and LiveCore
For those of you really wanting to dive down a rabbit hole, the Nano Series also includes two powerful approaches to live coding – both with text code, as the name implies, and low-level graphical patching.
“Live coding” describes an approach to making seat-of-the-pants, rapid-fire construction of instruments part of performance. It’s spawned big communities, partly because it also is easy to share code snippets and free tools. And yes, as the name implies, it can involve using coding as a musical interface. That sounds wild to the uninitiated, but the approach can appeal even to newcomers to electronic music, once they get the hang of it. Why? Well, sometimes it’s faster to type a line of code describing a rhythm or melody than it is to play around with a bunch of faders in someone else’s interface. Code can be expressive, and these code libraries are designed to be immediate for musicians, not only for people writing software as a day job.
Visual coding can be part of live coding, too, even if you likely think of typing first. REAKTOR is one of the best-known of these visual tools; building an ensemble really is programming of a sort, even more so as you get down to the level of Core.
Nano Pack has some convenience modules for working both ways. For typing live coders, or anyone wanting an interface built around musical pattern (especially stuff like polyrhythms), there’s support for TidalCycles. For visual patchers and REAKTOR gurus, there’s LiveCore – a set of modules built in simple Core tools that you can patch together in glitchy combinations.
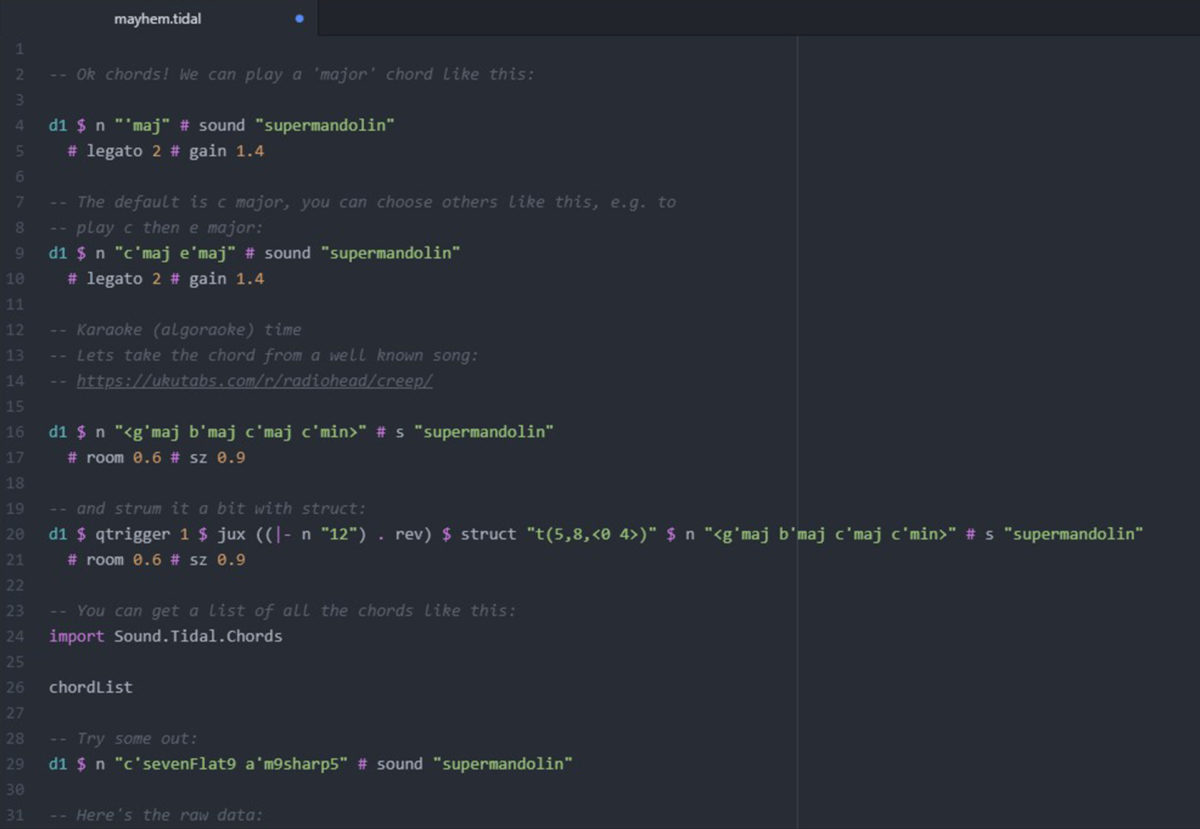
TidalCycles. Okay, imagine a studio where you patch one big modular rig into another modular rig – and that’s the basic notion of combining TidalCycles and REAKTOR. The combination even makes some sense. TidalCycles, the live coding environment, specializes in musical, easy-to-learn instructions that make elaborate musical patterns with small amounts of text. It also harnesses all the power of SuperCollider, the landmark open-source synthesis and multimedia library – an object-oriented code cousin to REAKTOR in many regards.
Tidal uses OSC (OpenSoundControl) to work, and to play instruments with its patterns. REAKTOR natively supports OSC and Blocks (and the Nano Pack) let you build powerful instruments. Alternatively, you might want to use instruments built in Tidal and SuperCollider from REAKTOR – or simply interface creations you’ve built in each.
You’ll find a folder of Tidal-centered Blocks in Nano Pack. Look at Utility > Tidal to find the full set. In the free CE, these various options boil down to a few basic approaches, all built around processing OSC received from or sent to Tidal Cycles:
- Send OSC messages to the Tidal text editor. (The idea is, you’d open Tidal’s editor for live coding but be able to receive OSC from REAKTOR inside that window.)
- Receive OSC messages from Tidal, and process them them (mapping, scaling) for use as signal in your REAKTOR patch.
- Convert OSC to notes and expression in various ways, for making it easier to play REAKTOR Blocks instruments.
- Control REAKTOR Blocks snapshots from Tidal Cycles.
- Set up a 16-sample player in REAKTOR – the OSC Sample Player Megakit. (This just lets you use REAKTOR as an easy solution to setting up some samples for Tidal without having to dig into SuperCollider.)
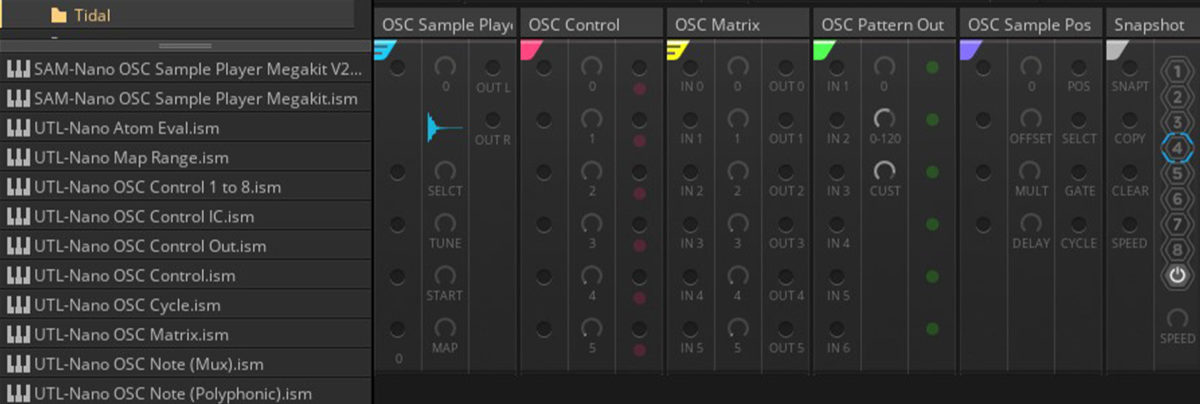
In the hacked-together spirit here, some of these use a third tool – the free patching environment Pure Data (Pd). (https://puredata.info)
Tidal has friendly documentation – even for total beginners – and tons of resources and community links at its official site. The software is free, so go for it.
Installation is a multi-stage process since it requires various tools to run – SuperCollider for synthesis and Atom for code editing. But once it’s running, you just add in the Tidal objects in REAKTOR Blocks and go.

LiveCore
LiveCore lets you do powerful – or ridiculous, or both – stuff with signal, quickly. You can get advanced and use this as your personal musical language, or just stay a bit shallow and have a good time making glitchy sounds by mashing modules together.
Since LiveCore uses REAKTOR Core Cells, you’ll need to be in Ensemble mode to work with it. (If you add the LiveCore Block in a Rack, it’ll sit there but you won’t be able to edit or do much with it!) So instead of choosing File > New Rack, choose File > New Ensemble. Then choose Library > Blocks > Nano Pack CE > Sequencers > SEQ-Nano LiveCore.ism. On the panel, you’ll see the block with some ins and outs, but this is bigger on the inside than it is on the outside.
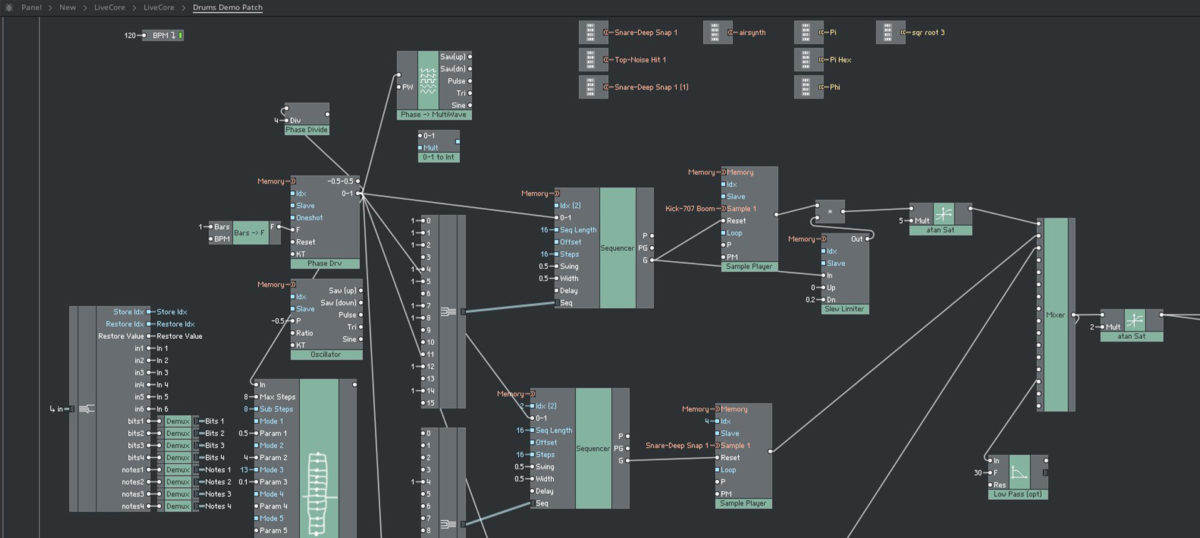
This really will feel like going down the rabbit hole, literally, as you’ll be able to double-click your way down into the depths of the LiveCore Block. Toybox included samples of drums, synths, and a gate repeat effect to get you started. There’s some more background on how this works over on CDM.
Next steps
Now you have at your disposal a very beginner-friendly modular setup, some intermediate options that work musically really well, and some advanced and truly bottomless interactions. But for all the seriousness of these advanced tools, your best bet is to go wild and knock yourself out. Tweak knobs. Plug things where they shouldn’t go. See what sounds you discover.
You’ll find rich communities for REAKTOR, REAKTOR Blocks, Tidal, and more, too – so part of the joy is sharing patches and ideas and code snippets with other people and learning together. With that in mind, here are a few recommended resources for digging deeper into all of the above:
- The REAKTOR User Library – where you’ll find plenty of user-created free blocks
- Tidal Club – an online community for learning and discussing TidalCycles
- TOPLAP – a community for live-coding in general
- The Algorave movement
- And, of course, Toybox’s own video tutorials


