The kick drum is the foundation of much popular music. It’s the basis of a solid mix and the driving force behind many forms of club and electronic music. It’s also one of the hardest sounds to get right. A good kick should feel heavy without being overbearing, punchy without sounding sharp, and present while leaving space for other elements. If your kick’s not quite doing these things, then EQ might be the answer.
EQ, or equalization, is the process of changing the level of different frequencies in a signal. In this article, we’ll explain how to EQ a kick drum to get it hitting just right. We’ll then provide a step-by-step guide to improving your kick’s force and clarity, fixing sample issues, solving frequency masking, and more. Consider this your kick drum EQ cheat sheet. Keep it on hand and you won’t go too far wrong.
Jump to these sections:
Learn how to EQ your kick drum with Neutron, a powerful mixing plugin with up to twelve EQ band nodes to dial-in your sound.
What is the ideal EQ for a kick drum?
The ideal kick drum EQ settings depend on what your kick sounds like and the kind of track you’re working on. But there are a few basic steps you can follow to EQ kick drums in a consistent, methodical way. Most kick drums are made up of a few discrete frequency areas. By paying attention to each of these areas in turn, you can make sensitive EQ decisions that will improve how your kick sounds – whether you’re working on a pounding club track or delicate sound design.
Start with the lowest frequencies. Kick drums tend to have a loud “boomy” element in the 40–100 Hz range. This is what gives the kick its power. If your kick has unwanted sub bass frequencies below this point, you can use a high-pass filter to remove them.
Proceed with caution here. The bass frequencies are what make your kick drum sound heavy, and if you cut too much then the kick will lose its power. Start by identifying the fundamental frequency of the kick – its dominant low frequency. You can do this by temporarily applying a narrow Q bell filter with a strong boost and sweeping it around the bass frequencies until you find the loudest one. Once you have identified the fundamental frequency, set your high-pass filter comfortably below this point, so you can be sure you’re not cutting out anything important.
Now for the fundamental frequency itself. Boosting this frequency range with a gentle bell filter will make the kick sound heavier. But make sure it’s balanced with the rest of the track – particularly other low end elements such as the bass. A too-bassy kick will make your track sound muddy and muffled.
Next, look at the low midrange. The zone from around 100–600 Hz is what gives a kick drum its body and character. But too much in the midrange can make the kick sound dull and claustrophobic. Consider a gentle EQ cut in this zone to improve the clarity of your kick. Live-sounding “rock” kicks often benefit from a cut at around 300 Hz to reduce boxiness.
Finally, the upper midrange. Most kicks have a clicky “attack” in this range, somewhere around 1–4 kHz. Boosting with EQ can make your kick sound clearer and more punchy. Or, if your kick is too sharp, cut this range to soften it.
Not every kick drum will require EQ in all of these frequency zones. But by paying attention to each zone in turn, you can make methodical EQing decisions and consistently improve your kick drum sound.
What frequency is a punchy kick drum?
There is no single ideal frequency range for punchy kick drum: it depends on the kick drum sound you choose and the mix you’re placing it in. As a general rule, boost the fundamental frequency of the kick (somewhere around 40–100 Hz) to give it extra weight, and the low-mids (100–250 Hz) for more punch. But be careful: boosting too much in these ranges can have the opposite effect, causing your kick to sound bloated and muddy.
How to EQ kick drums
Now you’ve got the basics down, let’s look at how to EQ a kick drum when faced with specific issues. Some kick drum sounds need extensive EQing, while others will only require minimal tweaks. But with this kick drum EQ cheat sheet on hand, you’ll be well-equipped to fix any issues you come across.
EQ changes can be subtle, especially at lower frequencies. It’s recommended you listen to these audio examples with good quality speakers or headphones.
1. Add clarity and definition
We have a techno kick drum that’s been heavily saturated. It’s got tons of personality but it sounds quite muffled in the mix. We can use EQ to make it sound clearer.
First, the low end. The saturation effect applied to this kick has added unwanted sub frequencies. We identified the kick’s fundamental frequency and applied a high-pass filter safely below it, at 35 Hz.
Next, the low mids. Some light cuts in this zone will improve clarity. We applied a gentle Q bell filter with -1 dB attenuation at around 150 Hz, and another at about 550 Hz. With these applied, the kick drum sounds a little more clear and “open.”
Now the upper midrange. Our kick is quite muffled and soft, so a significant boost here will help it to punch through. We boosted by +6 dB at around 1500 Hz.
Finally, a little housekeeping in the high frequencies. Most kicks don’t have much going on above 10kHz. In this case, the saturation applied to our kick created stray resonances up there. The kick will sound cleaner with these frequencies removed. A steep low-pass filter from 10kHz did the trick.
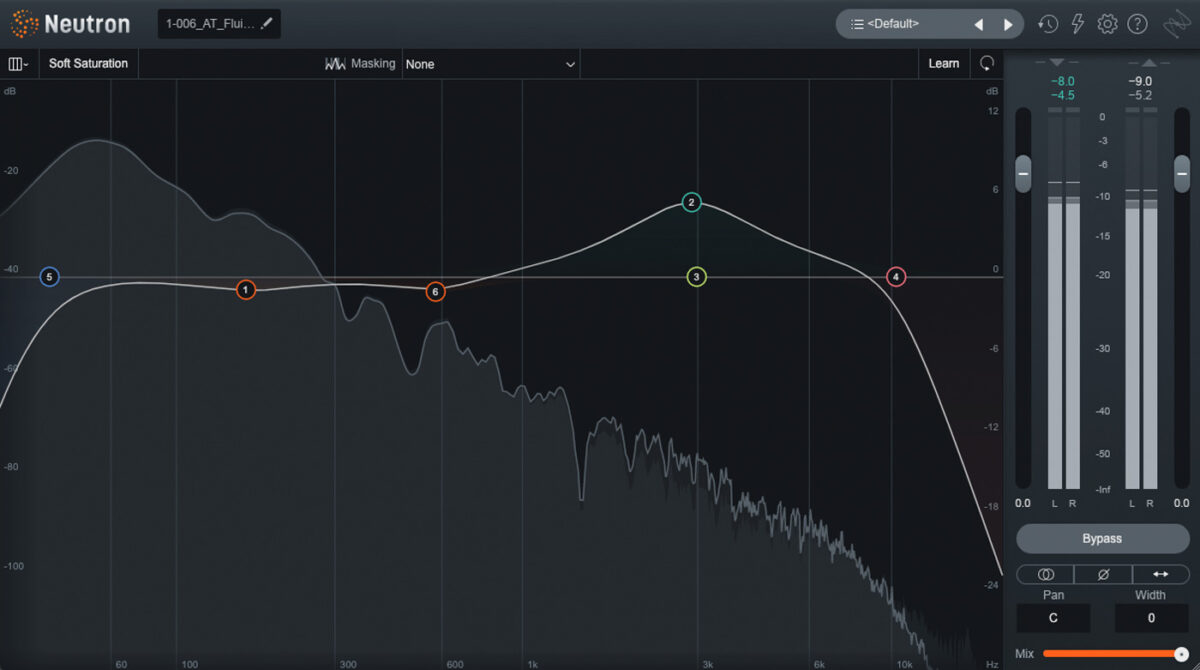
Here’s how the kick sounds before and after EQ was applied. With the EQ added it sounds clearer and should punch through better in the mix.
2. Tailor your sound to your genre
A great-sounding kick is context specific: it depends on the sounds around it. Different genres demand different kinds of kick sound, and different kick drum EQ settings to match. Here are a couple of ways to tailor your kick to a specific genre using EQ.
In rock and metal, the kick drum often benefits from a cut at around 300–600 Hz. Take this live-sounding kick, for example:
It sounds nice and punchy on its own, but will sound boxy and small in the context of the whole mix. That’s because the kick has too much energy in the low mids. Attenuating this frequency range might seem counterintuitive: after all, this zone gives our kick its punch. But taming this zone will help the kick to sit well in a full mix alongside heavy guitars, bass and the rest. Ultimately, that will make the kick sound heavier.
To do this, we applied a medium Q cut of around -3.5 dB just above 300 Hz. Here’s how the kick sounds before and after EQ was applied.
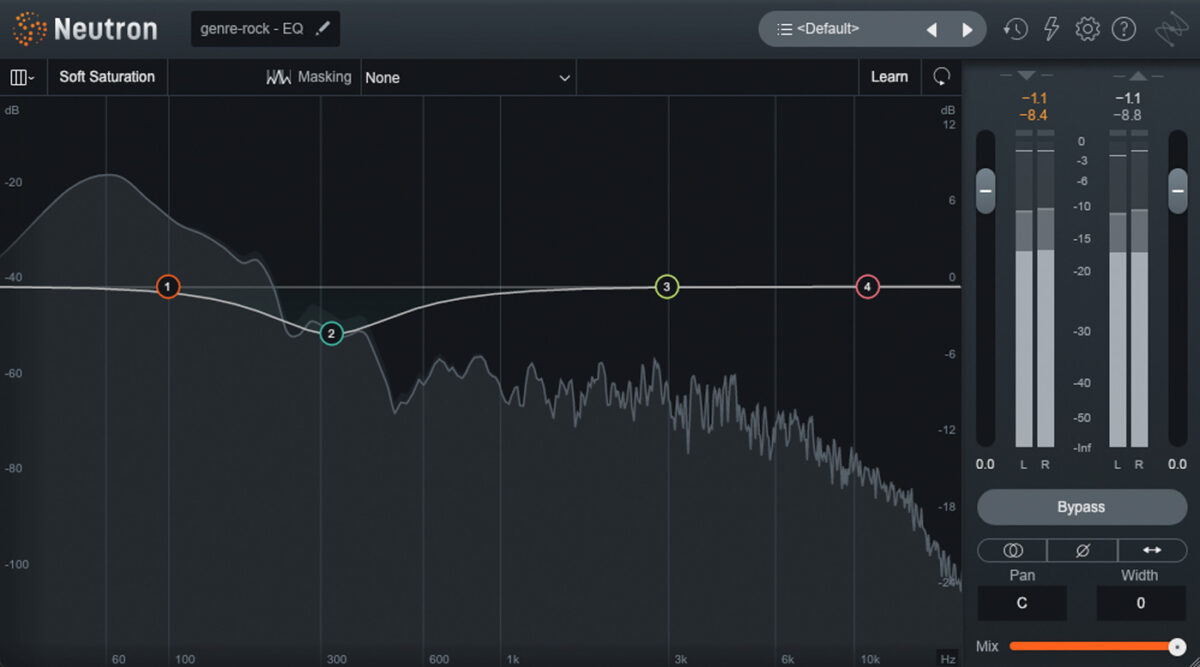
Next, here’s an 808 kick drum. This iconic booming sound, taken from the Roland Tr-808 drum machine, is used endlessly in electronic and club music, especially hip hop.
We plan to use this kick sound as a bass part by combining it with another, punchier kick drum. That means it doesn’t need a “clicky” attack: just plenty of weight in the low end. (By the way, we added this weight by saturating and compressing the kick drum with Supercharger GT).
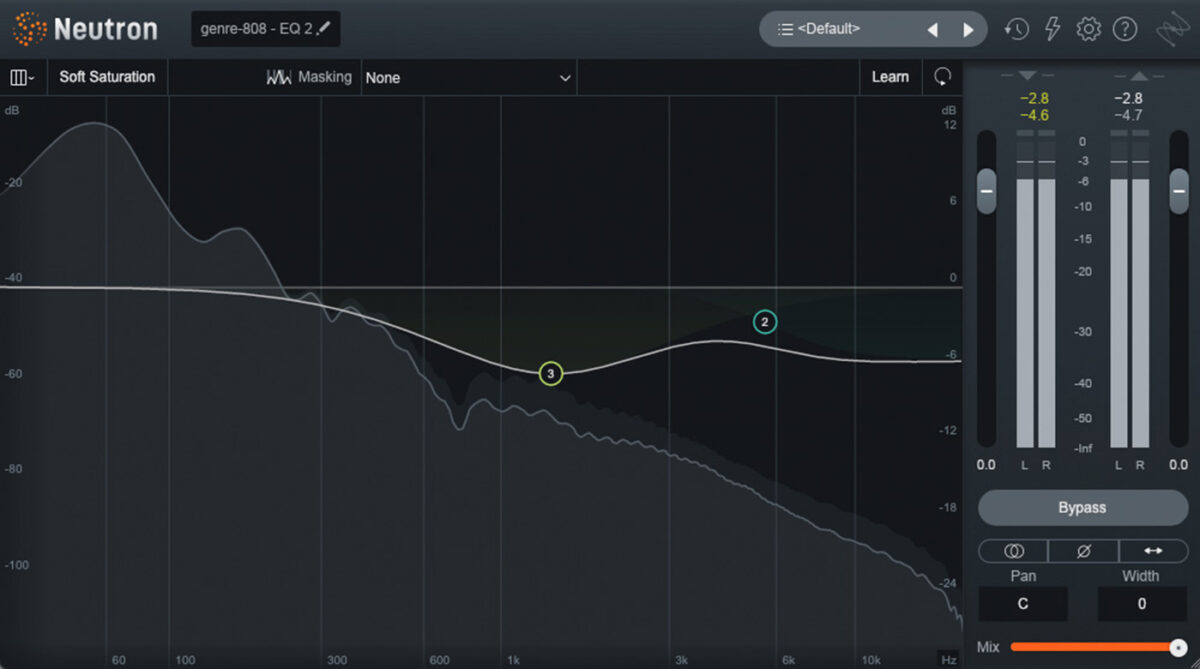
We used EQ to adapt the kick to this role. We applied a hefty cut of -7 dB at around 1500 Hz, with a wide Q. We also tamed the very high frequencies with a high shelf cut of -5 dB from 5.5kHz.
Here’s how the 808 kick sounds before and after EQ was applied.
3. Correct sample issues
Not every kick sound is perfect from the get-go. Sometimes you might be working with a problematic sample. You can use EQ to clean up any issues before putting your kick to work.
This recording of a live kick is sounding a little raw. There’s a lot of roomy resonance in the hi-mids which detracts from the kick’s impact. There’s also some boxiness in the low-mids that makes it sound a bit dull.
We’ll fix these issues with EQ. First, we can tackle the upper midrange resonance with a low-Q bell filter at around 1500 Hz. A cut of -3.5 dB improves the sound considerably. Next, we cab target the boxiness at 300 Hz with a higher Q bell curve, attenuating by -2.8 dB.
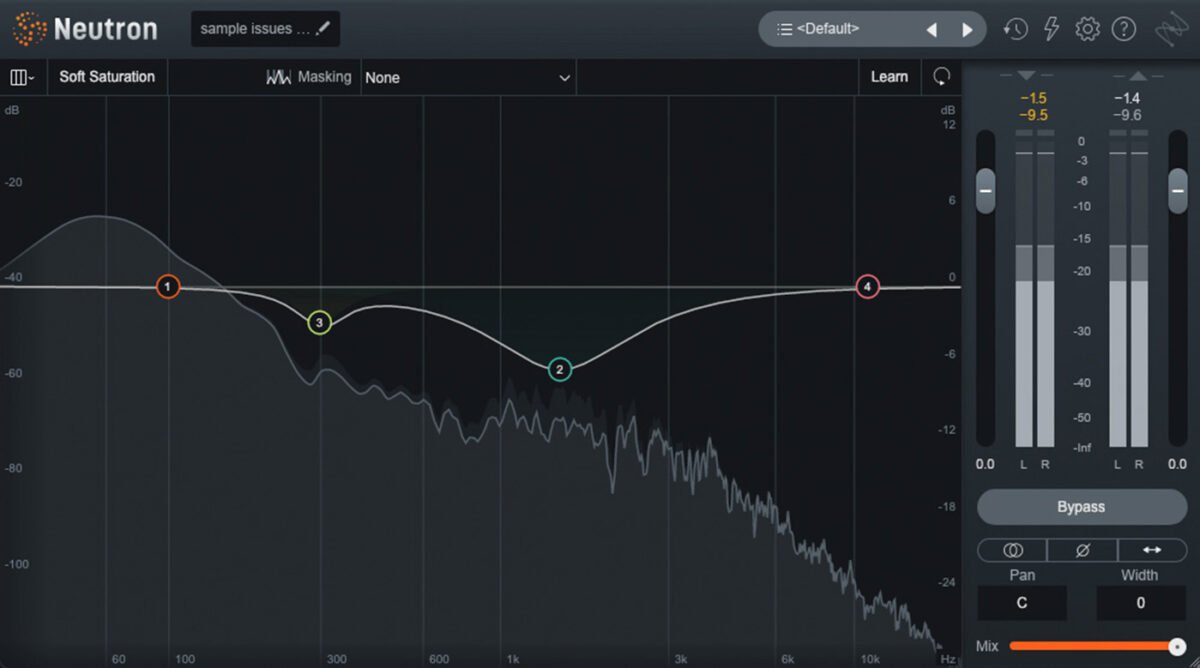
Here’s how the kick sounds after we fixed these issues. The difference is subtle, but it sets us up well to get a great-sounding kick later in the mix.
4. Remove frequency masking
The low end can get crowded quickly. Bass and kick drum parts often fight for space, leading to a confused and muddy mix. We can use EQ to address instances of “frequency masking” – where two elements clash.
We combined the 808 kick we made above with a punchier kick sound. Let’s use EQ to address the masking issues that arise.
There’s some unpleasant boominess in the sub bass frequencies as the two kick drums fight for space. To fix this, we first need to identify the fundamental frequency of the new kick drum. You can do this by sweeping a narrow Q filter with a strong boost up and down the low frequencies until you find the loudest point. With our kick it’s at around 50 Hz.
Next, we cut this frequency range in the 808 bass. We used a narrow Q bell filter and an intermediate cut of around -3 dB.
Our 808 is also clashing with the new kick in the lower midrange. Here we used a gentler Q and applied a -2 dB cut at around 150 Hz.
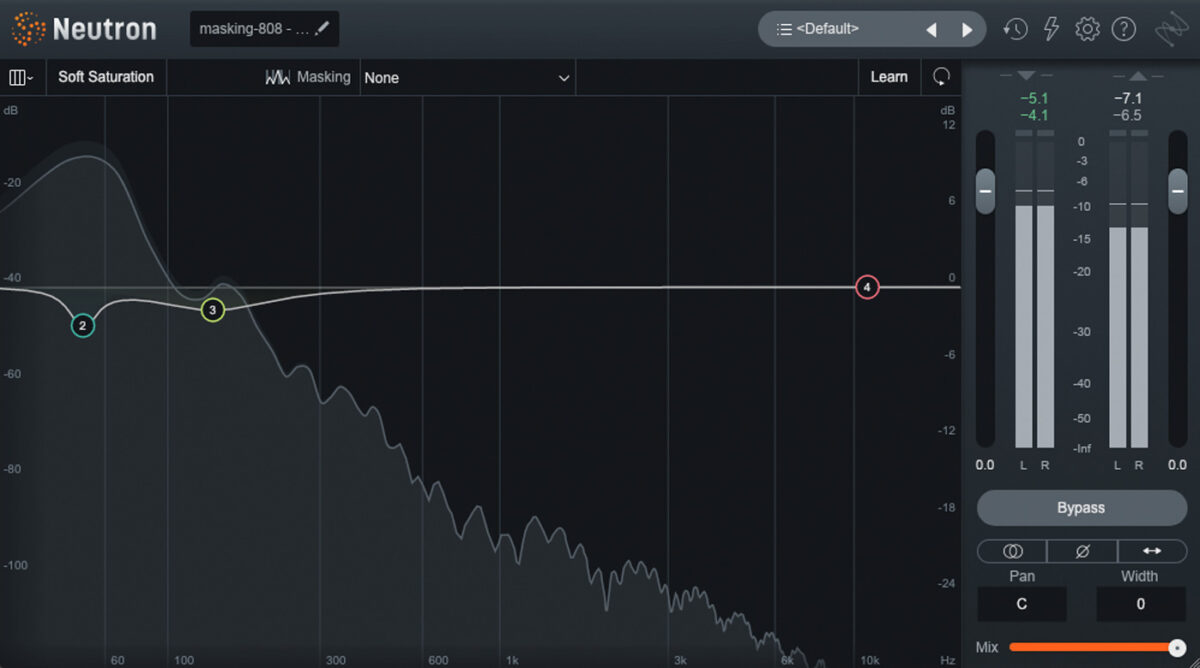
Here’s how the kick drums sound before and after EQ was applied.
Start EQing your kicks
In this article we’ve shown you how to EQ a kick drum. We walked through the fundamentals of kick drum EQing, and provided a kick drum EQ cheat sheet for dealing with common issues. Now it’s time to start using these methods in your own productions.
If you’re looking for a versatile, top-quality EQ for treating kicks and beyond, consider trying iZotope Neutron 4. This all-in-one mixing suite features everything you need to create top quality mixes – including a highly sophisticated EQ, which we used throughout this article.


