


Staring at an empty DAW is intimidating. Often, the very first notes are the hardest part of making a track. The new Tools in Kontakt 8 have been developed to skip past that initial phase and get straight into the thick of making a track. Features like Leap and the updated Kontakt Factory Tools make it act like a creative partner. It can spark ideas, shape melodies, and help you bounce ideas faster than ever before.
Let’s walk through the process of making a track from scratch using Kontakt 8. We’ll cover how to use Leap for inspiration, as well as look into the Kontakt’s Factory Tools. By the end of this article, you’ll know how to use Kontakt to speed up and enhance your music production workflow.
These tools are also available in the free Kontakt Player, so no matter what version of Kontakt you’re using, you can get the most out of all of these powerful tools for your music.
Jump to these sections:
Start using these tools in your music using Kontakt 8 or the free Kontakt Player included in the Komplete Start bundle.
What Kontakt Factory Tools are available in Kontakt 8?
Kontakt has always been an iconic instrument and sampler. Alongside flagship synths like Massive X and Reaktor, it’s a household name for producers, composers, and sound designers, and its huge instrument library and third-party support have consistently made it an industry standard.
But with this latest update, Native Instruments has elevated Kontakt 8 into a full creative suite that helps generate ideas quickly.
Where once Kontakt was primarily a powerful sampler, you can now lean on Kontakt’s new creative features as a way to write the music itself. The latest update includes:
- Arpeggiator
- Chord Builder
- Chords
- Humanizer
- Patterns
- Phrases
- Scale Lock
- Velocity Curve
These are especially powerful when combined with Leap, an instrument that acts as a loop-based playground. Together, Leap and the Factory Tools have elevated Kontakt into being a hands-on production assistant.
Kontakt Tools in action
Now that we know what’s new, let’s look into exactly how to use Kontakt’s new Tools to make a track.
1. Start with Leap for instant inspiration
Every track needs a starting point. Leap is the easiest way to make that blank page problem disappear. Leap lets you load curated loops and sample kits, then remix and transform them with macro controls. You can drag in a beat, adjust textures, and experiment with randomized variations until you land on something exciting.
Let’s start our track with a drum kit. We’ll use the Modern Soul Kit preset from the Drum Breaks expansion.

We can sample all of the available ideas within this kit by holding down different notes on our keyboard.
The sound of the beat on B3 is nice, so let’s go with that one. It’s got a simple swinging neo-soul vibe to it – and that’s a great place to start.
For even more guides on Leap, check out these blogs on how to use Expansions with Leap and five ways you can supercharge your production with Leap.
And with that foundation in place, it’s time to start building melodies and harmonies using the Factory Tools.
2. Build chords and progressions
One of the hardest parts of writing music often comes down to harmony. What chords should you play, and how do you make them interesting? Kontakt has this covered with chord-focused Tools.
Chords
The Chords Tool is a simple but powerful way to generate harmonies. Each preset comes with a series of chords, each of which works with the others, and can be triggered by playing one MIDI note. This makes it incredibly fast to test different harmonic ideas without needing deep theory knowledge.
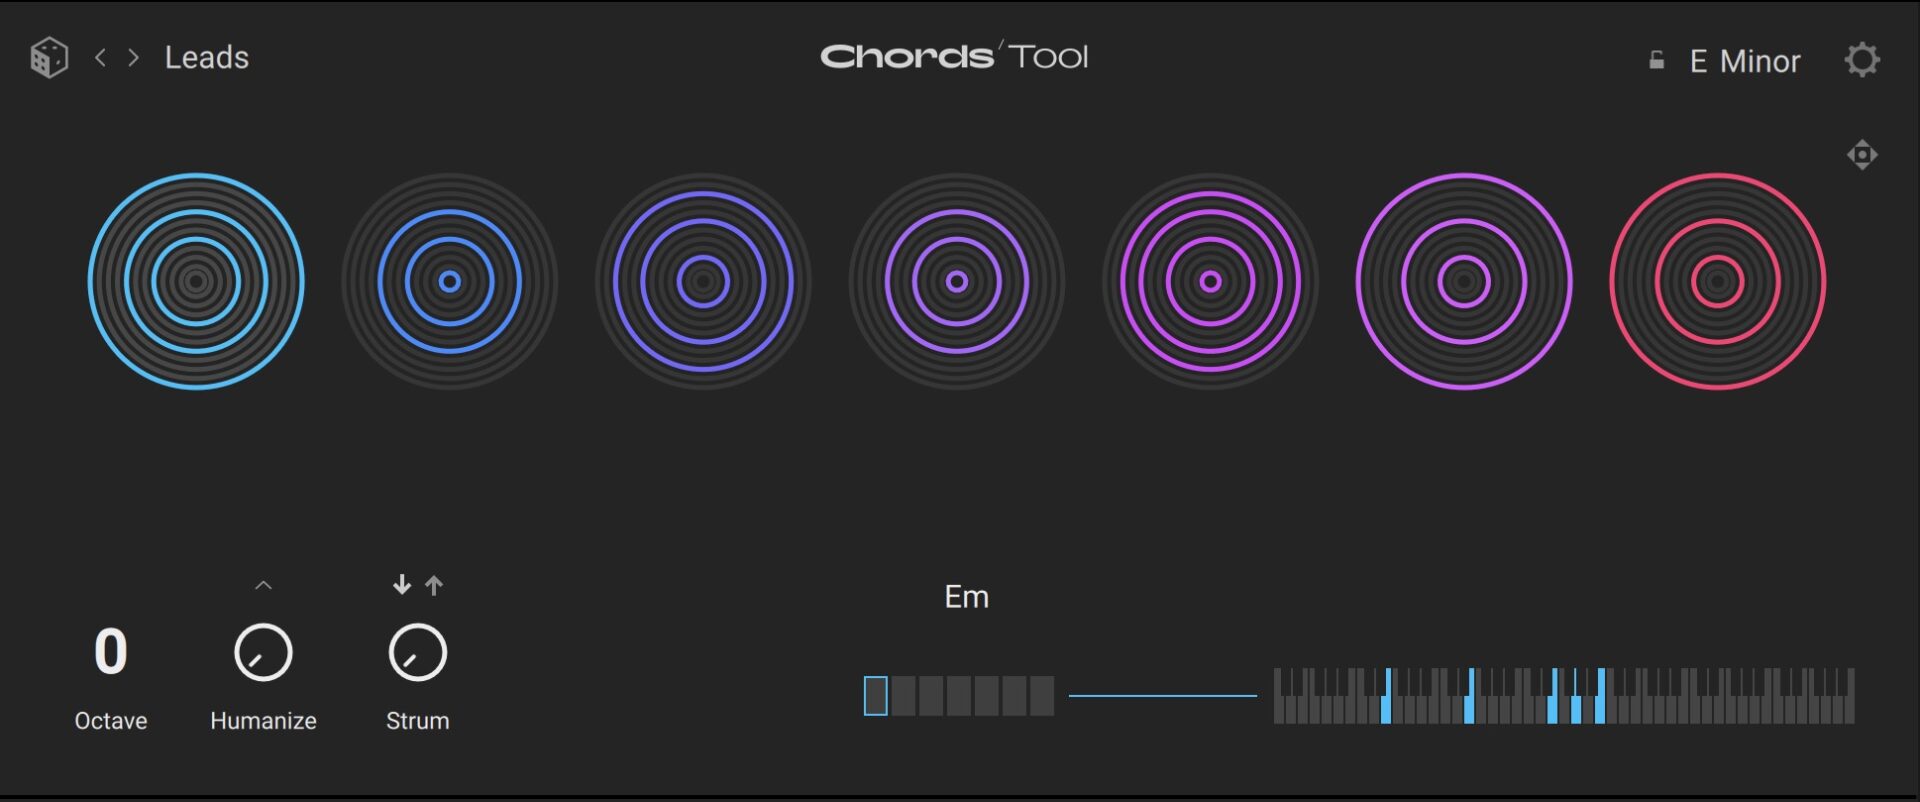
We’ll load up the Leads preset onto an instance of Electric Keys: Phoenix to layer on top of our drum beat.

Our harmonically rich chord progression sounds like this.
Chord Builder
If you want more specific control, the Chord Builder Tool lets you design custom chord stacks and trigger them from single keys. This is great for unique harmonic palettes for your track. You can layer extensions and different intervals, add octaves for weight, or experiment with jazz-inspired voicings.

For this track, we can stick with what came out when we played with the Chords Tool, but Chord Builder is fantastic for getting into specific voicings.
3. Add rhythm and motion
With chords in place, it’s time to add rhythm and motion with Kontakt’s Arpeggiator, Patterns, and Phrases Tools.
Arpeggiator
The Arpeggiator transforms notes and chords into repeating melodic sequences. Play a chord, and it generates a flowing arpeggio that you can sync to your DAW’s tempo. You can control everything about the arpeggiated notes, like step distance, velocity, and swing. This makes it easy to customize arpeggiated melodies.

Let’s load up an instance of Stacks with the Ghostly Tine preset. Now we’ll add in some basic notes that are in the key of our chord progression (E minor), and throw them into the Arpeggiator:
Patterns
The Patterns tool is like the combination of a step sequencer and an arpeggiator.
It is somewhat similar to the Arpeggiator in how it plays a customizable repeated pattern of notes, but it generates polyphonic patterns.

Let’s put the exact same notes as above through the Chord Climb preset on Patterns and see what comes out:
Phrases
The Phrases Tool lets you generate parts that sound polished and composed without manual sequencing.
Let’s use the Axis preset on an instance of Noire to create a syncopated melody section:

That’s a super interesting melody that we can add later in our track.
4. Subtle touches that make a big difference
Humanizer
One risk with modern production is that everything can sound a little bit too perfect. Humanizer works to create subtle variations in timing, velocity, and articulation on MIDI input for a more “played in” feeling.
By loosening things up, it adds natural imperfections that makes your parts sound more like a live performance.

This is a small detail that makes a big difference, especially in genres where an organic feeling is essential.
Scale Lock
With Scale Lock, every note you play is forced into a chosen scale. This is a quick way to experiment with melodies without accidentally hitting a wrong note. It’s also great for exploring unfamiliar modes or keys.
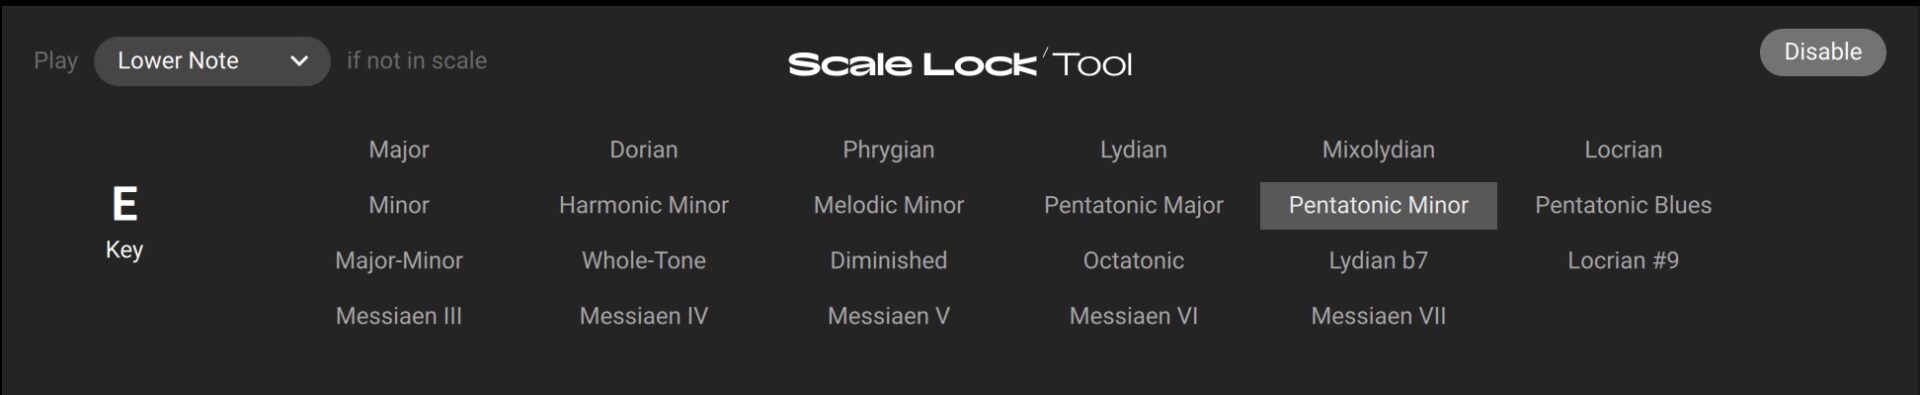
In the context of what we’re doing here, we might want to add some randomness with the Humanizer’s Pitch control, without hitting notes that are out of key. Scale Lock will ensure that all the notes that are triggered stay in the E minor pentatonic scale, even if they are unexpected.
Velocity Curve
The Velocity Curve tool lets you reshape how Kontakt responds to your playing dynamics. If you want more sensitivity on soft touches or a punchier response on loud hits, you can adjust the curve to match your playing style. This is another subtle way to make your instruments feel expressive.

We’re going to apply all three of these tools to our bass line, which is played in on the Scarbee Sun Bass – Finger, and amplified through Guitar Rig 7 Pro.
These Tools are used subtly here, but they bring the bass line to life in a way that straight MIDI notes never could.
5. Bringing it all together
By this stage, we’ve used Leap to spark inspiration, built chord progressions with Chords, added rhythmic motion with Arpeggiator and Patterns, introduced organic feel with Humanizer, and refined expression with Scale Lock and Velocity Curve.
Now we’re left with a track that came together very quickly, and all within Kontakt.
Each of the Kontakt Factory Tools keeps the creative process moving. They stop you from getting stuck on music theory, programming details, or technical barriers – leaving you to focus on actually making music.
Start using the Kontakt Factory Tools as your writing partner
Don’t let yourself be daunted by a blank screen on your DAW. Use Kontakt Tools to make the process intuitive and inspiring. Create combinations of Leap and the expanded Factory Tools to spark ideas quickly, experiment freely, and add professional polish to your music without getting bogged down in tiny details.
Kontakt 8 has the Tools to help you get tracks started as you open your DAW. Open Kontakt, load Leap, and let the Factory Tools guide your creativity from blank page to banger.
Related articles
-
Statement from Nick Williams, CEO of Native Instruments
Native Instruments provides an update on its recent restructuring process.
-

How Massive helped Johnny Gorillas shape two creative worlds
Johnny Gorillas shares how mastering Native Instruments Massive shaped his solo work and his work with mono sky, creating consistency…
-
The best sound design plugins from Native Instruments
Discover the best sound design plugins for music, film, and games, including top synths, effects, and creative tools from Native…
-

Taming the monster: behind the soundtrack of K-Pop Demon Hunters
Discover how GRAMMY-nominated engineer Curtis Douglas and producer Lindgren used iZotope Ozone, RX, and Kontakt to craft the high-impact, polished…
-

The best DJ effects: a complete list for beginners and pros
Discover the best DJ effects for every mix, from essential filters and delays to creative tools like the Beatmasher. Learn…
-

Weird by design: HAAi on the limitless potential of Absynth 6
Discover how the Australian artist HAAi uses the new engine in Absynth 6 to create layered atmospheres and immersive soundscapes…
-
$0 to pro studio: your first 5 music production tools that replace $3,000 of gear
In this blog, you’ll learn how to replace hardware gear with VST plugins and get a cheap pro home studio…
-

Noha on groove, texture, and using Guitar Rig to shape emotion
Italian producer Noha explains how Guitar Rig, modulation, and subtle distortion shape his minimal yet emotional sound in “The Place.”…