


Subtractive synthesis is the superstar of sound synthesis. When the person on the street thinks of a synthesizer, they’re probably thinking of the iconic subtractive synths that defined the electronic sound of 1970s and 1980s pop music. These days, a range of other synthesis methods—such as FM and wavetable—are established and readily available. But subtractive synthesis remains the go-to for many music-makers.
What is the secret to its success? And how can you get the most out of your subtractive synth, whether hardware or software? In this article, we’ll go under the hood of subtractive synthesis. We’ll ask: what is subtractive synthesis exactly? We’ll break down the parameters found in your trusty synth and show you how to use them creatively. And we’ll share some ideas for creating effective basses, leads, and pads using subtractive synthesis.
- What is subtractive synthesis?
- Additive vs. subtractive synthesis
- How does a subtractive synthesizer work?
- How to use subtractive synthesis
Follow along with this tutorial using MONARK, a subtractive synthesizer from Native Instruments.
What is subtractive synthesis?
Subtractive synthesis is a form of music synthesis in which rich waveforms are generated by oscillators and then shaped using components such as filters and envelopes.
Waveforms such as triangle, sawtooth, square, and pulse waves are harmonically rich and relatively easy to generate using electrical components. However, these sounds aren’t particularly interesting on their own. By shaping their frequency and amplitude (volume) over time using filters, envelope generators, LFOs, and other components, these basic waveforms can be turned into characterful sounds.
This is subtractive synthesis. It’s the art of removing the bits we don’t want, like chiseling a delicate sculpture out of a block of marble.
A great example of the classic subtractive synth sound is in “Billie Jean” by Michael Jackson with its distinguished synth chords that start a few bars into the song, created using a Yamaha CS-80.
Additive vs. subtractive synthesis
We can better understand subtractive synthesis by comparing it to its inverse: additive synthesis.
A complex sound can be broken down into a stack of different pure sine waves, or harmonics. The precise frequencies and amplitudes of these sine waves give a sound its character, or timbre. It might be rational to think that, if we want to create a sound electronically, we should build it from the ground up, one harmonic at a time. This is exactly what additive synthesis does. It adds together many sine waves to create a complex waveform.
The problem with this mode of synthesis is that it is very resource intensive. Effective additive synthesis requires dozens or hundreds of oscillators—one for each harmonic in the desired sound. That’s why additive synthesis only came into its own with the arrival of digital technology in the 1980s.
Back at the dawn of synthesis, in the middle of the 20th Century, the circuitry simply wasn’t up to the job. So researchers worked the other way around. Using relatively simple electrical components, they were able to generate a repertoire of harmonically rich waveforms such as triangle, square, and sawtooth waves. From there, other components such as filters, envelope generators, and LFOs were used to shape these waveforms into interesting sounds.
Subtractive synthesis was an elegant solution to the technical limitations of the time. It also has a distinctive and pleasing “warm” sound, particularly when executed in the analog domain. Subtractive synthesis remained the dominant mode of synthesis throughout the ‘70s and ‘80s. Even now, when many other forms of synthesis are available, it’s a staple of electronic music production.
How does a subtractive synthesizer work?
A subtractive synthesizer works by generating an audio signal and then shaping it in various ways. Understanding subtractive synthesis is all about understanding how this shaping works.
To do this, we need to get to grips with the various components in a subtractive synth: from the oscillators that generate the waveform, through to filters, envelope generators, and LFOs.
Sound typically travels through these components in a fixed order (unless the synth is modular, in which case they can be reconfigured at will). Let’s go through them in sequence.
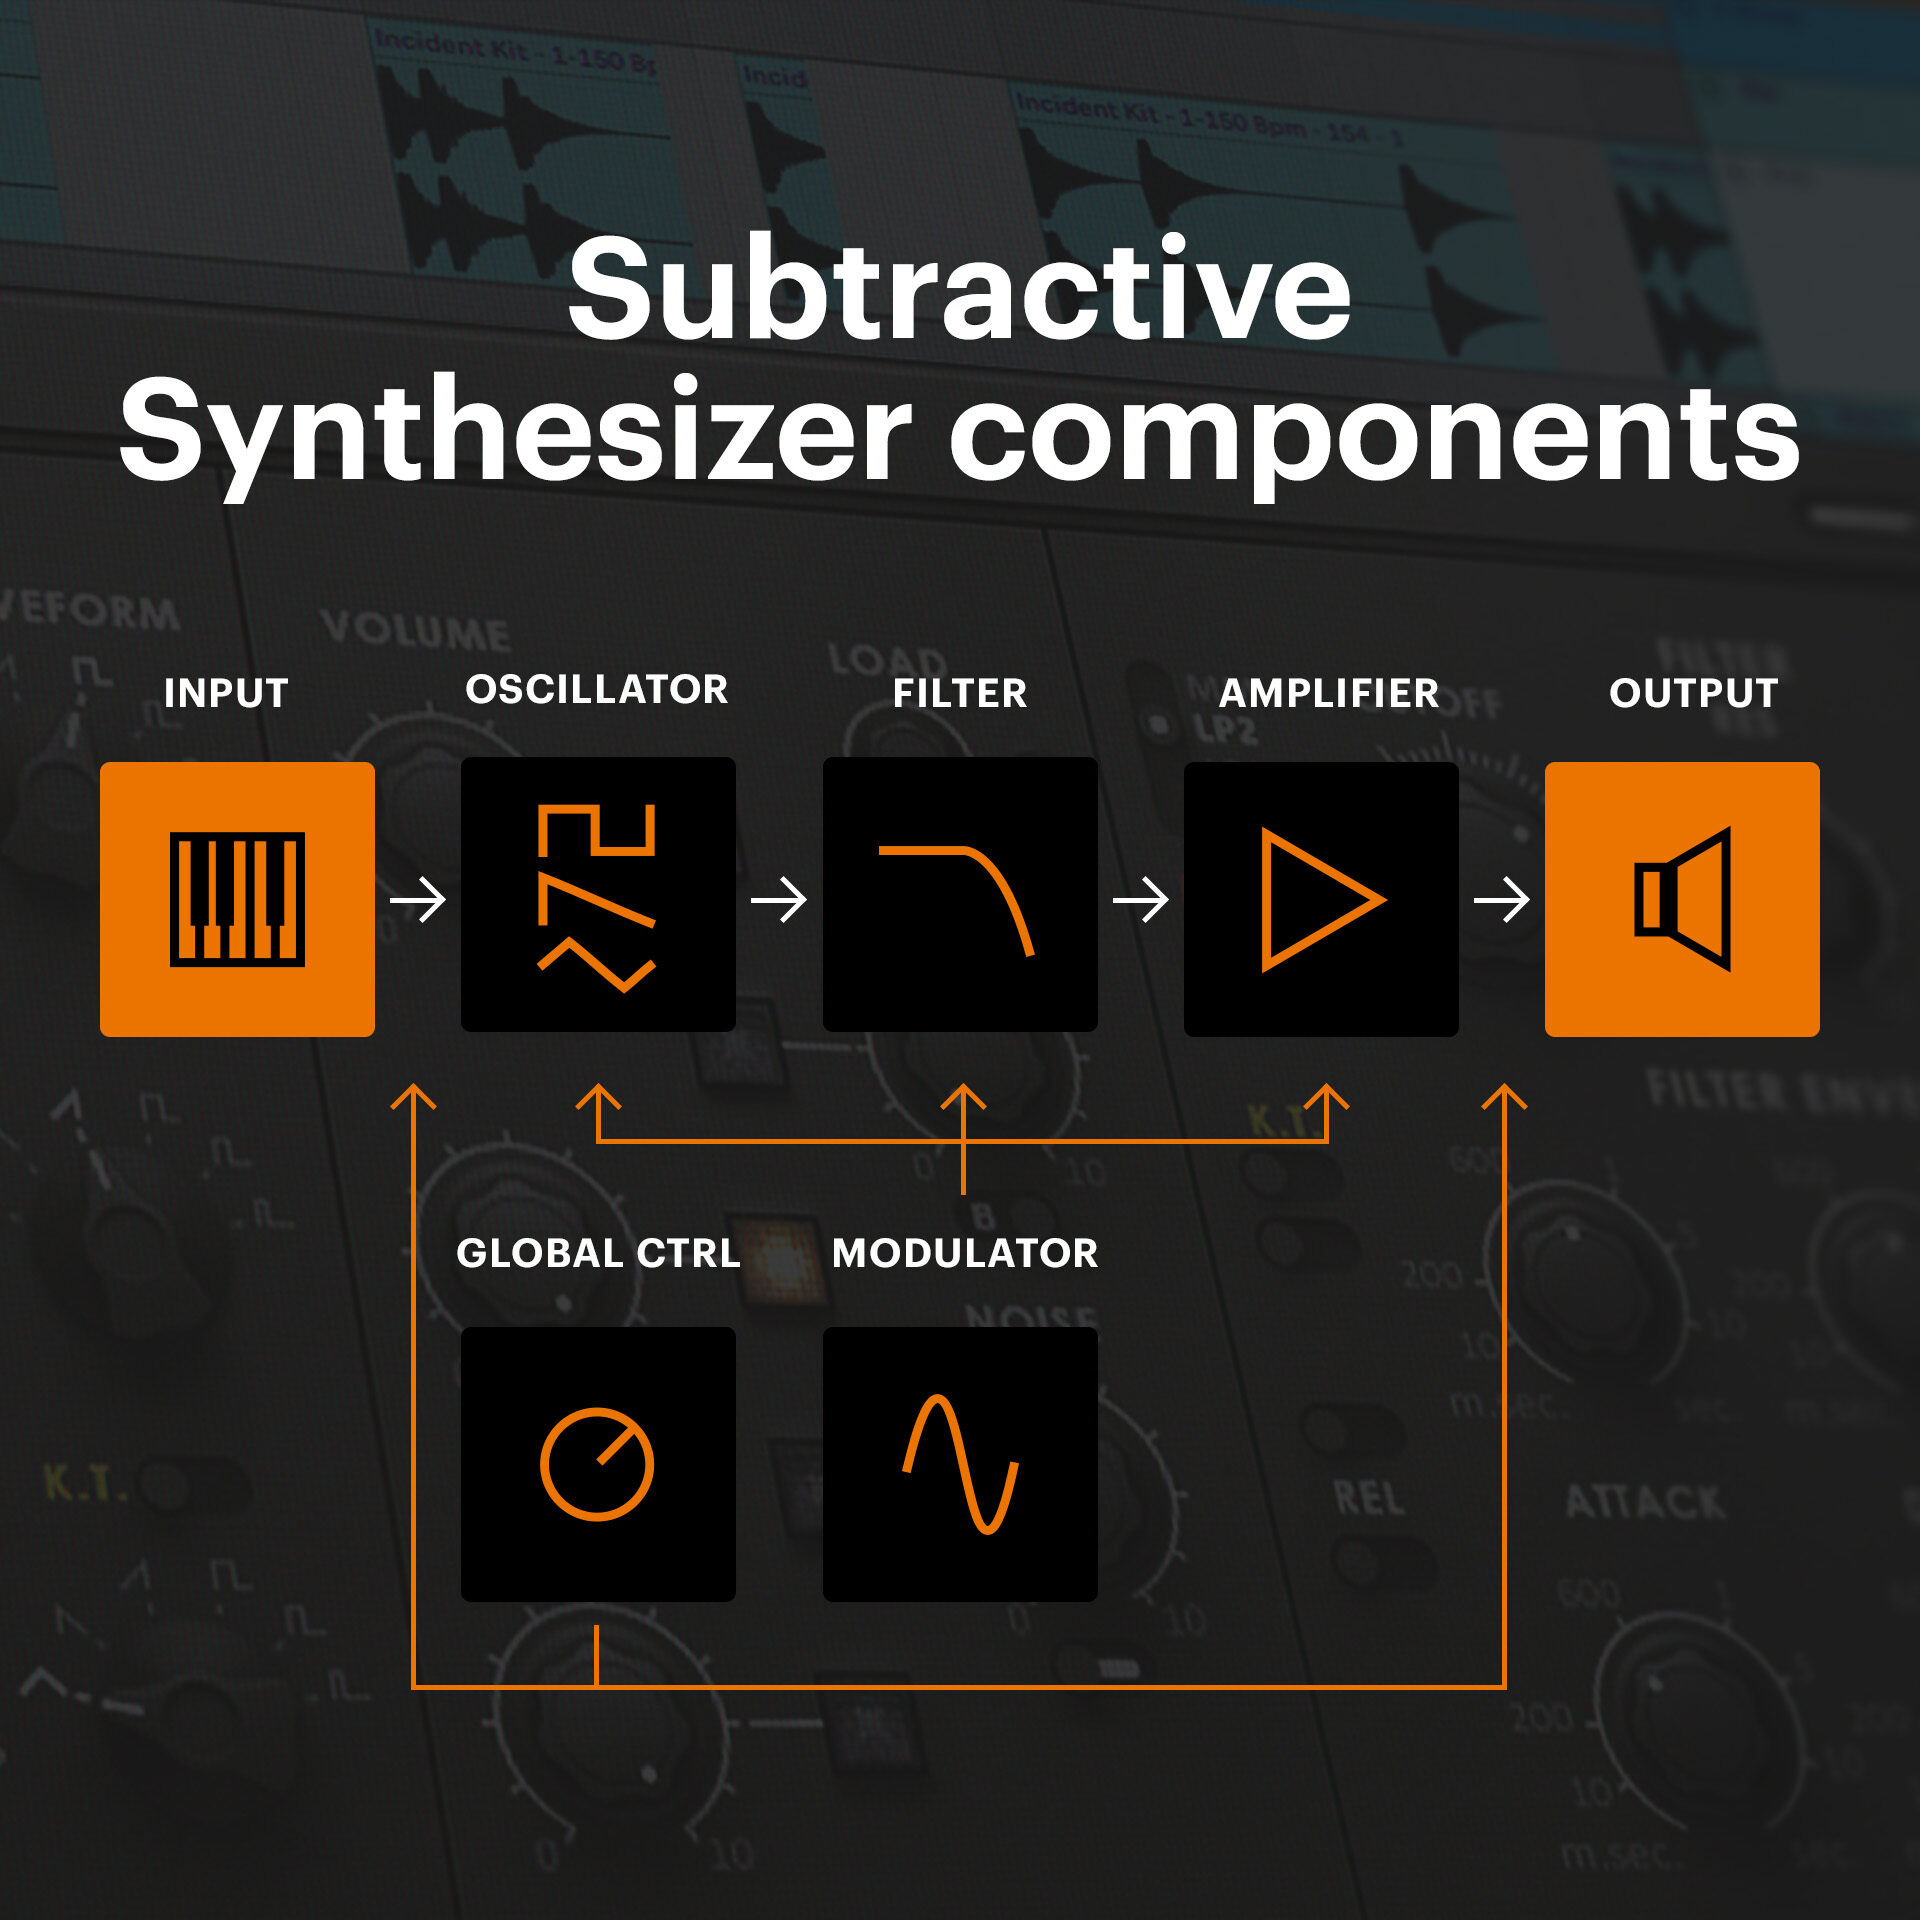
Oscillator
The oscillator is the ultimate sound source in a subtractive synth. It lays the foundation for your synth sound.
Many subtractive synths feature multiple oscillators whose signal can be mixed together. By combining oscillators with different waveforms and pitches it’s possible to create complex sounds.

Waveforms
Waveforms are the building blocks of synthesis. A subtractive synth tends to feature a stock set of waveforms that provide us with plenty of harmonics to play with as we sculpt our sound.
The most mellow of these is a triangle wave. This is the closest that many subtractive synths get to a “pure” sine wave, and is your best option for creating gentle, smooth sounds.
By contrast, a sawtooth wave has a sharp, buzzing profile, better for more intense sounds.
A square wave is similarly bright, but with a different character. Try combining square and sawtooth waves to create thick layered sounds.
Some subtractive synths offer a variation on a square wave called a pulse wave. Some allow you to vary pulse width, opening up a range of new timbral possibilities.
Finally, many subtractive synths feature a white or pink noise generator. In this mode, the oscillator fluctuates randomly, creating a sound like TV or radio static. Layered with more orderly triangle, sawtooth and square waves, noise can be a handy tool for accentuating leads or adding air to pads.
Pitch
Pitch controls the frequency of an oscillator, causing it to deviate from the note played on your keyboard or piano roll. For instance, If you key in an A at 440 Hz, you could tweak the pitch control so that the oscillator actually outputs a signal at 443 Hz, or 437 Hz.
This “detuned” sound can add personality to a synth patch. For best effect, try layering multiple oscillators with slightly different tunings.
In this example, you’ll first hear three oscillators tuned to the same pitch. Then two of them are slightly detuned. Finally, they’re heavily detuned to create dissonant chaos.
Octave
The Pitch and Octave controls are partners in crime. Both enable you to thicken up sounds by layering oscillators with different characters.
Where Pitch allows you to shift your oscillator a few Hz from a given note, Octave flips it up or down the octave. In other words, the oscillator produces a frequency that is half (down an octave) or double (up an octave) the frequency played on your keyboard.
Try layering oscillators that are two or three octaves apart to create extra thick sounds.
In this example, you’ll hear a single sawtooth oscillator, followed by three sawtooth oscillators set one octave apart.
Filter
Now the sound has been generated by oscillators, it’s time to start sculpting it. This is where the “subtraction” comes in.
The filter is the most important component used to shape a raw signal into something musical and expressive.
Most subtractive synths feature a low-pass filter (or LPF). This rolls off frequencies above a certain cutoff point (allowing only lower frequencies to pass). This is handy for controlling the bright frequencies found in waves like the sawtooth and square, creating pleasing sounds that fit neatly into a mix.
The “steepness” with which your filter rolls off unwanted frequencies can vary, depending on the filter design. Many subtractive synths offer a range of slopes. For example, Native Instruments’ MONARK offers three low-pass filters, ranging from a steep 24 dB-per-octave slope through to a gentle 6 dB per octave.
In this example, the cutoff is slowly brought down on a filter with a 12 dB-per-octave slope.
Some subtractive synths offer other filter modes. For example, a high-pass filter (HPF) is the opposite of an LPF, rolling off lower frequencies.
MONARK includes a band-pass filter (BPF), which lets through a narrow band of frequencies, rolling off frequencies below and above that point. Use it to produce dramatic sweeping effects, like this.
The final filter parameter to know is resonance, or Q. Boosting the resonance creates a bump around the cutoff point, accentuating the filter’s behavior. Extreme resonance settings create wild peaks in the sound—think of the shrieking effect of the Roland TB-303.
Here’s our low-pass filter again, this time with a very high Resonance setting.
Amplifier
In an analog subtractive synth, the amplifier boosts (or amplifies) the level of the electrical signal coming from the oscillator so that it’s loud enough for use in performance and recording.
In a digital synth, this level boost isn’t necessary, but the amplifier is still important. This is because we can control, or modulate, the amplifier with other components, in order to create expressive changes in the volume of a synth sound over time.
The most common way to modulate an amplifier is with an envelope generator. Let’s take a look at how this works.

Envelopes
Envelopes control how a sound behaves over time. They do this by modulating other components in the synth, causing their parameters to be different at the beginning, middle, and end of a played note.
Most subtractive synths feature envelopes for controlling both amplitude (by modulating the amplifier) and the filter cutoff. Below we’ll focus on the amplitude envelope, but the same principles apply for a filter envelope. (In the examples below, both amplitude and filter envelopes are altered, to make the envelope’s effects nice and clear.)
Envelopes are typically split into four stages. These correspond to the beginning (Attack and Decay), middle (Sustain), and end (Release) of a played note. By tweaking these parameters, you can control whether a synth sound has a short and sharp beginning or a slow, gentle onset; and whether the sound disappears quickly when a note ends, or if it lingers.
Attack
The Attack setting controls how long it takes for a note to go from silence to its initial peak. A short attack creates an abrupt impact, while a long attack is a slow fade in. In this example, you’ll hear a short attack first.
Decay
Decay is how quickly the sound falls away after the initial peak of the attack. A short decay creates a dramatic drop off after the attack, for a “plucking” effect. Longer decays have a smoother feel.
Sustain
Sustain controls what happens in the middle of a note. Unlike the other parameters in an ADSR envelope, it’s not measured in time. Instead, it’s measured in volume (dB). At higher sustain levels, a note maintains its full strength after the initial attack: think of a sustained organ tone. Lower sustain levels create a contrast between the attack and a (quieter) body to the note. When sustain is at zero, the sound won’t hang around at all once the decay time has elapsed.
Release
Release controls how long a note hangs around once you take your finger off the key. A shorter release time means a note will quickly fade to silence. A longer release time will give your patch a drifting feel.
LFOs
LFO is short for low frequency oscillator. Unlike the other oscillators we’ve looked at, the LFO oscillates so slowly that we don’t hear it as sound. Instead, this undulating signal can be used to modulate other components in a subtractive synth—much as the envelope generators can change amplitude or filter cutoff over time.
Most subtractive synths allow LFOs to be assigned to modulate various components. Different assignments will produce different effects. For example, connecting an LFO to oscillator pitch will create a vibrato (warbling) effect. Connecting it to amplitude will create a tremolo (where signal volume ducks up and down). Connecting an LFO to filter cutoff will create a filter sweep effect.
Here’s a vibrato (LFO modulating oscillator pitch), followed by a filter sweep (LFO modulating filter cutoff).
How to use subtractive synthesis
Now you understand how subtractive synthesis works, it’s time to start making some sounds. By following the stages laid out above—starting with oscillator settings, then moving on to filter, envelopes, and LFOs—you’ll be programming powerful subtractive synth patches in no time. Below are a few examples to get you started.
In these examples we’ll be using MONARK, the juicy subtractive synth from Native Instruments. Modeled on an iconic analog monosynth, MONARK presents the classic analog subtractive signal-flow layout in a compact virtual package.
Thick bass
The rounded sound of subtractive synthesis makes it ideal for basses. Let’s create a thick, detuned bass sound to fill out the bottom end of a track.

We’ll need two oscillators to create a thick sound. Make sure Oscillators 1 and 2 are both switched on in the mixer section, and select different waveforms in each. Let’s say a square for oscillator 1 and a sawtooth for oscillator 2.
Set them at different octaves for a powerful effect: oscillator 1 at ‘32, and osc 2 at ‘16.
Detune one of the oscillators for extra fatness. Tweak the Pitch knob on osc 2 just a tiny bit left of center.
Now for the filter. Using the low pass filter LP2, turn up the resonance to about 9 O’Clock. Then pull down the cutoff knob to just above midday, in order to smooth out some higher frequencies.
That’s it. Here’s how it sounds.
Punchy lead
This time, let’s use the envelope generators and some noise to dial in a punchy lead sound.

Again, use oscillators 1 and 2, set to different waveforms, an octave apart, and with one of them slightly detuned.
This lead needs a tight contour, so let’s use the envelope generators to shape how the sound behaves over time.
First, the amplitude envelope. For a tight, punchy sound, keep the attack all the way to the left. Turn the sustain down a little from full so that the attack “pops out” slightly.
Now set the filter. Using the steep MM low pass filter with the resonance at around 10 O’clock, turn the cutoff way down so that you almost can’t hear the signal.
Now turn up the contour control. This gets the filter envelope involved.
Let’s tweak the filter envelope. As with the amplitude envelope, keep the attack at its shortest and the decay somewhere in the middle for a punchy onset. but this time turn the sustain way down, so that the filter cutoff will linger in a low position when a key is held down.
Now engage the noise. Hit the button next to the noise generator and turn it up just a little for extra bite.
There you have it. A punchy, analog-style lead.
Lo-fi pad
Like many classic analog subtractive synths, Monark is monophonic. This means it can only play one note at a time (unlike a “polyphonic” synth, where you can press down five keys and hear five different notes at once).
This lends itself to parts that play a single line, like basslines and leads. But it’s possible to use MONARK’s multiple oscillators for unusual chord-like effects. Let’s make a lo-fi pad using this technique.
Engage all three oscillators and give each a different waveform. Set them all to play at the same octave: let’s say 16’.
Note: make sure that the K.T. (keytracking) switch above oscillator 3 is switched on (yellow), so that it behaves as a normal oscillator rather than a modulator signal.
Detune two of the oscillators to create a chord effect. Turn the tuning knob on oscillator 2 right down to -7, and oscillator 3 up to around 5.
Give the sound a smooth, pad-like contour using the amplitude envelope. Set the attack and decay medium-long—let’s say around 1 second—but turn the sustain down to zero.
Now turn to the filter. A band pass filter will give the sound a thin, drifting feel. Select “BP” and turn the cutoff to around 10 O’ clock.
The filter needs some movement. Turn up the contour knob, and give the filter envelope identical settings to the amplitude envelope: medium-long attack and decay, and zero sustain.
Finally turn up the glide knob high to create slippery glissandos between notes.
Here’s how it sounds.
Start using subtractive synthesis
In this article we’ve taken an in-depth look at subtractive synthesis: what it is, how it works, and the sound sculpting possibilities it offers. Now that you know subtractive synthesis inside out, it’s time to start using it in your own productions.
Start exploring the iconic sound of analog subtractive synthesis with MONARK, or take a look at other professional synth VSTs from Native Instruments.
Related articles
-

Inside the evolution of orchestral sampling: an interview with ProjectSAM
Discover how ProjectSAM’s Lineage Series uses NKS and smart features to change orchestral sampling. Plus, save on instruments in our…
-

How New Constellations turn emotion into sound with Massive X
Go inside the studio with New Constellations. Learn how they use Native Instruments gear, happy accidents, and lifelong friendship to…
-

Citizen Kain on building emotion and space with Replika
Citizen Kain explains how Replika helped shape the rhythm, tension, and emotion behind his debut Eversun Records single “Moments.”…
-

The organic precision behind Calcou’s Anjuna release featuring Reaktor
Calcou shares how Reaktor, Monark, and Super 8 shaped the creative balance and live energy behind their new duo EP,…
-

14 NKS instruments that will change the way you create music
Discover 14 NKS instruments to freshen up your workflow. From lo-fi tape synths to cinematic strings, shop the Native Instruments…
-

Parallelle on crafting living basslines with Reaktor and TRK-01
Parallelle share how Reaktor and TRK-01 shape the bass and warmth in 11th Avenue, balancing analog depth with modern control.
-

Where will your sound lead you? Explore the Native Instruments Summer Sale
Save 30% on instruments, effects, and sounds in our Summer Sale. Find the tools to keep your tracks moving and…
-

How Mr. Bill builds sonic worlds in Massive X
Mr. Bill explains how Massive X and instinctive sound design shaped the storytelling process behind his new downtempo album, Mr.