


Amp sims let you shape guitar tone in exciting new ways. Freed from the limitations of physical amps and effects, tools such as Guitar Rig 7 allow you to create bold new sounds and quickly solve fiddly mix problems. Even simple amp sim tricks can get you a long way towards powerful, authentic guitar tone.
In this article, we’ll look at ways to enhance your tone with the help of EQ components in Guitar Rig 7. Use these simple amp sim EQ techniques to tighten up your sound, slot your guitar into a busy mix, add width, and much more.
Jump to these sections:
Follow along with Guitar Rig 7 Pro, an inspiration suite filled with sought-after guitar and bass amp simulators, studio effects, and pedals – now 50% off for a limited time.
How do you get a good guitar tone with amp sims?
To get good guitar tone with your amp sim, first consider the style of the song you’re working on and the effect you’d like to create for the listener. The right guitar tone for a heavy rock song will be totally different to the sound you choose for a lo-fi hip-hop production. Your choice of amps and effects will depend on your sonic goal. The right amp sim EQ settings will help finalize your tone.
While there’s no one “perfect tone,” amp sims ensure that you’re not limited in your quest for the right sound. Guitar Rig 7 lets you choose from dozens of iconic amp models and countless effects – including several fully-featured EQs – and combine them into any signal chain imaginable. Once you’re comfortable with your amp sim, good guitar tone will be just a few clicks away. The tips below will help get you there.
How do you EQ amp sims?
You can apply amp sim EQ simply by dropping an EQ component into the signal chain. This EQ component could be positioned before or after the amplifier in your sim.
Guitar Rig 7 offers several guitar EQ components that excel at different tasks. Solid EQ is a great all-rounder for amp sim EQ. This component models the channel equalizer section of a highly acclaimed mixing desk from the 70s, and its precise and transparent sound is considered a reference among mixing engineers.
Amp sim EQ tricks
1. Tighter low end
This simple amp sim EQ trick can tame your guitar sound and help it fit into a busy mix. This technique works particularly well with a classic-sounding high-gain amp model like Hot Plex. Sending a lot of lower frequencies into an amp like this can create an intense, highly saturated sound. Sometimes this might cause muddiness and confusion in the mix.
We can solve this problem by removing lower frequencies from the guitar before it reaches the amp. This will thin out the tone in a way reminiscent of an open-back cabinet. It will also create space for low end elements such as the bass and kick drum.
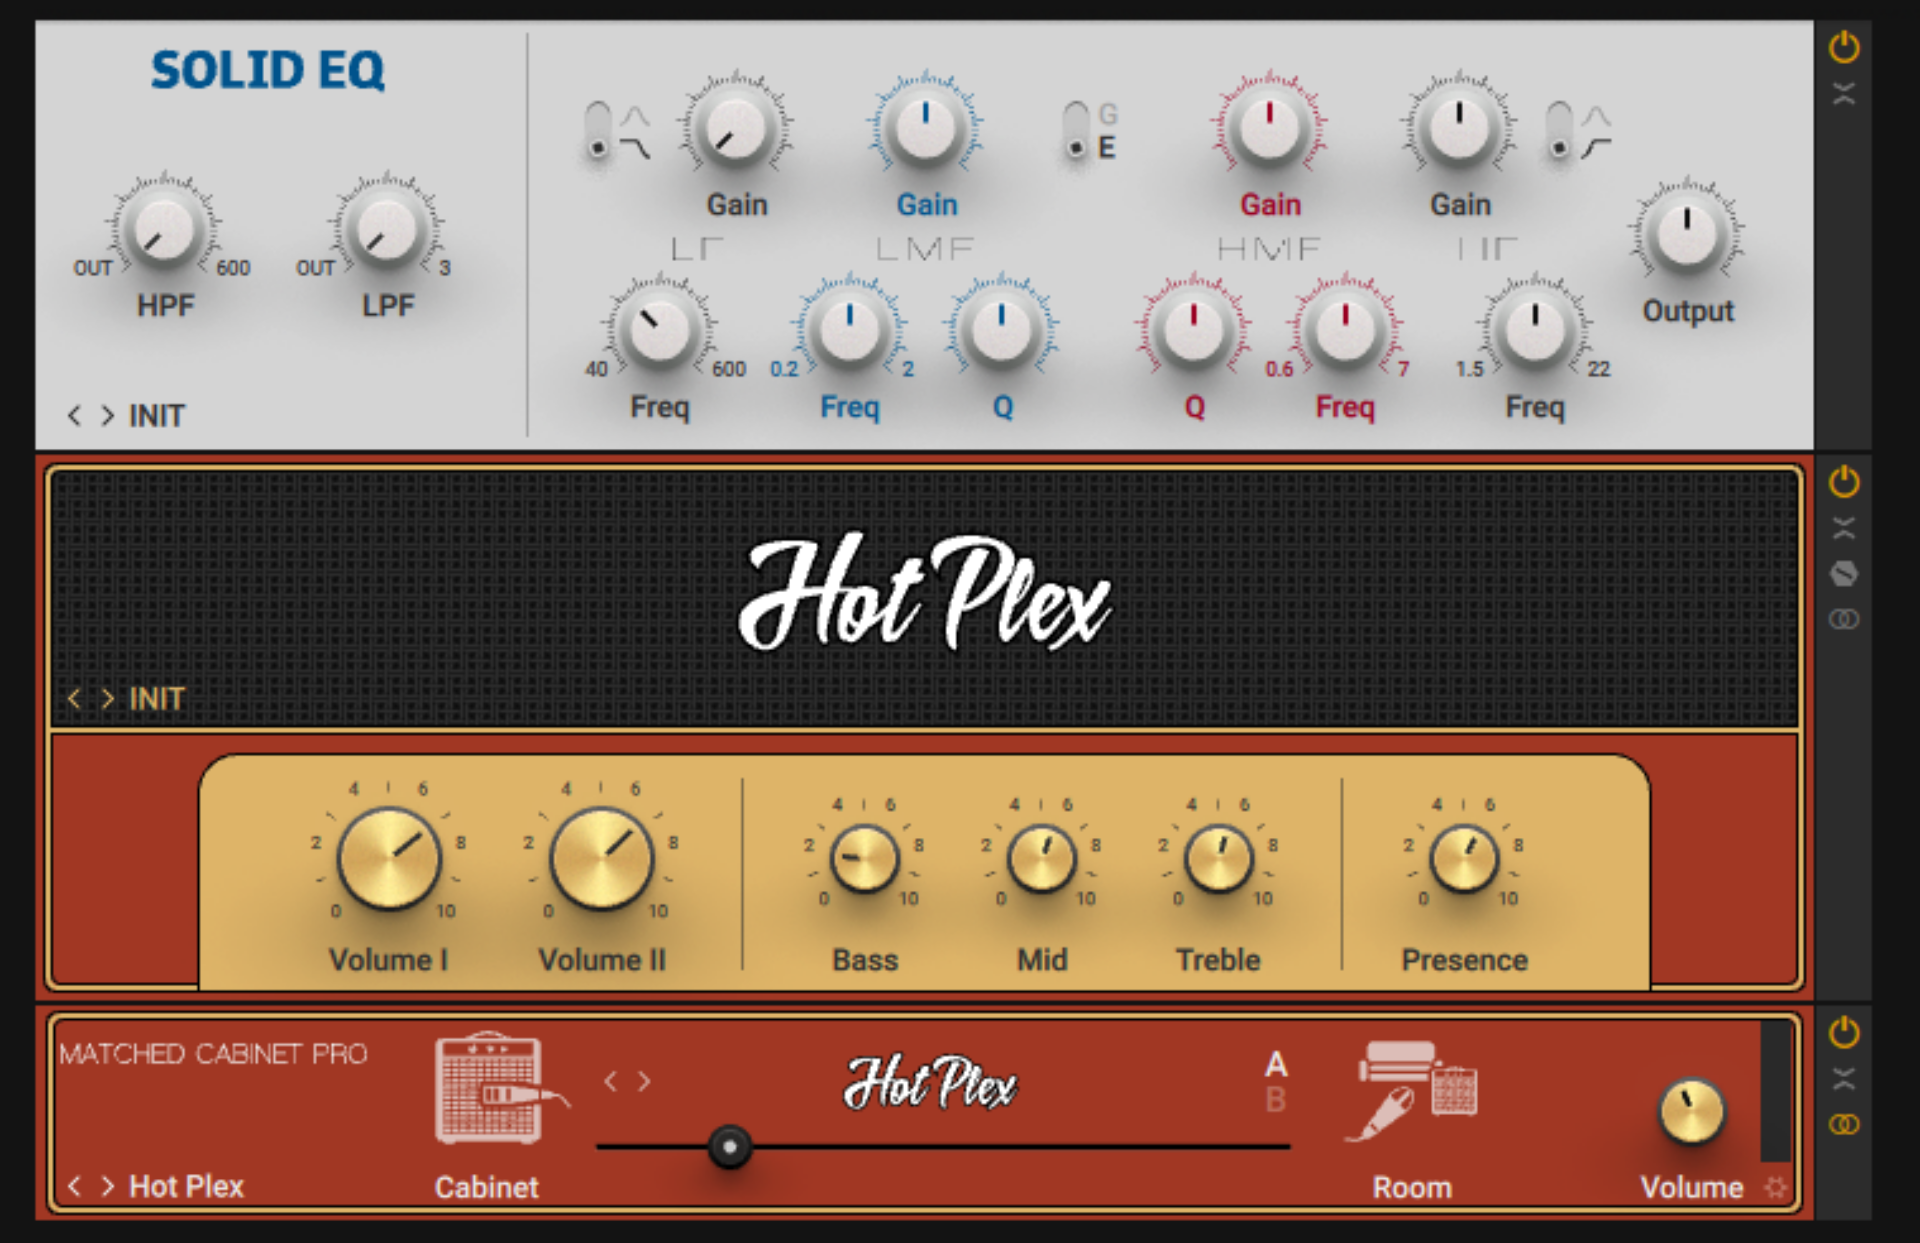
To achieve this effect, place a Solid EQ component before the amp. We only need to use the lowest EQ band (furthest to the left on the interface). Set the frequency to around 100 Hz and turn down the gain to minimum for a substantial -20 dB cut.
Here’s how our rhythm guitar sounds before and after the EQ has been applied. Notice how the un-EQed version is flabbier in the low-end. Once EQ is applied, the riff sounds tight and punchy – and will slot more easily into a mix.
For a more sophisticated mixing effect, consider automating the EQ so that it’s only engaged in busier parts of a song. When the guitar is heard on its own, disengage the EQ to enjoy your riff in all its bassy glory.
2. Bi-amping
A guitar sound is rich and complex, with detail right across the frequency spectrum. Special guitar EQ tools in Guitar Rig 7 can be used to separate these various frequency zones and process them differently. Do this to create a guitar tone with more definition and richness.
The magic tool here is the Crossover component. This simple component divides the frequency spectrum into two bands that can have their own chains of amps and effects. This means we can amp different parts of our guitar sound differently.

To start, set the crossover at about 500 Hz. Then select an amp for each of the two bands.
For the lower frequencies, consider using an amp that sounds powerful when you drive it hard. We chose Jump, a model of an 80s amp beloved in hard rock and metal. Here’s how the lower frequencies sound with the amp applied.
For the higher frequencies we want something with more definition. The Twang Reverb amp delivers a bright, jangly tone. Here are the higher frequencies once the amp has been added.
By combining the two bands, we get force from the low end combined with clean articulation from the high end – the best of both worlds.
Use the crossfade slider in the Crossover component to find a nice balance between low and highs. In our case a 50/50 balance sounds great.
Take this one step further by using the pan controls in the Crossover component to spread your two bands across the stereo field. In this example we panned the high frequencies to the right and the lows to the left for a beautiful expansive sound.
3. Boosting articulation
Great guitar playing is often about subtle articulation and deft fingerwork. But with the wrong tone profile this pleasing detail can get lost, especially in a busy mix. When this happens, use amp sim EQ to boost the presence zone of a guitar signal – that is, the higher frequencies at around 4 kHz-6 kHz. This will help bring out the subtleties of a solo or a delicate picked part.
Be careful, though: the human ear is particularly sensitive to frequencies in this zone, so if you boost too far your part might sound sharp or tinny.
To start, drop in the Solid EQ component. Using the High-Mid Frequency (red) band, with the frequency at around 3 kHz and the Q low. Then boost the gain to taste. You want the guitar part to be clear and precise, but stop boosting when it feels sharp. A boost of +13 dB worked in our case.

Here’s how our guitar part sounds before and after the boost is applied.
4. Mid scoop
A lot of modern rock and metal owes its slick, powerful sound to a single EQ move: the mid scoop. This means reducing the low-mid frequencies in a guitar signal (around 200-400 Hz) to create a sculpted sound that is powerful but leaves room in the mix for other instruments.
There are several ways to achieve this guitar EQ effect in Guitar Rig. You could try adjusting the EQ controls on your chosen amp component to reduce the mids – but this may not be precise enough. The most effective way is to dial in a mid scoop with an additional EQ component.
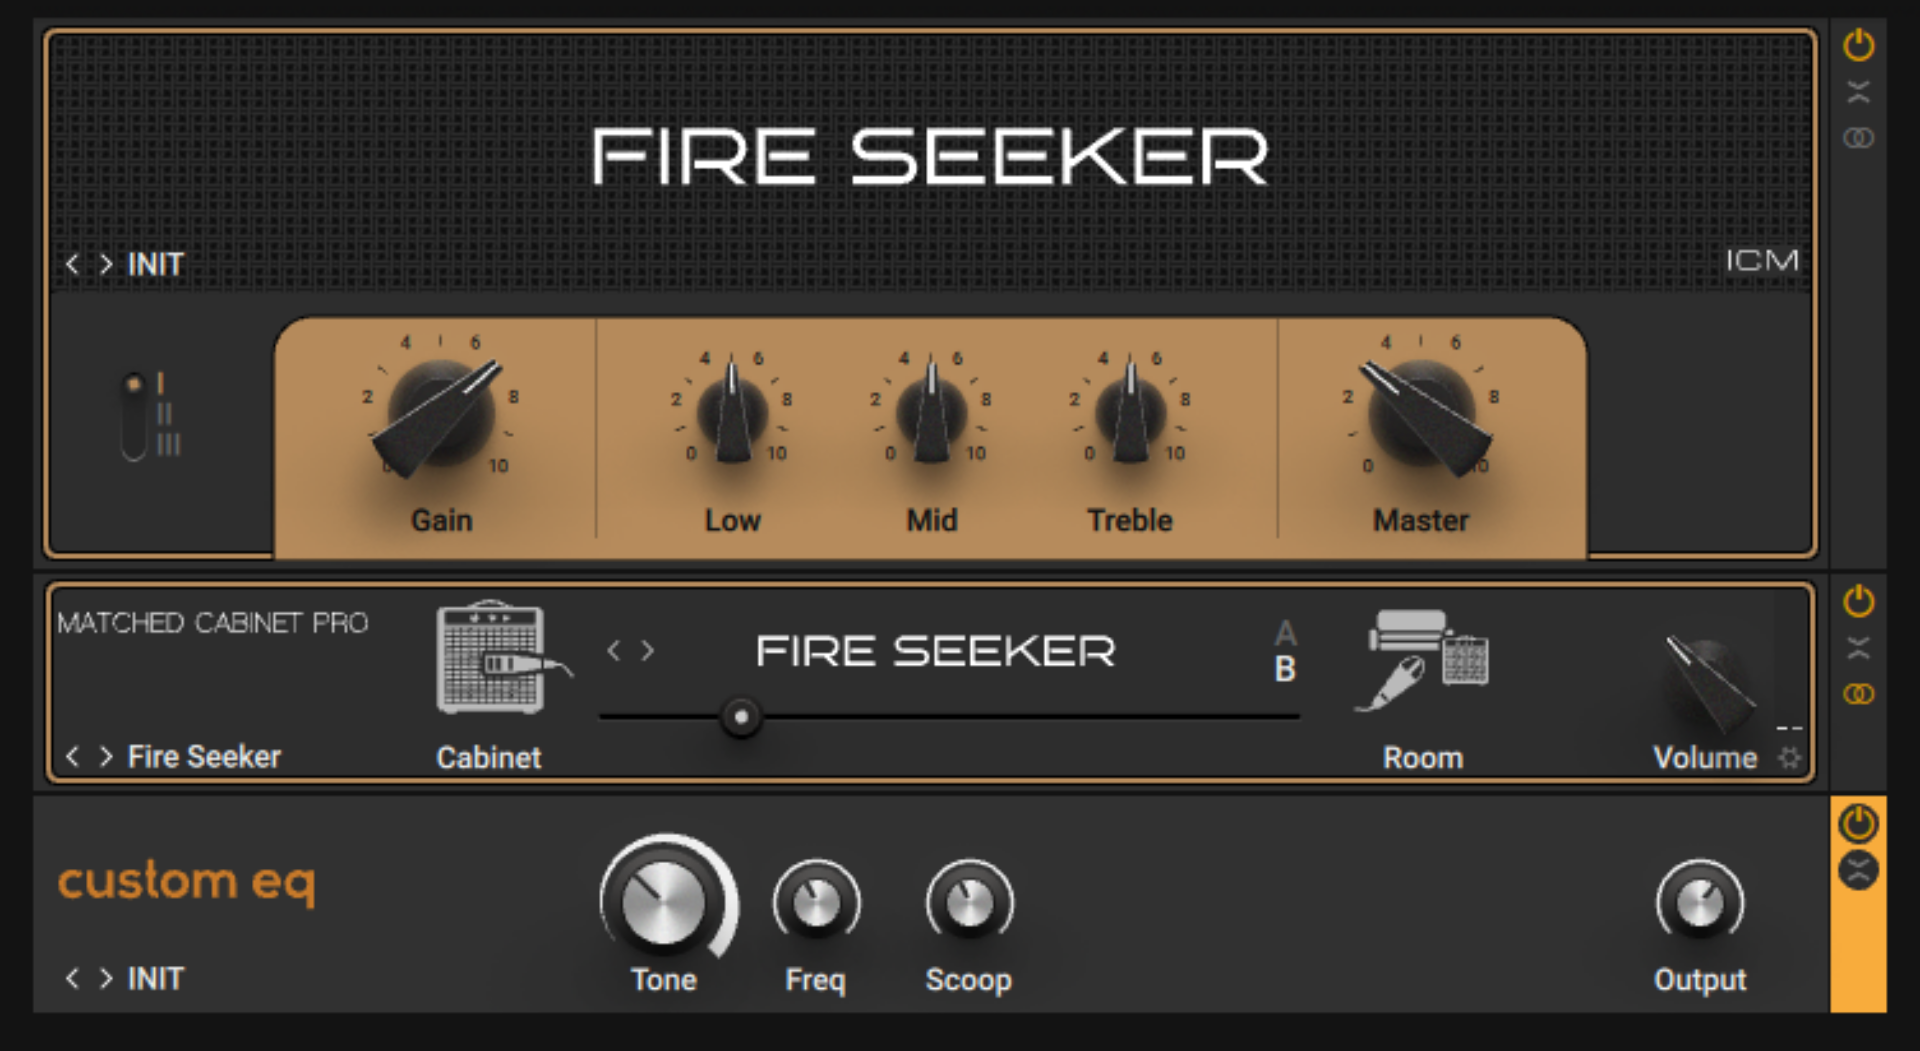
For this task, we can use the Custom EQ component, which models the sound of a popular vintage equalizer with a colorful and warm sound. This component has a handy Scoop control which lets you dial in a mid scoop with precision.
Unlike in our other examples, the EQ component should be placed after the amp this time. Drop it in and adjust the frequency control to somewhere around 200-400 Hz (400 Hz worked for us). Then tweak the Scoop amount until you have a sound that is sleek and controlled without sounding too thin. Note that applying a mid scoop typically leads to a drop in gain (loudness). Compensate for this by boosting the Custom EQ output by a few dB.
Here’s how our guitar part sounds before and after the mid scoop has been applied. With the EQ added, it still has plenty of low-end and precise high frequencies, but with less of that messy stuff in the middle.
5. Adding width with mid/side EQ
Traditional amping has plenty to offer when it comes to stereo processing. Guitarists who are serious about stereo simply get two stacks. But what about mid/side processing? Guitar Rig allows us to quickly apply mid/side EQing to our guitar tone, unlocking powerful mixing tricks that are typically the domain of studio nerds.
What exactly are the “mid” and “side” parts of a signal? The mid band contains all the parts of the sound that are the same in both the left and right channels of a stereo signal. The side band, meanwhile, contains all the sounds that differ between left and right. Guitars tend to be in mono, meaning they’re all “mid.” But effects such as chorus, phase, and delay – so long as they are stereo effects – can add juicy “side” content to the sound.
We experience this additional content as “width.” By processing the side band with simple EQing, we can enhance this feeling of width, emphasize the effects used, and create a glossy, immersive guitar sound. This trick works particularly well with heavily processed guitar parts that are intended to feel dreamy and expansive.
The key to unlocking mid/side processing in Guitar Rig 7 is the Split M/S component. Apply this component to your signal chain and then drop Solid EQ into the “side” band.

Now boost the high frequencies to bring out the sides. Using the High Frequency band (furthest to the right), dial in a high shelf boost from around 5 kHz. We boosted the highs by a full +20 dB.
Here’s how our guitar part sounds before and after the side boost. Hear how the effects pop out more and the whole part feels wider and more exciting.
Start dialing in your amp sim EQ
In this article, we’ve run down some handy amp sim EQ tricks for getting great guitar tone. We’ve explored techniques for tightening up low-end, improving definition, enhancing width, and more. Now it’s time to start using these techniques in your own music.
Guitar Rig 7 is your go-to tool for amp sim EQ, offering dozens of sought-after amp models and countless effects, including several fully-featured EQ components. Near-limitless customization means your perfect guitar tone is just a few clicks away.
Related articles
-
How to make music: the beginner’s guide
Learning how to make music is easier than you think. This beginner's guide covers everything from understanding music theory and…
-

Tems and Native Instruments join forces to empower women in music across Africa
Discover how GRAMMY-winner Tems and Native Instruments are partnering with the Leading Vibe Initiative to empower emerging women in music…
-

Why Monark plays a central role in Broken Hill’s Detroit-influenced club tracks
Broken Hill breaks down how he used Monark to shape the bass line on "Brain Delay" – sharing tips on…
-

How the Kontrol S88 keyboard helps Kaitlyn Aurelia Smith translate emotion into structure
Kaitlyn Aurelia Smith shares how the Kontrol S88 keyboard and Kontakt shaped the writing of GUSH, focusing on harmony, emotion,…
-

How Sainte Vie uses Battery to shape rhythm across cultural sounds
Sainte Vie breaks down how he uses Battery to trim, tune, and shape rhythm across genres - keeping his drum…
-
What is phonk music? A beginner’s guide and how to produce it
Learn what phonk music is, what defines its gritty sound, and follow this step-by-step guide on how to make phonk…
-

Why Ainonow uses FM8 for percussion, noise, and everything that isn’t a lead
Ainonow shares how he uses FM8 for percussion and noise design on his latest release, with tips on transient control,…
-

Will Clarke on turning Maschine+ into a live performance powerhouse
Will Clarke breaks down how Maschine+ powers his live show, bringing flexibility and feel to performances of his 'Midnight Mass'…