


A few decades ago, recording guitar wasn’t easy. Aside from the instrument itself, you needed an amp, pedals, and a microphone or two—not to mention a space to record in. These days, those of us with limited space and resources are lucky: We have digital amp simulators.
An amp sim is a mighty digital toolbox for guitar players and other music-makers. It captures the sound of amps, pedals, and other equipment in digital form, allowing you to get that “real band” sound with just an audio interface and some software. But more than that, virtual amps are powerful creative playgrounds for anybody interested in shaping sounds.
In this article, we’ll explain everything you need to know about virtual amps. We’ll show you how to set one up in your DAW, and demonstrate how to use your amp sim to record guitar, sculpt innovative sounds, and even mix a track.
Jump to these sections:
Follow along with Guitar Rig 7 Pro, an inspiration suite filled with sought-after guitar and bass amp simulators, studio effects, and pedals.
What is a digital amp sim?
A digital amp simulator captures the sound of amps and other equipment in digital form. Amp sims are available as VST plugins for use in your DAW. Most feature digital “models” of famous and well-loved amplifiers, allowing you to capture iconic guitar tones from the comfort of your home studio. Many, such as Guitar Rig 7 Pro, also include simulated pedals, rack effects, and other features, making them powerful tools for shaping all kinds of sounds.
What is a guitar amp sim?
A guitar amp sim captures the sound of guitar amps in plugin form, making realistic guitar tones accessible inside your DAW. But virtual amps aren’t just for electric guitars. Try running other instruments or sounds through your amp sim to get inspiring results.
Why use an amp sim?
An amp sim is a great option for those without the resources or space for a physical guitar rig. It also opens up new creative possibilities. With Guitar Rig 7 Pro, you can try out dozens of amps and effects from across the decades, switching your tone in an instant or inventing weird and wonderful new rigs. You can also combine your virtual amps with digital synthesizers and effects inside your DAW to create hybrid signal chains. Once you start experimenting with your guitar sound, the possibilities quickly multiply.
How to use an amp sim
To start with, you need to set up your digital amp sim for use in your music production software.
For this, you’ll need a computer running a DAW (Digital Audio Workstation) such as Ableton Live, Logic Pro, Cubase, or FL Studio. Amp sims such as Guitar Rig 7 Pro are compatible with all of the major DAWs.
If you want to use your amp sim in conjunction with a guitar or other instrument, you’ll need a way to get sound from your instrument into your DAW. For this, you’ll need an audio interface with the appropriate input, and an audio cable to connect your instrument to the interface.
If you’re using your amp sim in conjunction with a software sound source such as a synthesizer VST or Kontakt instrument then you can do this right inside the DAW.
Next, create a new track (or channel) in your DAW. If you’re working with an audio source such as a guitar, then this should be an audio track. If you’re using a VST instrument, it should be a MIDI track.
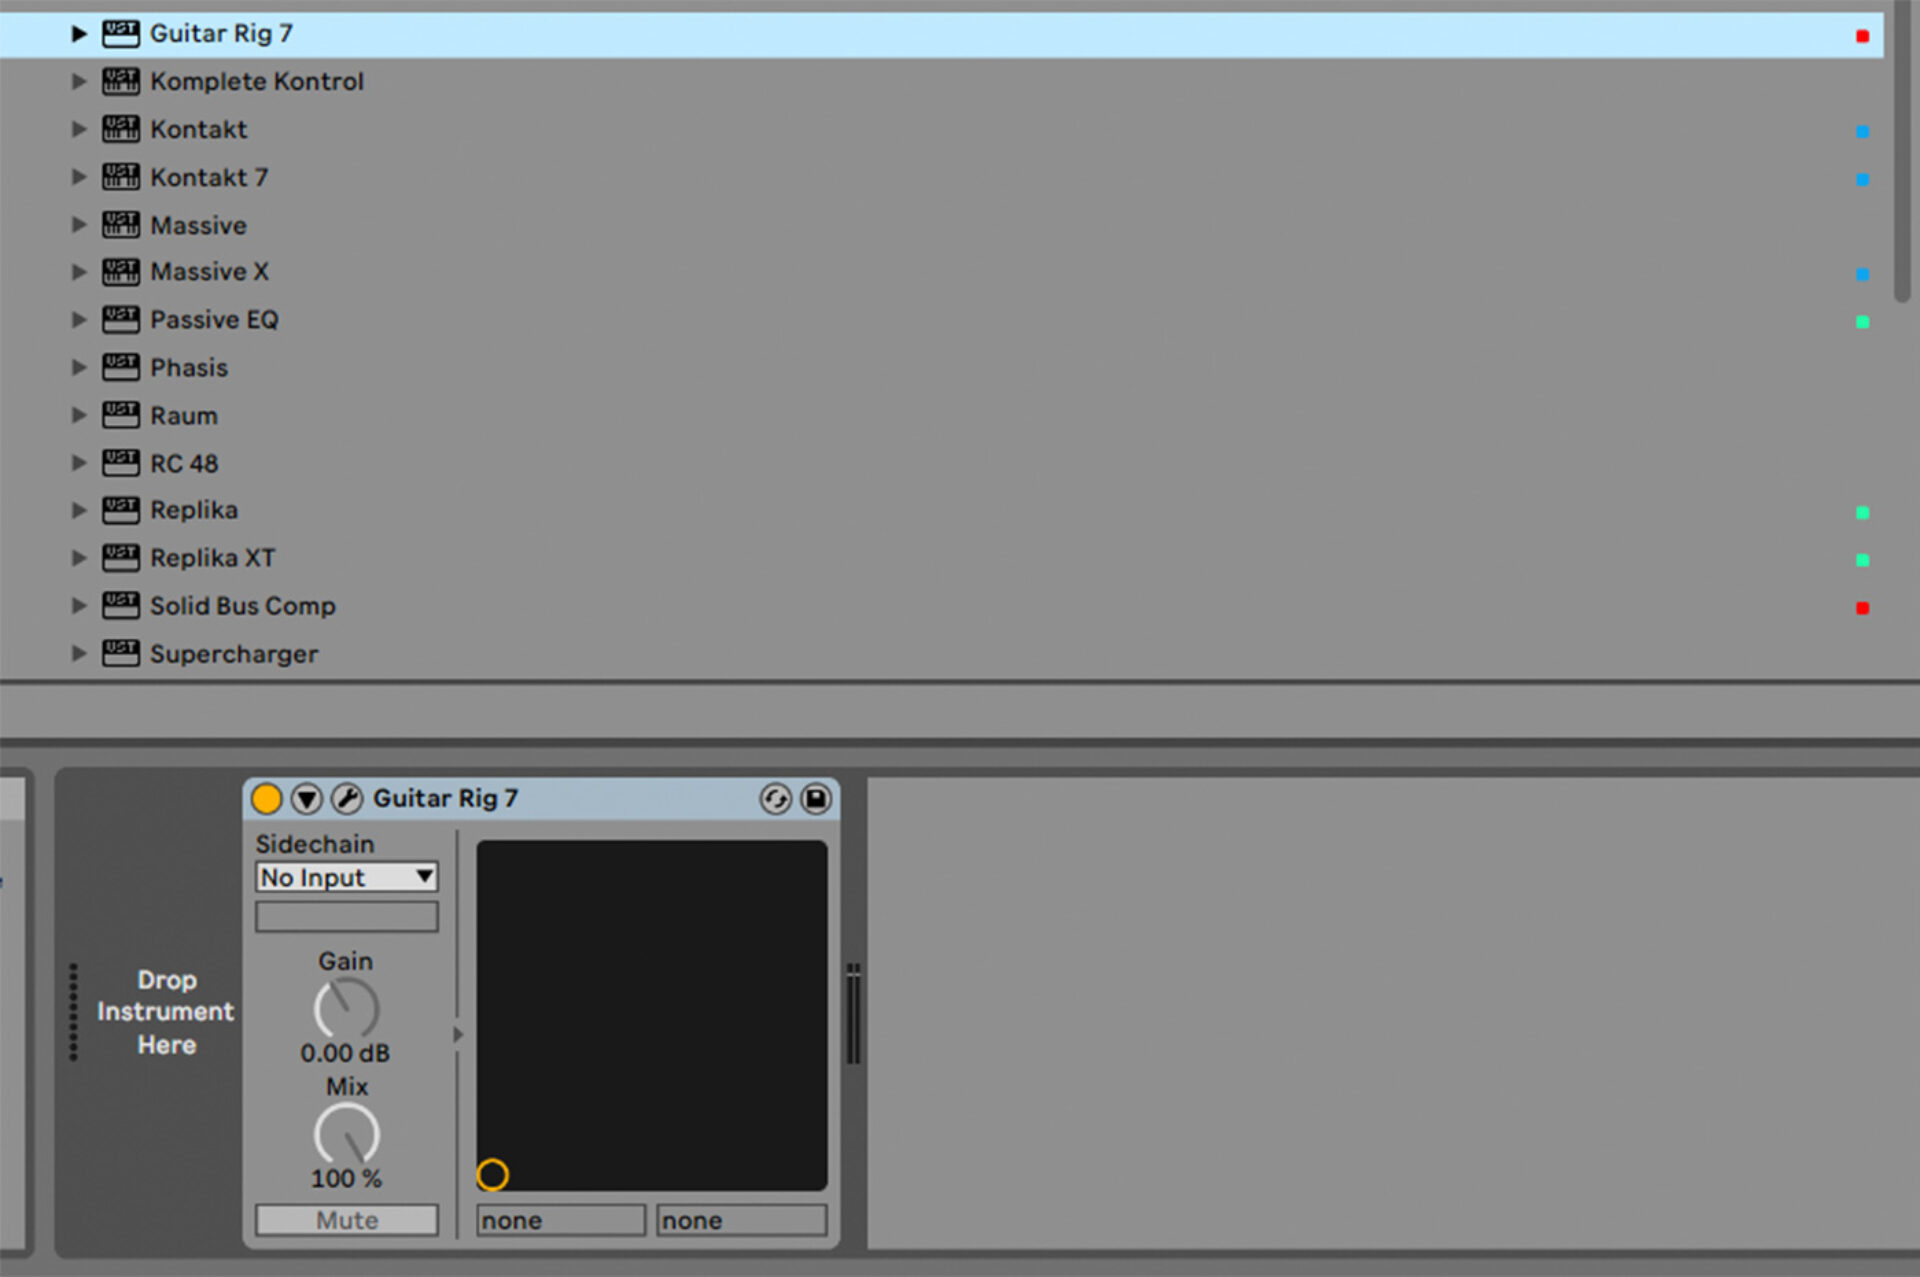
Insert the amp sim into the track in your DAW. This is usually done by selecting the amp sim from a list of available VSTs. Here we’ve added an instance of Guitar Rig 7 Pro to a MIDI track in Ableton Live.
Finally, add an audio source to be processed by your amp sim.
If your audio source is an instrument such as a guitar, plug the instrument into an input on your audio interface, then select this audio input as an audio source in the track in your DAW.
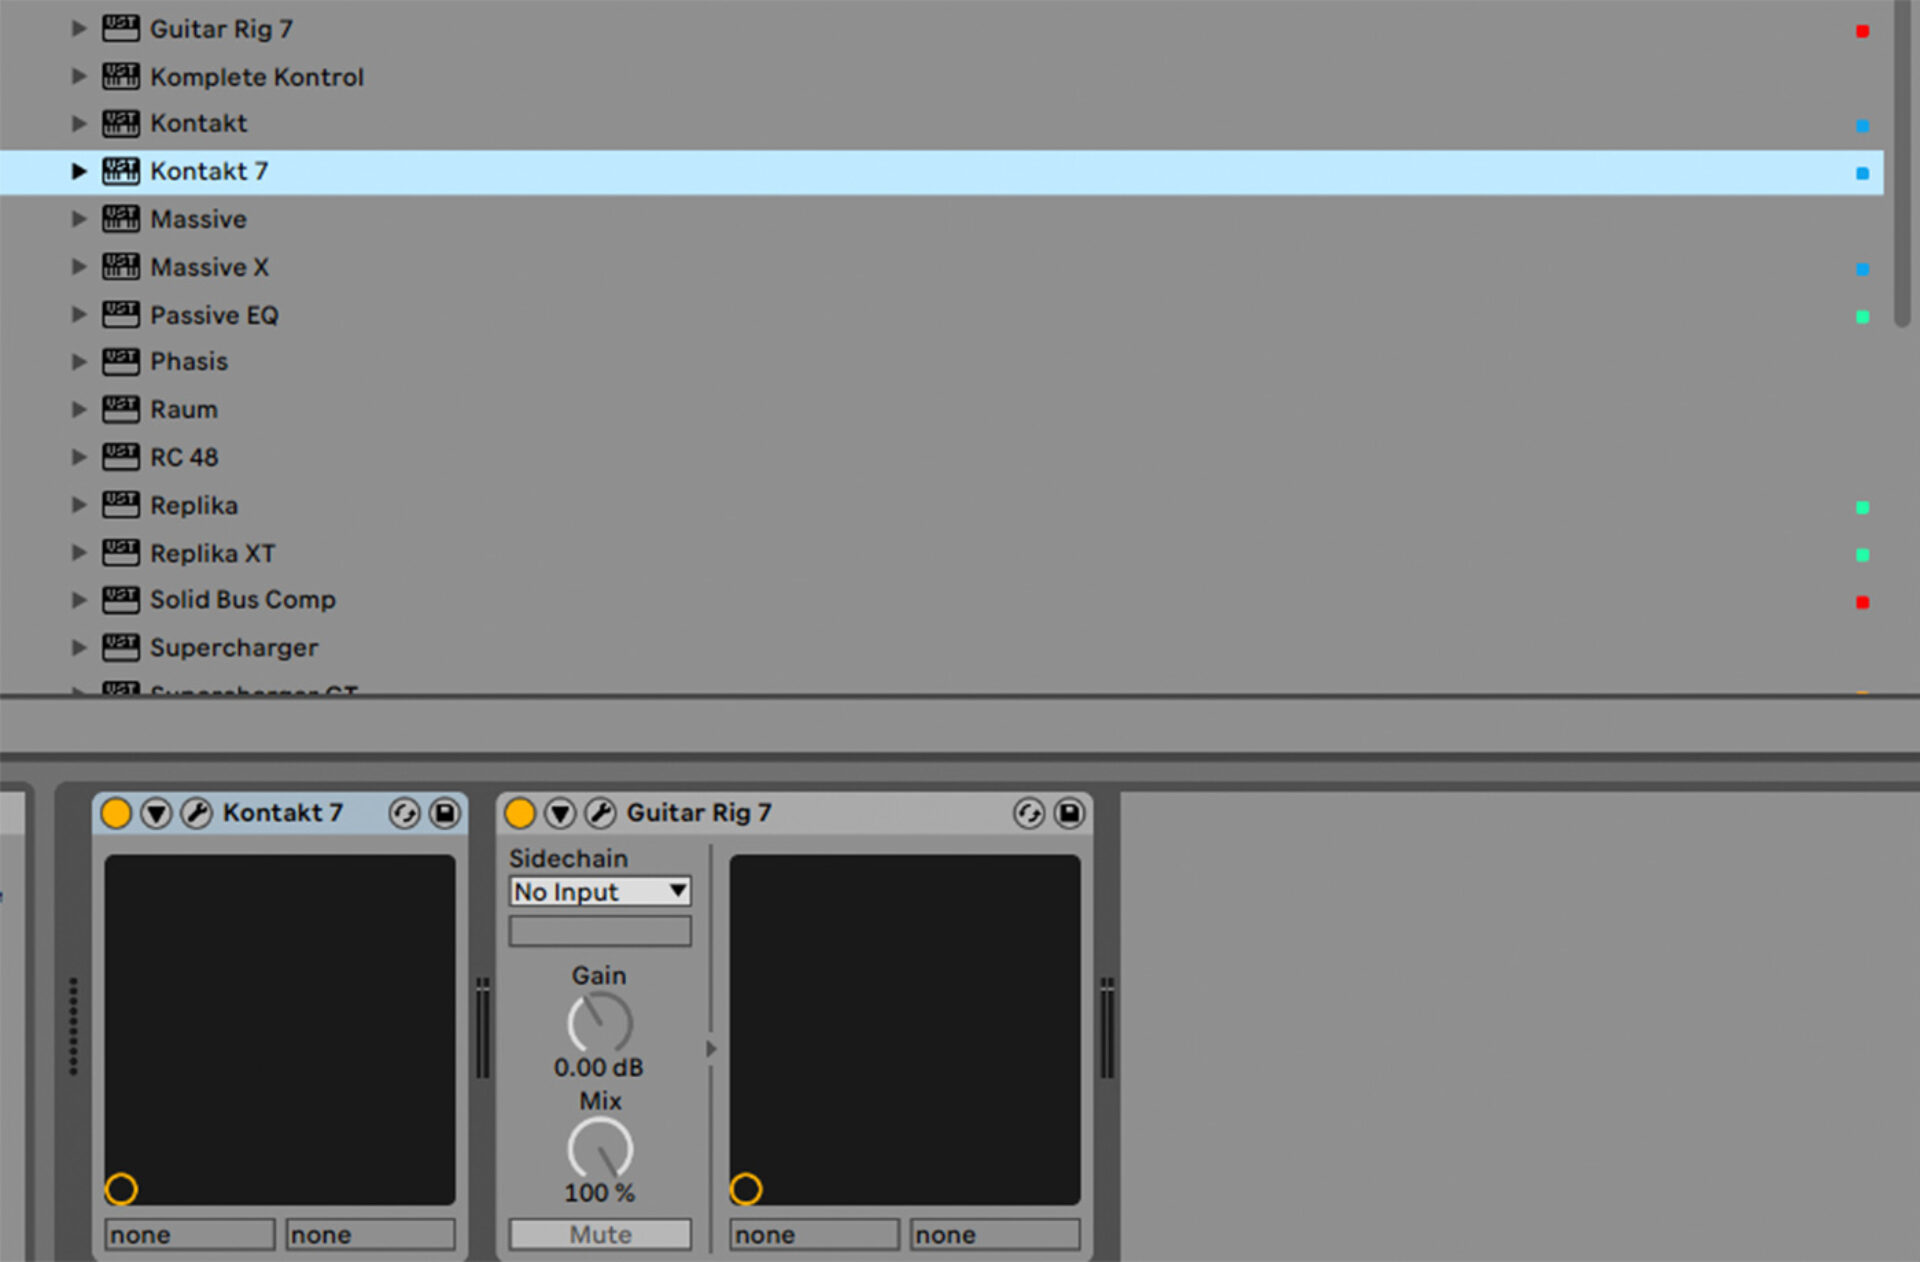
If your audio source is a software instrument, select this instrument from the available VSTs—as you did with your amp sim—and drop it into the MIDI track in your DAW.
In the image below, we’ve added a software instrument, Kontakt 7, to the MIDI track containing Guitar Rig 7 Pro.
Now you’re ready to start processing audio with your amp sim. Let’s take a look at a few different approaches to getting great sounds from your digital amp simulator.
1. Guitar and bass processing
Amp sims such as Guitar Rig 7 Pro excel at processing guitar and bass. After all, much of the gear that they model were originally designed to work with these instruments. Here’s how to use Guitar Rig 7 Pro to make guitars sound rich and authentic.
Here’s our guitar. It sounds quite dry and flat without any amping or other processing.
Our goal is to imitate the kind of set-up we’d use in a real-world environment. That means an amp, a cabinet, and some effects.
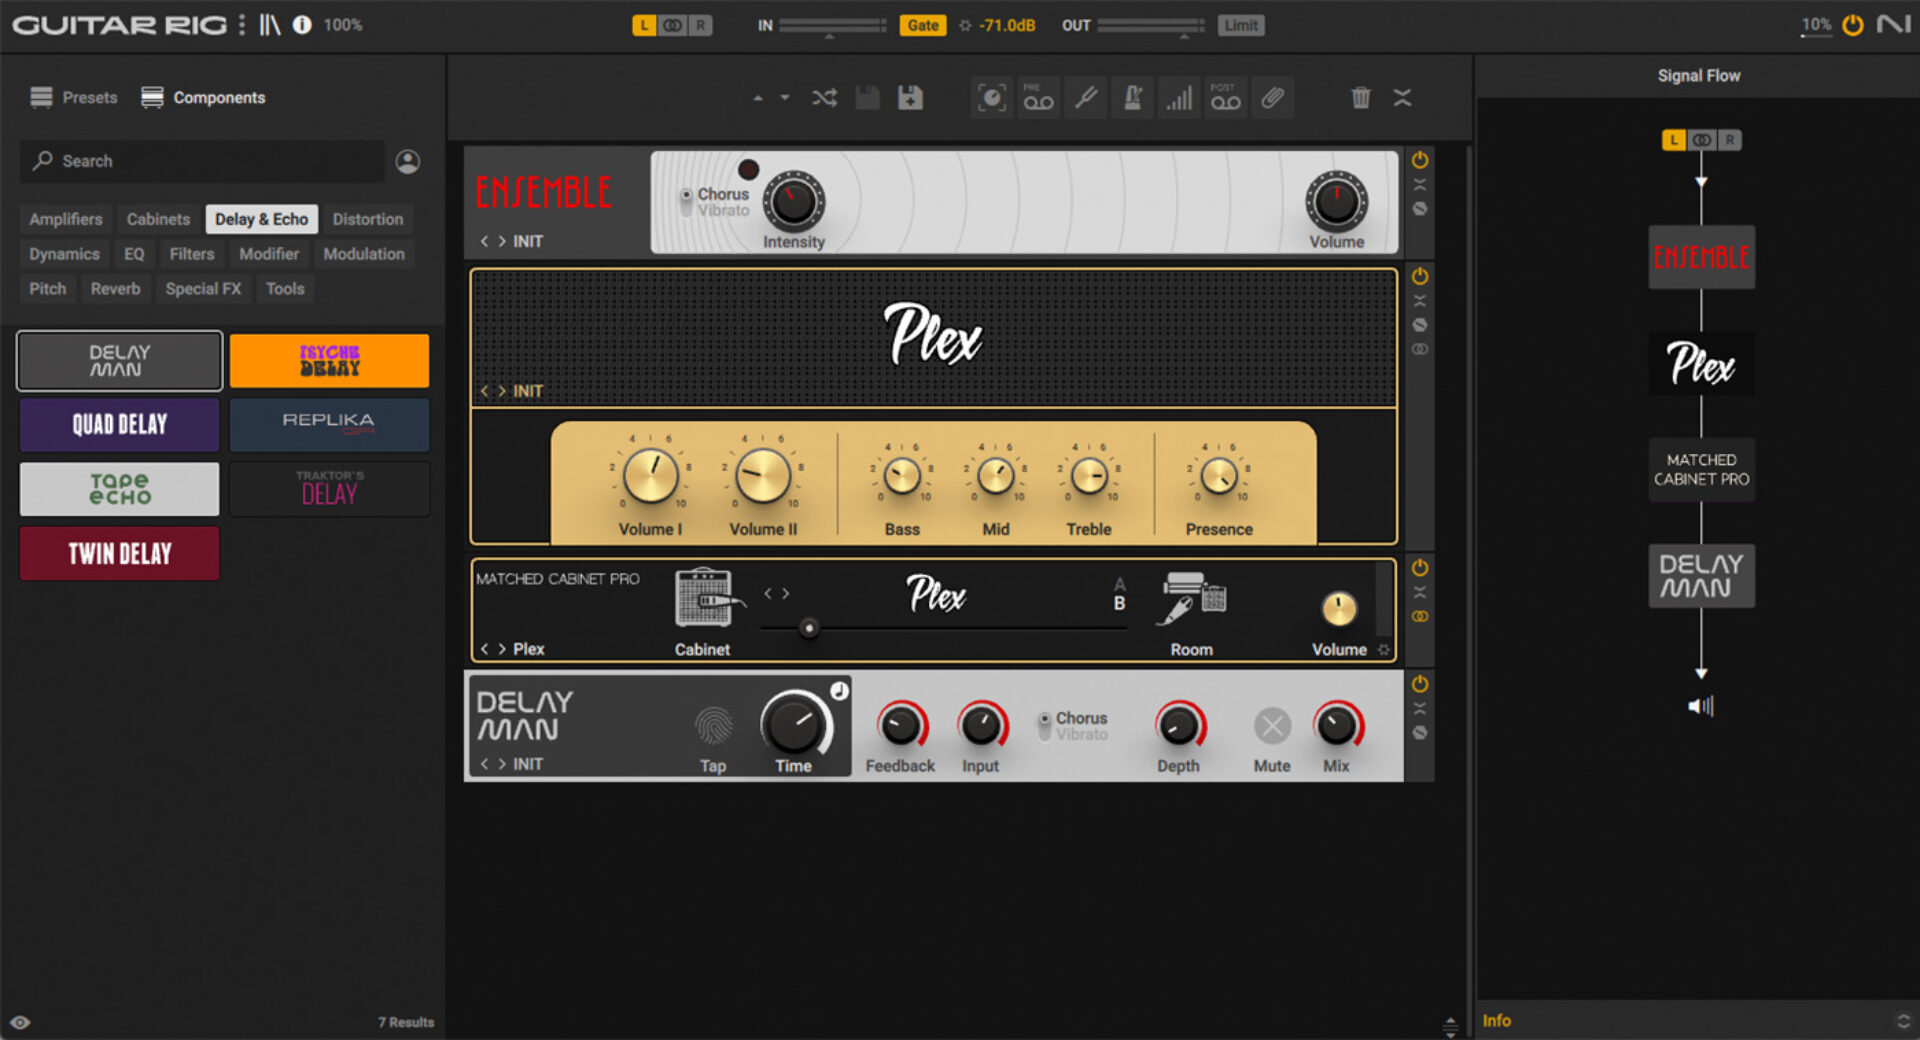
First, let’s select an amp. We can browse the available amps in the components menu on the left-hand side. There are dozens spanning decades and styles, from iconic vintage tube amps to ultra-modern high-gain monsters. We’ve chosen Plex, which is modeled on the sound of a legendary ‘60s amp with an unmistakable tone.
Drag and drop the amp into the rack. The rack is where we can assemble our rig and tweak its parameters. In this case, turn up the gain knobs on the left hand side of the amp interface (Volume I and Volume II) to add a little grit.
You’ll notice that a cabinet was automatically added after the amp. Guitar Rig 7 Pro’s Matched Cabinet feature automatically adds a cabinet that pairs well with the chosen amp. If you like, you can move the Room slider a little to the right for some authentic room sound.
Finally, some effects. These are what give your guitar tone its personality. The effects you choose should be based on the style and feel of your guitar part.
Let’s add a little chorus for a psychedelic feel. Chorus effects can be found in the Modulation submenu. We chose Ensemble, which is modeled on a classic effects unit used to give guitars thickness and sheen. Drag and drop the effect above the amp in your rack to ensure that the guitar passes through the chorus effect before it reaches the amp. This imitates a conventional guitar signal chain, in which effects pedals are placed before the amp.
Now let’s add some delay. Open the Delay & Echo submenu and drag and drop an instance of Echo Man into your rack. This flexible delay effect is modeled after a classic echo pedal renowned for its warm character. Let’s place it below the amp, meaning that the delay effect comes last in the signal chain.
Here’s how it sounds: Our plain guitar part has become rich and characterful, with a vintage feel.
2. Sound design
Amp sims can do much more than just authentic guitar tone. The wealth of great-sounding amps and audio effects found in Guitar Rig 7 Pro make it an inspiring tool for shaping all kinds of sounds. Here’s how to use an amp sim for innovative sound design.
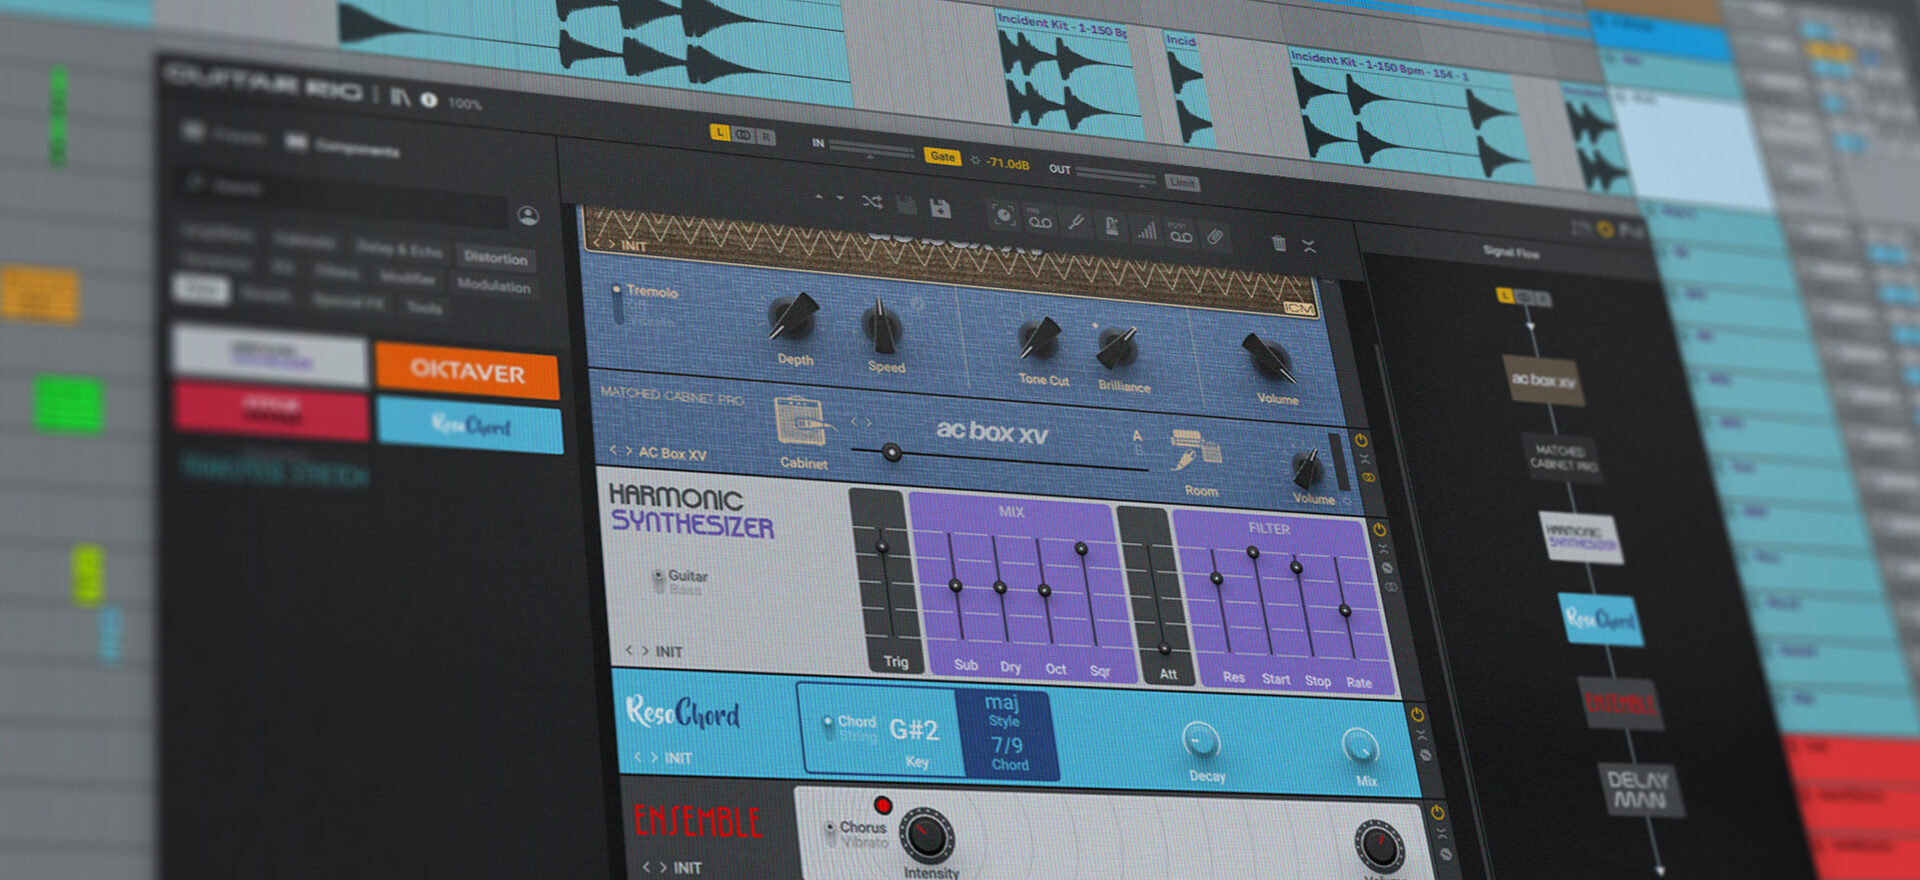
We’re using our guitar as a source again, but we’ll use the sound-sculpting possibilities of Guitar Rig 7 Pro to transform it completely.
Here’s our source sound: a simple sustained note.
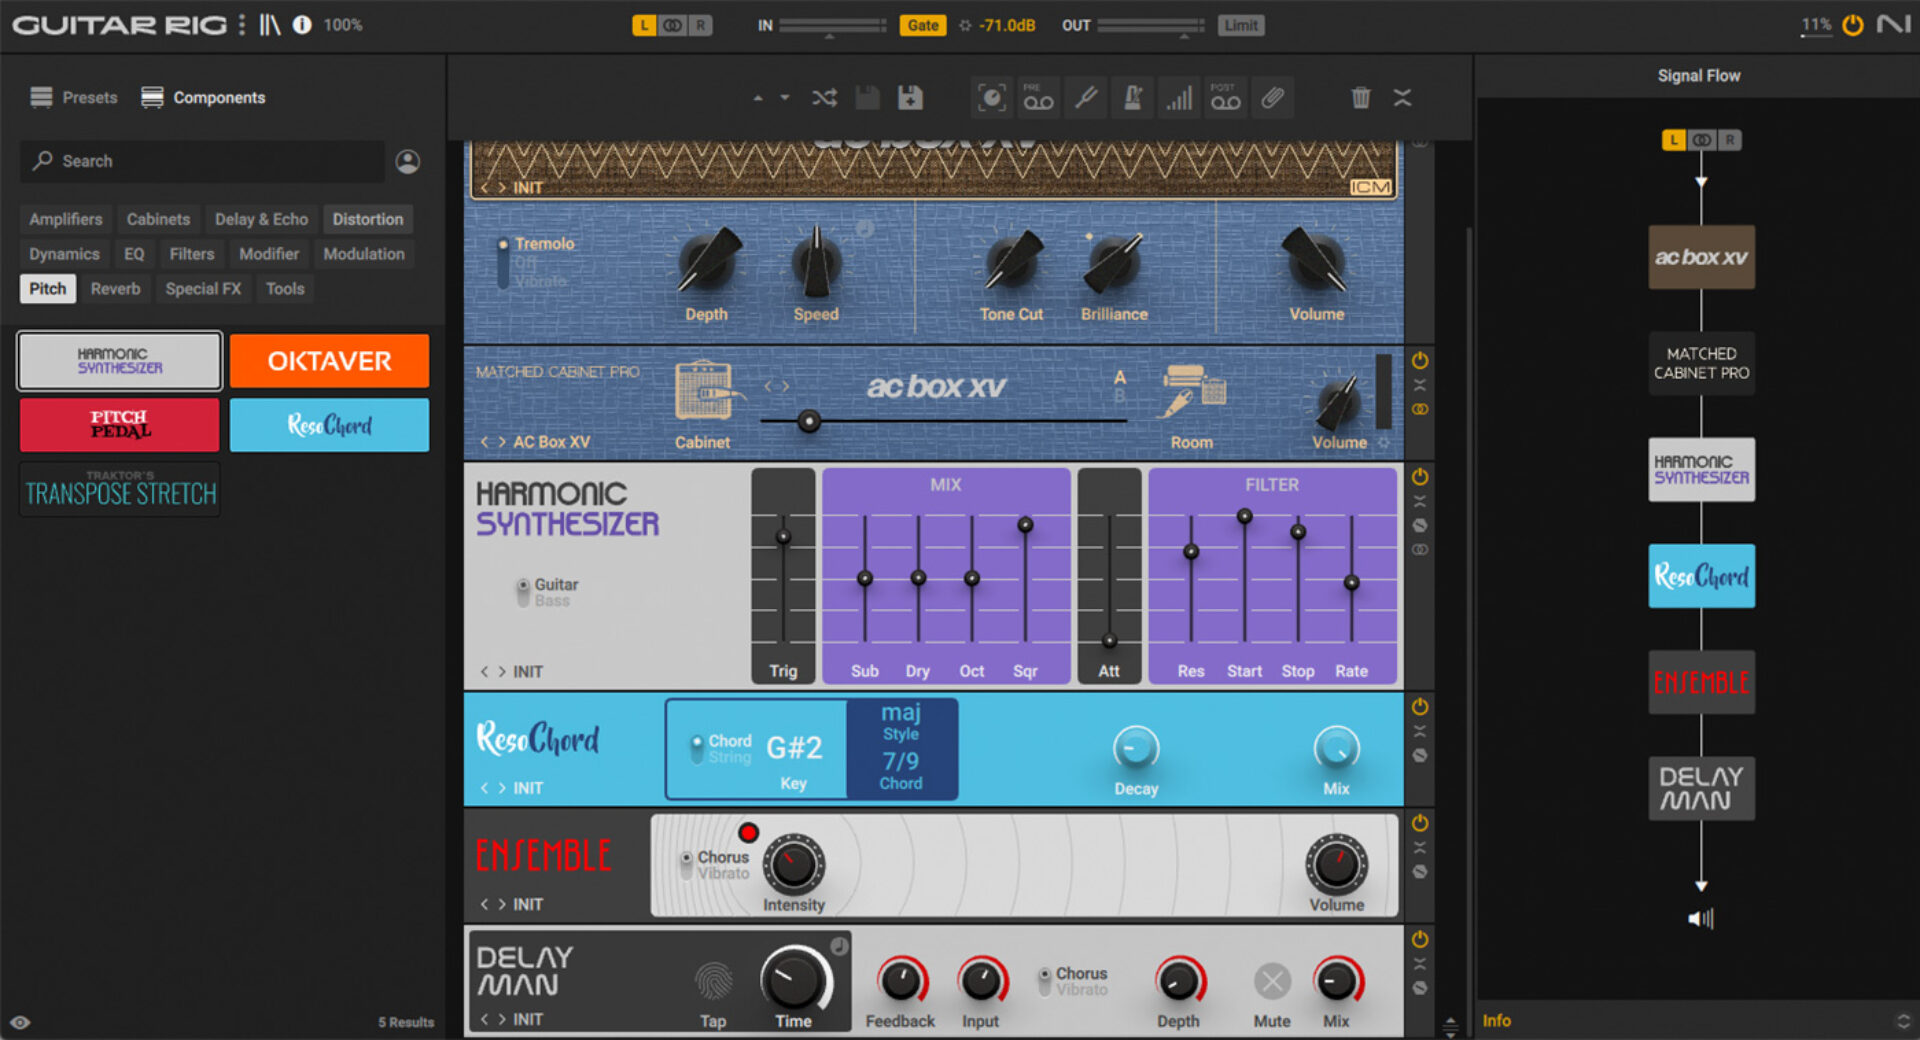
First, add an amp to boost the signal and enhance character. We’ve gone for AC Box XV, which models a beloved ‘60s tube amp with a gorgeous clean sound.
Now, let’s go to town on the effects. This time we’ll place all of our effects below the amp in the rack.
When it comes to creative sound design, the goal is to explore and experiment. So we’ve dug around in the more obscure corners of Guitar Rig 7 Pro’s effects collection in search of weird and wonderful sounds.
First we chose Harmonic Synthesizer, which tracks the incoming audio signal and generates classic synthesizer sounds to match – effectively turning our guitar into a synth. Next comes Resochord: a bank of six comb filters that turn our single note into a rich, resonant chord. Finally, for added richness, we added the same chorus and delay we used in the previous example.
Here’s the result: An epic, synthetic-sounding chord that’s miles away from our source material.
3. Drum processing
Amp sims can be equally powerful when adding grit and character to drums. Let’s look at how to process a drum loop using Guitar Rig 7 Pro.
Here’s our starting loop. It’s a nice groovy beat, but it sounds very dry and lacks character.
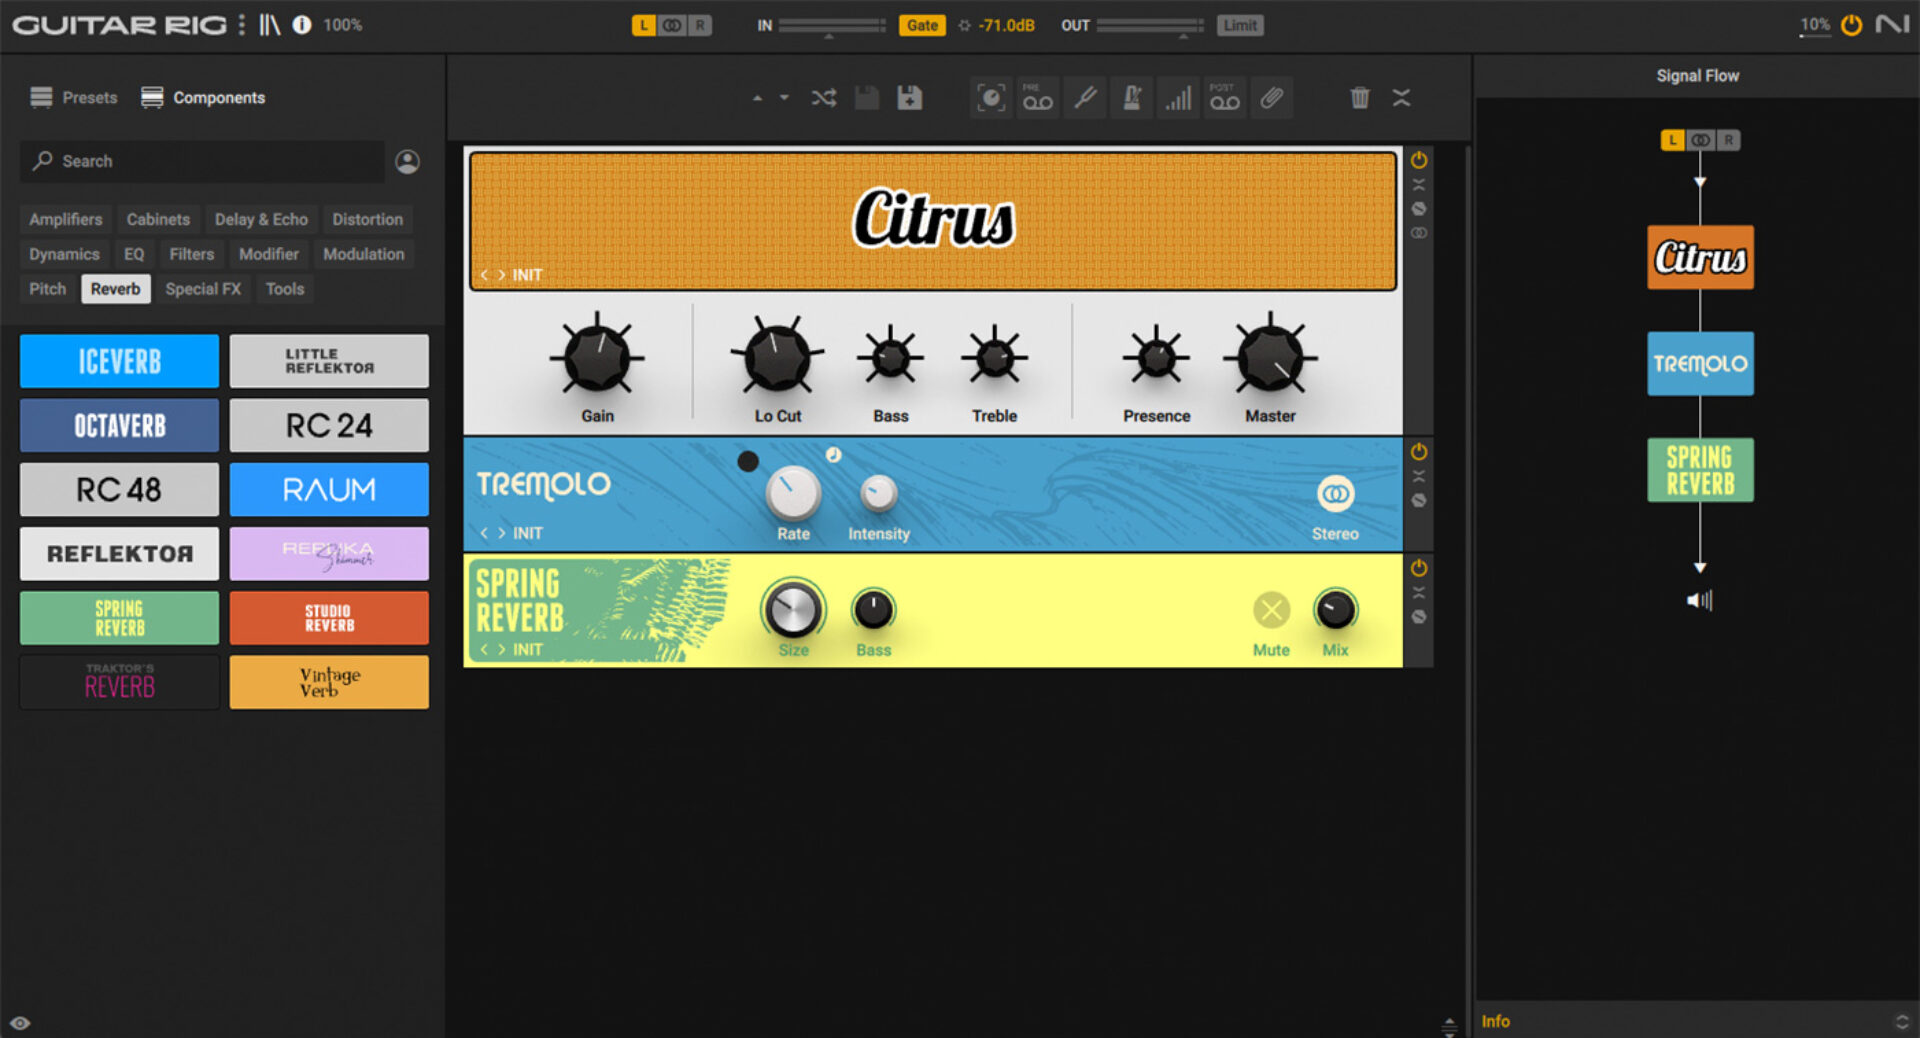
Let’s see if we can rough it up a little using our amp sim. As usual, our first step is to select an amp. We’ve chosen Citrus, modeled on a top-quality British amp from the ‘70s.
The drum loop should immediately sound different: grittier and warmer. Next, remove the cabinet that Guitar Rig Pro automatically added after the amp. (You can remove a component from your rack by right-clicking it and selecting Delete). This should return some brightness and punch to the sound, while retaining that gritty character. One of the beauties of working with amp sims is that we don’t have to play by the rules.
Next, let’s add some subtle effects. First, a Tremolo will subtly pan the signal between the left and right channels, adding movement. Switch the effect into Stereo mode to get this panning effect, and dial down the Intensity to keep it subtle. Next, add some dark, smoky reverb from the Spring Reverb component.
Finally, combine the processed signal with the original, dry drum loop to get a good balance of punch and personality. Here’s how it sounds.
4. Creative effects
Amp simulators can be used to add creative effects to your productions. By offering a full set of high-quality effects in a single interface, amp sims such as Guitar Rig 7 Pro make it easy to try out different effects and signal chains, tweak parameters, and get compelling results. Let’s use Guitar Rig 7 Pro to add space to a vocal.
Here’s our vocal. It sounds great, but it’s too dry.
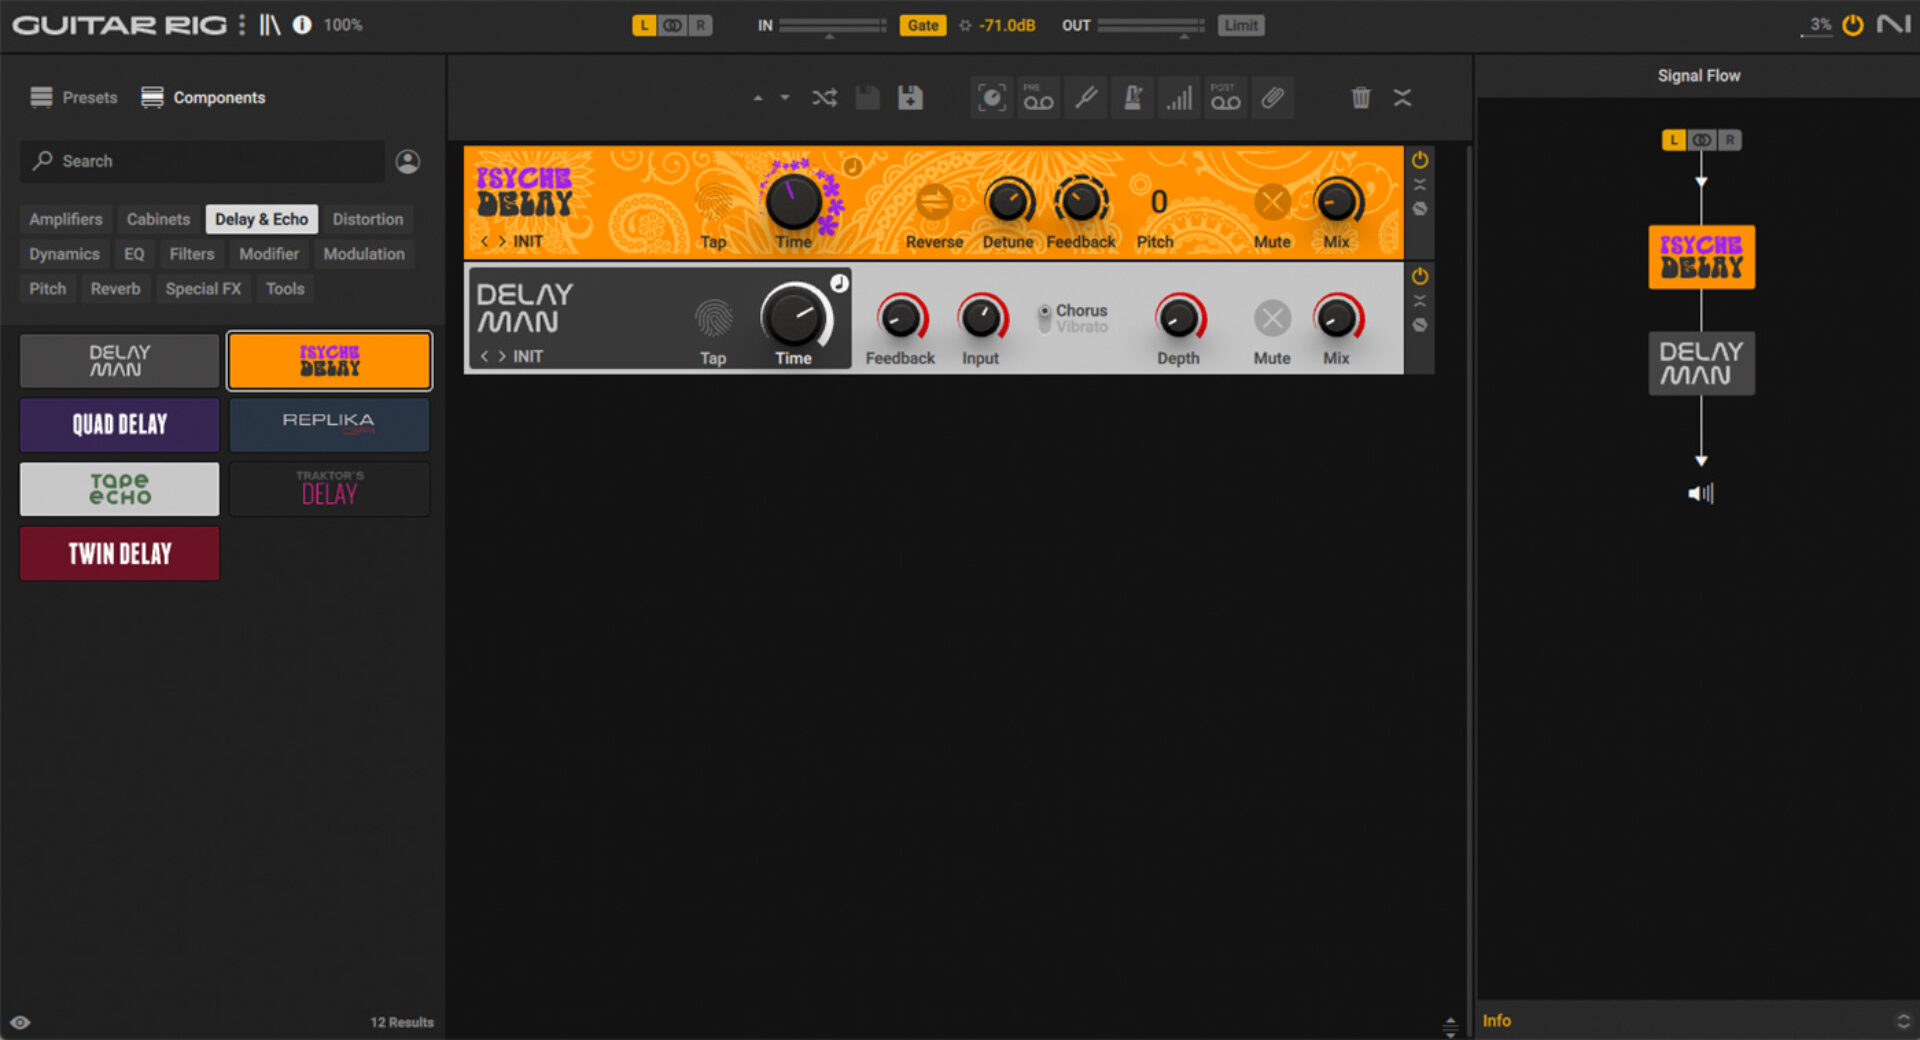
First, let’s add reverb—sort of. We can use a delay effect with a short Delay Time to create an unusual-sounding reverb effect. The Psych Delay component is great for this. This stereo delay effect can produce a range of atmospheric echoes reminiscent of the backwards tape sound of the 1960s. Set Time to short (around 60ms) and reduce feedback to around 30% for a tight, reverb-like response. Turn up the Detune knob a little for width. Finally, use the Mix knob to balance the wet and dry signals. Around 15% wet should work.
Let’s add some delay too. Our trusty Delay Man works great. Make sure to sync the Delay Time to the tempo of your project (by clicking on the note image) for a controlled, rhythmic repeat. Turn Mix way down to 5% wet for a subtle effect.
Here’s how it sounds.
5. Mixing
Amp sims can also be a quick, intuitive way to execute important mixing tasks such as EQing and compression. Let’s look at an example.

Here’s how the parts we’ve been working on are sounding together.
The drums and guitar are too strong in certain frequency zones, obscuring the vocal. Let’s use Guitar Rig 7 Pro to EQ these parts to create space for the voice.
First, the drums. The amp sim processing we added made our drums nice and gritty, but it also added a lot of high frequency content. There’s a raspiness around 3 kHz that’s clashing with the vocal. We can use a simple EQ component in Guitar Rig 7 Pro to fix this.
Guitar Rig offers a range of top-quality EQ effects to suit every situation. In this case we can use Equalizer Parametric, which allows for precise EQing across two frequency bands. Position one of the frequency bands at around 3 kHz and drag it down until the drums are sounding tamer. A cut of around -7 dB should do it.
Next, the guitar. Here, the low-mid frequencies are clashing with the body of the vocal. We can use Equalizer Shelving to attenuate all frequencies below a certain point. A cut of -8 dB from around 400 Hz down should do it.
Here’s how our parts sound with the EQing applied.
Start using amp sims in your music productions
In this article, we’ve looked in-depth at digital amp simulators. We’ve explained what they are and how to set them up in your DAW, and demonstrated how you can use your amp sim to sculpt sounds, from guitar and drum processing to creative effects and mixing. Now it’s time to start using amp sims in your music productions.
Guitar Rig 7 Pro is a near-limitless creative toolbox for guitarists and sound sculptors. Featuring dozens of top-quality modeled amps and effects with a slick and intuitive workflow, it’s the ideal way to go deeper with digital amp sims.
Related articles
-

How New Constellations turn emotion into sound with Massive X
Go inside the studio with New Constellations. Learn how they use Native Instruments gear, happy accidents, and lifelong friendship to…
-

Citizen Kain on building emotion and space with Replika
Citizen Kain explains how Replika helped shape the rhythm, tension, and emotion behind his debut Eversun Records single “Moments.”…
-

The organic precision behind Calcou’s Anjuna release featuring Reaktor
Calcou shares how Reaktor, Monark, and Super 8 shaped the creative balance and live energy behind their new duo EP,…
-

14 NKS instruments that will change the way you create music
Discover 14 NKS instruments to freshen up your workflow. From lo-fi tape synths to cinematic strings, shop the Native Instruments…
-

Parallelle on crafting living basslines with Reaktor and TRK-01
Parallelle share how Reaktor and TRK-01 shape the bass and warmth in 11th Avenue, balancing analog depth with modern control.
-

Where will your sound lead you? Explore the Native Instruments Summer Sale
Save 30% on instruments, effects, and sounds in our Summer Sale. Find the tools to keep your tracks moving and…
-

How Mr. Bill builds sonic worlds in Massive X
Mr. Bill explains how Massive X and instinctive sound design shaped the storytelling process behind his new downtempo album, Mr.
-

How Father Funk builds low-end energy with Kontakt instruments
Father Funk breaks down how bass instruments in Kontakt power the low-end muscle and live feel behind his new record,…