


Do you know your mix bus from your aux and your sends from your returns? When it comes to audio routing, the terminology can quickly get confusing. But behind these dry terms lies a powerful creative tool. Clever use of audio routing in a DAW can help keep your projects organized, improve your workflow, and create interesting sonic effects that can’t be achieved through other means.
So how does audio routing work? In this article, we’ll cover all the basics. We’ll explore the fundamental concepts and explain the terms you need to know. We’ll also demonstrate some creative uses of DAW signal routing, from subtle sonic polishing to daring sound design.
Jump to these sections:
- What are the basics of audio routing?
- What is routing in a DAW?
- What is a bus?
- What is a group bus?
- What is an aux channel?
- What are sends and returns?
- Start harnessing the power of audio routing in your music
Follow along with this tutorial using Komplete Start, a free collection of professional audio tools including instruments, sounds, effects, and more.
What are the basics of audio routing?
Audio routing refers to the flow of signal in your audio setup, whether it’s a hardware rig or production software like a DAW.
In any musical context, some kind of “signal” (whether that’s sound waves, electrical signal, or digital ones and zeroes) has to travel from one place to another.
When you play electric guitar, the signal begins at the strings of your axe, where it’s captured by the pickups on the guitar’s body. This signal (which is now electrical voltage) might then be routed to effects pedals that alter the signal. It then travels to an amplifier before being pushed into the air.
In electronic music-making setups, signal flow can get more complicated. You might think of the messy patchbays found in a well-equipped studio, or the forest of cables sticking out of a modular synth. But audio routing isn’t only relevant in the hardware realm. It’s just as crucial in software production, where it’s easy to set up smart and complex DAW signal routings.
What is routing in a DAW?
Audio routing in a DAW refers to the path that a signal takes from when it is generated to when you hear it. DAW signal routing typically starts with a sound source such as an audio file or synthesizer. Eventually it reaches the output of your DAW, where it can be sent to your speakers or headphones, or bounced to an audio file for later listening.
A lot of things can happen in between these two points. The signal might be routed through effects that transform it in creative ways. It might be grouped together with other signals, or duplicated and sent down multiple pathways.
Modern DAWs allow for almost limitless audio routing configurations. Indeed, the power to manage complex signal flows is one of the strengths of software production. Learning to master this complexity will broaden the scope of your music.
To better understand audio routing in a DAW, we need to learn some key terms, starting with “bus.”
What is a bus?
A bus, or mix bus, is a channel that takes signal from multiple channels and bundles them together into one signal.

Pretty much all DAW projects have at least one bus: the master bus. This is the final channel that every other channel in your project feeds into before being sent to the output of your audio interface (or rendered to an audio file).
If you make changes to this one bus – like adjusting the level – these changes will affect all of the sounds in your project, because they’re all routed through the master bus.

It’s possible to create other mix buses in your project beyond the master bus. By using this basic principle – multiple signals becoming one signal – buses can help you keep organized, improve workflow, and shape sound creatively.
Mix buses can be used in different ways, with different terms used to describe them. We’ll get into the two main kinds of bus below.
Be aware that the names of buses will vary depending on the DAW you use. If you use Ableton Live you’ll see terms like Group and Return Track. Elsewhere you might see Track Stack (Logic Pro), Folder Track (Pro Tools), and other terms.
The way these buses work inside the software might also be subtly different, although the underlying principle (multiple signals becoming one signal) is the same.
Below, we’ll demonstrate buses in Ableton Live. If you use a different DAW, be sure to check its manual to get the details straight.
What is a group bus?
A group, group bus, or subgroup, is a particular kind of bus that is used to consolidate signals inside your DAW. The routing for a group bus is as follows: individual channels deliver their signal to the group, which bundles them together and passes them further along (usually to the master bus).

You may have noticed that the master bus, as described above, is a kind of group bus too. But the master bus is always the final stage in your DAW’s audio routing. The group bus we’re describing here sits between individual channels (which generate sound) and the master bus. That’s why they’re sometimes called subgroups. (In the signal flow, they’re subservient to the master group).
Why use a group bus?
By bundling signals together, a group bus helps consolidate the material in your project. This makes buses handy for keeping your projects organized.
Completed DAW projects often feature dozens or hundreds of channels. There might be 10-20 channels for the drums alone. What if you decide all of the drums need to be 2 dB quieter? You could spend ages turning down each channel individually. Or you could route all of your drums to a group bus – let’s call it the drum bus – and turn this bus down 2 dB.
A well-organized project might feature a group bus for each type of material: drums, synths, bass, and so on. This makes it quick to dive in and make changes across the project.
In many DAWs, buses also help to keep the visual interface tidy. In Ableton Live, for example, you can minimize a Group so that only the bus is visible, not the individual channels that feed into it. This makes it much easier to navigate a busy project.
Creative uses of group buses
The final reason for using a group bus might be the most powerful. With multiple channels bundled together, you can quickly apply effects and other processing to all of the channels together.
Let’s say we want to shape a transition moment in a track by applying filtering to the drums. As a new section approaches, we want to take the low frequencies out of the kick drum and remove higher frequencies from the hi hats.
We could apply individual EQ automation to each of the drum channels. Or we could apply the filters to the group bus and quickly dial in the effect we want. Much quicker.
Using effects on group buses isn’t just about saving time. Some effects actually behave differently when applied to a group bus rather than to individual channels.
For this reason, input-dependent effects like saturation and compression are often applied to group buses to get certain sonic results.
Sometimes this is subtle, like the gentle compression that’s applied to a drum bus to “glue” the parts together. Sometimes it’s bolder.
In this example, we added an instance of Driver to the drum bus. This plugin combines saturation, filtering, and an envelope follower to create unique, bold effects that are closely responsive to the input signal. It creates a unique texture that we can only get by processing the whole group bus together.
What is an aux channel?
An auxiliary channel – also known as an aux, return channel, and by various other names – is another kind of bus commonly used in audio production.
Like a group bus, an aux channel gathers signal from individual channels and routes it somewhere else – probably to the master bus.
So what’s different about an aux channel? Where a group bus receives the output signal from multiple channels, an aux channel receives a copy of this signal.

In a group bus arrangement, each channel has its output plugged directly into the group bus. With an aux channel, a separate output (called a send) is used to route signal from the source channel to the aux. The channel’s main output is still free to go somewhere else – perhaps to a group bus, or the master bus.
In an aux channel set-up, we end up with two instances of the signal. These two versions can be processed differently and blended together to get creative results.
Why use an aux channel?
“Auxiliary” means giving extra help or support. This helps us to understand the role played by this kind of bus.
A group bus is mainly a tool for organizing and simplifying: it consolidates the audio from the incoming channels in one place. An aux channel, on the other hand, creates a duplicate signal that supports the main action.
Effects such as reverb, delay, and compression can be added to this duplicate signal, which is then blended back in with the original signal further down the chain (perhaps in the master bus).
If you’re familiar with using effects as an insert directly on a channel or group bus, then aux channels present a new way of working. When using an effect as an insert, you typically use a dry/wet control to adjust the balance between the dry (unprocessed) signal and the affected signal. The dry and wet signals are immediately blended together in the same channel or group bus.
When you use an effect on an aux channel, it should usually be set at 100% wet. The affected (wet) signal can be heard on the aux channel, and the unaffected (dry) signal can be heard on the original channel or group bus. The two signals are kept separate, and can be manipulated separately.

There are several benefits to this way of working.
For one thing, it’s more efficient. If you want to add reverb to multiple instruments in your project without using an aux, you’ll need to apply a reverb plug-in to every single channel. In a big project, this could mean adding dozens of separate reverb plug-ins.
With an aux, you can send all of the desired instruments to a single reverb-plugin, saving time and CPU.
Using effects on an aux channel also gives you more control. You can apply multiple effects to your aux to shape the sound, without altering the dry signal from your source channels.
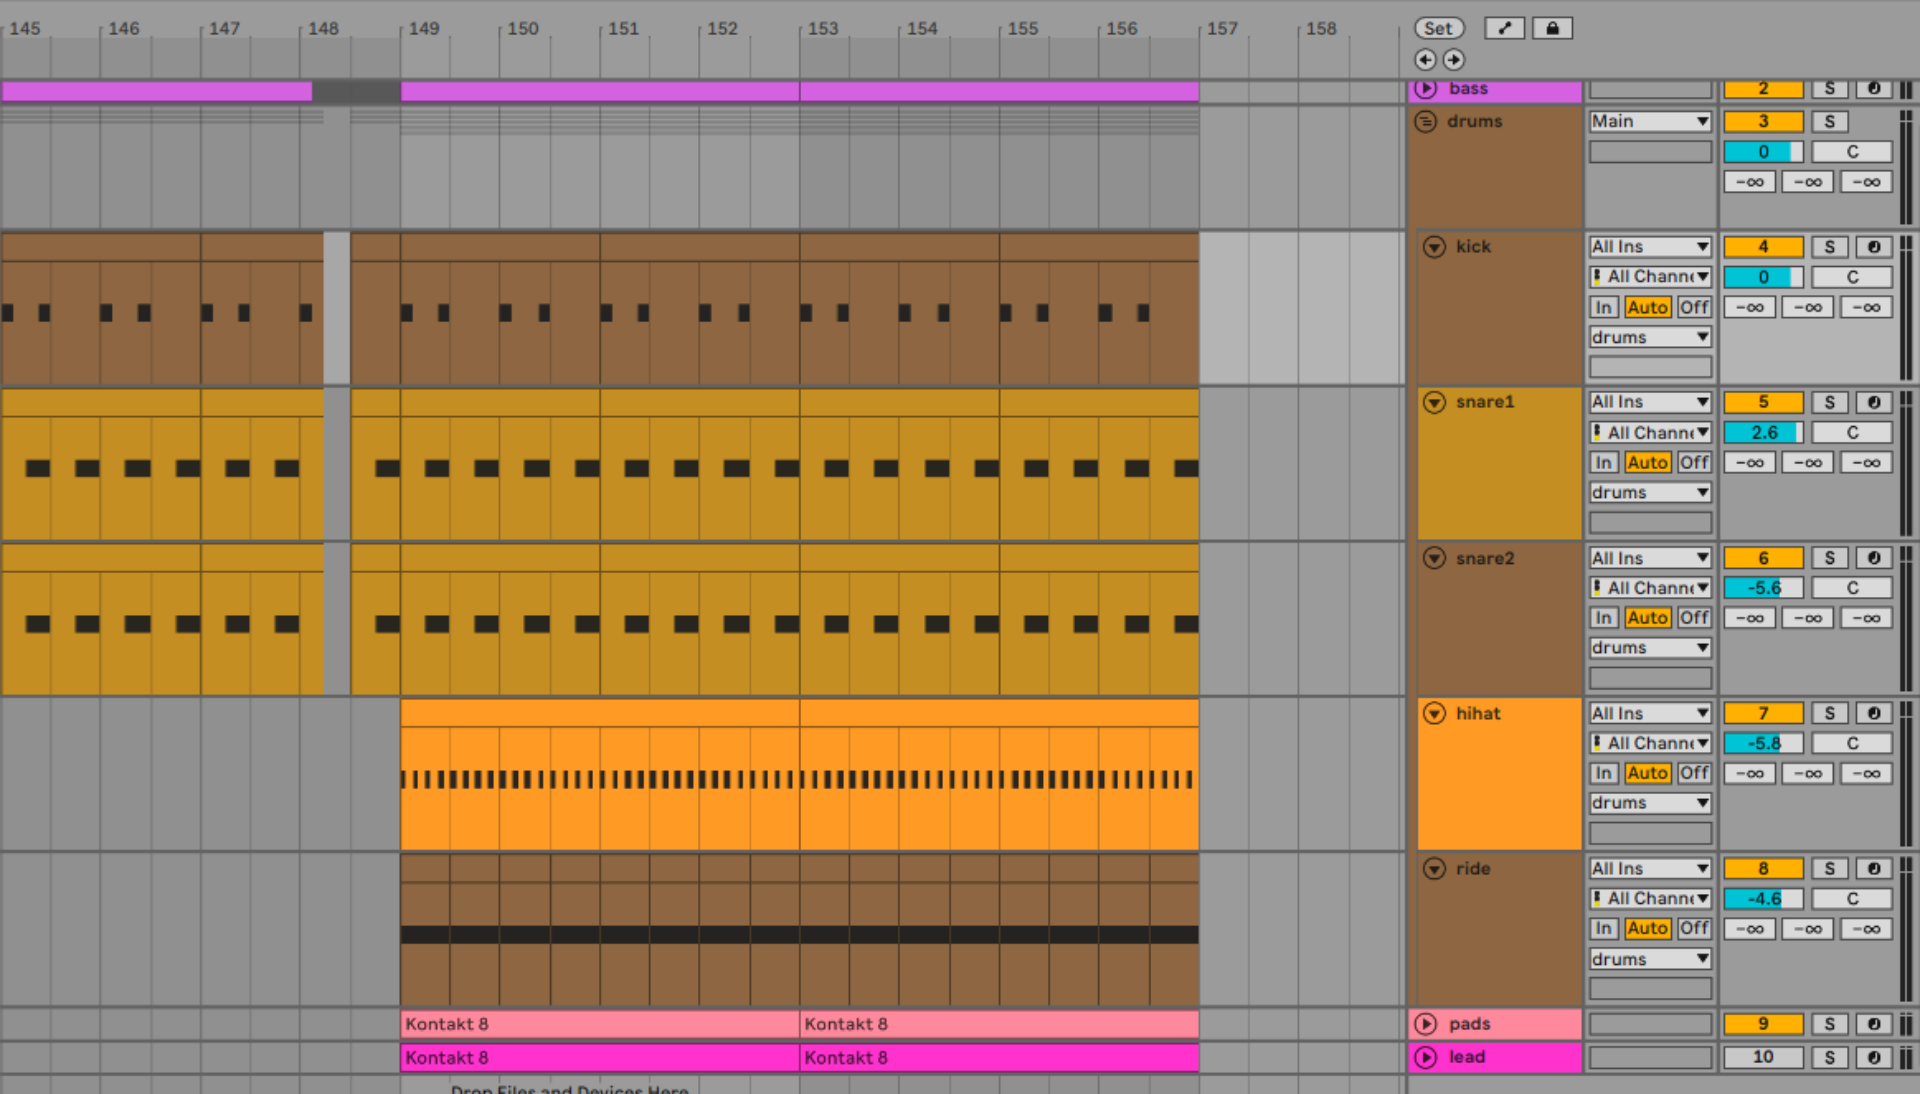
You can also decide exactly how much signal from each source channel goes to the aux, by adjusting the send amounts on the source channels. In this image, the send controls are the smaller boxes showing number values.

By adjusting these controls per channel, you can create a complex balance of elements that might be different from the mix going to the master bus from the original channels. When using a reverb on an aux, for example, you can make some elements sound wetter (and thus more distant in the mix) by sending more signal to the aux from those channels.
Creative uses of aux channels
Aux channels are behind some of the most iconic sounds in electronic production.
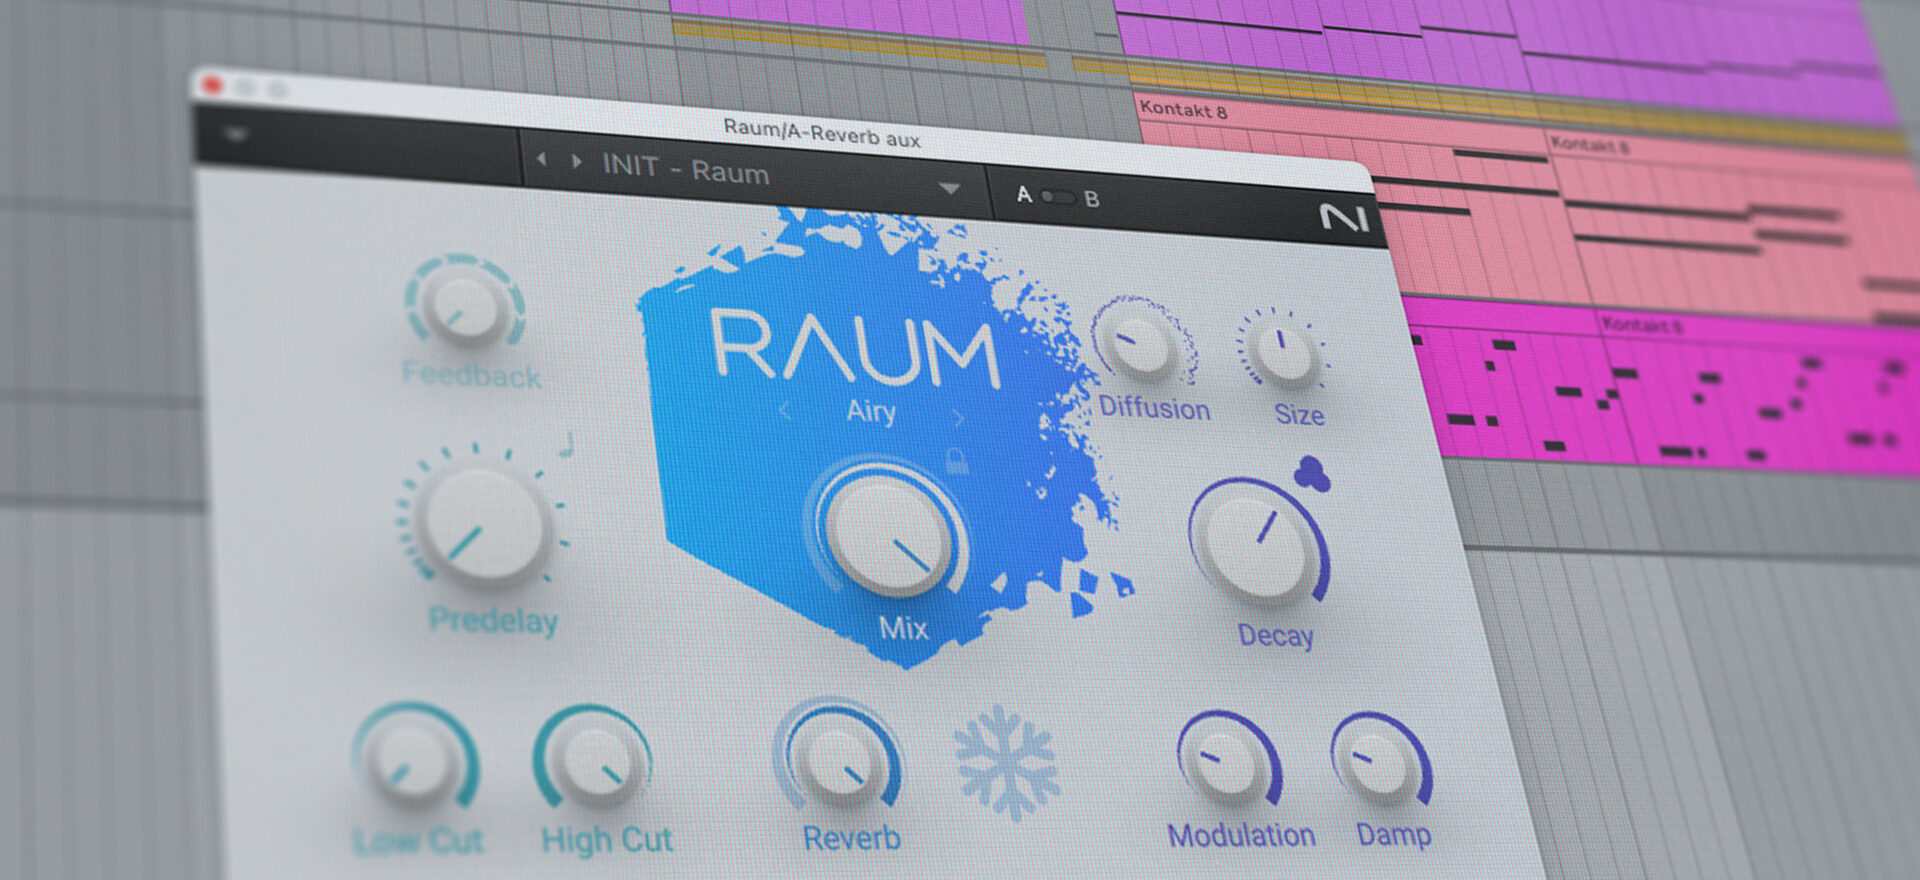
One such sound is the echo heard in dub music. Jamaican dub producers would create these effects by setting up effects chains on the aux channels on their mixing desk. They would then play back the stems of a reggae instrumental and adjust the send amounts in real-time to add a swirling cloud of effects.
This method is easy to set up in a DAW. Here are our drums from earlier with a couple of dub-style effects added.
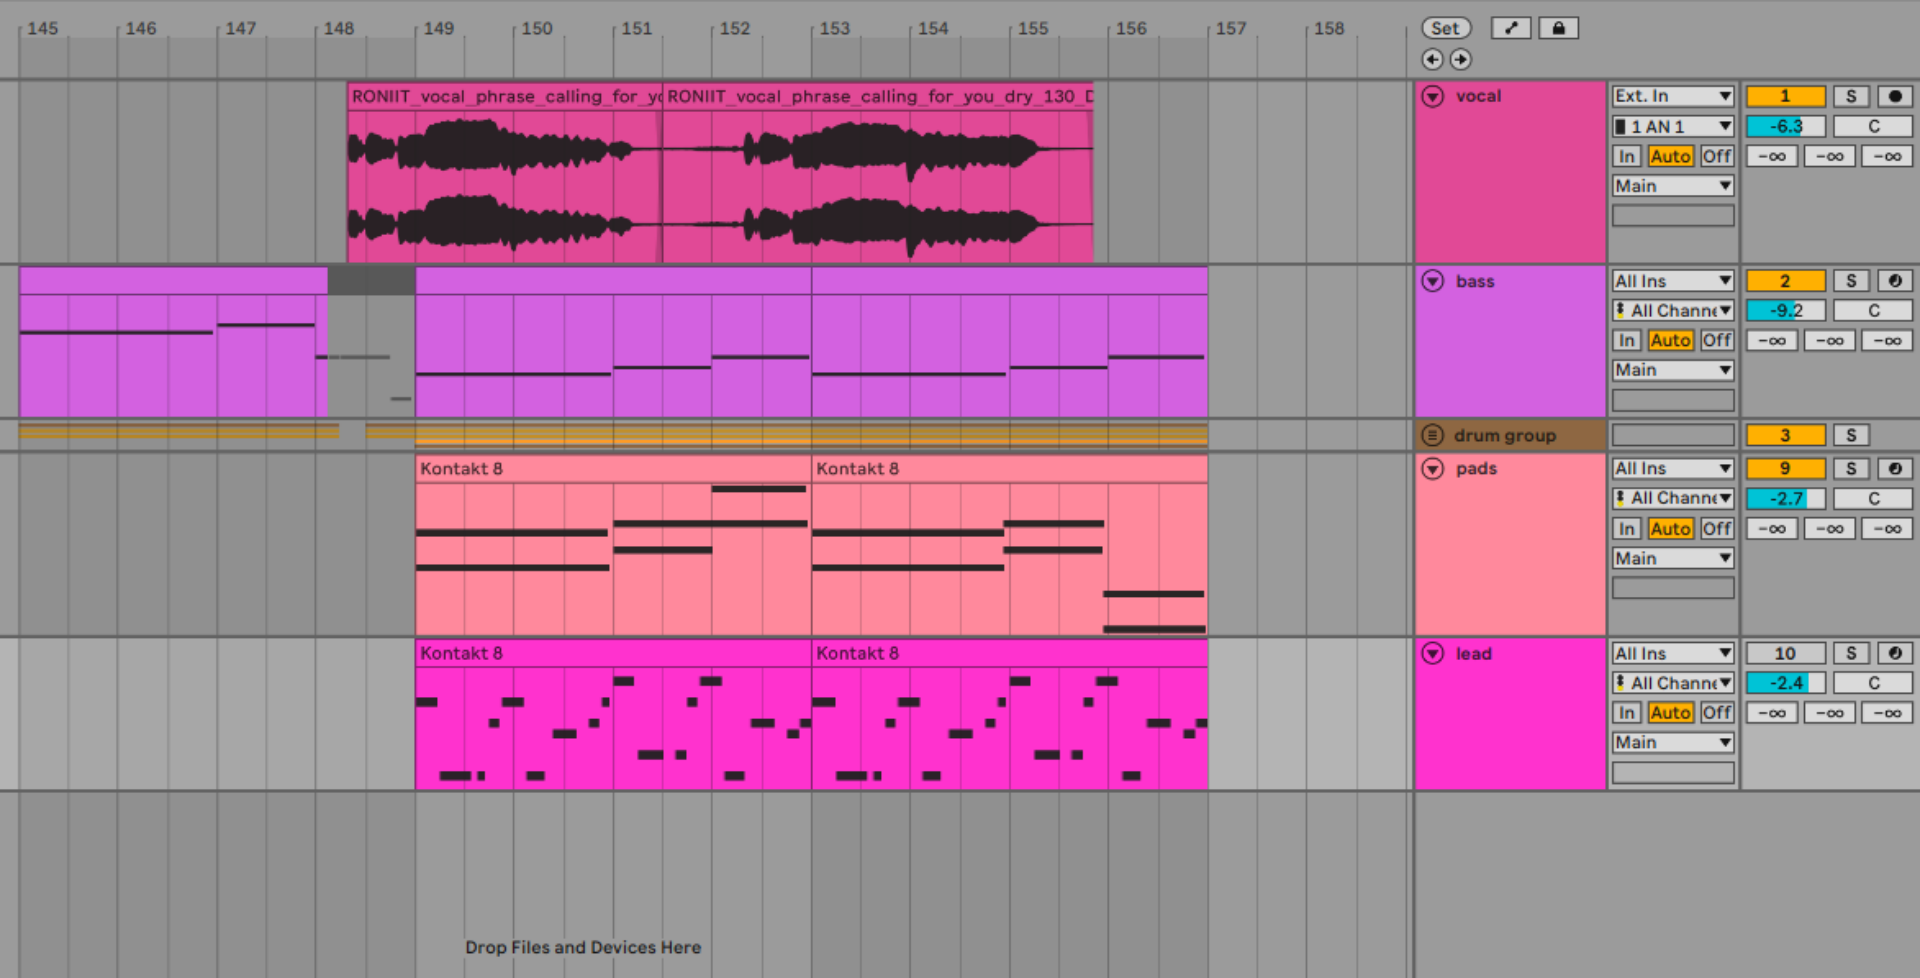
Another iconic sound made possible by aux channels is “New York-style” parallel compression. This involves sending the signal from a drum bus to an aux channel with an extreme compression effect. By combining this compressed signal with the dry drum bus signal, you can get a loud, energetic drum sound that still has plenty of punch.
We got a bit creative with our New York-style aux processing here. As well as compression, we added saturation and flange to create a bold effect that, when layered with the original, radically changes the character of the drums
What are sends and returns in audio routing?
Send and return are terms that relate to the use of aux channels. To understand exactly what they mean, think of the signal flow involved in using an aux channel.
First, you need to “send” a duplicated version of the signal from the source channel to a different place in your DAW – the aux channel. This signal then needs to be “returned” to the audio flow, typically to the master bus (though it might also be routed to a group bus or another aux channel before winding up at the master bus).
Using an aux channel in this way is sometimes called a send/return loop. Confusingly, the words “send” and “return” are also sometimes used interchangeably with “aux.”
In Ableton Live, “Send” is the name given to the control on each individual channel (or group bus) that decides how much signal is sent to an aux channel. The sends are the three smaller boxes in this image.
“Return track,” meanwhile, is used to refer to the aux channels themselves, since in Ableton Live these channels also return audio to the master bus.
Start harnessing the power of audio routing in your music
In this article, we’ve taken a detailed look at audio routing. We explained the basic concepts behind this crucial aspect of production, and defined key terms including bus, aux, send, and return. Now you’re familiar with the creative uses of audio routing – from subtle sound polishing to bold sound design – it’s time to start harnessing buses in your own productions.
Komplete Start is a comprehensive kit with everything you need to create great music. Whether it’s shaping a group bus with Ozone 11 EQ or adding dub-style reverb with Raum, Komplete Start has the perfect tools for exploring audio routing.
Related articles
-

Inside the evolution of orchestral sampling: an interview with ProjectSAM
Discover how ProjectSAM’s Lineage Series uses NKS and smart features to change orchestral sampling. Plus, save on instruments in our…
-

How New Constellations turn emotion into sound with Massive X
Go inside the studio with New Constellations. Learn how they use Native Instruments gear, happy accidents, and lifelong friendship to…
-

Citizen Kain on building emotion and space with Replika
Citizen Kain explains how Replika helped shape the rhythm, tension, and emotion behind his debut Eversun Records single “Moments.”…
-

The organic precision behind Calcou’s Anjuna release featuring Reaktor
Calcou shares how Reaktor, Monark, and Super 8 shaped the creative balance and live energy behind their new duo EP,…
-

14 NKS instruments that will change the way you create music
Discover 14 NKS instruments to freshen up your workflow. From lo-fi tape synths to cinematic strings, shop the Native Instruments…
-

Parallelle on crafting living basslines with Reaktor and TRK-01
Parallelle share how Reaktor and TRK-01 shape the bass and warmth in 11th Avenue, balancing analog depth with modern control.
-

Where will your sound lead you? Explore the Native Instruments Summer Sale
Save 30% on instruments, effects, and sounds in our Summer Sale. Find the tools to keep your tracks moving and…
-

How Mr. Bill builds sonic worlds in Massive X
Mr. Bill explains how Massive X and instinctive sound design shaped the storytelling process behind his new downtempo album, Mr.