


Hardstyle music is characterized by its energetic beats, distorted sounds, and driving basslines, often incorporating elements of trance and hard trance.
In this tutorial, explore the world of hardstyle music and learn how to make hardstyle music that incorporates sound design, processing and arrangement techniques, as well as mastering tips to help you craft powerful and dynamic drop that can sound like this:
Jump to these sections:
In this walkthrough we’re going to use Native Instruments Massive X, drum samples from Battery 4 in Komplete Kontrol, Raum (available free as part of Komplete Start), and Crush Pack plus iZotope Neutron 4 and Ozone 11 to create a hardstyle drop from scratch.
What is hardstyle music?
Hardstyle is a heavy, uptempo form of dance music that evolved from Dutch hardcore and hard trance in the early 20th century. The genre is notable for its distorted and harmonically rich kick drum sounds, harsh synths, and stadium-style aesthetics.
Contemporary hardstyle often takes influences from commercial styles of music such as pop, RnB, and trap, and employs ‘screech’ kicks inspired by the harsh ‘rawstyle’ subgenre.
Hardstyle music typically ranges from 150 to 160 beats per minute (BPM). However, BPM can vary slightly depending on the specific subgenre and the preferences of individual artists.
Let’s walk through one of the essential parts of hardstyle music: the drop. A hardstyle drop is a climactic moment in a hardstyle music track characterized by a sudden and intense shift in rhythm, energy, and melody. It typically features distorted kicks, frenetic synths, and aggressive basslines, creating a high-energy atmosphere for listeners to dance to.
How to make a hardstyle drop
1. Create a hardstyle kick drum
Creating a hardstyle kick drum is an involved process in itself, so to begin this project we’ll create a distorted kick that we can resample. This means that when we’ve made our kick we’ll turn it into an audio file that we can load into a sampler and process further.
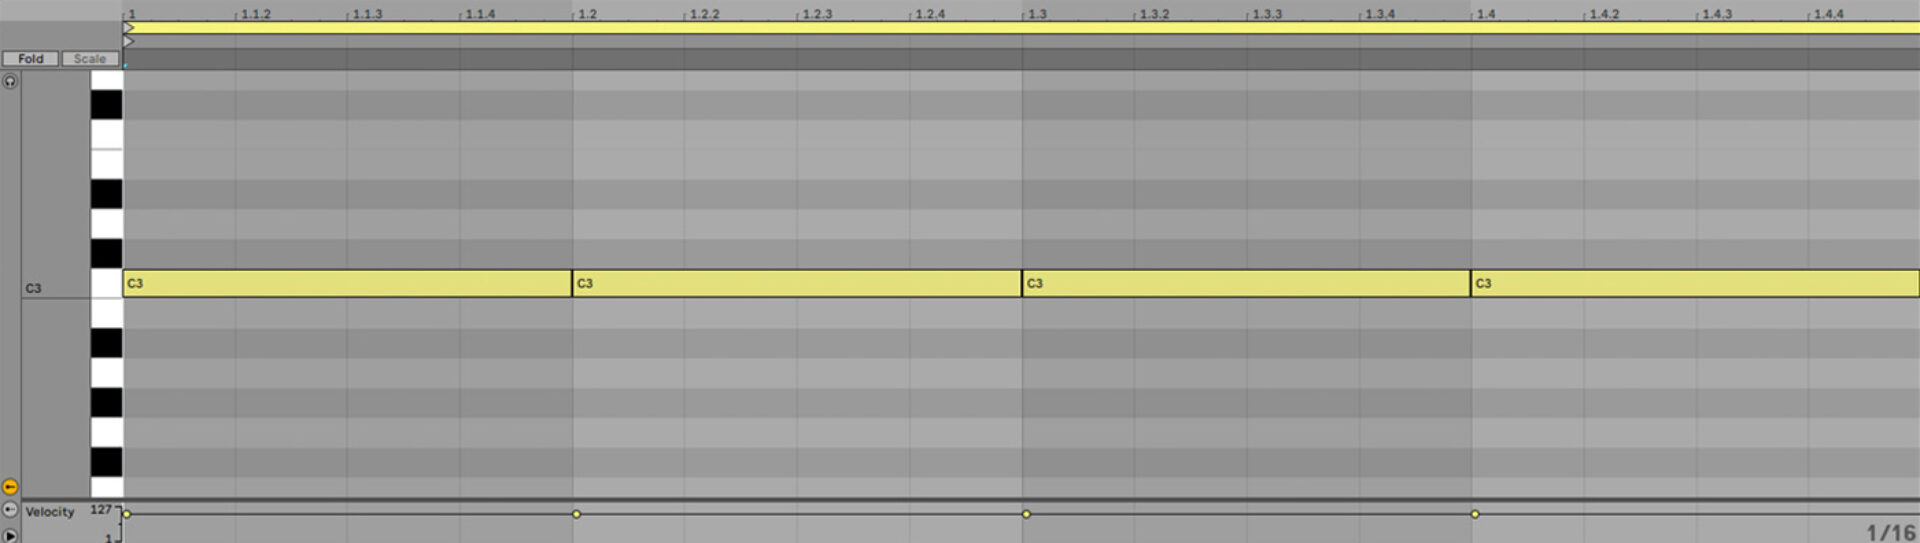
Start by setting your audio editing software’s project tempo to 160 BPM, a suitably high tempo for a contemporary hardstyle track.

Create a new MIDI track, and add an instance of Komplete Kontrol. In Komplete Kontrol click the One-shot tab, and enter ‘Kick 909X 2’ into the text search field. This will bring up the kick drum sample in Battery 4’s library.

Double-click the Kick 909X 2 to load it up, and you can now play back the sample. Sequence it to play C3 on every beat of a bar. We’ll use velocity values of 100 for everything in this walkthrough unless otherwise specified.
A common hardstyle technique is to use a series of distortion and equaliser effects in series to shape the sound and bring out its harmonics. We’re going to use Native Instruments Crush Pack, specifically the Bite effect as our main source of distortion, and you can use your audio editing software’s built-in EQ.
First we’ll add a distortion effect. Add an instance of Dirt, and load the Synth + Keys > Devil Fish preset. Set Drive A to 68.5%. This gives us a big, distorted hardcore techno kick.

Now add an EQ effect before the Dirt effect. This means the tone of the kick will be affected before it hits the distortion, which makes a big difference to its timbre. Add a -13.3 dB cut at 50.5 Hz, a -11.5 dB cut at 170 Hz, and a 11.8 dB boost at 383 Hz. This emphasizes the mid-range over the low-end.

Now add another Bite, and set this instance to the Synth + Keys > Squeek preset. Set Drive A to 9.5, Amount A to 100%, and Drive B to 32.5%.
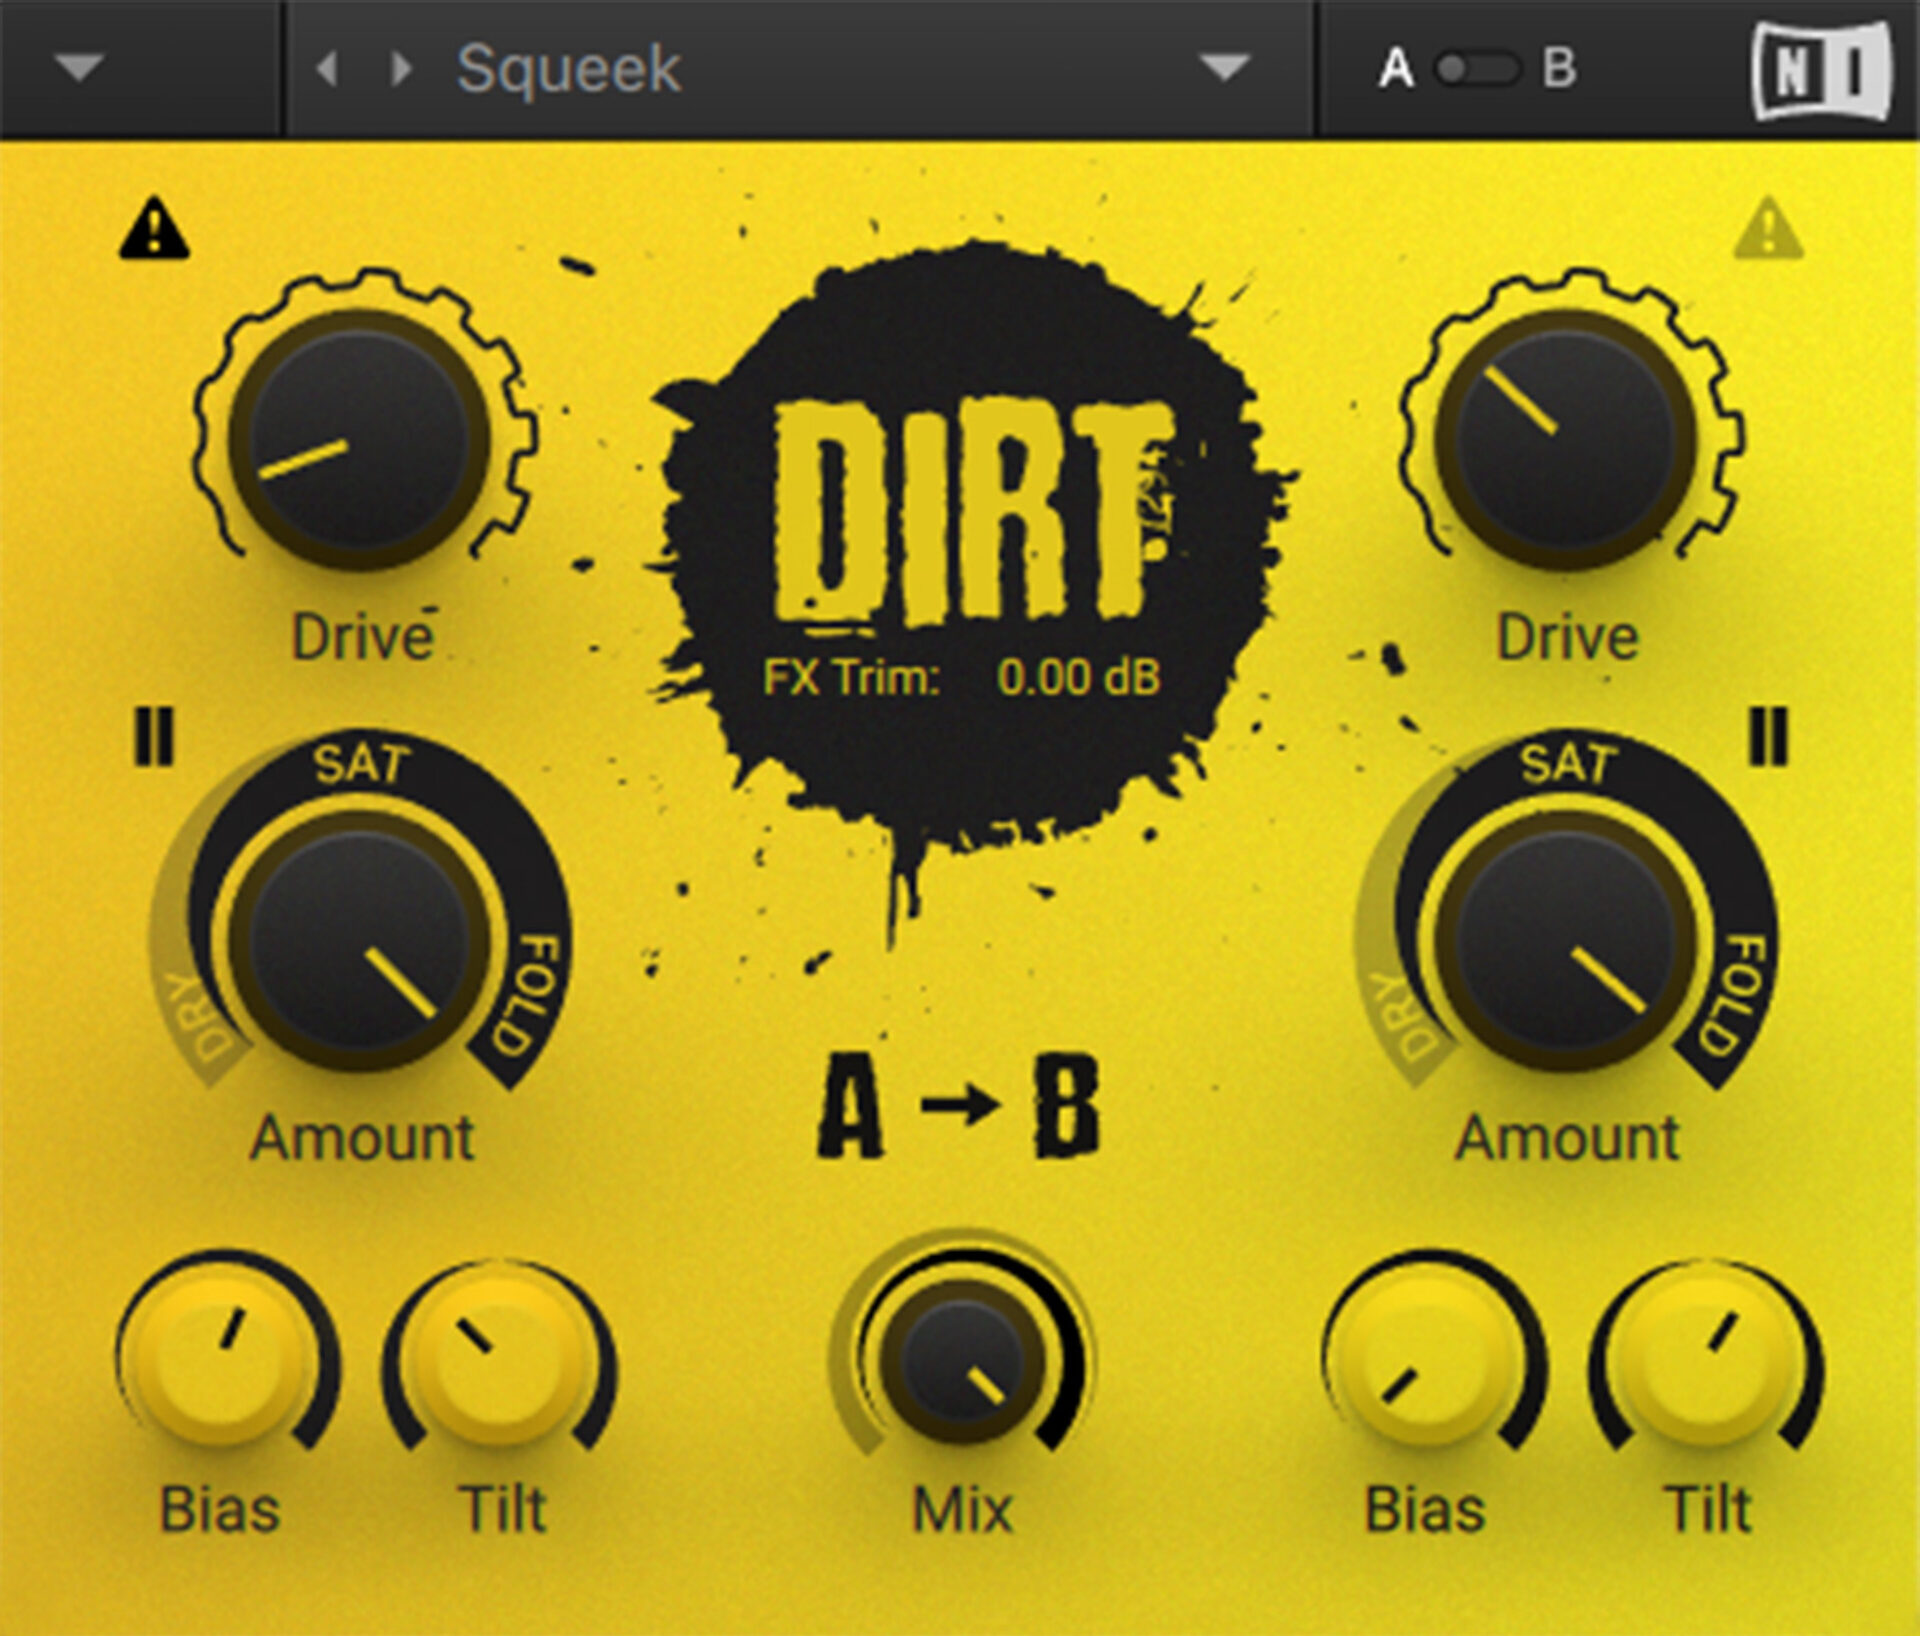
Now add another EQ before the second instance of dirt, this time boosting 4.59 dB at 49.5 Hz, 5.83 dB at 979 Hz with a Q of 0.22, and 10.5dB at 1.86k Hz. This again emphasises the mids, but brings some low-end back in.

2. Resample the kick drum
Now we have a great source sound for a distorted hardstyle kick. Now export the audio from your DAW, or in Ableton Live you can freeze and flatten the track as we’ve done here.
Drag the kick drum audio into the sampler of your choice. We’re using Live’s Simpler instrument, which defaults to an output level of -12 dB. This is worth noting because we’re going to be adding further distortion, and the volume level of the sample will affect how this sounds. You can delete the original kick track when you’re done.

Set the sampler to play from the final kick of the sample. Set the sampler’s amplitude envelope to a Sustain of -14 dB with a Decay of 76.1 milliseconds, and a Release of 173 ms.

Create a four-bar MIDI clip, and sequence the kick drum to play on every beat, with triplet 8th notes on the last beat of the second bar, and 8th notes at the end of the fourth bar. We’re using pitch values of C3 and velocity values of 120.
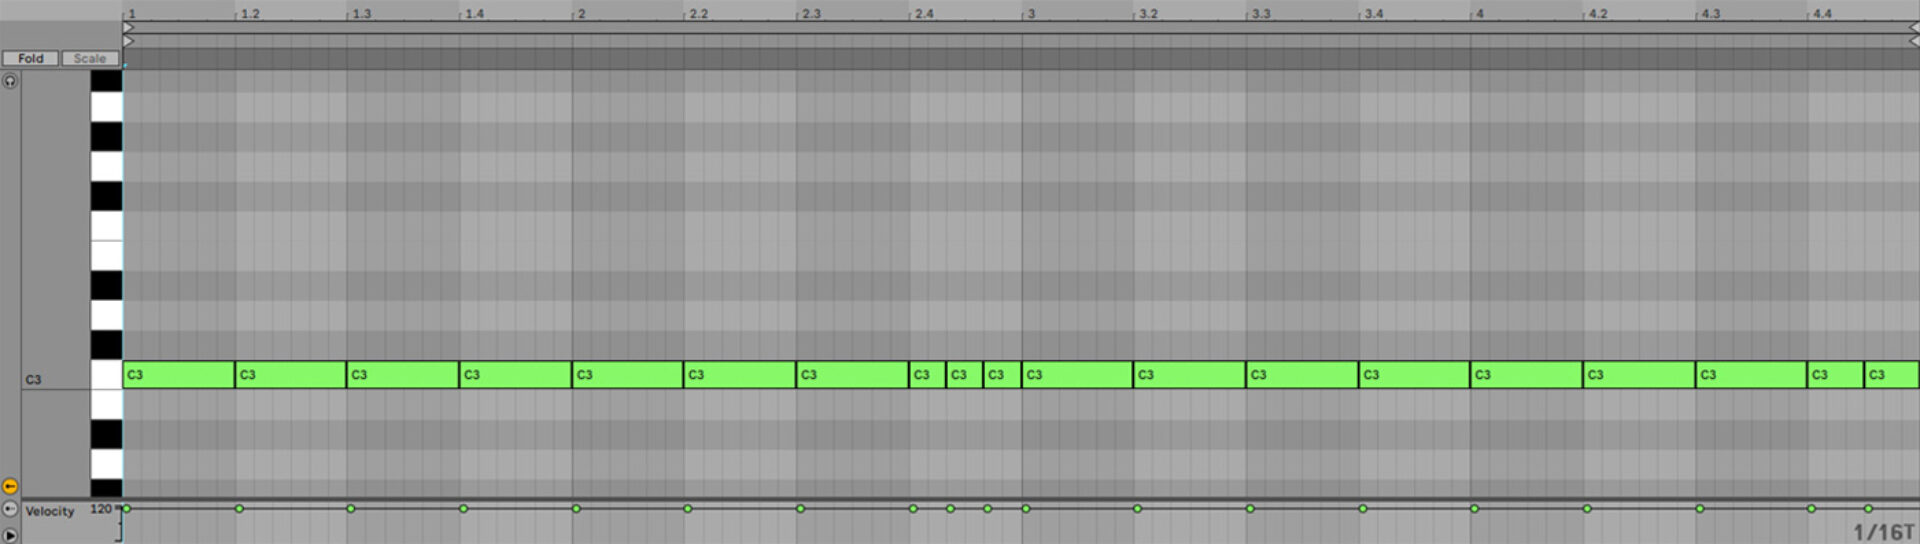
Now add a Bite bitcrusher effect on the sampler track, and select the Re-Sampled > Low Res preset. Set the Rate to 9.86 kHz, the Bits to 6, the Crunch to 51%, the Saturation to 8dB, and the Mix to 66.5%.
Please note that this extreme distortion causes a high pitched sound when the final kick finishes playing. This is something that you’d fade out in the in version of the song, but because we want to add more processing before this effect, we’re going to keep everything “live” rather than bounce the track out again.

Again, we can shape the sound by adding an EQ before this distortion effect. Add an EQ, and boost 4.09 dB at 1.11 kHz with a Q of 0.13. This brightens the sound a touch.

Now add an instance of iZotope Neutron 4 Transient Shaper after the Bite effect. Set the multiband splits to 200Hz and 6kHz, then set the Sustain of the middle band to -6.2 and the Sustain of the high band to +12.8. This also helps bring out the top-end of the sound.

Let’s add one more EQ to shape the sound. This time boost by 1.43 dB at 47.4 Hz, 2,14 dB at 250 Hz, and cut by -8.06 dB at 861 Hz.

3. Add a supplementary kick drum
Our resampled kick has lots of harmonics, but all this distortion has reduced its punch. So, let’s add another kick drum to reintroduce it. On a new MIDI track add an instance of Komplete Kontrol, then select the One-shot tab, and this time search for ‘Kick 909 26’. Load up this sample.

Set this track to -15.8 dB, and the resampled kick track to -1.2 dB to balance them.

Sequence this kick to play the sample pattern as before, again with a velocity of 120, but this time with a pitch of C#3, which helps it fit with the pitch of the resampled kick drum.

Let’s add some distortion to this kick too. Add an instance of Dirt, set it to the Drums > Trapped Kick preset.

Now add a compressor to the resampled kick track, setting the sidechain input source to the supplementary kick. Here we’ve used a Threshold of -24 dB to get a pumping sound.

4. Make a screech
To get an authentic contemporary hardstyle sound we need a rawstyle screech. Massive X’s factory library includes a preset that’s an ideal basis for this element in the form of Scream Snare. Add a new MIDI track, load Massive X up on that track, then open the browser, search for ‘Scream Snare’, and load the preset.

Set this track to -10.9 dB.

Duplicate the MIDI over from the supplementary kick track, but this time transpose it to A4, which makes it sound in tune with the other elements.

Now add an instance of Dirt and select the Acid preset.

5. Add a saw synth
Now we’re going to add a supersaw-style synth to keep up the energy level between each beat. Add another MIDI track, load up Massive X, and this time load the April Dawn preset.

Turn the Reverb macro down.

Set this track to -10.6 dB.

Duplicate the MIDI over from the screech track.

High-pass filter the sound at 235 Hz.

Add an instance of Dirt, again selecting the Acid preset.

Now add an instance of Bite, selecting the Crushed > Gate 9 preset.

Now add Raum, and select the Large > Dreamy Synth preset.

To make this sound pump, add a compressor, again set the sidechain input to the supplementary kick track, and set the Threshold to -38.9 dB.

6. Create a fill
Let’s make a drum fill that will help us make our drop arrangement flow smoothly. First add a new MIDI track with an instance of Massive X on it, and load up the Clap Master preset.

Set this track to -17.7 dB.

Program this pattern with a triplet roll at the end, using a C3 and velocity values of 127.

Add an EQ by boost by 15 dB at 267 Hz and 696 Hz.

High-pass the clap at 495 Hz.

Add an instance of Dirt, setting Drive A to 97.5% and Drive B to 27%.

Now compress with the sidechain routed to the kick, this time using a Threshold of -15.7 dB.

Add another MIDI track. Load Komplete Kontrol, select the One-shot tab, and load up the Snare Pendulum 1 sample.

Set this track to -22.3 dB.

Duplicate the MIDI over from the clap track.

Add an instance of Dirt, setting it to the Trapped Kick preset.

Add an EQ, boosting by 6.07 dB at 1.21 kHz.

High-pass the snare at 255 Hz.

Add Raum and select the Creative > Caramel Guitar preset.

Now sidechain compress with the kick as the trigger, again using a Threshold of -15.7 dB.

7. Arrange the drop
Before we make the drop, let’s make a more musical part for the saw synth to play. Copy this part using velocity values of 120, and noting that we’re using a triplet grid.

Here’s the drop arrangement.

You’ll hear that the saw synth filters in during the breakdown. A low-pass filter is used for this, sweeping in from 280 Hz to 16.6 kHz over the breakdown. The saw synth also reverts to the breakdown pattern eight bars after the drop to keep things interesting.

8. Master your track
Add an instance of Ozone 11 to the master bus, and click the Assistant View button. Ozone 11 will ask you to play the track from its loudest point. Play if from bar 9.

The plugin will automatically create settings ideal for this track.

Start making energetic hardstyle music
Here we’ve seen how you can make your own hardstyle drop from scratch. If you’d like to learn more, take a look at How to make electronic music: the ultimate guide, 5 free Kontakt instruments for electronic music production and Music production 101: How to start producing music.
Related articles
-

Inside the evolution of orchestral sampling: an interview with ProjectSAM
Discover how ProjectSAM’s Lineage Series uses NKS and smart features to change orchestral sampling. Plus, save on instruments in our…
-

How New Constellations turn emotion into sound with Massive X
Go inside the studio with New Constellations. Learn how they use Native Instruments gear, happy accidents, and lifelong friendship to…
-

Citizen Kain on building emotion and space with Replika
Citizen Kain explains how Replika helped shape the rhythm, tension, and emotion behind his debut Eversun Records single “Moments.”…
-

The organic precision behind Calcou’s Anjuna release featuring Reaktor
Calcou shares how Reaktor, Monark, and Super 8 shaped the creative balance and live energy behind their new duo EP,…
-

14 NKS instruments that will change the way you create music
Discover 14 NKS instruments to freshen up your workflow. From lo-fi tape synths to cinematic strings, shop the Native Instruments…
-

Parallelle on crafting living basslines with Reaktor and TRK-01
Parallelle share how Reaktor and TRK-01 shape the bass and warmth in 11th Avenue, balancing analog depth with modern control.
-

Where will your sound lead you? Explore the Native Instruments Summer Sale
Save 30% on instruments, effects, and sounds in our Summer Sale. Find the tools to keep your tracks moving and…
-

How Mr. Bill builds sonic worlds in Massive X
Mr. Bill explains how Massive X and instinctive sound design shaped the storytelling process behind his new downtempo album, Mr.