


Future bass is a synth-heavy genre inspired by a wide variety of musical influences including trap and dubstep music. In this beginner’s guide to making future bass, we’ll show you how to make a future bass loop from scratch, covering how to program drum patterns and how to compose future bass chords, leads, and bass lines that can sound like this:
Jump to these sections:
To make a future bass loop we’ll use BATTERY 4, MASSIVE, MONARK and sounds from the METEORIC RISE expansion. We’ll also use KOMPLETE KONTROL which makes accessing all these sounds easy, and you can get this for free as part of KOMPLETE START. We’ll also add some master bus processing with iZotope Ozone 10.
What is future bass music?
Future bass comes from the popular trap and dubstep music genres, featuring heavy synths, danceable rhythms, and buzzy bass. Pioneered in the late aughts by producers such as Hudson Mohawke and Rustie, future bass contrasted with the emerging commercial dubstep sound thanks to its focus on musicality and jazzy vibes. It boasts an intriguing range of influences, from the obvious such as trap and 80s funk, to the more esoteric such as chiptune and happy hardcore.
Over the 2010s future bass increased in popularity with artists such as Flume, The Chainsmokers and Illenium entering the mainstream.
Future bass tempo typically ranges from 130–160 BPM, and in these next steps, we’ll learn how to create a future bass track that bounces on the dance floor.
How to make future bass
1. Program future bass style drums
One of the main elements of future bass is its trap music inspired drum beat patterns. To create future style bass drums, you’ll need to create a trap beat pattern using drum sounds characteristic of the future bass genre and a future bass BPM between 130–160 BPM.
We’ll set this project to 150 BPM.
Next, is sound selection for our drum kit. Load up KOMPLETE KONTROL on an instrument track. We specifically want to use sounds from the METEORIC RISE expansion which contains samples suitable for a future bass drum kit. To find the METEORIC RISE expansion, click on the Files tab on the left of the KOMPLETE KONTROL interface, and navigate your way to where the expansion is installed on your hard drive.

If you’re not sure where this is on your computer, you can open Native Access, open the Installed Products category, then select Meteoric Rise and click on the Installation Path tab.

In the Sounds folder we’ll find the METEORIC RISE patches organized by which instrument they’re for. Open the Battery Kits folder, and you’ll see a list of available kits. Let’s use a snappy-sounding kit. Double-click the Stay Kit to open it, and you’ll see the BATTERY 4 Cell Matrix is populated with sounds.
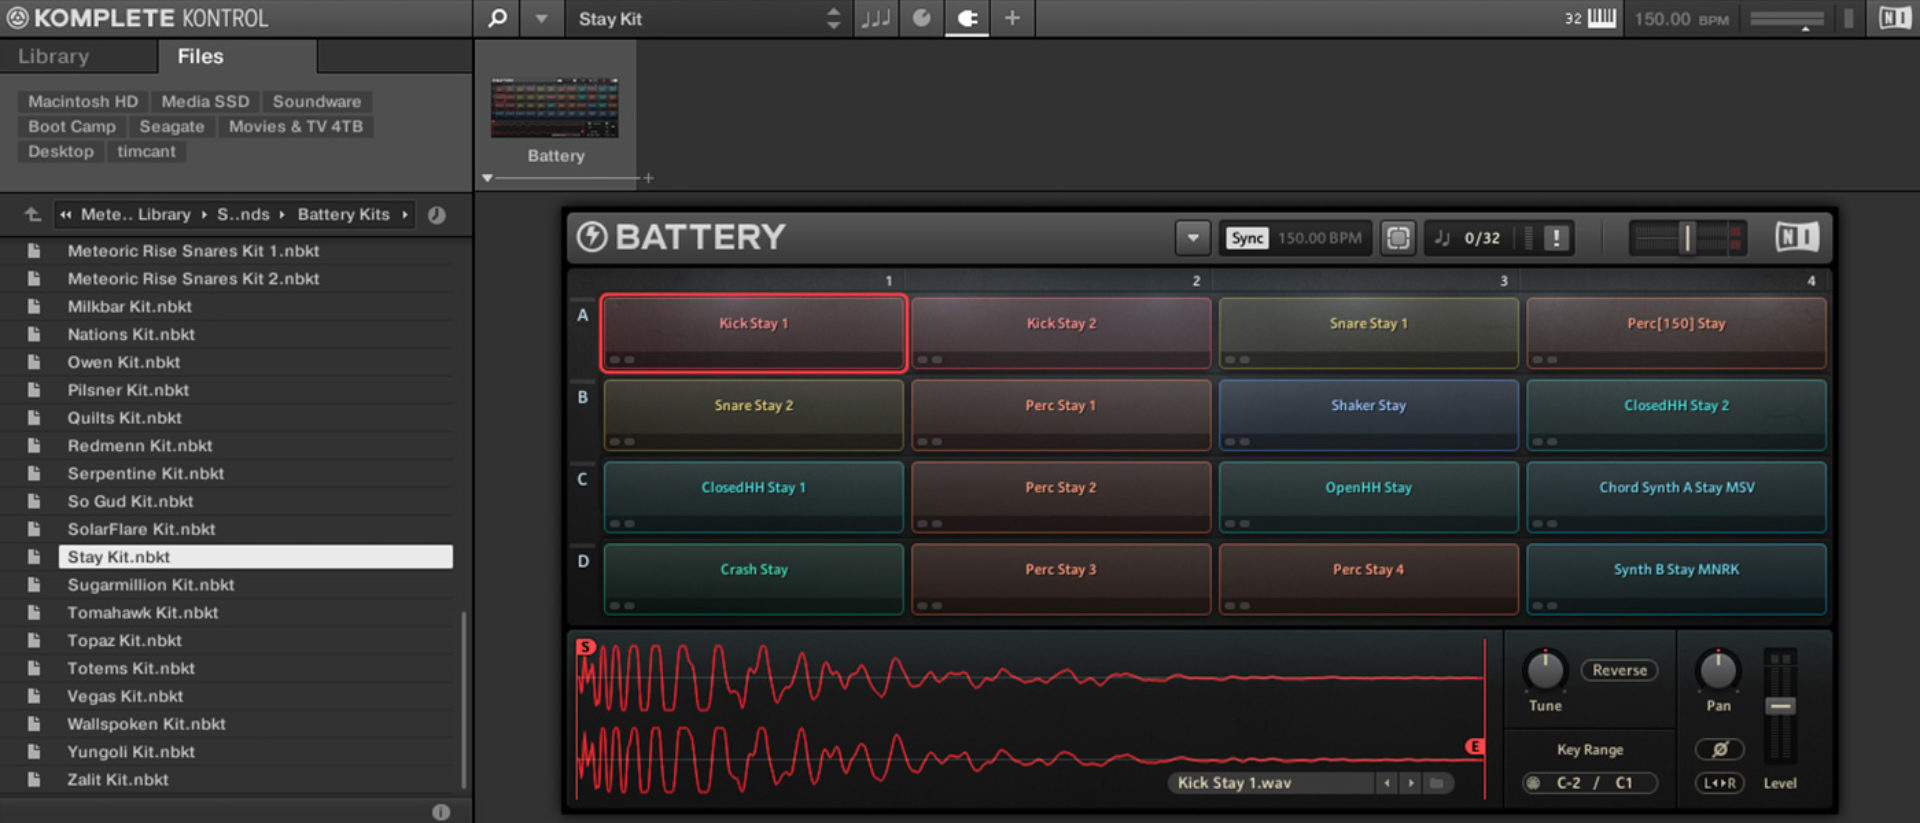
Create a two-bar MIDI clip in your audio editing software, and start by adding G1 closed hats on 8th notes. Put D1 snares on the fourth, seventh, ninth and twelfth 8th notes, and C1 kicks on the first and second beats of the first bar, and the second beat of the second bar.

This gives us a trap-style beat with common-time hats, and half-time kicks and snares. Let’s spruce it up with some hat rolls and the end of the second bar. Set your audio editing software’s grid divisions to 32nd notes, and replace the final two closed hats with three note rolls on 32nd notes.

It’s a little dull if every two bars are like this, so duplicate the MIDI clip out to make a four-bar sequence. At the end of the fourth bar, replace the rolls with a G#1 open hat and a G1 closed hat.

Now we have a drum part to work with, it’s time to start on some music. Turn the BATTERY 4 track down to -2.3 dB so that we have some headroom to add other elements.

2. Compose a chord progression
Typically, future bass songs use extended chords to create a more sophisticated sound. When writing chord progressions for future bass music, try playing major and minor 7ths, 9th, 11th, and 13th chords instead of using simple triads.
Begin with sound selection. Add another track with a KOMPLETE KONTROL instrument, and this time open the METEORIC RISE’s Massive Sounds folder. This contains a wide variety of synth sounds, but we’re specifically looking for something we can compose a chord sequence with. Double-click the Topaz 2 patch to load it up.
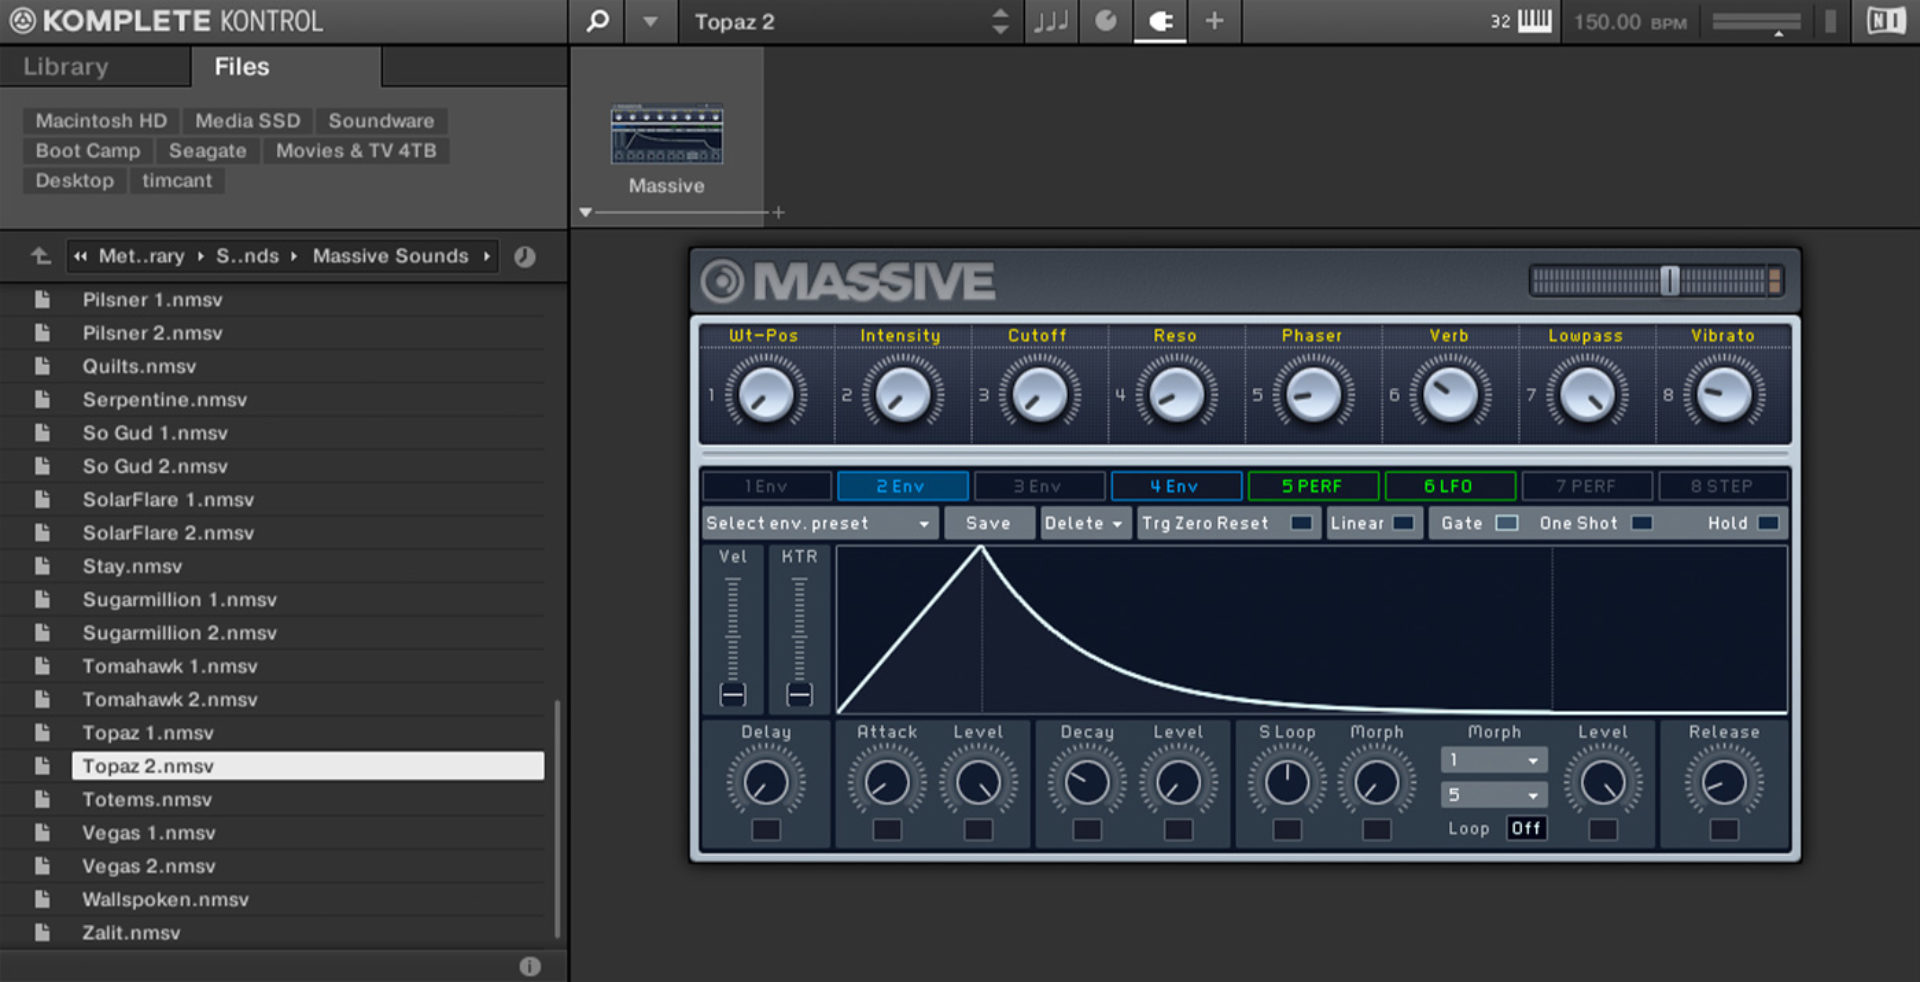
This sound is very loud, so turn its track down to -14.2 dB to balance it with the drum part.

Topaz 2 is a polyphonic patch, which means that we can play multiple notes at once, making it a good candidate for creating a chord progression. Let’s create a chord progression that plays F minor 9, D♭ major 9, E♭ major 9, and C minor with an augmented fifth in the octave above.

As you can hear, we’re getting kind of jazzy with the chords here, and it’s these jazzy chords which give future bass its musical flavor.
The chord progression is giving us the right feel, but the amplitude envelope on the patch doesn’t quite fit the drum part. Let’s try shortening the attack time so it hits faster and modulating the amplitude to give the sound a pulse. Click the + icon at the top of the KOMPLETE KONTROL interface to bring up Massive’s full interface.

In the Amp panel we can see that the fifth modulation source is assigned to Amp Mod. If we click 5 PERF we can see the modulator’s parameters.

Currently this is set to a simple two-step sequence with a ramp up for the first step, and the full amount for the second step. Let’s make this effect a bit snappier. First, change the Ratio from 1/8 to 1/16. This gives the amplitude modulation a faster rhythm.

Next, click the Load Curve button and select the flat curve one up from the bottom left-hand corner in the grid on the left.

Now drag all the way up on the first step, and all the way down on the second step. This gives us a modulation that simply moves between the minimum and maximum values.

This amplitude modulation is a better fit with our drum beat.
We’re going to use a bass line that follows the root note of the bass line, and we can get a cleaner, jazzier sound if we mute the root notes of the chord progression. Let’s do that now.

3. Layer the chords
We can get a more sophisticated sound if we layer the chord with another patch playing the same progression. Create a new instrument track, and this time load up the Crystalball 2 patch from the Massive Sounds folder.

Duplicate the MIDI part over from the original chord track, and set the new track to -13.6 dB.

This is a cool sound that adds interest to the chords, but it has substantial reverb and delay on it which is muddying up the mix a little. Turn down the Reverb and Delay macros to prevent this.

4. Add a bass line
To create a bassline for future bass music, simply follow the root note of the chords. First we need a bass sound. Create another instrument track, and this time open the Monark Sounds folder, and load up the Jellybean patch. Set this track to around -9.6 dB.

Program in a bass line on 8th notes that follows to the root of the chords.

This bass patch is highly resonant so it features a fair bit of mid-range, but not the low-end weight that we need. Let’s tweak the patch. If the front of the Monark interface isn’t showing, press the + icon on KOMPLETE KONTROL’s interface to bring it up.
Set the Filter Cutoff to 9 o’clock, the Filter Resonance to just before 9 o’clock, and the Filter Contour to 12 o’clock. This gives us a tighter and more solid sound.

5. Write a catchy synth lead hook
For a future bass track it helps to have a really expressive lead sound, and we can make a lead sound with a lot of character and depth by layering up multiple patches. First, let’s get an inspiring sound by creating a new instrument track, opening the Prism Sounds folder, and loading up the Feeline patch. Set this track to -9.7dB.

This delicate, acoustic-style pluck sound is a great place to start, so let’s compose a melody. We’re going to use an eight-bar melody, so duplicate out the drum, chord and bass MIDI clips to give us an eight bar loop.

Here’s the first four bars of the melody line. This gives us a basic melodic idea.

Here’s the second four bars of the melody line. This changes the idea up, giving us a contrast to the first half.

Here’s how it sounds all together.
Now it’s time to layer the lead up. Create another instrument track, again set it to -9.7 dB, but this time load the Comeback patch from the Prism Sounds folder.

Duplicate the MIDI over from the original lead track. This adds a touch of texture and room sound to the lead.

Next a track set to -16.3 dB with the Illuminate 2 patch from the Massive Sounds folder.

Duplicate the MIDI over, and transpose this part down an octave.

This synth string-esque sound gives the lead a more solid sustain, and helps it come through in the high frequencies.
Set the next track to -21.8 dB, and load up the Sugarmillion 1 patch from the Massive Sounds folder. Duplicate the transposed MIDI over from the previous track. This is another sound with body, but with more mid-range.

For the final lead element set a track to -15.5 dB and load up Totems from the Massive Sounds folder. Duplicate over the transposed MIDI from the previous track. This sawtooth-style lead sound has a cool vibrato on it that helps it sound expressive, and it helps our composite lead sound full and funky.

6. Add master bus processing
To get our loop sounding loud and crisp, let’s add Ozone 10 Maximizer to the master bus. Select the Fast and Edgy preset, and bring the threshold down to -6.9 dB. This gives us a loud mix that brings out the track’s punch and weight.

Start making future bass today
Here we’ve seen how you can make your own future bass loop from scratch. If you’d like to learn more check out Future Bass | Expansions, Behind the new sound of East Africa and a discussion with Lo-fi hip hop producer Lophiile.
For instruments, effects and expansions you might find useful, be sure to take a look at BATTERY 4, MASSIVE, MONARK, METEORIC RISE, KOMPLETE START and iZotope Ozone 10.
Related articles
-

Behind the synth: A. G. Cook on stacked sawtooths and the creation of Super*Saw
Explore the extremes of stacked sawtooth waves with Super*Saw, a new synthesizer co-created with A. G. Cook. Learn how to…
-

Inside the evolution of orchestral sampling: an interview with ProjectSAM
Discover how ProjectSAM’s Lineage Series uses NKS and smart features to change orchestral sampling. Plus, save on instruments in our…
-

How New Constellations turn emotion into sound with Massive X
Go inside the studio with New Constellations. Learn how they use Native Instruments gear, happy accidents, and lifelong friendship to…
-

Citizen Kain on building emotion and space with Replika
Citizen Kain explains how Replika helped shape the rhythm, tension, and emotion behind his debut Eversun Records single “Moments.”…
-

The organic precision behind Calcou’s Anjuna release featuring Reaktor
Calcou shares how Reaktor, Monark, and Super 8 shaped the creative balance and live energy behind their new duo EP,…
-

14 NKS instruments that will change the way you create music
Discover 14 NKS instruments to freshen up your workflow. From lo-fi tape synths to cinematic strings, shop the Native Instruments…
-

Parallelle on crafting living basslines with Reaktor and TRK-01
Parallelle share how Reaktor and TRK-01 shape the bass and warmth in 11th Avenue, balancing analog depth with modern control.
-

Where will your sound lead you? Explore the Native Instruments Summer Sale
Save 30% on instruments, effects, and sounds in our Summer Sale. Find the tools to keep your tracks moving and…