


At first glance, it might seem the SESSION GUITARIST series is intended for non-guitarists, but even the most seasoned of players can find room for a virtual session player in their production workflow; as someone who’s spent several years as a studio musician, I see a great deal of value in working with another guitar player – even if it’s a virtual one! Sometimes STRUMMED ACOUSTIC 2 complements my own acoustic part, for example, sometimes it plays on its own, and of course sometimes it takes a break while I play a part in on the J-45.
Whether or not you’re a guitarist, the key to making the most of the SESSION GUITARIST series – or any guitar library, for that matter – is knowing how to add nuance and a human-feel so the parts sound realistic—not just accurate. So here’s a run-down of some super-simple tips for doing exactly that in your next track.
Cut and paste for easy pattern variations
This is one of the simplest ways to add variety to Patterns. First, render or bounce the Kontakt track to convert it into audio. Next, make some slices at 8th notes—other values work too, but this is a good start—and treat these as building blocks you can move around. Even slight changes add useful variations (Fig. 1).

Figure 1: In Audio Example 1, the only difference between the first group of two measures, and the second group of two measures, was switching the two eighth-note sections shown above.
Interestingly, it seems that if you copy a couple sections and paste them somewhere else, you almost can’t go wrong—try it! You’ll generally want to introduce these variations toward the end of a Pattern, leading into the next Pattern. Occasionally muting sections to create more space in a part can add variety and drama.
Combine chords with patterns
Patterns are wonderful, but sometimes you just want to hit a strummed chord. Although the yellow keys are considered “endings,” A#1 rings out a big, full-sounding chord, while B1 plays a chord stab. Hitting a note associated with Patterns just before playing either A#1 or B1 specifies the chord’s root note. Unlike Patterns, these respond to velocity, so you can use dynamic chords to augment Patterns (Audio Example 2).
Rhythmic fader automation
Back when eight mixer channels were a luxury and I was doing sessions at Columbia Records’ studios, I was lucky to see an engineer mix a song that became a huge hit. As the song played, he closed his eyes and moved the faders subtly and rhythmically, in time with the music. I never forgot that lesson. Fig. 2 shows a fader automation curve added to Strummed Acoustic, using a hardware fader controller to emphasize the dynamics—I can only imagine how long it would take to draw that automation with a mouse.
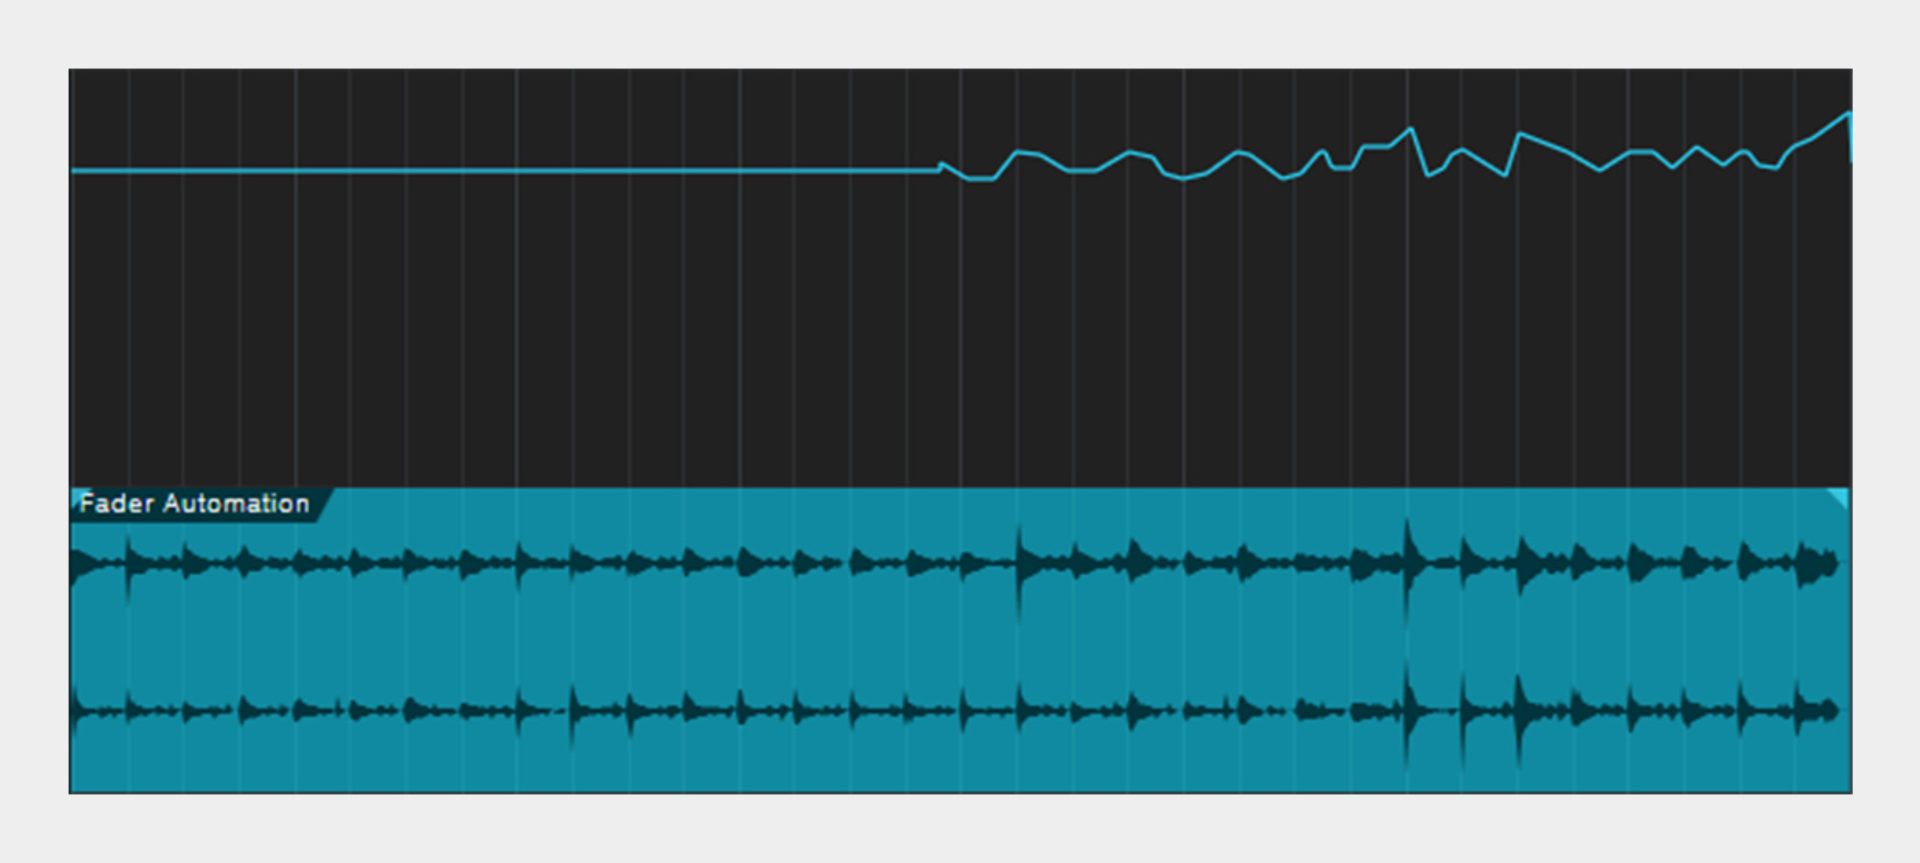
Figure 2: Rhythmic volume automation applied to Strummed Acoustic. In Audio Example 3, the first 4 measures have no automation, while the second 4 measures have rhythmic level changes, exaggerated slightly in the audio example for clarity.
Take accent beyond the pitch wheel
Velocity doesn’t affect a Pattern’s dynamics, because you wouldn’t want to lock an entire pattern to a specific velocity value. Instead, you can accent or de-emphasize parts of a Pattern with the Pitch Bend wheel to add expressiveness. However, NI’s Transient Master can take this even further, when you really want to hit the strings—or pull way back in quieter sections.
In Audio Example 4, the first 8 measures have no Transient Master processing, followed by a very short fade. The second 8 measures automate the Attack control, as shown in Fig. 3. The Transient Master’s option to Limit the output is extremely convenient; this avoids overloading the available headroom.
Figure 3: The automation in measures 9-17 controls the Transient Master’s Attack parameter.
Rush or drag the beat
Music is about tension and release, and part of that involves leading or lagging the beat, respectively. The Offset control adds feel to a part by either lagging the beat slightly for a more laid-back vibe, like after coming out of a solo, or leading to push the beat more, like in the lead-up to the solo. But don’t think of this as a set-and-forget control—use automation where appropriate. Automate a negative offset to place the pattern notes ahead of the beat, or a positive offset to pull back a bit and drag the beat (Fig. 4).
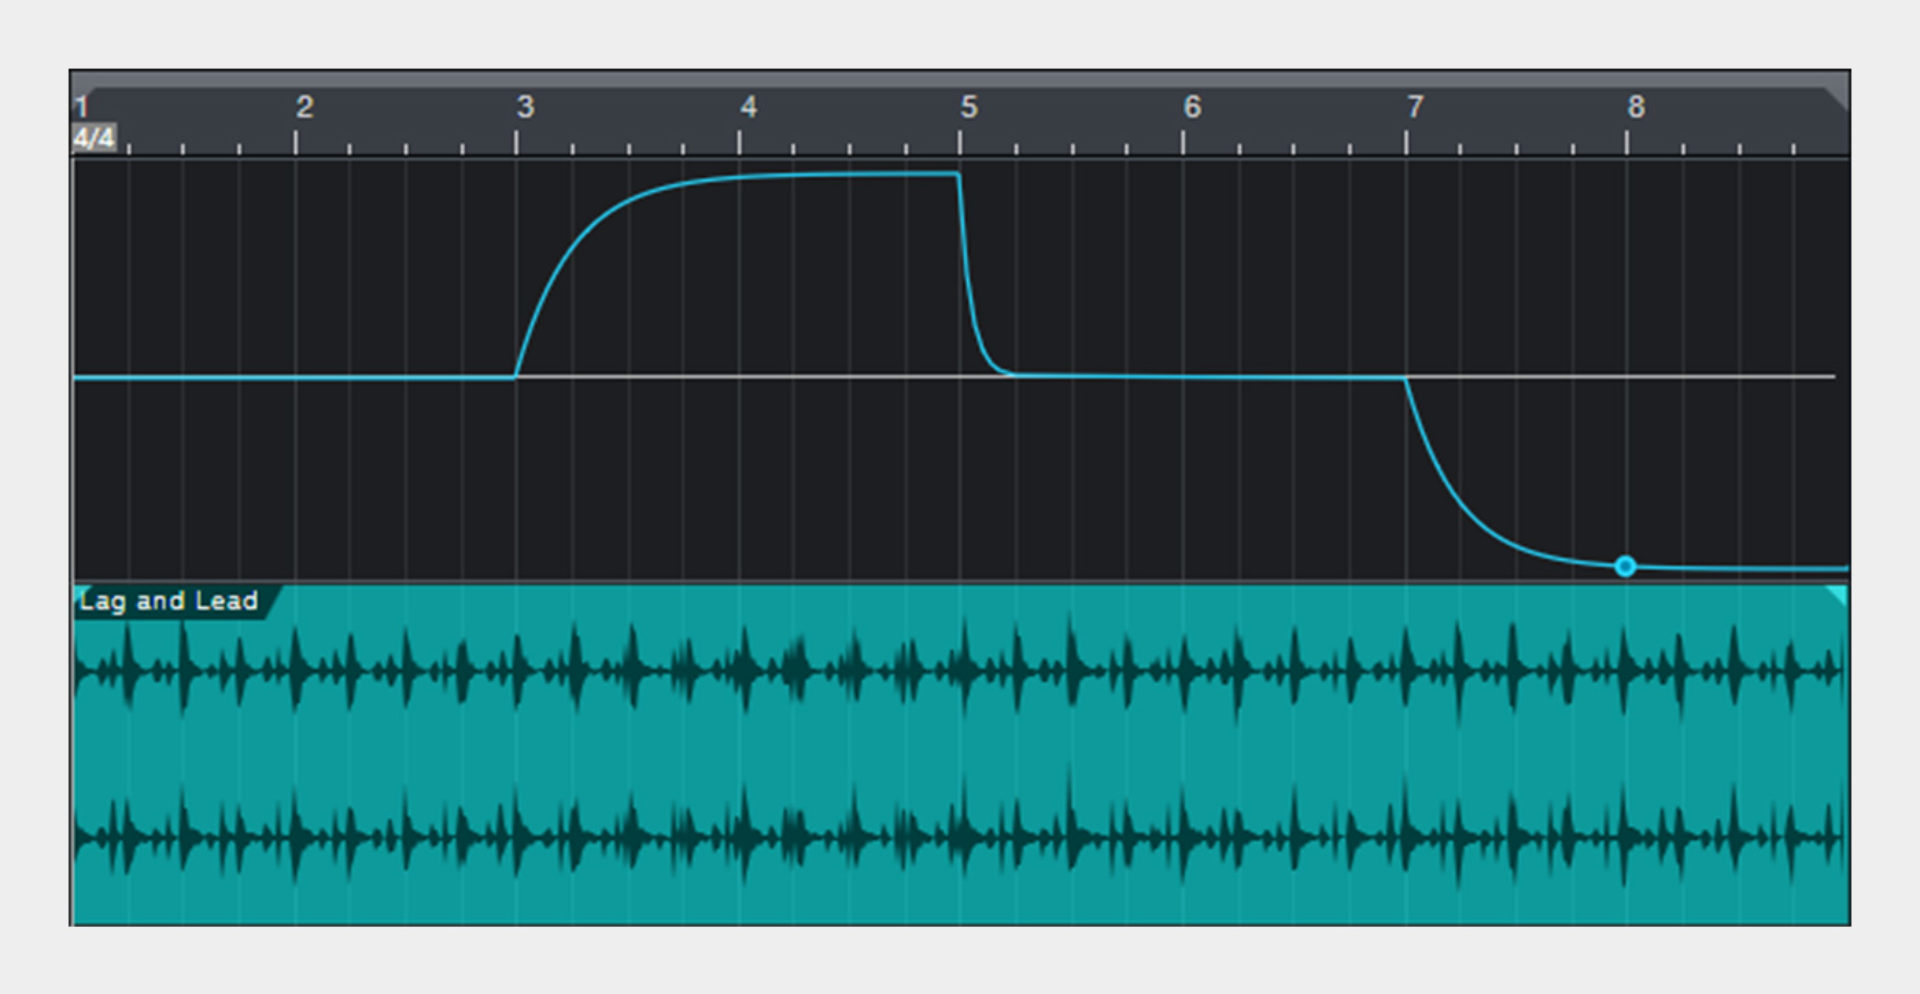
Figure 4: In Audio Example 5, automation is dragging the beat in measures 3 and 4, and rushing the beat in measures 7 and 8. The part plays against a metronome, which highlights the offset changes.
Automating Swing is a little more difficult to do so that it doesn’t sound “wrong,” but adding slight amounts of Swing, for relatively short durations (e.g. half a measure or so), can introduce more variety and make Patterns sound more fluid.
Automating the fret noise can also add expressiveness. Fret noises are more likely when playing aggressively because you’ll be playing faster and not paying as much attention to careful fingerings. If you emphasize fret noises selectively, increase Transient Master attacks, and maybe even add a very slight bit of negative offset to push the beat, the sound will be more intense than the default pattern sound.
Because all the sound parameters are automatable, you can change the guitar character as needed to fit specific parts of a song, without having to make changes that require additional plug-ins or mixing techniques. Humanize, EQ Amount, Compression Amount, Reverb Volume, and more are all candidates for automation.
When to use high or low voicings
Using high or low voicings with two instances of Strummed Acoustic helps differentiate the guitars more. But you can also change modes as part of an arrangement. Guitarists tend to use lower voicings when they need to drive the song with a bigger sound. Higher voicings sound “smaller,” so they’re better-suited to quieter, more reflective sections. The mod wheel (MIDI CC#1) can crossfade between the voicings. But for realistic parts as opposed to special effect, I prefer a rapid switching between High and Low modes, preferably with playing the D2 note pickup in the transition between the High and Low modes.
Songwriting, too
Being able to experiment with chords and Patterns can provide a different perspective, compared to what you tend to play when you pick up a guitar. Just like having a solid drum beat from a Kontakt drum instrument can jumpstart your creativity, so can the chord Patterns from Strummed Acoustic. Because you’re working with MIDI data, programs with chord tracks, like Cubase and Studio One, can take advantage of the structure you create with Strummed Acoustic to build a song further with other instruments.
Programming the Light Guide
Knowing where the different keyswitches fall on the keyboard is helpful, but since Strummed Acoustic isn’t NKS-compatible, Komplete Kontrol keyboards won’t show the light guides. Fortunately, there’s a simple workaround.
Open Komplete Kontrol in stand-alone mode, then click on the MIDI connector symbol in the upper right. Create a new template and name it Session Guitarist – Strummed Acoustic. Click on the Keys tab, and click +Split five times to create six splits total. Click on a split to select it, then drag its split edge divider to narrow the split to the desired range: Red C1 – G1, Yellow G#1 – C2, Green C#2 – D#2, and Blue E2 – D#5. Outside of Strummed Acoustic’s range, choose a non-Strummed Acoustic color so you don’t hit those keys (Fig. 5).
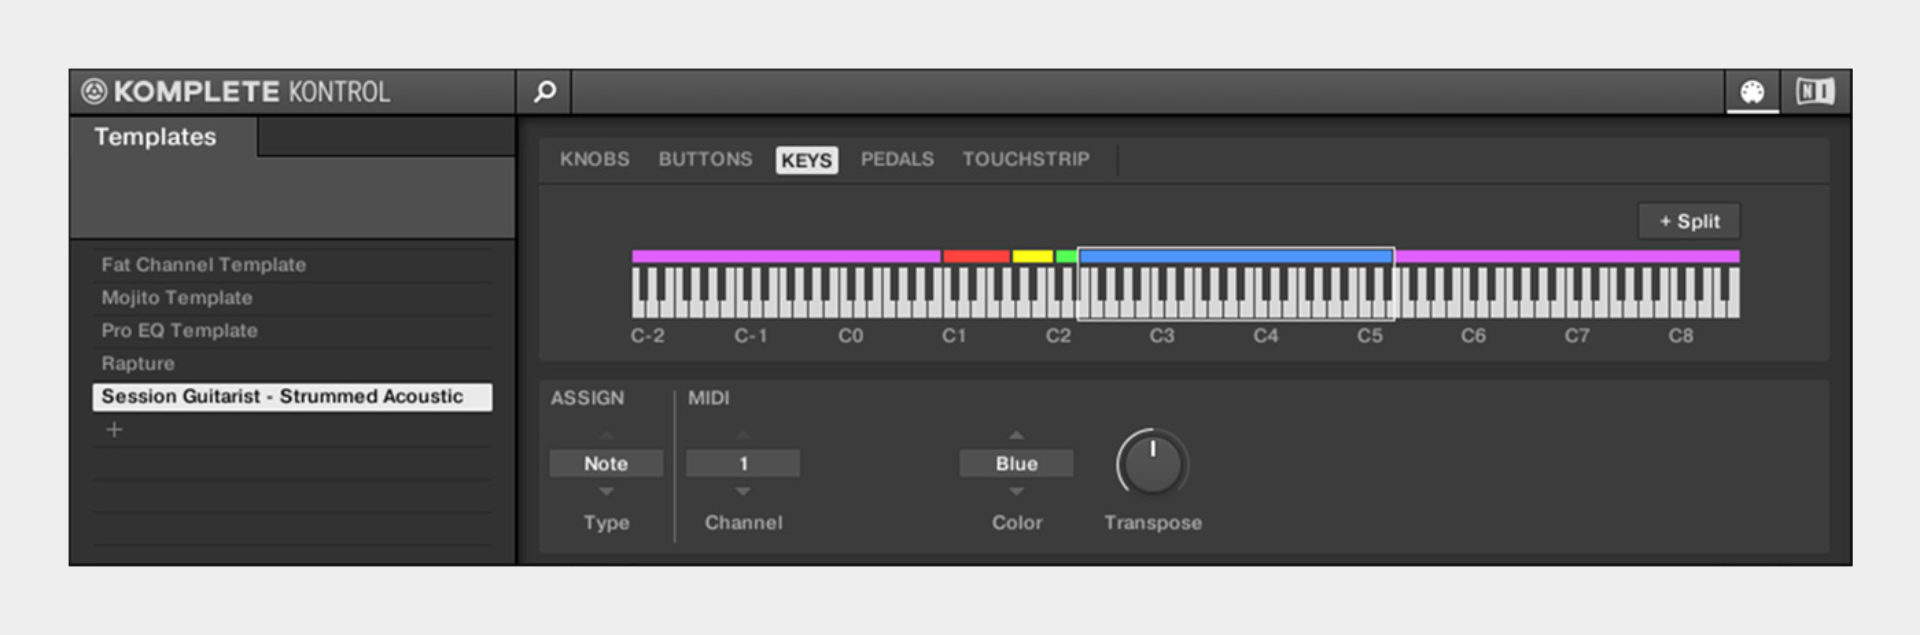
Figure 5: Light Guides have been programmed for Session Guitarist – Strummed Acoustic using the Controller Editor.
Now you can close Komplete Kontrol. Insert Kontakt as an instrument, and load Strummed Acoustic. Of course, you can still load the Komplete Kontrol plug-in for use with other instruments—the keyboard will switch to the appropriate mode when you select the track with either Strummed Acoustic or the Komplete Kontrol plug-in.
These tips are just some of the ways you can get more out of Session Guitarist – Strummed Acoustic. One of the problems when working as a solo artist is trying to get some of the same feel that happens when you collaborate with other artists. With Strummed Acoustic, you actually are collaborating with other artists: the person who played the guitar, and the programmers at Drumasonic and Native Instruments. Even better, these “session guitarists” always show up on time—and don’t charge time-and-a-half if the session runs long!
Related articles
-

Inside the evolution of orchestral sampling: an interview with ProjectSAM
Discover how ProjectSAM’s Lineage Series uses NKS and smart features to change orchestral sampling. Plus, save on instruments in our…
-

How New Constellations turn emotion into sound with Massive X
Go inside the studio with New Constellations. Learn how they use Native Instruments gear, happy accidents, and lifelong friendship to…
-

Citizen Kain on building emotion and space with Replika
Citizen Kain explains how Replika helped shape the rhythm, tension, and emotion behind his debut Eversun Records single “Moments.”…
-

The organic precision behind Calcou’s Anjuna release featuring Reaktor
Calcou shares how Reaktor, Monark, and Super 8 shaped the creative balance and live energy behind their new duo EP,…
-

14 NKS instruments that will change the way you create music
Discover 14 NKS instruments to freshen up your workflow. From lo-fi tape synths to cinematic strings, shop the Native Instruments…
-

Parallelle on crafting living basslines with Reaktor and TRK-01
Parallelle share how Reaktor and TRK-01 shape the bass and warmth in 11th Avenue, balancing analog depth with modern control.
-

Where will your sound lead you? Explore the Native Instruments Summer Sale
Save 30% on instruments, effects, and sounds in our Summer Sale. Find the tools to keep your tracks moving and…
-

How Mr. Bill builds sonic worlds in Massive X
Mr. Bill explains how Massive X and instinctive sound design shaped the storytelling process behind his new downtempo album, Mr.