Gone are the days when music producers would need a million-dollar studio to achieve million-dollar results; this accessibility has been one of the biggest shifts in the music production space over the last decade and a half. And yet, all of our favorite records and the music we grew up listening to had that warmth, punch, and clarity we now directly associate with “analog warmth.”
But this buzzword can seem like an ephemeral target to aim for producers of any level, especially newer artists who are just starting out and feel overwhelmed by the sheer number of different plugins that claim to be the “magic bullet” solution to achieve results that all your favorite artists seem to pull off with ease.
This is why Hyperbits is the perfect guy to talk to about hitting this goal. Not only has he been making warm, punchy club music for over a decade, but he also has been running his elite online production school, The Hyperbits Masterclass, where he’s guided thousands of students to achieve similar results as he has seen.
TL;DR – He’s an in-the-box wizard and an expert teacher, and he’s about to share everything he knows about using Guitar Rig to bring punch, clarity, weight, and warmth, not only without using a scrap of hardware but doing so [almost] entirely within a single plugin.
Jump to these sections:
- The initial draw of Guitar Rig
- First steps and fast results
- Hyperbits’ favorite Guitar Rig presets
- Essential modules for analog warmth
- When Guitar Rig made all the difference
- Workhorse plugin or niche use weapon tool?
This interview is packed with actionable tips, pro-level advice, several of Hyperbit’s favorite presets and modules, and a ton of his music, which you can hear Guitar Rig being used heavily throughout.
When did you first start using Guitar Rig, and what drew you to it initially?
I first began experimenting with Guitar Rig in 2015. I’ve always been super passionate about achieving the warmth and character of analog sound without the financial commitment of high-end hardware, so I was immediately intrigued by Guitar Rig from the get-go.
While I’ve had the privilege of working in studios equipped with a wealth of hardware, I found it often disrupted my workflow rather than enhanced it. Hardware certainly has its place for many artists and engineers, but it never quite aligned with my creative process. In my quest to find high-quality saturation and distortion tools, a trusted friend suggested I explore Native Instruments Guitar Rig, and it proved to be a game-changer for my approach to sound design.
I’ve been using it ever since.
Hyperbits pro tip: For maximum warmth, try running Guitar Rig through a parallel processing chain. Use the plugin to saturate the signal, then blend it back with the dry signal. Adjust the wet/dry mix to preserve transients while still benefiting from the analog-style warmth.

For producers chasing a warm, analog tone, what are the first steps you take in Guitar Rig to set the foundation?
To establish a warm, analog-inspired tone with Guitar Rig, my process always begins with inserting the plugin on a bus. This approach allows for subtle blending and greater control over the effect’s presence in the mix.
Next, I move away from the preset view and dive into the individual components. While presets can be powerful, I prefer crafting my signal chain from scratch to tailor the tone precisely to my vision. At this stage, I always ensure that the left and right channels are enabled in stereo mode.
When selecting a distortion component, I focus on finding the perfect match for the sound I’m shaping. Different distortions lend themselves uniquely to various sound types, and I’ve always felt that discovering these pairings is essential for refining not only your sonic palette but it helps you define your signature sound.

For instance, I often gravitate toward the ‘Fuzz’ distortion for sustained, saw-based leads, as it adds a raw, analog warmth, while the ‘Digital Lofi’ distortion shines on plucks with a crisp, punchy attack.
Regardless of what you land on, the key here is to be subtle. This ensures the distortions, saturations, or effects I am using are simply enhancing the sound as opposed to overpowering it. While straightforward in technique, the results are anything but.
Are there specific presets in Guitar Rig that you rely on for that vintage, analog vibe? How do you tweak them to make them your own?

Honestly, I’m not big on presets, but Guitar Rig does have a few gems that can kickstart that vintage, analog vibe. If I’m in a rush or just looking for a quick starting point, I might pull up something like ‘Cool Vintage Clean’ preset. It’s got that warm, retro tone baked in, but I never leave it as-is.
The key to making them your own is breaking them apart. I’ll dive into the components, tweak the EQ or compressor to taste, and swap out effects to suit the track.
For instance, I might change the distortion module to something grittier if I need more edge or adjust the tape saturation settings to hit harder in the mids. I’m always asking, “What’s this sound missing in the context of the mix?” and doing my best from there to dial in what it needs accordingly.
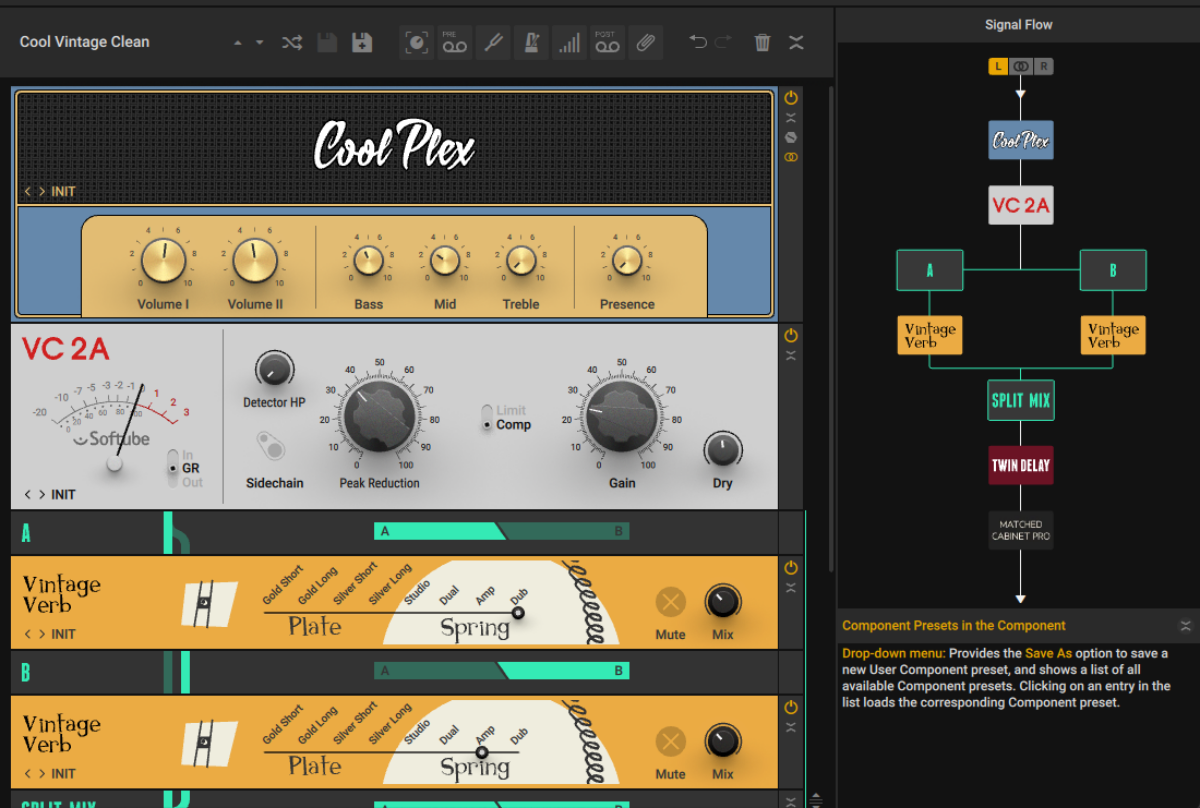
Sometimes it’s about subtle moves – rolling off the high end with an analog EQ or adding a touch of chorus for movement. Other times, it’s flipping the script entirely, like replacing a mellow delay with a grainy reverb to give it more atmosphere. The goal is to take that preset framework and reshape it until it feels unique – something that’s undeniably yours.
Do you have any favorite modules or effects in Guitar Rig that are essential for achieving warmth? What’s your approach to stacking effects?
Absolutely, Guitar Rig is packed with modules I keep coming back to for warmth.
Tape saturation is an essential – there’s just something about the subtle compression and harmonic richness it adds. I also love the ‘Tube Compressor’ for rounding out the sound and giving it that buttery analog feel. And I can’t forget the ‘Pro Filter’ – its clutch for carving out frequencies and shaping warmth in a controlled way.
But if we’re talking personal favorites, the Pitch Pedal and Vintage Vibrato are hands down at the top of my list. Pitch Pedal is pure creativity in a box – it’s perfect for adding subtle detuning to create width or going all-out with pitch-shifting effects that feel unpredictable and alive. It’s like adding a layer of emotional tension to the sound that you just can’t get anywhere else.
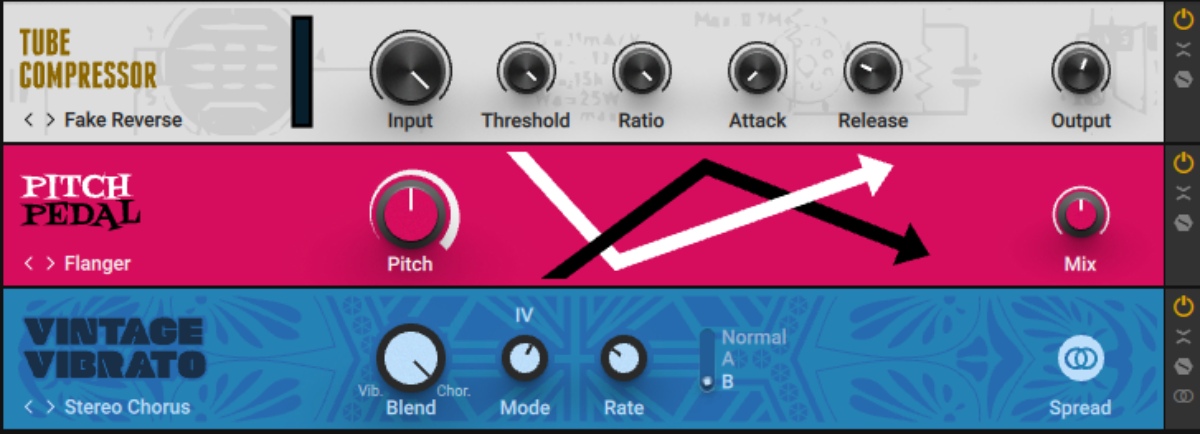
Then there’s the Vintage Vibrato, which I’m completely obsessed with.
It brings that lo-fi tape warble that instantly adds character and nostalgia to a sound. Whether I’m adding a subtle drift for texture or dialing it up for an over-the-top, wonky vibe, it never fails to deliver. It’s perfect for giving sterile digital sounds a touch of imperfection that makes them feel alive.
When it comes to stacking effects, I try to adhere to my general processing chain – so this means saturation first, followed by reductive EQ, followed by compression and sidechain, followed by additive EQ, and topped with some effects.
The order of this processing chain is very important to me because it avoids redundancies and allows you to aggressively dial in exactly what a sound needs.
At the end of the day, achieving that analog vibe, that warmth….it’s not about one move or one plugin, it’s about how they all play together.
Hyperbits pro tip: After you apply each plugin to a chain, ask yourself, what this is doing to the sound in the mix. Is it still balanced? Is it getting lost? Did it pop out? Always listen in context. Soloed tracks can deceive you – check how the effect feels in the full mix to ensure it enhances rather than detracts.

Subtle saturation is my bread and butter – it finds its way into every single project I’ve ever worked on. These effects can be subtle and tough to pinpoint at times, but they’re foundational to the sound of every record I’ve released. I’ll switch between tools, other super common saturation modules and plugins, but Guitar Rig always holds a special place in my workflow.
A great example of Guitar Rig in action is the intro chords to Noire, my collaboration with Vintage & Morelli on Enhanced Recordings. The Vintage Vibrato effect played a key role in adding that nostalgic, analog drift, giving the track a sense of warmth and movement right from the start.
You can also hear a more understated use of the same effect in Another Life, my collaboration with Sam Welch on Lilly Era. It’s tucked into the chord breakdown section, adding just enough texture to make it feel alive.
Most recently, I won a songwriting competition hosted by Kaskade, and Guitar Rig was front and center on that track. I used subtle distortions on the main lead to give it more weight and analog character.
But the real standout was the Pitch Pedal, which shaped the big, wobbly LFO riser synth right before the final drop. It added this unpredictable, dramatic tension that completely leveled up the transition. That track is evolving into a collaboration with Kaskade and is set to release on his label Arkade.
Hopefully, you’ll be able to hear it on all digital platforms soon – it’s a perfect showcase of how Guitar Rig can help turn ideas into something unforgettable.
Hyperbits pro tip: Automate parameters within Guitar Rig over time, such as the rate of the Vintage Vibrato or the detune on the Pitch Pedal, to create evolving textures that keep the listener engaged.
How does Guitar Rig fit into your broader mixing workflow? Is it more of a go-to tool or a specialty plugin for specific tasks?

It’s honestly a bit of both. I’d lean toward calling it a specialty plugin since I tend to use it for specific tasks, like injecting life and analog warmth into certain elements – usually synth-based leads or chord progressions. It’s great for turning something overly clean or sterile into something with character and depth that fits better in the mix.
That said, I also use it on a group level from time to time, adding subtle saturation or compression to help a stack of sounds blend together. For example, it works really well on layered pads or vocal stacks, giving them a bit of glue and warmth without losing the individuality of each layer.
For me, it’s about flexibility.
Guitar Rig isn’t necessarily something I throw on every track, but when I do use it, it’s because it can solve a problem or add something unique that other tools can’t quite replicate. It’s more about finding the right moments for it rather than relying on it as an all-purpose solution
Hyperbits pro tip: When using Guitar Rig on group tracks, experiment with your favorite dynamic EQ plugin after the chain to tame resonances that might build up from the saturation or compression applied to multiple layers.
Start using Hyperbits tips in Guitar Rig
We wanted to give a massive shoutout to producer, educator, mentor, and wizard on the deck, Serik Slobodskoy AKA Hyperbits, for taking the time out of his busy schedule to chat with us about how he uses Guitar Rig every single day in the studio to achieve massive results.
Time and time again, we are reminded that it’s rarely ever about one massive, drastic move in a track that defines it. Instead, it’s a buildup of hundreds, maybe even thousands, of small and minor changes and adjustments that make music come alive and give it that nuanced and detailed quality we most often associate with warmth.
The best part?
Guitar Rig gives you all of these touch points and modulation stages directly in one single plugin environment so that you can stay focused and get the warm results in your mixes fast and efficiently; making more music that gets top-quality results like a nod from Kasakde just like Hyperbits did (and it’s, in large part, because of tools like Guitar Rig).


