


An over-the-top mashup of modern musical influences, hyperpop takes popular music production tropes and stretches them to near breaking-point with extreme processing, maximal mixes, and outlandish aesthetics. Larger-than-life and packed with irrepressible energy, hyperpop is a genre ideal for producers who love taking things to the limit.
In this beginner’s guide to making hyperpop we’ll show you how to make a hyperpop beat, process vocals in a hyperpop style, and add big bass and soaring synths.
Jump to these sections:
What is hyperpop?
Maximal, manic and mischievous, hyperpop takes a broad selection of influences, pilfers their most extreme excesses, and filters them through a warped aesthetic, resulting in an intense musical melange.
Genres that inspire hyperpop include a diverse array of often musical styles, including trap, house, trance, donk, chiptune and emo. Hyperpop’s roots can be traced back to the output of the UK’s PC Music label in the 2010s, which is affiliated with hyperpop royalty such as Charli XCX, GFOTY, and the late SOPHIE.
In recent years hyperpop acts from outside the UK such as 100 Gecs have taken the style into increasingly extravagant musical directions.
Hyperpop is a broad genre that has even taken a role in the rehabilitation of meme star Rebecca Black, whose “Friday (Remix)” features a diverse array of collaborators including Dorian Electra, Big Freedia and 3OH!3.
Learn how to make a hyperpop song with a free demo of Nectar 3 to get the signature hyperpop vocal sound.
How to make hyperpop
1. Start with drums
Let’s start by making a hyperpop beat. Set your audio editing software’s tempo to a brisk 205 BPM.

Load up BATTERY 4 onto an instrument track, and load up the 808 Multiple Kit.
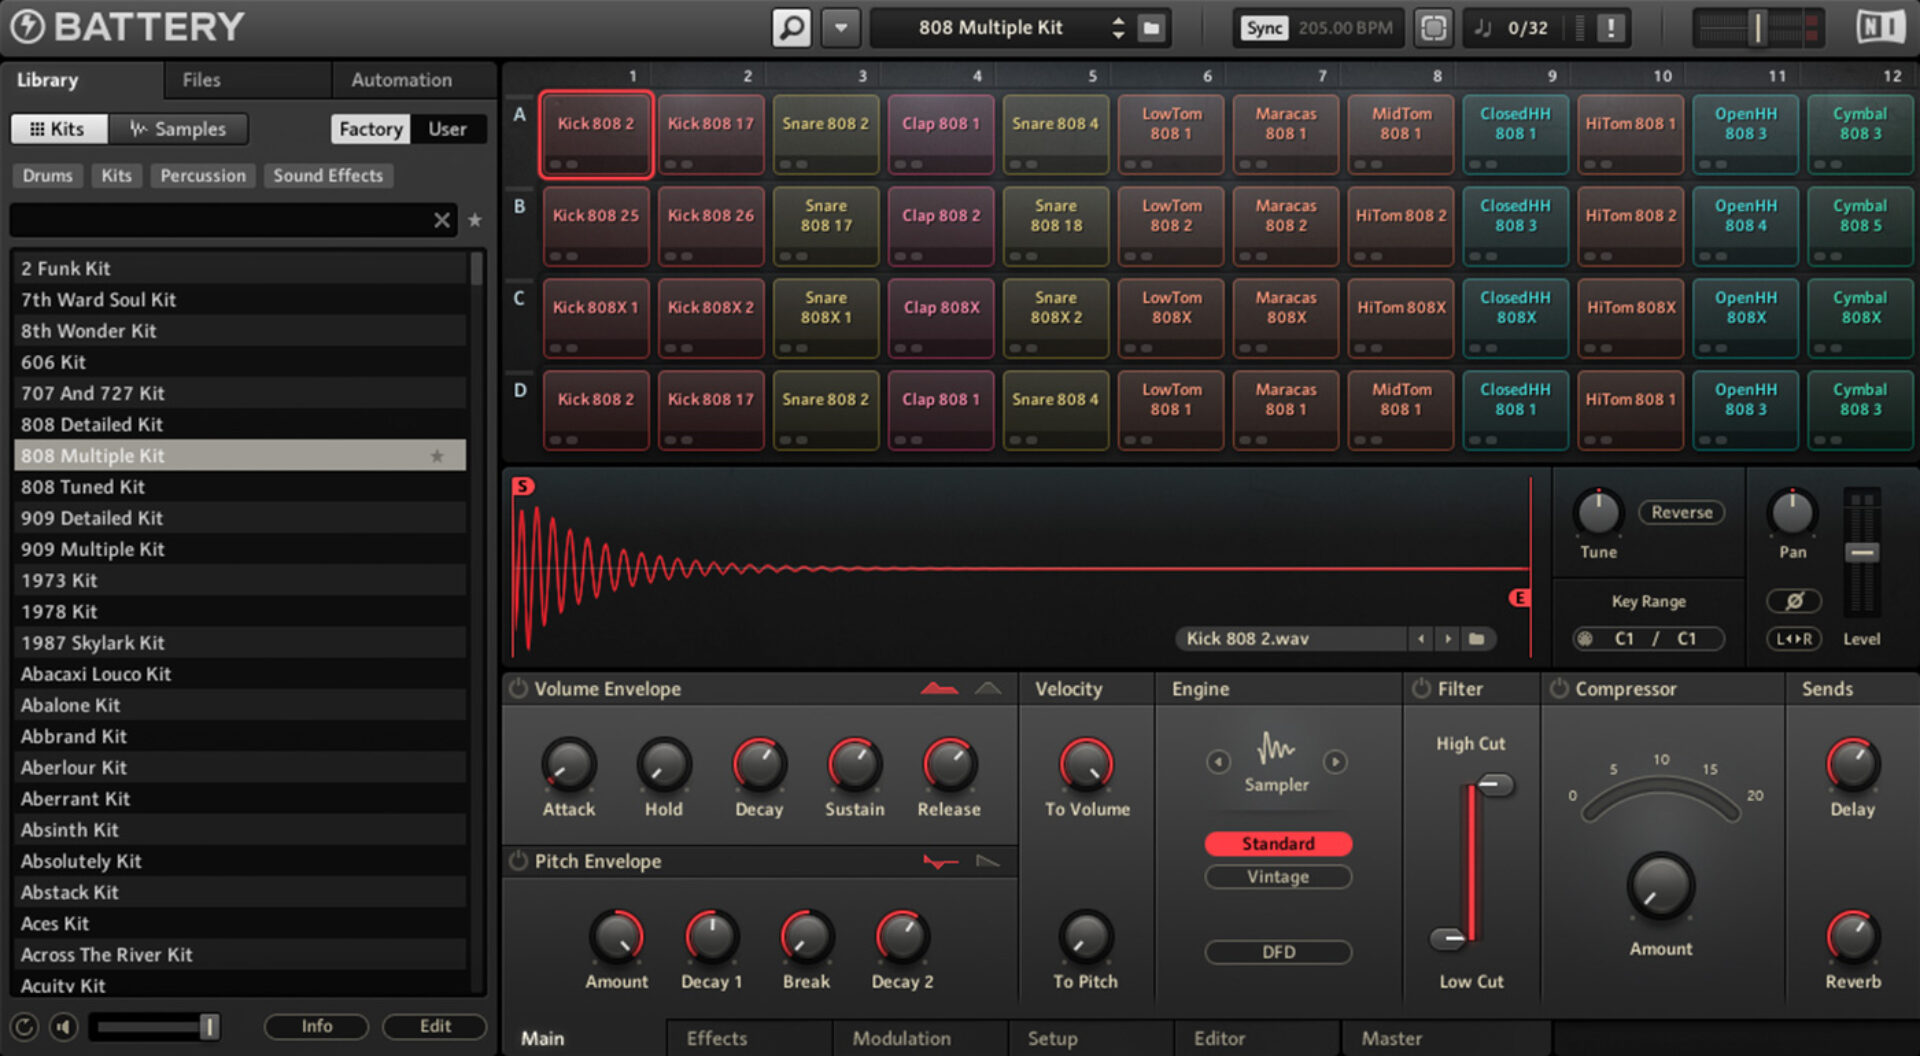
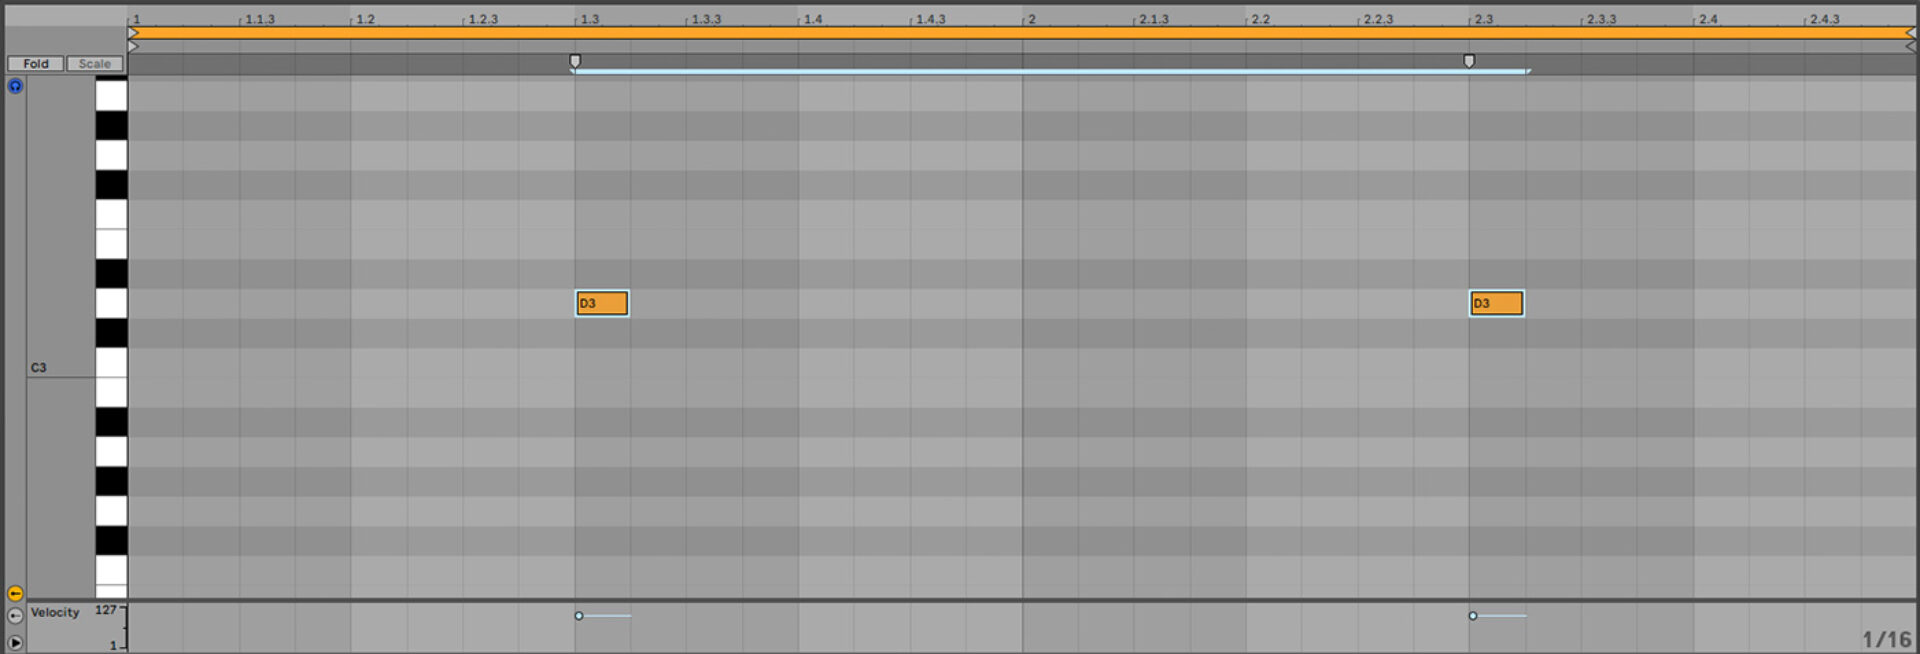
Create a two-bar MIDI clip, and place D3 snares on the third beat of each bar. We’re using velocity values of 100 for all the notes in this tutorial.
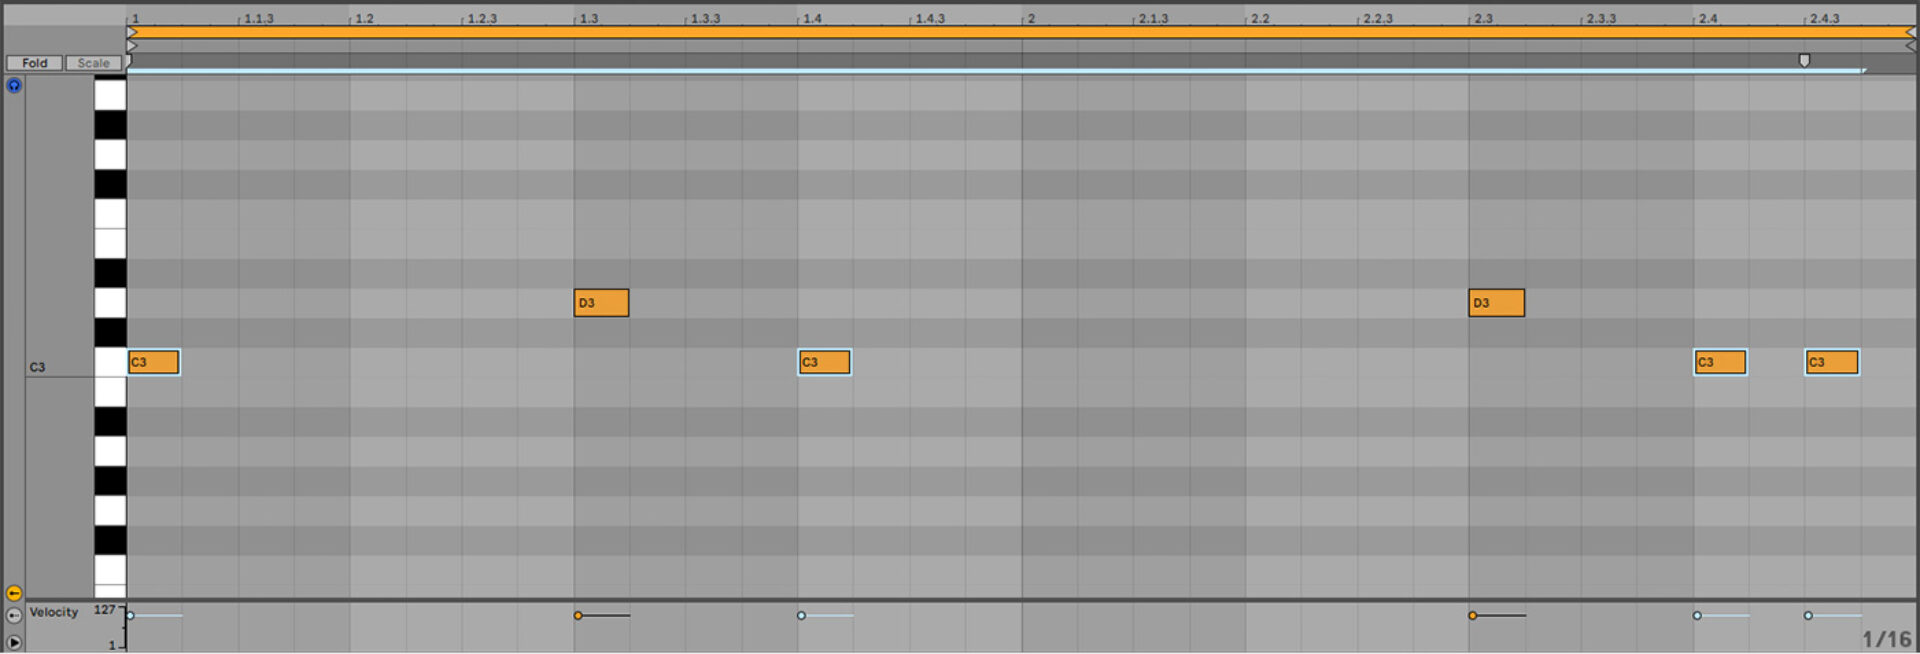
Now position C3 kicks on the first and fourth beat of the first bar, and the final two eighth notes of the second bar.
Let’s dirty these drums up a bit. Add DIRT on the BATTERY 4 track, and load up the Major Fuzz preset.
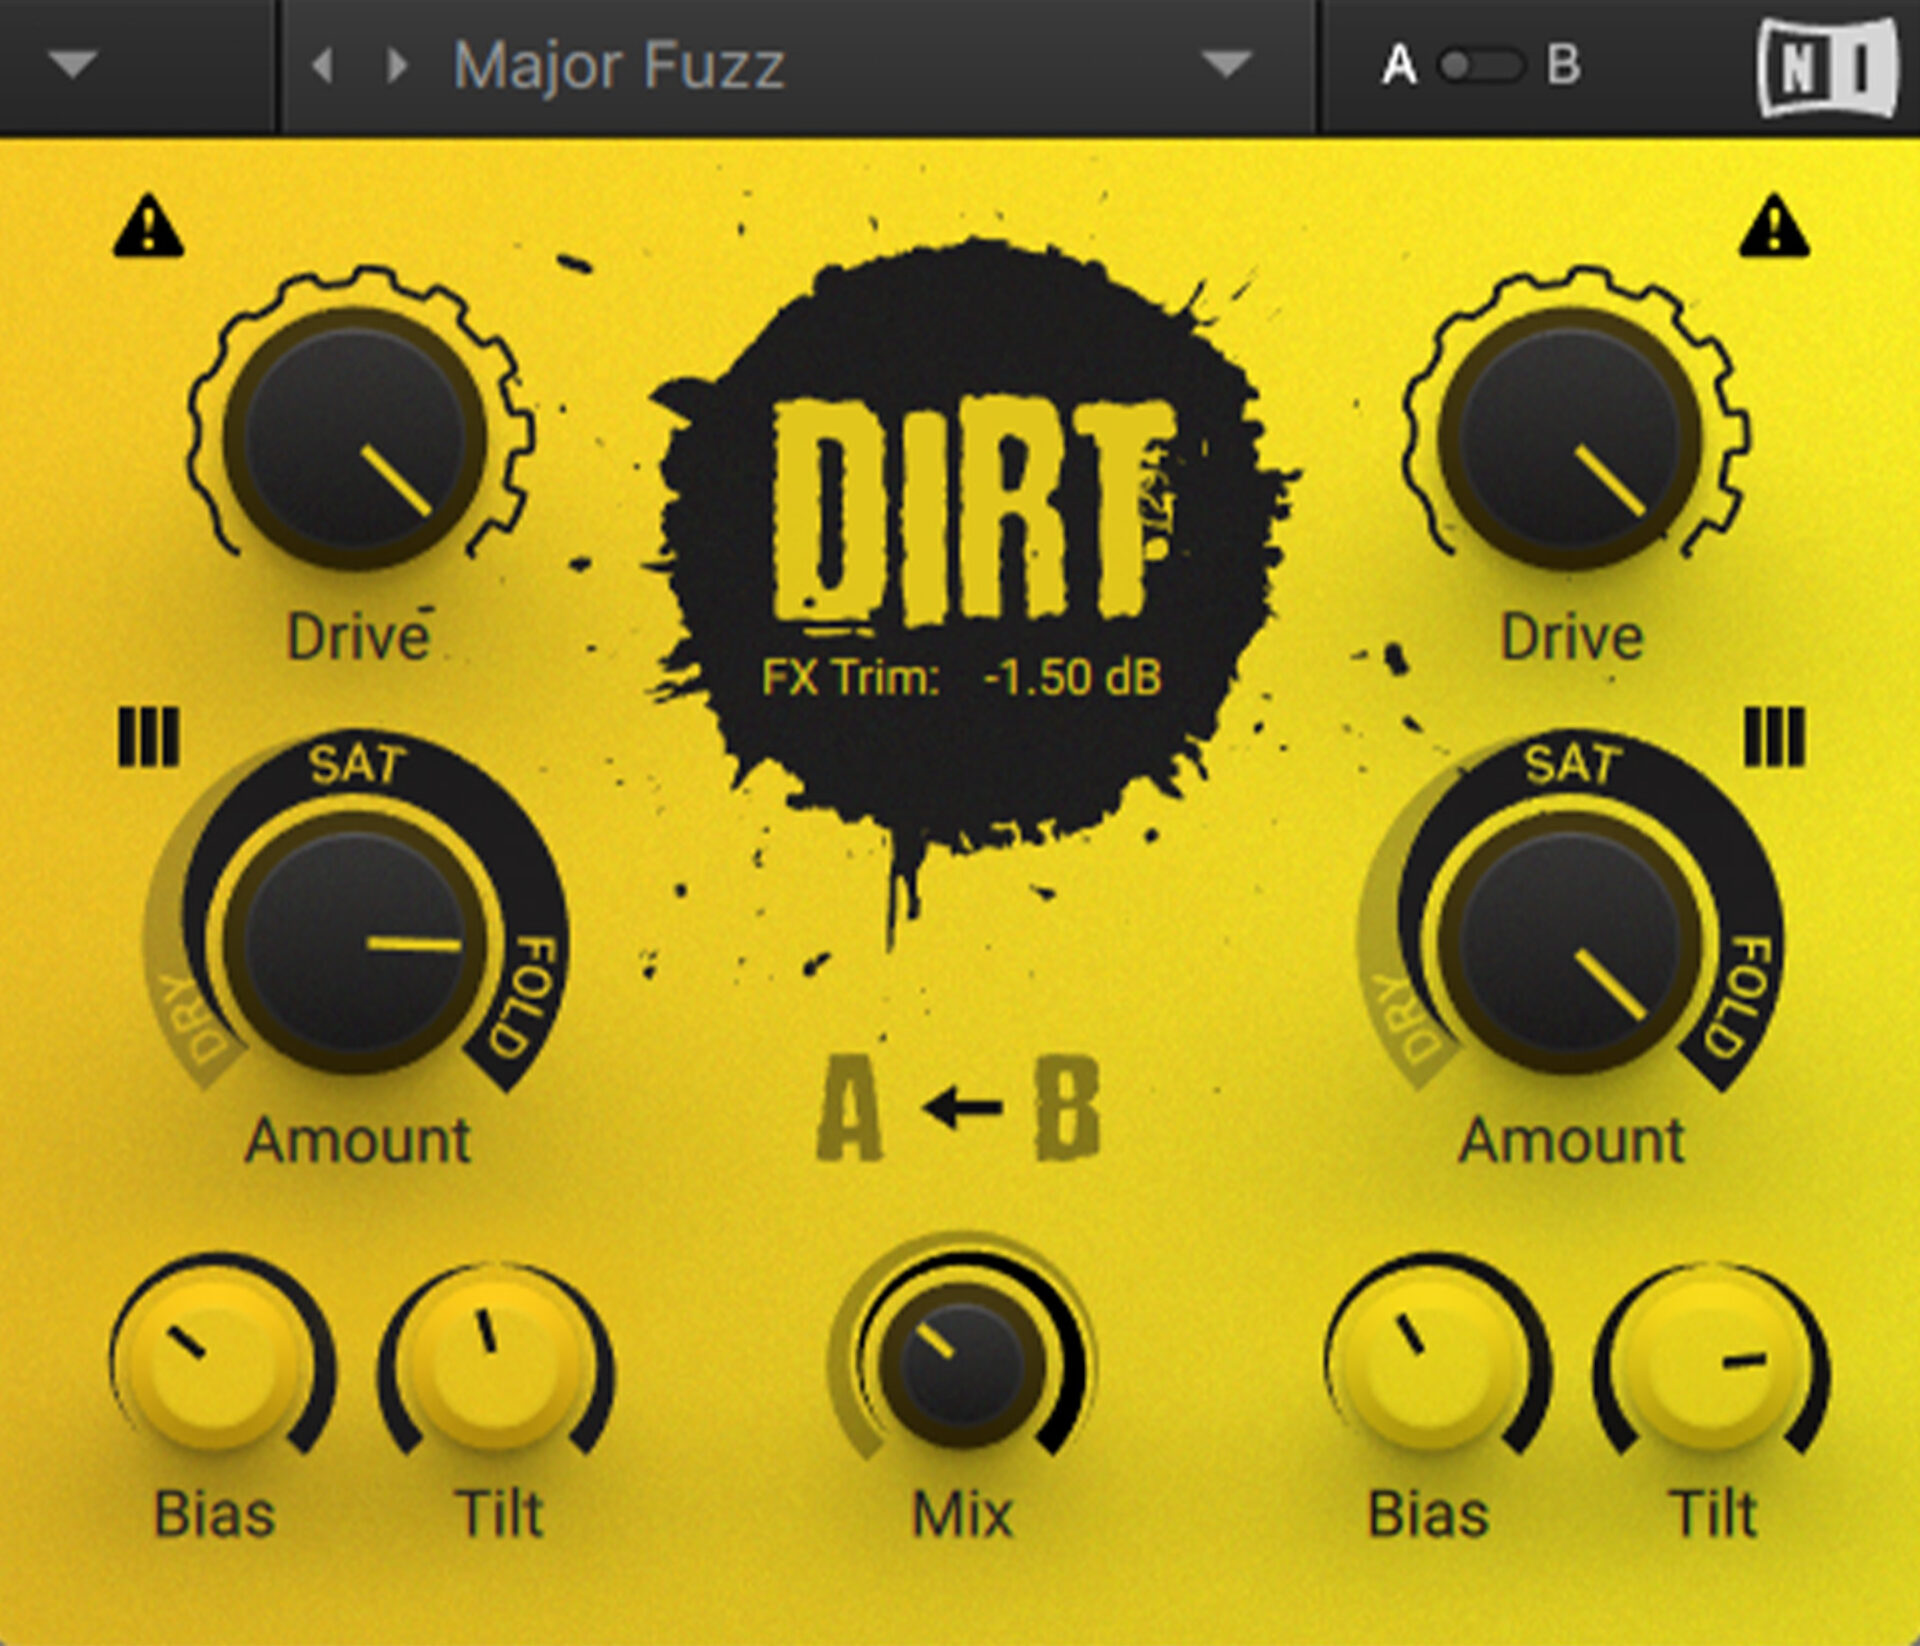
Set the Drive A knob to 58% and the Drive B knob to 67%.

Let’s add another instance of BATTERY 4 on a new virtual instrument track so that we can add some hats that don’t have the same distortion effect on them. Again, select the 808 Multiple Kit, and this time add G#2 hats on eighth notes. Add extra notes on 1.4.2 and 2.2.2 to create some hat rolls.

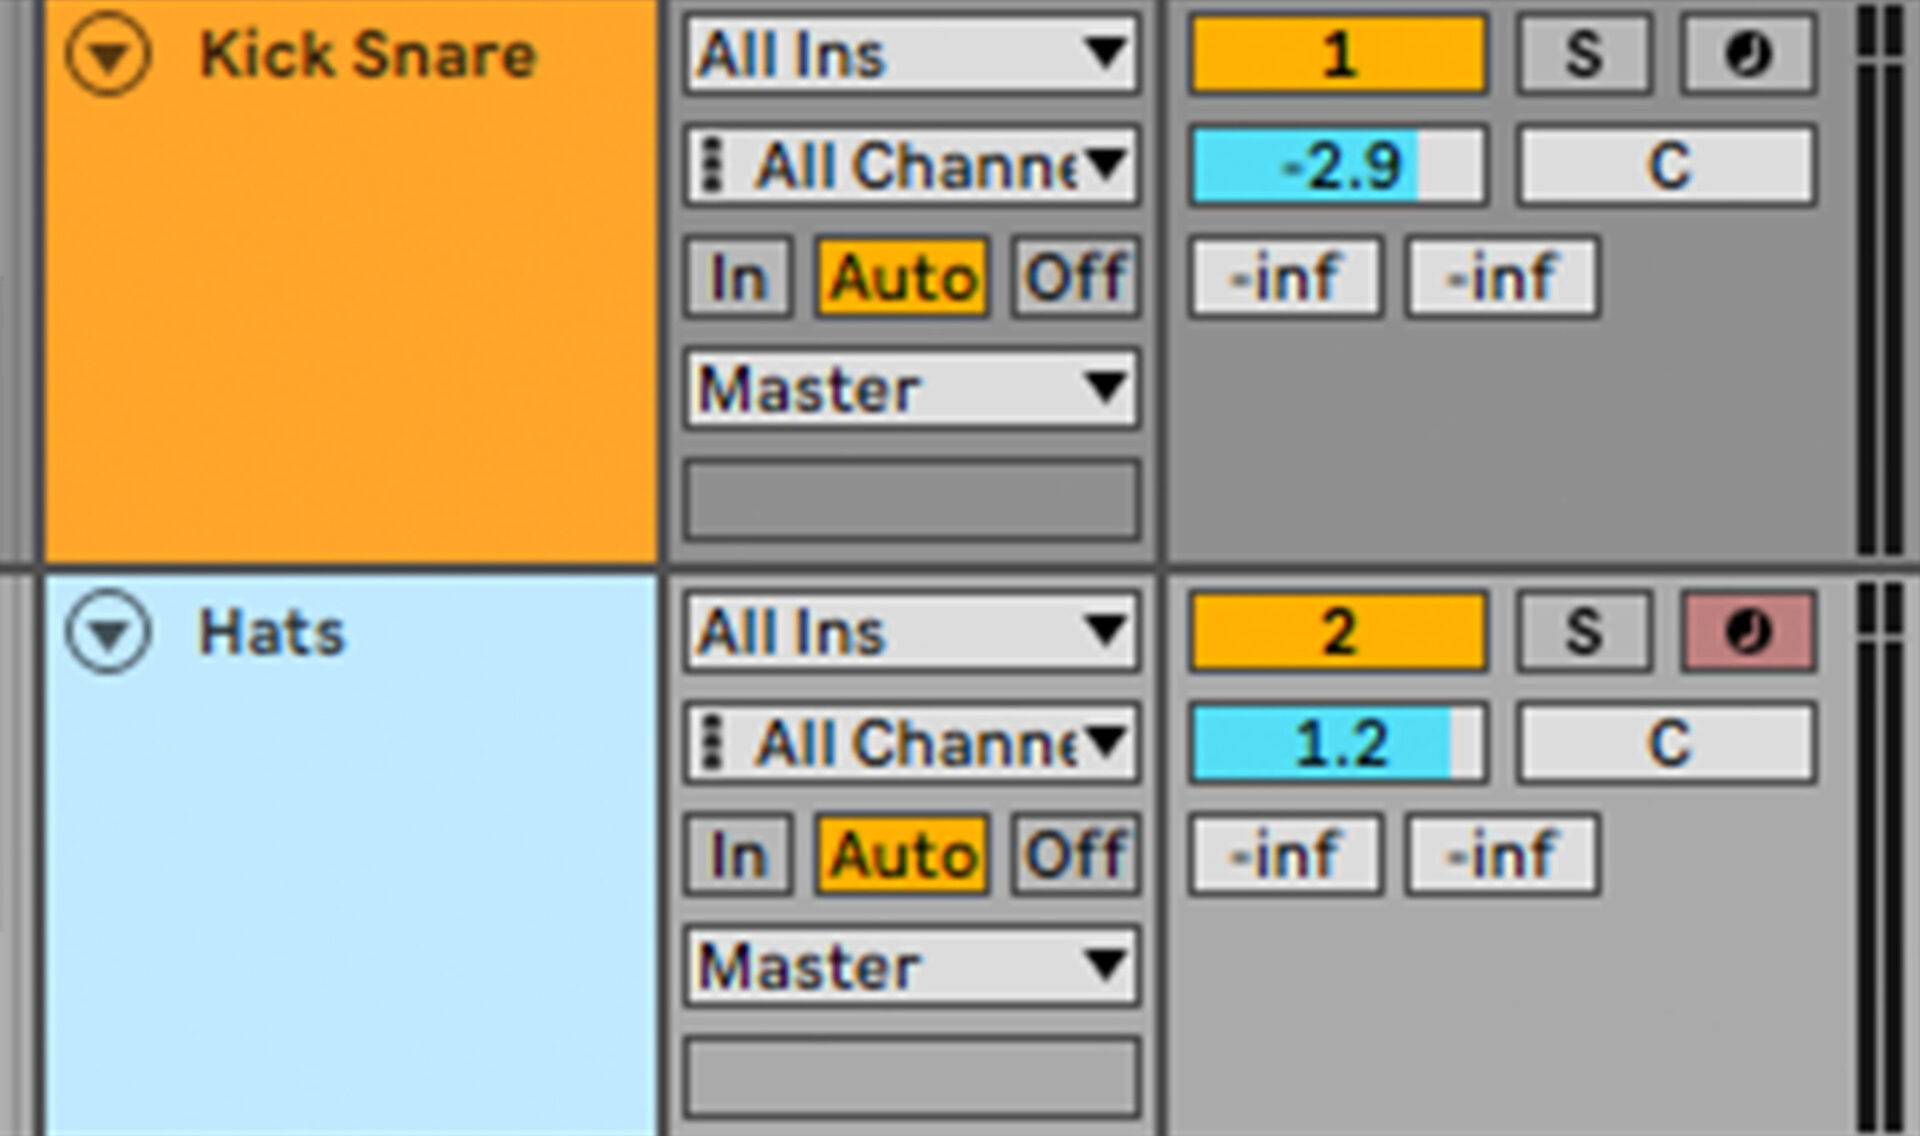
Set the Kick Snare track to -2.9 dB and the hat track to +1.2 dB to balance them.
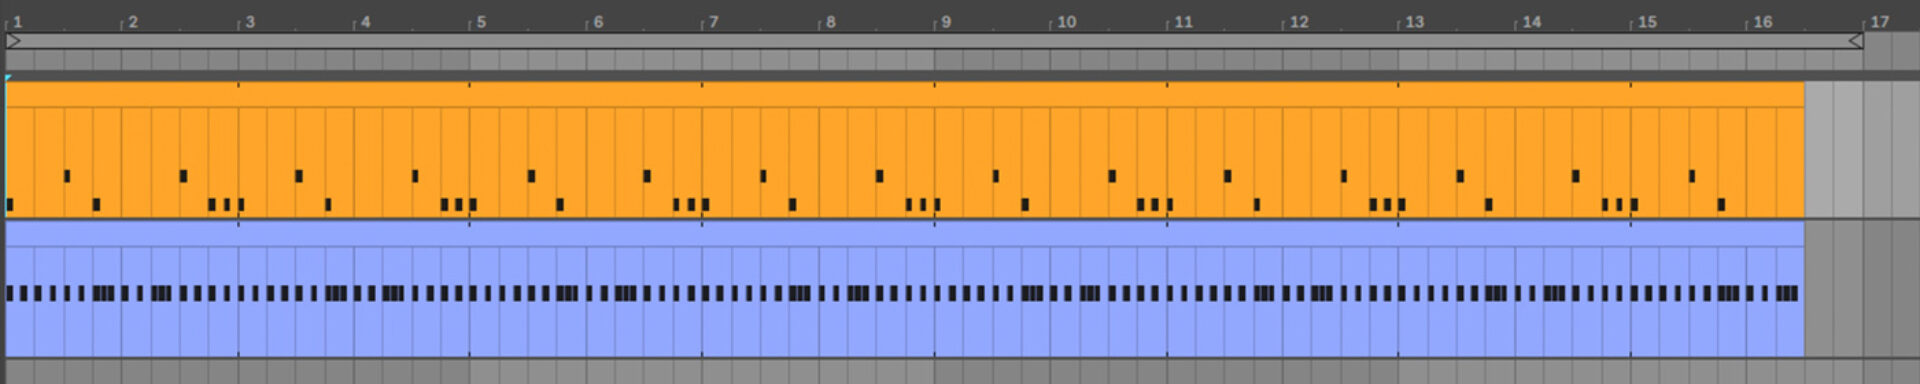
Loop these clips out for sixteen bars. Add another instrument track, again with an instance of BATTERY 4 with the 808 Multiple Kit loaded, and set this track to +3.1 dB.

At the end of the sixteen-bar sequence, truncate the Kick Snare and Hat parts so they don’t play the final two beats.
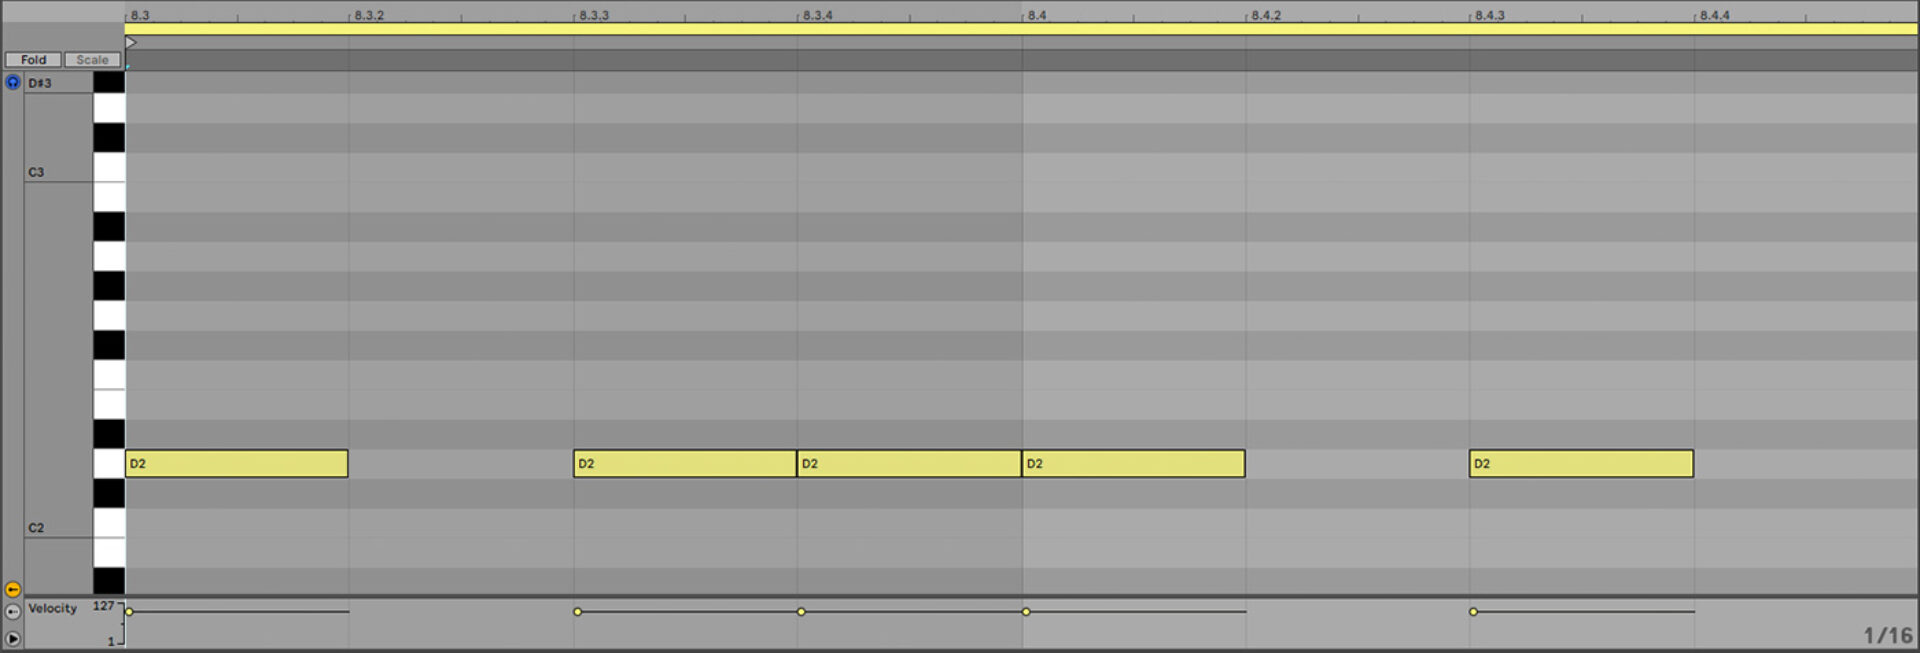
Then add a snare fill using D2 snares on the third BATTERY 4 track.
2. Create hyperpop vocals
For our vocal in this track, we’re going to use a vocal sample in C minor. We use Ableton Live’s warping capability to timestretch the vocal to the project tempo, then add Nectar 3 which is going to help us turn it into a hyperpop-stye vocal.
In the Pitch module in Nectar 3, we activate pitch correction, and set the scale to C minor.

We set the pitch correction Speed to 0.00 ms to get an artificial-sounding, super-snappy pitch correction effect.

To get a “chipmunk” effect on the vocal, we turn the Formant knob up to 7.20 semitones.

The fast pitch correction and formant-shifting give us that ultra-processed hyperpop sound.
We set this track to -7.2 dB.

3. Add chords
Let’s compose a chord progression that works with the vocals. Add Massive X onto a new virtual instrument track, and in the preset browser click the Synth Lead tag and double-click the Antelope Springs patch to load it up.

Set this track to -15.3 dB.

Sequence a chord progression that plays C minor, D# major, D minor, and C minor.

This sound has a very full frequency range, but there are going to be many other elements in our mix, so it makes sense to attenuate the high and low frequencies. Use filters to cut out the < 300 Hz and > 850 Hz frequencies. Here we’ve used Ableton Live’s Auto Filter effect.

We want the beats and bass to occupy the center of the mix, so add an instance of iZotope’s free Ozone Imager after the filters, with the Width parameter turned all the way up.

This makes the synth chords very wide, leaving room in the middle of the mix available for the beats and bass.
4. Write a bass line
On a new instrument track add an instance of MASSIVE X, this time selecting the Bass tag and loading up the Mafia Eight preset.

Set this track to -9.7 dB.

Sequence a bass line that follows the root note of the chords, with an octave skip during the first chord to keep things interesting.

This gives us a big, beefy bass line that underpins the rest of the track.
5. Process synths
Let’s add some synth sounds to inject energy into the mix’s mid-range. Add a new instrument track and this time load up FM8. in the Browser age, select the Arpeggiated tag in the Mode category, then locate Dirty Percu Stab in the patch list on the right, and double-click it to load it.

Set this track to -10.2 dB.

Sequence the instrument to play C4, G3, D3 and C3.

Use a filter to high-pass this track at 300 Hz, and again use Ozone Imager to widen the track.

Let’s add a lead sound. On a new virtual instrument rack add an instance of MASSIVE X, and this time select the Synth Lead tab and load up the Maya preset.

Set this track to -11.4 dB.

Sequence a lead line that plays C3, A#3, F3, A#2, D#3 and C3.

This sounds a little too straightforward for hyperpop. Let’s add some effects to make it more interesting. First add an arpeggiator, we’re using Ableton Live’s Arpeggiator, and set the Step to 2 so that the part plays over multiple octaves.

Now add a ‘bitcrusher’ effect. We’re using Ableton Live’s Redux, with the sample Rate set to 12 kHz and the Bit depth set to 8. This gives the lead a crunchy lofi sound.

Now add a filter to take out everything under 300 Hz.

Next we add a glitch effect, specifically the Vocal Fun preset in Ableton Live’s Beat Repeat. Set the Interval to 4. This creates a glitchy, chopped-up effect that makes this part much more interesting.

The final effect we add to this part is another Ozone Imager, again set to widen the sound.

6. Group your tracks
Let’s add all our drum sounds to one group called “Drums,” and all our synth sounds to another group called “Sidechain.”

We want the kick and snare track to punch through the mix, so add a compressor to the Sidechain group, and set its input routing to the Kick Snare track.

7. Arrange your track
Our arrangement starts with just the FM8 arp, chords and vocal. We use a low-pass filter to filter the arp in over 16 bars, with the hats coming in on bar 9.

On bar 17 the filter opens completely, with the full beats and bass dropping.

On bar 33 the glitch lead comes in too. Here’s the arrangement in full:

8. Master your song
Let’s boost our mixes’ volume with Ozone 10. You can do this in just a few clicks with the intuitive Master Assistant in Ozone. I’ve chosen to add the Ozone 10 Maximizer to my master track and set its Mode to IRC IV. I’ve brought the Threshold fader down to -7 dB.

Start making hyperpop today
Here we’ve seen how you can make your own hyperpop track. If you’d like to learn more check out even more music production tutorials like essential compression tips, how to write pop chord progressions, how to make a beat, and the essential music production guide.
Related articles
-

Behind the synth: A. G. Cook on stacked sawtooths and the creation of Super*Saw
Explore the extremes of stacked sawtooth waves with Super*Saw, a new synthesizer co-created with A. G. Cook. Learn how to…
-

Inside the evolution of orchestral sampling: an interview with ProjectSAM
Discover how ProjectSAM’s Lineage Series uses NKS and smart features to change orchestral sampling. Plus, save on instruments in our…
-

How New Constellations turn emotion into sound with Massive X
Go inside the studio with New Constellations. Learn how they use Native Instruments gear, happy accidents, and lifelong friendship to…
-

Citizen Kain on building emotion and space with Replika
Citizen Kain explains how Replika helped shape the rhythm, tension, and emotion behind his debut Eversun Records single “Moments.”…
-

The organic precision behind Calcou’s Anjuna release featuring Reaktor
Calcou shares how Reaktor, Monark, and Super 8 shaped the creative balance and live energy behind their new duo EP,…
-

14 NKS instruments that will change the way you create music
Discover 14 NKS instruments to freshen up your workflow. From lo-fi tape synths to cinematic strings, shop the Native Instruments…
-

Parallelle on crafting living basslines with Reaktor and TRK-01
Parallelle share how Reaktor and TRK-01 shape the bass and warmth in 11th Avenue, balancing analog depth with modern control.
-

Where will your sound lead you? Explore the Native Instruments Summer Sale
Save 30% on instruments, effects, and sounds in our Summer Sale. Find the tools to keep your tracks moving and…