


Synthwave, a genre that surfaced in the 2000s, reinvents the tropes of 80s synth-based music into a new style that features relentless drum machine beats, pulsating synth rhythms, and atmospheric production. The genre can range from slow and goth-tinged to fast and poppy, offering a diverse range of musical experiences.
In this beginner’s guide to creating synthwave, we’ll show you how to craft a captivating drum pattern that perfectly embodies the genre’s essence. You’ll then learn how to incorporate a plethora of synth sounds, including bass, lead, and strings, to build a track that captures the nostalgic essence of synthwave that can sound like this:
Jump to these sections:
Follow along with this tutorial using Komplete 14, the ultimate music production suite.
What is synthwave music?
The roots of synthwave lie in the millennial French house scene, which saw artists such as Kavinsky and College take the genre’s 80s influence to the next level with tracks such as “Testarossa Autodrive” and “Teenage Color”.
This sound would prove to be influential among non-house artists such as M83 and The Midnight, and it spawned a new synth-centric genre that wasn’t constricted by house’s relatively narrow tempo range and DJ-friendly arrangement requirements.
Synthwave has become very much a part of the mainstream zeitgeist thanks to high-profile synthwave-infused cultural works such as Drive and Stranger Things.
What is the 80s aesthetic called?
The popular contemporary 80s-inspired audio-visual aesthetic is known as synthwave, and it combines influences from 80s movies, video games, and synth pop.
Why is synthwave popular?
One could argue that the reason behind synthwave’s enduring popularity is our continued cultural obsession with 80s nostalgia. As early as 1997, the Adam Sandler comedy “The Wedding Singer” and electro-revival tracks such as I-f’s “Space Invaders Are Smoking Grass” heavily drew inspiration from the then-recently-departed decade.
Since then, 80s nostalgia has been hard to ignore, with house music incorporating 80s tropes non-stop throughout the 2000s.
The soundtrack to 2002’s Grand Theft Audio: Vice City helped bring the sound of the 80s to a new generation, and cultural juggernauts like 2011’s “Drive” and 2016’s “Stranger Things” have only further entrenched the decade as a semi-mystical era of magic and authenticity. If you’re a Millennial or Gen Z, you might not even remember a time when 80s nostalgia wasn’t one of our primary cultural influences, and perhaps this goes some way to explain synthwave’s continued popularity.
How to make a synthwave track
In this walkthrough on how to make synthwave music we’re going to use Native Instruments’ Neon Drive expansion along with Komplete Kontrol, Battery 4, Massive, Super 8 and Monark plus iZotope Ozone 10 to create an epic synthwave track from scratch.
1. Create a drum pattern
Let’s start by setting our project tempo to an unhurried 100 BPM.

Add Komplete Kontrol to an instrument track, and in its browser navigate to where the Neon Drive expansion is installed.

If you’re not sure where Neon Drive is installed, open Native Access, click on Neon Drive and select the Installation Path tab on the right to reveal where its files are located.

Open the Sounds > Battery Kits folder, and double-click the Waiting Game Kit preset to load it up.

Create a one-bar MIDI clip and sequence C1 kicks on each beat, with D1 snares on the second and fourth beats. Unless otherwise specified, we’ll use velocity values of 100 for everything in this tutorial.

Now add G#1 hi-hats on 16th notes with a velocity of 74. Remove the hi-hats on the second and fourth beat to give the snares room to breathe.

For the final touch at another hi-hat with a velocity of 39 on the final 32nd note before the third beat. This gives us a little touch of funk that provides a counterpoint to the otherwise rigid rhythm.

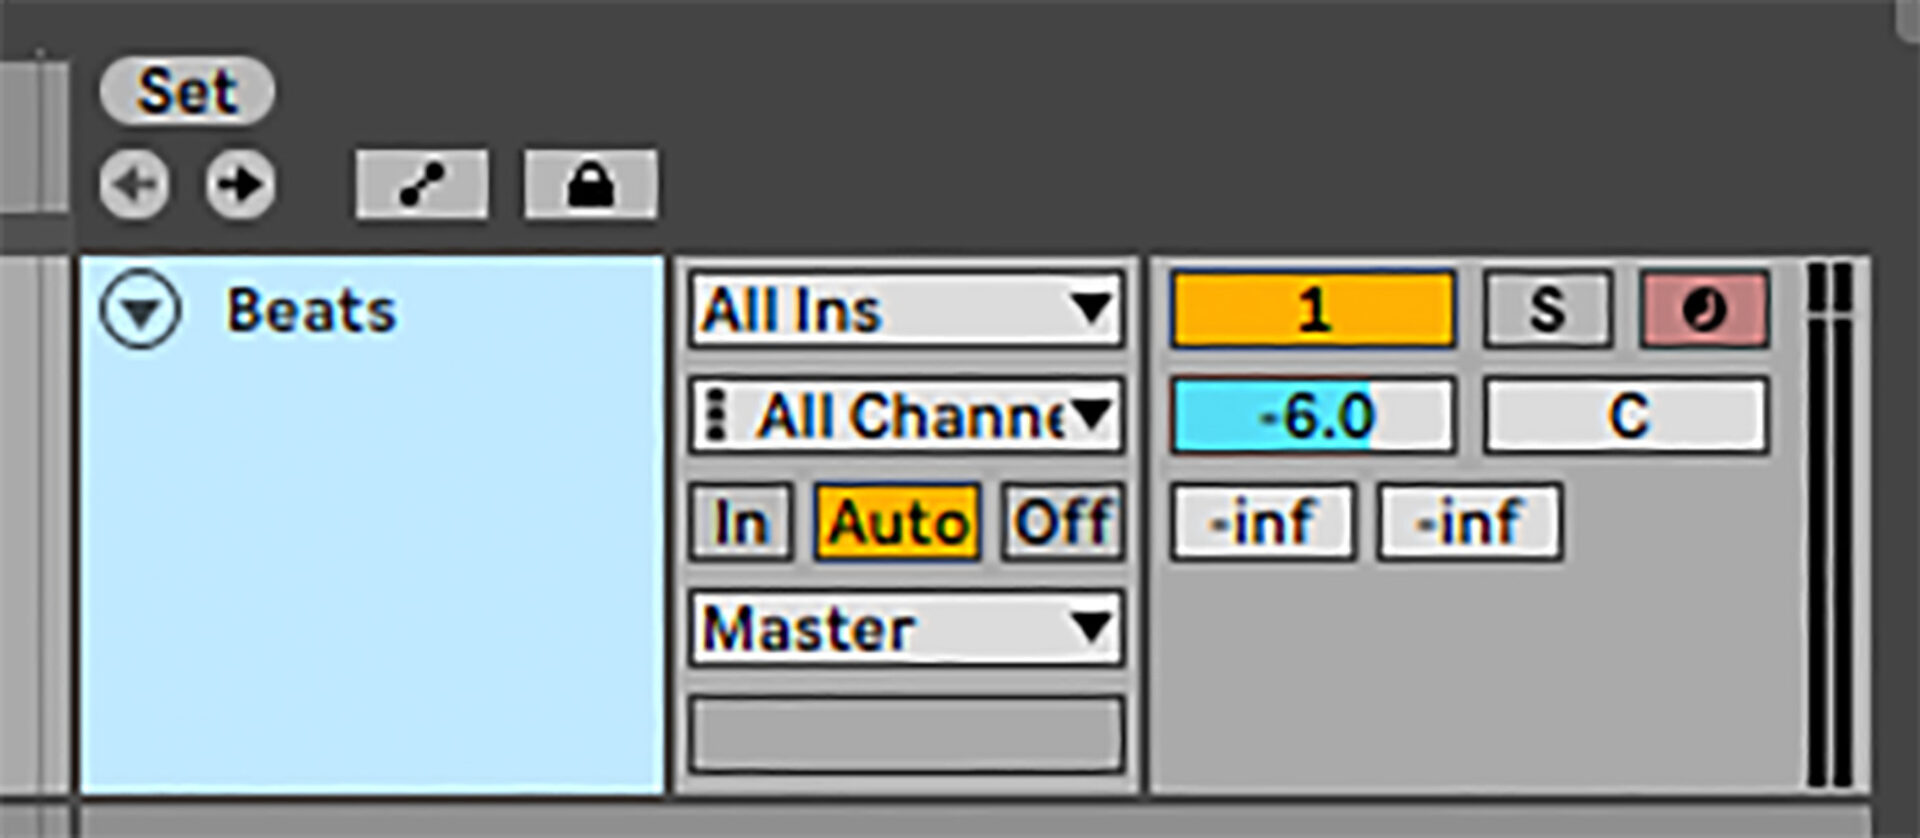
To give us more headroom to add other elements, turn this track’s volume down to -6 dB.
2. Sequence a driving synth sound
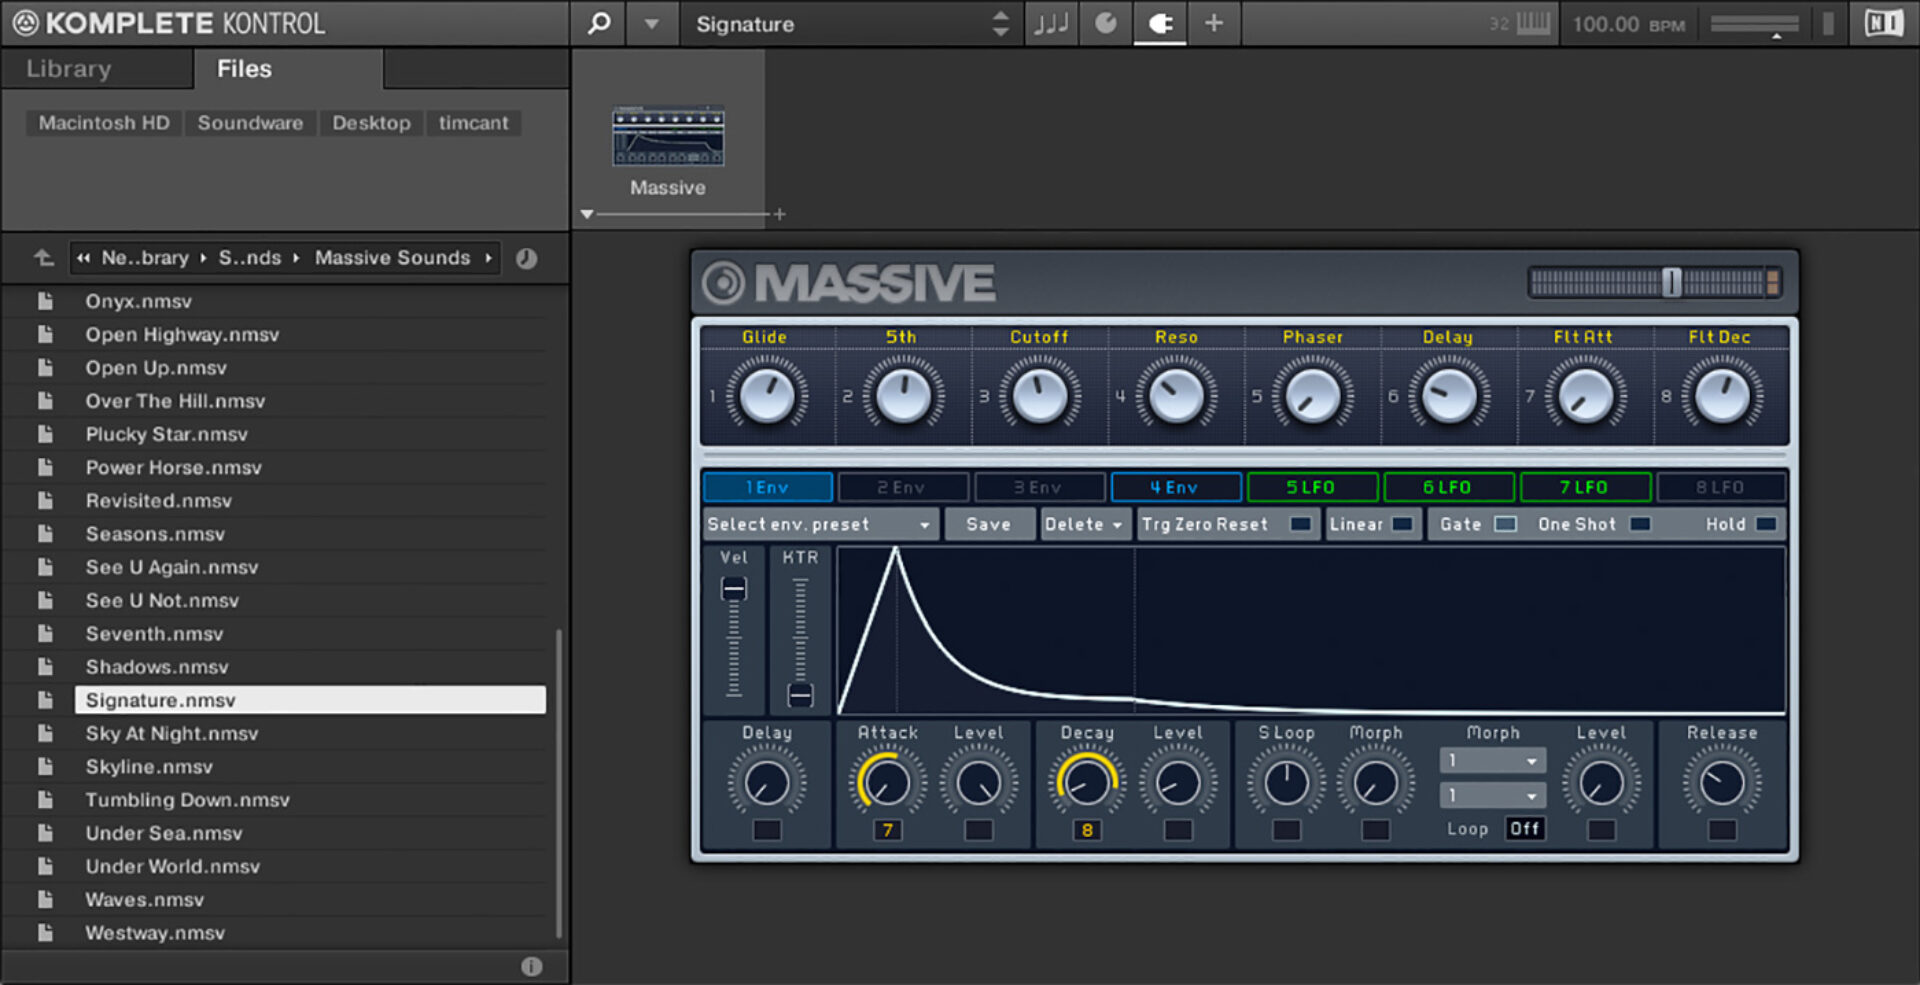
Naturally for a synthwave track we want some big, sawtooth-based synth sounds. Add another Komplete Kontrol on a new instrument folder, and this time open Neon Drive’s Sounds > Massive Sounds folder. Double-click the Signature preset to load it up.
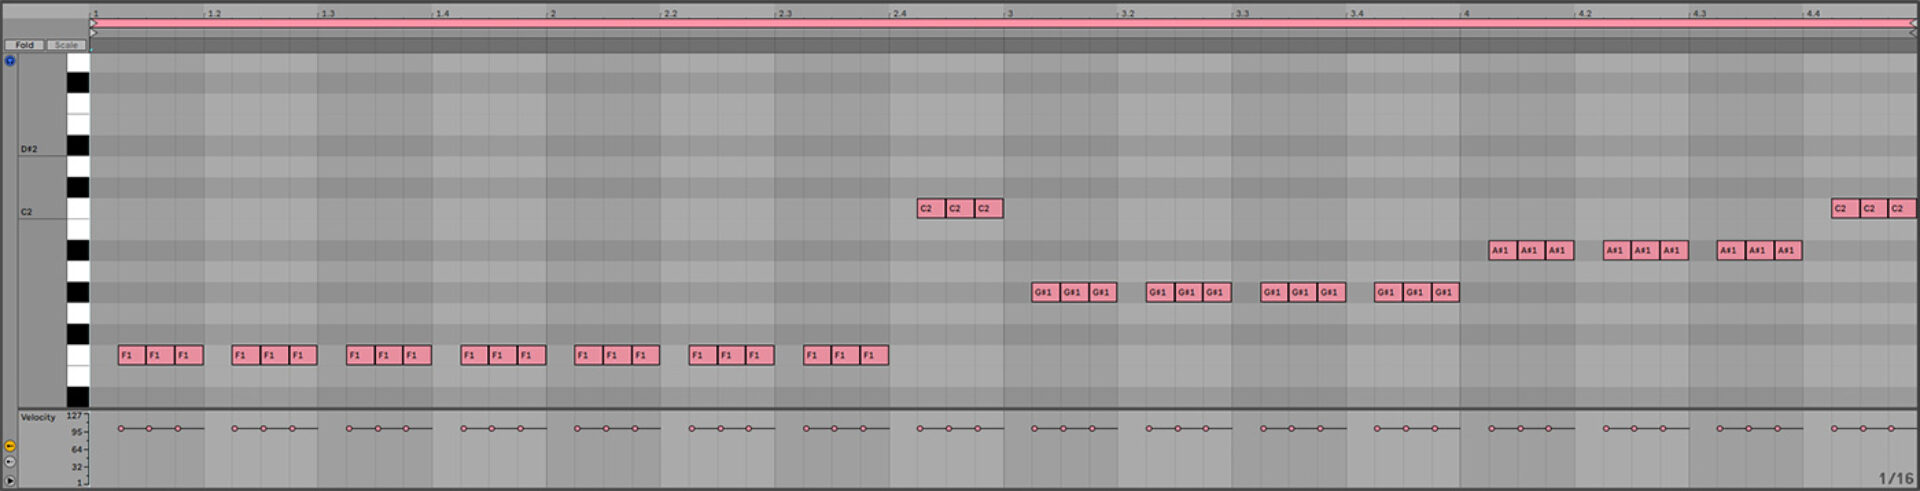
Program in a driving rhythm line that plays on 16th notes, playing F1, C2, G#1, A#1 and C2.

Remove the notes that play on the first beat of every bar. This helps emphasize the kick and snares that we placed there.
Balance this with the drum track by setting it to -6 dB.

3. Write a bass line
Load up Super 8 on a new instrument track. Open the preset browser, click the Bass tag, then click the Circuits preset to load it up.

This follows the driving synth part, but it plays on every other 8th note, creating syncopation with the kick drum.

Set this track to -6 dB to balance it with the other elements.

4. Modulate a synth sweep
Let’s beef-up our driving and bass synths with an epic sweep. Add Komplete Kontrol on a new instrument track, and this time load up Open Highway from Neon Drive’s Sounds > Massive Sounds folder.

This part follows the driving synth line in simplified form.

Add some delay and reverb to put the sound in a virtual space.

Set this track to -1 dB to balance it with the others.

5. Use a synth for rhythm
We have plenty going on in our mix’s low and mid-range, so let’s focus on the highs next. Load up Reaktor 6 on a new instrument track, and load up Monark from the Player tab. Click the patch list and select the Classic > Neon Delay preset.

This patch is quite loud, so right away let’s turn it down to -11 dB to balance it with the other elements.

Copy the 16th note pattern we’ve used here that flits between F3, F4, and D#3.

Add a high-pass filter and some reverb to take the weight out of the sound and help it sit comfortably in the mix.

6. Sequence a windy synth
Let’s add another high-end sound. On a new instrument track, add Reaktor and again load Monark, but this time load up the Classic > Clarinet instrument.

Again this patch is quite loud, so set it to -15 dB.

Program in an ostinato that plays F3, D#4, C4, F4 and G#3 on 16th notes as illustrated.

Again, add a hi-pass filter and a reverb to help the sound sit in the mix.

7. Use synth strings
The majority of the sounds we’ve used thus far have been very rhythmic, so let’s add a long, legato synth string sound to give the track some aural variety.
On a new instrument track, add Komplete Kontrol and this time load up Shadows from Neon Drive’s Sounds > Massive Sounds folder.

Sequence this to play languorous C5 and F4 notes.

Set the track to -4 dB to balance it with the other elements.

8. Create atmosphere
Let’s add one final synth element to help us create a compelling arrangement. Add another instrument track, load Komplete Kontrol onto it, and from Neon Drive’s Sounds > Massive Sounds folder load the Westway preset.

Set this track to -12 dB to balance it with the other parts of the track.

Sequence a note that plays F2 for four bars.

This adds a touch of rhythmic texture to the proceedings.
9. Use a drum fill
Adding a drum fill can help keep our arrangement rolling. Add a new instrument track, and again add Komplete Kontrol. This time open Neon Drive’s Samples > Drums > Tom folder, and drag Tom Digitalo 1 and Tom Digitalo 2 onto an audio track.

Set the audio track to -14 dB

Play Tom Digitalo 1 on 16ths on the penultimate beat, with Tom Digitalo 2 playing 16ths on the final beat.

Now open the Samples > Drums > Cymbal folder, and drag Crash Digital onto the first beat of a new audio track.

Set this track to -16.5 dB.

10. Utilize sidechain compression
We want our beats to punch through the mix, so add all tracks excluding the beats to a group.

Add a compressor to the group track, and set its sidechain input to the drum track. We’re using a Threshold setting of -22 dB here.

11. Arrange your track
For the track arrangement, we start with the Beats and Atmos tracks. The Rhythm synth comes in on bar 5, the Sweep synth comes in on bar 9, and the Wind synth comes in on bar 13.
On Bar 17 the Drive and Bass synths enter the fray, with the string elevating things on bar 25.
On bar 33 the Wind and String tracks drop out, with the Sweep dropping out on bar 41.
Here’s the arrangement in full:

12. Master your synthwave track
To make our track sound loud and full, let’s use iZotope Ozone 10 Maximizer. Add this to your master track, and bring its Threshold down to -7 dB.

Start making synthwave today
Here we’ve seen how you can make your synthwave track from scratch. If you’d like to learn more check out our guides on music production, beat making, and how to make a dubstep track.
For instruments, effects and expansions you might find useful, be sure to investigate the Neon Drive expansion along with Komplete 14, Battery 4, Massive, Super 8, Monark and iZotope Ozone 10.
Related articles
-

Inside the evolution of orchestral sampling: an interview with ProjectSAM
Discover how ProjectSAM’s Lineage Series uses NKS and smart features to change orchestral sampling. Plus, save on instruments in our…
-

How New Constellations turn emotion into sound with Massive X
Go inside the studio with New Constellations. Learn how they use Native Instruments gear, happy accidents, and lifelong friendship to…
-

Citizen Kain on building emotion and space with Replika
Citizen Kain explains how Replika helped shape the rhythm, tension, and emotion behind his debut Eversun Records single “Moments.”…
-

The organic precision behind Calcou’s Anjuna release featuring Reaktor
Calcou shares how Reaktor, Monark, and Super 8 shaped the creative balance and live energy behind their new duo EP,…
-

14 NKS instruments that will change the way you create music
Discover 14 NKS instruments to freshen up your workflow. From lo-fi tape synths to cinematic strings, shop the Native Instruments…
-

Parallelle on crafting living basslines with Reaktor and TRK-01
Parallelle share how Reaktor and TRK-01 shape the bass and warmth in 11th Avenue, balancing analog depth with modern control.
-

Where will your sound lead you? Explore the Native Instruments Summer Sale
Save 30% on instruments, effects, and sounds in our Summer Sale. Find the tools to keep your tracks moving and…
-

How Mr. Bill builds sonic worlds in Massive X
Mr. Bill explains how Massive X and instinctive sound design shaped the storytelling process behind his new downtempo album, Mr.