


Learning how to mix your own music is a critical skill for all music producers. It provides an additional layer of creative control and helps listeners experience your music more deeply. To mix songs, you must understand pitch correction, saturation, compression, EQ, reverb, and delay. In this blog post, you’ll learn which music mixing software and techniques to use when mixing your own music.
Learn how to mix your own music:
- Set rough track levels
- Tune your audio samples
- Thicken and enrich your recordings
- Control the dynamic range of your audio
- Enhance and reduce tonal characteristics
- Position elements across the stereo field
- Create a shared sense of space
- Use echoes to add rhythm and emphasis
Follow along with the new bx_enhancer from Plugin Alliance, a powerful mixing plugin that makes mixing recordings simple.
1. Set rough track levels
The first step of mixing a song involves setting rough track levels. Identifying mix issues is much easier when you listen to a balanced mix. Many new music producers overlook this step and jump directly to processing their tracks with mixing plugins. As a result, they end up applying ill-informed processing to tracks.
You should provide your mix with enough headroom to avoid clipping. Clipping is a type of waveform distortion that occurs when your audio signal exceeds the 0 dB limit of your digital audio workstation (DAW). As a general target, aim for a consistent 9 dB of headroom on your master track. This ensures a healthy signal level while providing enough headroom to accommodate sporadic transients within your mix.
Another benefit of setting rough track levels is that it reduces ear fatigue and allows you to mix songs longer before taking a break. Turning up the output on your audio interface to hear a soft pad will increase the overall volume of your mix and strain your ears. When listening to a balanced mix, you won’t need to adjust the overall volume as often.
Personal preferences come into play when setting track levels, in addition to unofficial standards tied to different genres. For example, setting the kick and bass in a hip-hop track relatively louder than in a rock song is common. These standards are subject to change as new trends emerge, so take this with a grain of salt.
You’ll develop a sense of what sounds balanced over time, but there’s a trick you can use to set moderately balanced track levels using pink noise. Pink noise reduces in amplitude as its frequency increases at a rate of 3 dB per octave. This type of noise is unique because it sounds balanced to the human ear across the frequency spectrum. Knowing this, you can use pink noise as a reference when setting track levels. The following video demonstrates how to mix music using pink noise.
2. Tune your audio samples
Nothing ruins a mix faster than out-of-tune audio samples. If you’re new to mixing and still dialing in the pitch accuracy of your ears, it helps to run your recordings through a tuner. Even if you tune a guitar prior to recording, the strings can loosen throughout a recording session. The result is that recordings captured at the end of the session will sound flat compared to recordings captured at the beginning.
The Brainworx bx_enhancer is a fast and easy-to-use mixing plugin for musicians. It includes a built-in tuner display, saturator, clipper, compressor, EQ, automatic level-matching feature, and various meters. All the processing you need to mix your own music is packaged into a (mostly) pre-configured processing chain. bx_enhancer’s prominent tuner display helps you instantly identify when an instrument is out of tune.
Consider using a pitch correction plugin like Melodyne 5 Essential to pitch correct vocals. This plugin is included in iZotope’s Music Production Suite 6. Type the key of your song into Melodyne, click Transfer, and then engage playback to make audio appear in the plugin. Highlight the notes you want to pitch correct and click the Correct Pitch Macro. Make sure there’s a checkmark beside “Snap to chord scale.” Adjust the Pitch Center value to 100%, then click OK. Listen to your audio to ensure no artifacts, and manually adjust individual notes as necessary.
3. Thicken and enrich your recordings
If your mixes don’t sound as rich and full as professional ones, there’s a good chance you’re not saturating your songs effectively. Too little saturation can lead to harsh and thin productions, while too much saturation can result in muffled and distorted tracks that lack clear low-end. Hardware selection and the type of saturation applied affect the final outcome.
Your microphone, preamp, and other hardware choices can greatly impact the tonality of your recordings. My go-to microphone for pop and hip-hop vocals is a Neumann TLM 103. The reason I like it is the same reason many people dislike it: it has a clean and transparent sound that lacks color. It doesn’t provide the flavor or warmth of a tube mic or the natural compression of a dynamic mic. While it’s always possible to add color to a recording, it’s much harder to remove it. Recording with a TLM 103 allows me to take my recordings in any direction I like, in the box.
In the hardware world, the preamp you record through affects the color of your recordings. The general-purpose preamps built into audio interfaces are typically meant to provide a neutral sound. It’s uncommon for them to dish out the flavor found in many standalone preamps. For example, I connect my TLM 103 to a Neve-style preamp to add a thick and fuzzy tone when producing rock and rap.
If you don’t have a colorful hardware preamp, you can achieve a similar outcome using bx_enhancer. Record audio into your DAW using the neutral-sounding preamps built into your audio interface. Then, turn up the Boost knob within bx_enhancer’s Sculpt section; this applies analog-style saturation to the signal, adding additional harmonic content that helps thicken the sound.
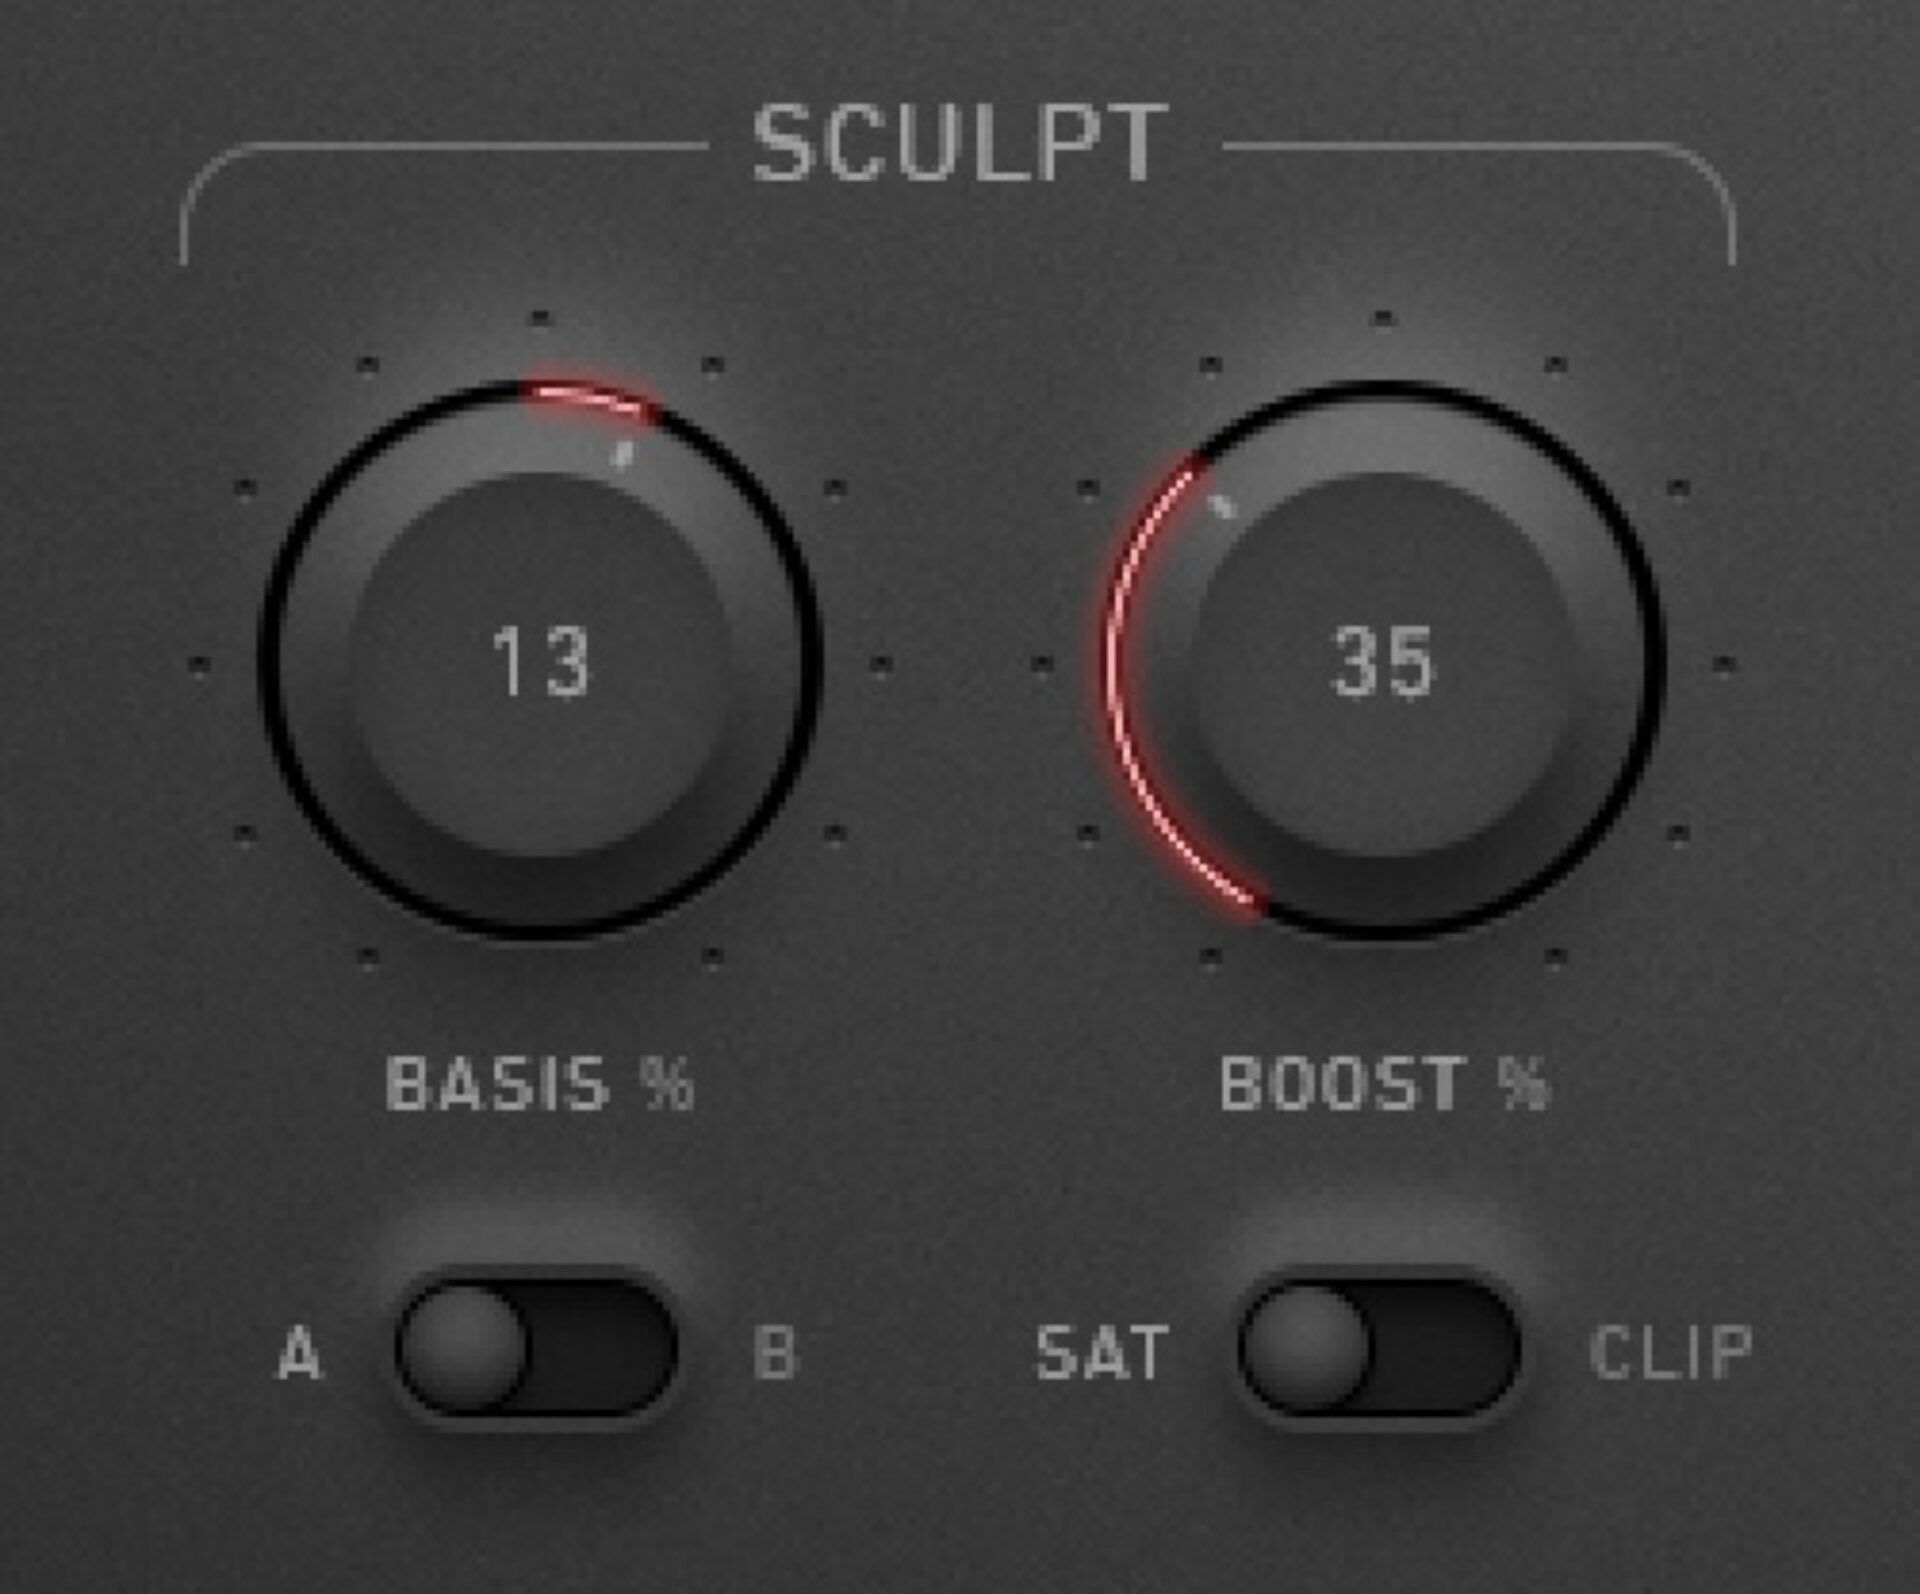
For a crunchier distorted effect, toggle the Sculpt module into Clip mode to apply analog-style clipping. Unlike digital clipping, the clipping applied by bx_enhancer can sound quite pleasing, especially when applied to drums. You can use this clipping effect to recreate the sound of old drum machines. Consider using a dedicated clipper plugin like bx_clipper for more advanced clipping control.
Saturating a sound can increase the prominence of certain frequency ranges, leading to an unbalanced sound. There’s a Basis knob built into bx_enhancer’s Sculpt module that acts as a tilt filter when set to “A” or a mid boost/cut when set to “B.” Add saturation to vocals, guitars, bass, and drums to thicken them, then rebalance their tonality using bx_enhancer’s Basis knob.
4. Control the dynamic range of your audio
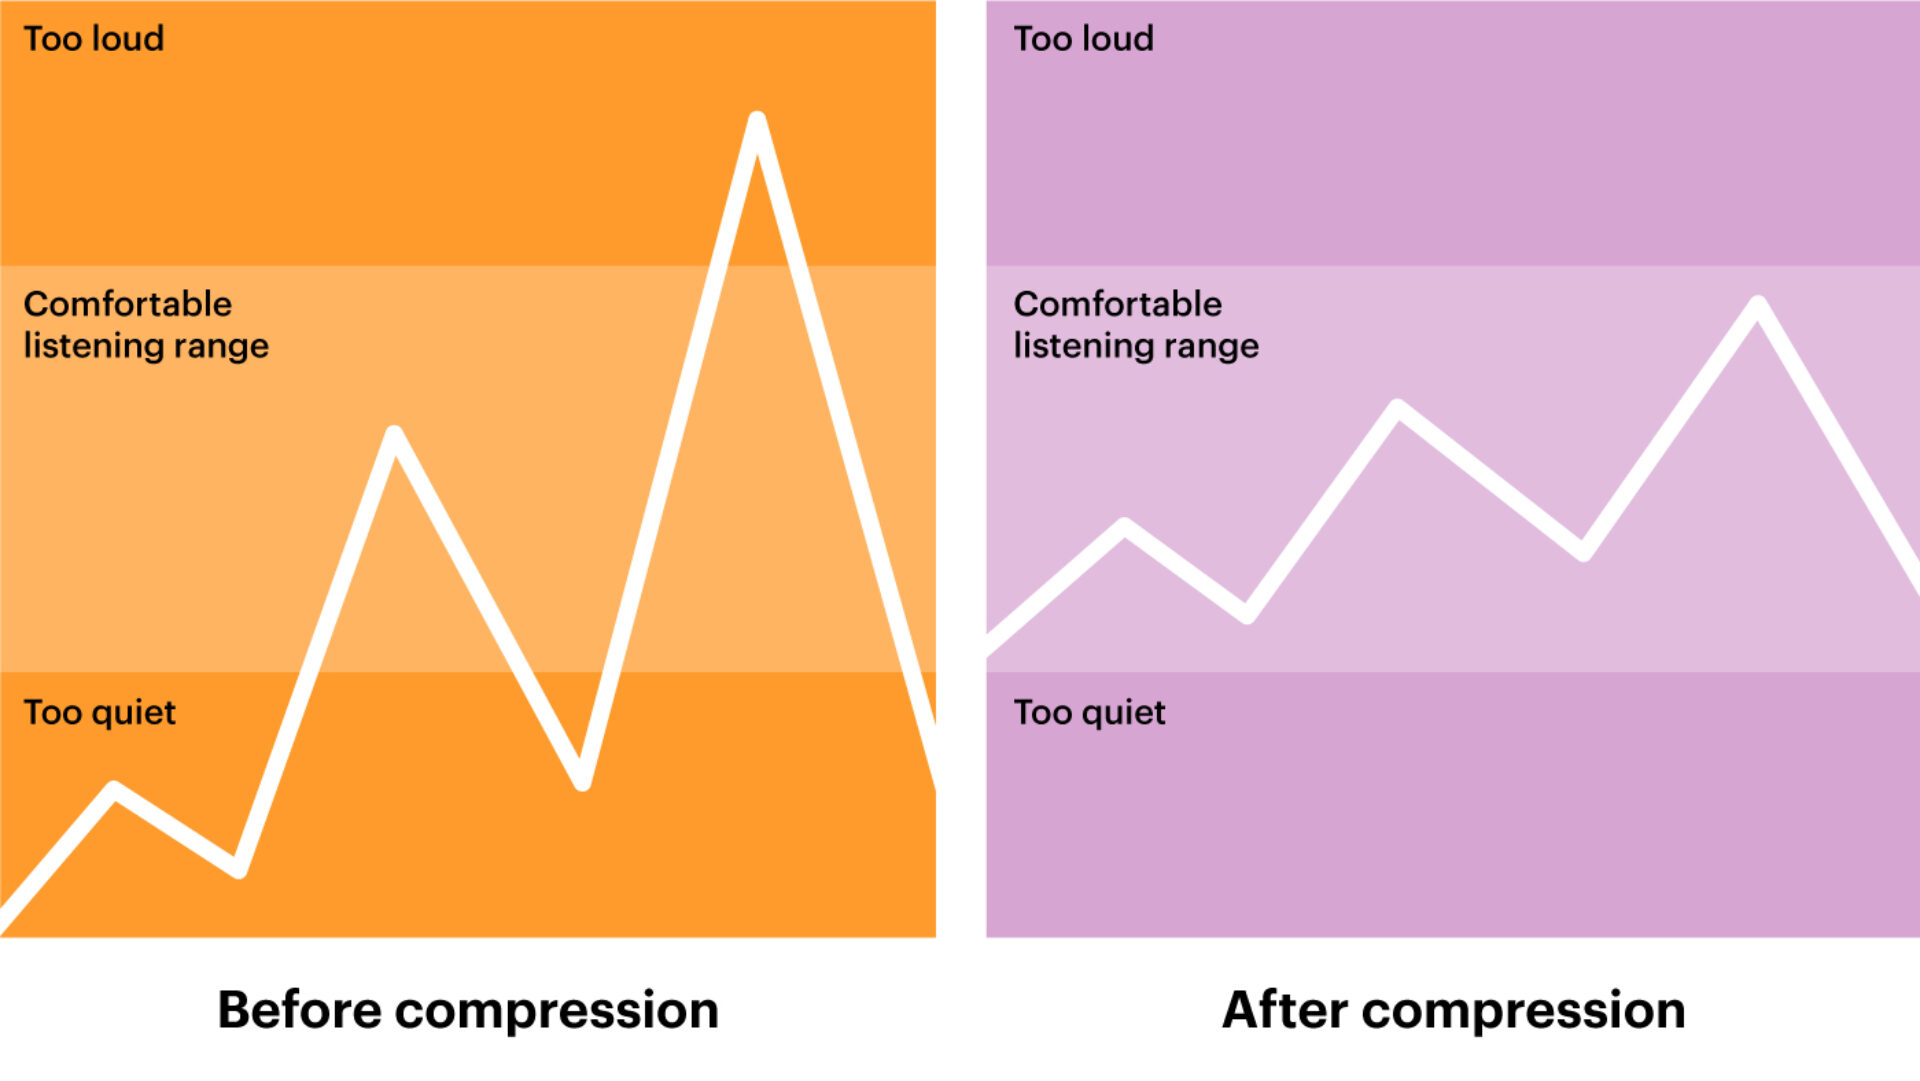
The dynamic range of a recording refers to the volume difference between quiet and loud sections. If a vocalist whispers one section of a song and belts another, the recording will have a large dynamic range. In contrast, the dynamic range will be quite small when a rapper screams into a microphone at the same level throughout an entire song.
Fitting dynamic recordings into a dense mix can be problematic. Quiet parts of the signal may get lost below the noise floor, while loud parts stick out like a sore thumb. A compressor allows you to reduce the level of loud parts, bringing them closer in level to quiet parts. With the signal compressed, you can increase its overall level to sit appropriately within an ideal level range.
Not all recordings require compression, but many raw recordings do. Dynamic music intended to be listened to in its raw form, like orchestral music, may receive little to no compression. Listening to this type of music in a quiet environment through a quality hi-fi system can sound like you’re at the symphony.
Pop, rock, and hip-hop are often played in public spaces like gyms and restaurants that have a high noise floor. A small dynamic range allows music to sit above the noise floor without certain sections appearing too loud. Compression can also contribute to an upfront, powerful, and full sound, which are desirable characteristics within these genres.
Brainworx’s bx_enhancer includes an analog-style compressor that allows you to apply gain reduction near the beginning or end of the processing chain. Applying compression before EQ allows you to perform surgical EQ adjustments that lead to a more detailed sound while applying compression after EQ is better suited for general tone shaping.
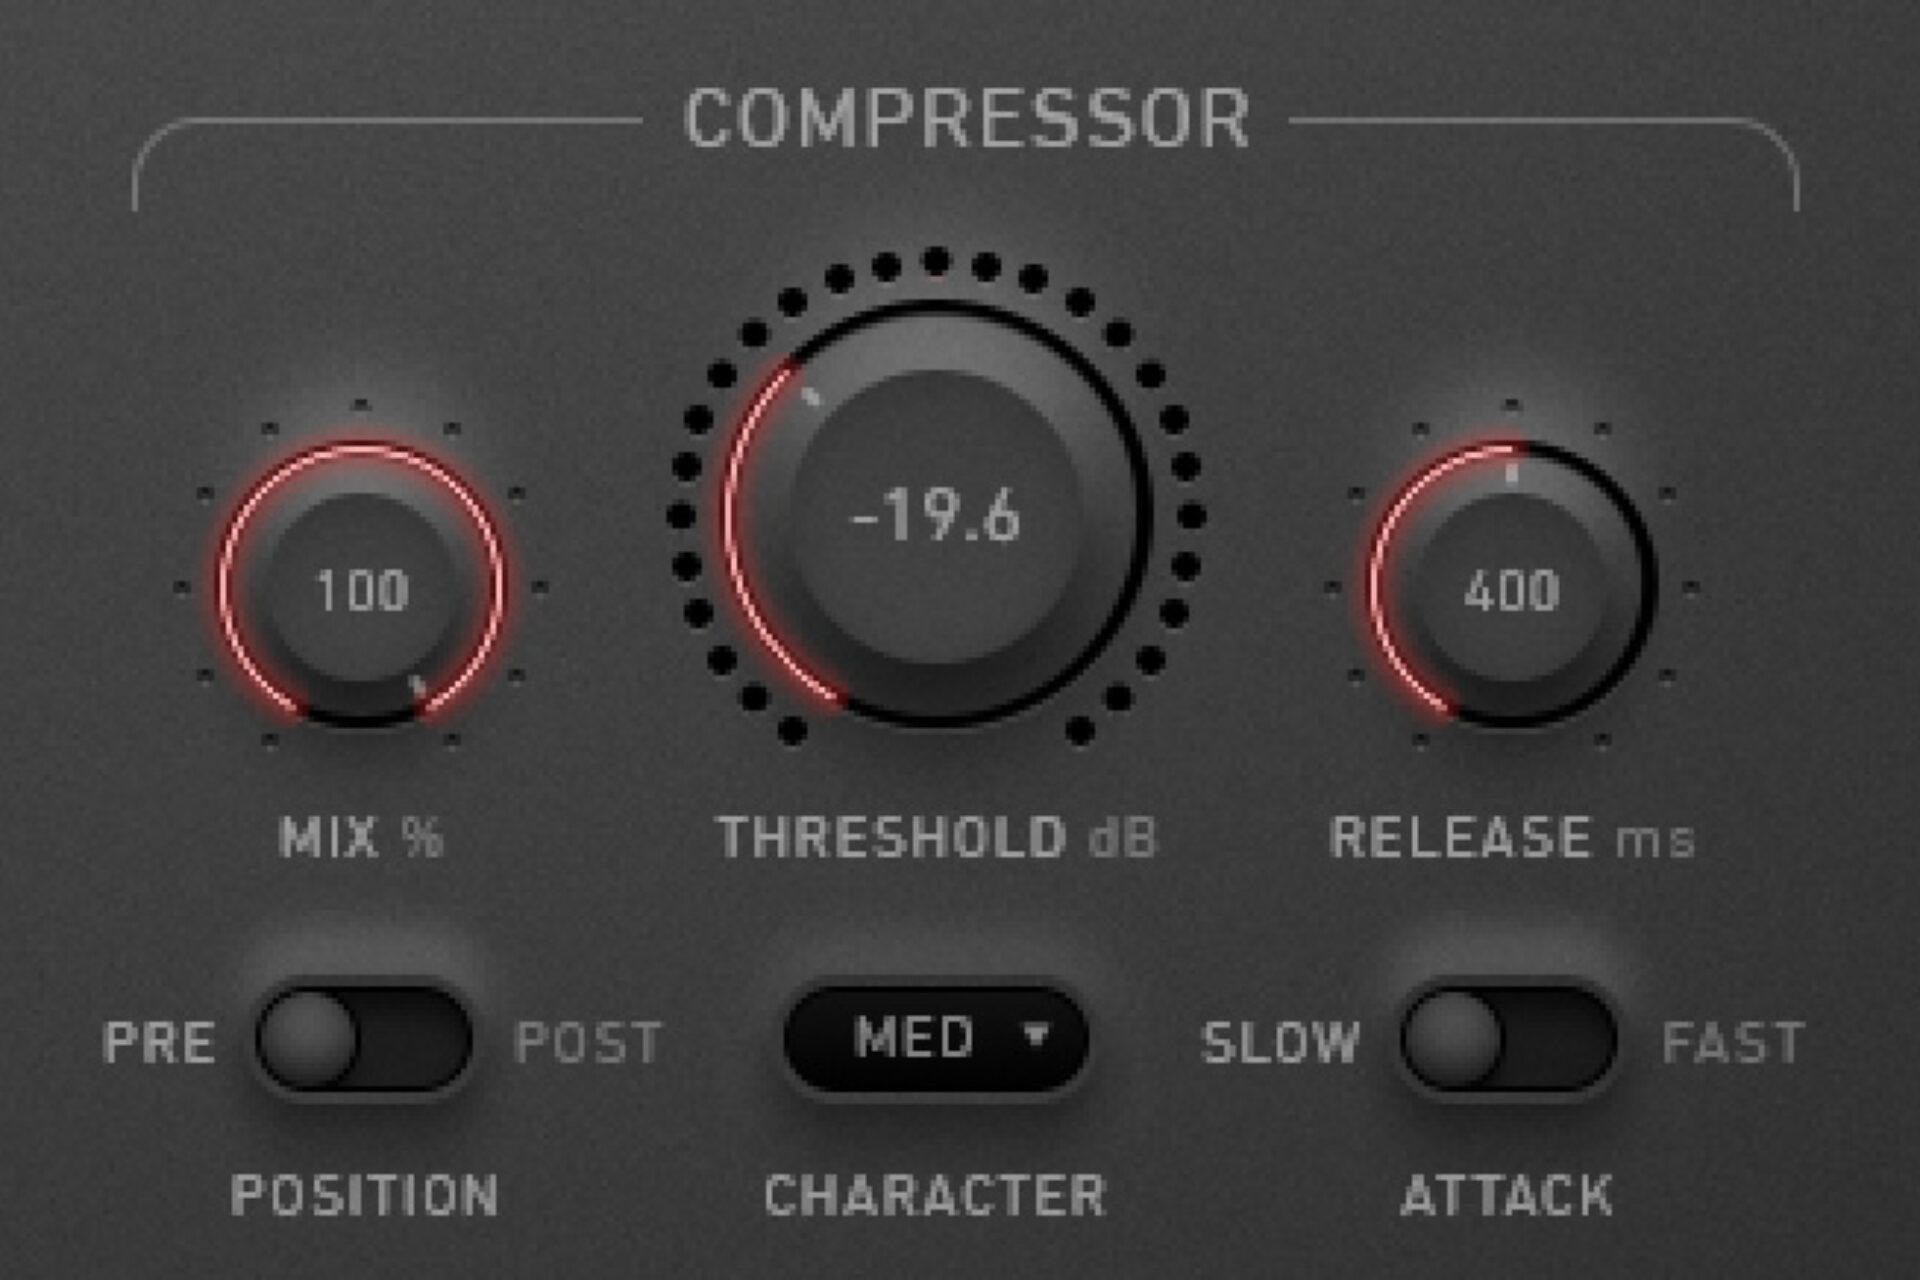
The compression settings you should use depend entirely on the sound you’re processing. A fast attack can help tame sharp transients, while a slow attack will preserve articulation. A fast release can lead to transparent gain reduction, while a slow release will result in a smoother sound. Use a soft knee for audio material that slowly changes in level or a medium/hard knee for more aggressive material. These are general guidelines, so make adaptations to fit your audio material.
5. Enhance and reduce tonal characteristics
Shaping the tone of your recordings using an EQ allows you to enhance their desirable characteristics, reduce unwanted characteristics, and fit sounds together like puzzle pieces. For example, you may want to increase the airiness of a vocal by boosting at 5,000 Hz and remove low-end rumble by cutting around 80-200 Hz. The result is that the top end of the vocal will float above your mix while leaving room for a dedicated bass instrument.
bx_enhancer includes a Colour section with a high-pass, Bass, Mid, High, Excite, and low-pass filter. Each filter uses a gradual slope, resulting in smooth EQ adjustments. While most of the filters behave as expected, the Excite filter is unique. It scoops out frequency content around 1,000 and 5,000 Hz while boosting frequencies between 10,000 and 20,000 Hz.

None of the knobs in the Colour section are labeled with a center frequency. bx_enhancer removes distractions that often mislead new producers into mixing with their eyes rather than their ears. The plugin’s simple design prompts musical results, which is what you should always strive for when mixing.
6. Position elements across the stereo field
The human brain uses timing, frequency, sound pressure level (SPL), dynamics, and reverb to localize sounds. Using various mixing techniques, you can trick the brains of music listeners into perceiving your mix in three dimensions. Imagine sitting in front of a pair of speakers, equally spaced apart. When you play a song through these speakers, you’ll be able to perceive the dimensions of height, depth, and width.
Low-frequency sounds will be perceived below high-frequency sounds. Quiet, compressed, and reverberant sounds will be perceived further away than loud, dynamic, and dry sounds. A stereo sound playing the exact same information through the left and right speaker will sound like it’s playing from a phantom sound source directly between the speakers. Reducing the level of one of the channels will pull the sound source toward the opposite speaker.
A wide mix can sound fuller, richer, and more engaging than a narrow mix. Saturation, compression, and EQ mainly affect the height and depth of a mix while having little effect on its width. bx_enhancer has a dedicated Mono Maker, Stereo Width, and Pan knob that allow you to control the position of sounds along a mix’s horizontal axis.

Summing the low-end of sounds into mono can improve phase alignment and lead to a punchier, more impactful low-end. bx_enhancer’s Mono Maker applies this form up processing up to 2,000 Hz. It can help you improve the phase alignment of kicks, 808s, and basslines, making your mixes playback clearly through mono-playback systems.
It’s common to record acoustic guitar using an X-Y microphone technique, which provides moderately wide stereo recordings. As your song comes together, you may realize that this recording technique sounds too narrow and that you need to fill additional space. Turning up the Stereo Width knob on bx_enhancer allows you to do this.
Use the Stereo Width knob in moderation to avoid phase-related issues.
7. Create a shared sense of space
Reverb is the sound that lingers after a sound source has stopped producing a sound. When you clap your hands (sound source) in a gymnasium, you’ll hear a washed-out version of your clap diffuse throughout the space over the next couple of seconds; this is called a reverb tail.
Picture reverb like the sonic fingerprint of a room. Every room is a different size, shape, and material. Room size affects reverb duration, with large rooms delivering a longer and more spacious reverb than small rooms. Shape contributes to the reverb’s character, with asymmetrical rooms leading to more even and natural-sounding reverb than square rooms. Finally, the materials within a room, such as wood, fabric, brick, and glass, impact reverb by either reflecting or absorbing sound, amplifying or dampening certain frequencies.
A reverb plugin like Native Instruments’ RC 24 allows you to create the impression that all the elements of your mix exist within a shared space. It includes parameters that let you manipulate the properties of the perceived space and modify the vibe of your song. A rock band performing in a small club will sound different from when it performs in a parking garage.
Since reverb is typically used to create a shared sense of space within a mix, you can set up a short reverb on an aux track. Send all the tracks that require reverb to the aux track and make sure the reverb is set to 100% wet. A little goes a long way, so don’t overdo it. Too much reverb can quickly muddy your mix and make it difficult to understand lyrics.
Consider applying an EQ to the aux track containing your reverb. By cutting below 500 Hz and above 2,000 Hz, you’ll remove a lot of conflicting frequency content. This helps control the reverb and confines it to a designated space within your mix.
You may want to apply a long reverb tail to certain tracks, like background vocals, arps, or dreamy acoustic guitars. Instead of applying reverb directly to these tracks, duplicate your short reverb aux track, and increase the reverb’s decay time to 4+ seconds. Send the tracks that require additional reverb to this secondary aux track. Using aux tracks to apply reverbs of different lengths will help keep your project organized and reduce your computer’s CPU load.
8. Use echoes to add rhythm and emphasis
A delay plugin generates echoes and is another type of spatial effect. Audio is fed into a delay plugin’s buffer and then played back at set intervals, reducing in level over time. You can use a delay to add rhythmic effects to percussion or emphasize vocal phrases. Replika XT is a multi-purpose delay that can be used for various applications.
By setting the delay time to sync with the tempo of a track, you can create echoes that align with the beat, enhancing the groove and adding a unique character. For instance, applying a dotted eighth-note delay to a snare or hi-hat can create a syncopated, bouncing rhythm that adds interest and movement.
This technique works well for electronic music, where a delay can transform simple drum patterns into intricate rhythmic landscapes. Apply Replika XT to an aux track and set the Mix knob to 100% in the same way that you’d apply a reverb to your mix.
By automating Replika XT to affect specific parts of a vocal line, you can draw attention to key lyrical moments or add a dramatic flair. This technique often involves longer delay times and moderate feedback to create a trailing echo, highlighting the end of a phrase or a significant word. It’s a common technique in pop, rock, and electronic music, where vocals are a song’s main focus.
Start mixing your own music with ease
Mixing music can be simplified with plugins like bx_crispytuner, bx_enhancer, RC 24, and Replika XT. You can mix any song with a pitch correction plugin, saturator, compressor, EQ, reverb, and delay.
For more on mixing, check out the Are You Listening? mixing and mastering video series, as well as our guides on compression, EQ, and mixing with free plugins.
Related articles
-

Inside the evolution of orchestral sampling: an interview with ProjectSAM
Discover how ProjectSAM’s Lineage Series uses NKS and smart features to change orchestral sampling. Plus, save on instruments in our…
-

How New Constellations turn emotion into sound with Massive X
Go inside the studio with New Constellations. Learn how they use Native Instruments gear, happy accidents, and lifelong friendship to…
-

Citizen Kain on building emotion and space with Replika
Citizen Kain explains how Replika helped shape the rhythm, tension, and emotion behind his debut Eversun Records single “Moments.”…
-

The organic precision behind Calcou’s Anjuna release featuring Reaktor
Calcou shares how Reaktor, Monark, and Super 8 shaped the creative balance and live energy behind their new duo EP,…
-

14 NKS instruments that will change the way you create music
Discover 14 NKS instruments to freshen up your workflow. From lo-fi tape synths to cinematic strings, shop the Native Instruments…
-

Parallelle on crafting living basslines with Reaktor and TRK-01
Parallelle share how Reaktor and TRK-01 shape the bass and warmth in 11th Avenue, balancing analog depth with modern control.
-

Where will your sound lead you? Explore the Native Instruments Summer Sale
Save 30% on instruments, effects, and sounds in our Summer Sale. Find the tools to keep your tracks moving and…
-

How Mr. Bill builds sonic worlds in Massive X
Mr. Bill explains how Massive X and instinctive sound design shaped the storytelling process behind his new downtempo album, Mr.