


One of the great things about being a music producer today is the accessibility of high-quality sounds. With just a few clicks, you can have choirs, orchestras, brass ensembles, synthesizers, and more at your fingertips, thanks to samplers and VSTs.
The challenge with VST-based strings is that, at their core, they’re digital.
They respond to MIDI input – which is more or less just a multitude of binary numbers – and produce a specific output. However, this digital nature can make them feel mechanical or flat, falling short of the expressive and non-linearity of the human touch. Real human-played strings have slight imperfections and variations in attack, release, and sustain that add emotional depth.
However, you can achieve lifelike recreations of these instruments if you know where to look, how to layer, and how to process them.
Jump to these sections:
- Layering explained
- Contrasting string layers
- Three things to always try when layering
- Common layering mistakes to avoid
Layering is the key to making Kontakt-based strings sound as if real musicians play them. It’s a blend of layering, some post-processing, and avoiding common pitfalls that new producers make. Let’s dive into how you can achieve this.
Layering explained
Layering strings is an effective way to mimic the expressive and dynamic qualities of real string performances. Regardless of the library, each string patch has unique characteristics – slower attacks, fuller bodies, or more expressive tails.
On their own, these patches can feel overly mechanical or digital if all you do is queue up the preset and noodle away or drop them in a MIDI file. However, when layered, one patch’s articulation can complement another’s dynamics, creating a more natural and evolving playback, even with basic MIDI input and without expensive expression pedals or meticulous velocity adjustments.
The challenge lies in approaching layering correctly and it’s this simple, overarching mindset that will guide and inform almost everything else we chat about throughout this article.
String layers, which often sustain longer notes, tend to overlap in both time and frequency. If not managed carefully, this overlap can introduce muddiness and a lack of clarity. To avoid this, selecting patches with complementary qualities is crucial – one might offer a richer, warmer sustained section, while another provides a brighter, fast-evolving attack. This balance allows the layers to interact and complement each other, producing a cohesive, evolving sound that feels natural, even from a single keystroke.
Of course the fine tuning, hand-played expressions and small velocity adjustments will always sweeten the deal here. Still, you would be shocked at how much fluidity and natural expression can be baked into a single string sound just by layering two complimentary string layers together.
Contrasting string layers
With all this in mind, contrast truly is king when layering strings. The first step might be pairing sustained strings with legato or more percussive pizzicato strings, but the concept goes much deeper.
For example, layering two string patches from entirely different libraries – like legato strings from Session Strings alongside a more experimental, Foley-inspired patch from a neo-classical library – opens up endless creative possibilities. Tools like Kontakt make this process seamless, allowing you to combine, mix, and shape these layers into something entirely unique.
As you can hear below, this fiddle is great but sounds a bit one dimensional on its own.
And these slow attacking strings are amazing but feel a little “presetty” on their own.
But pairing the two together creates a far more realistic ensemble.
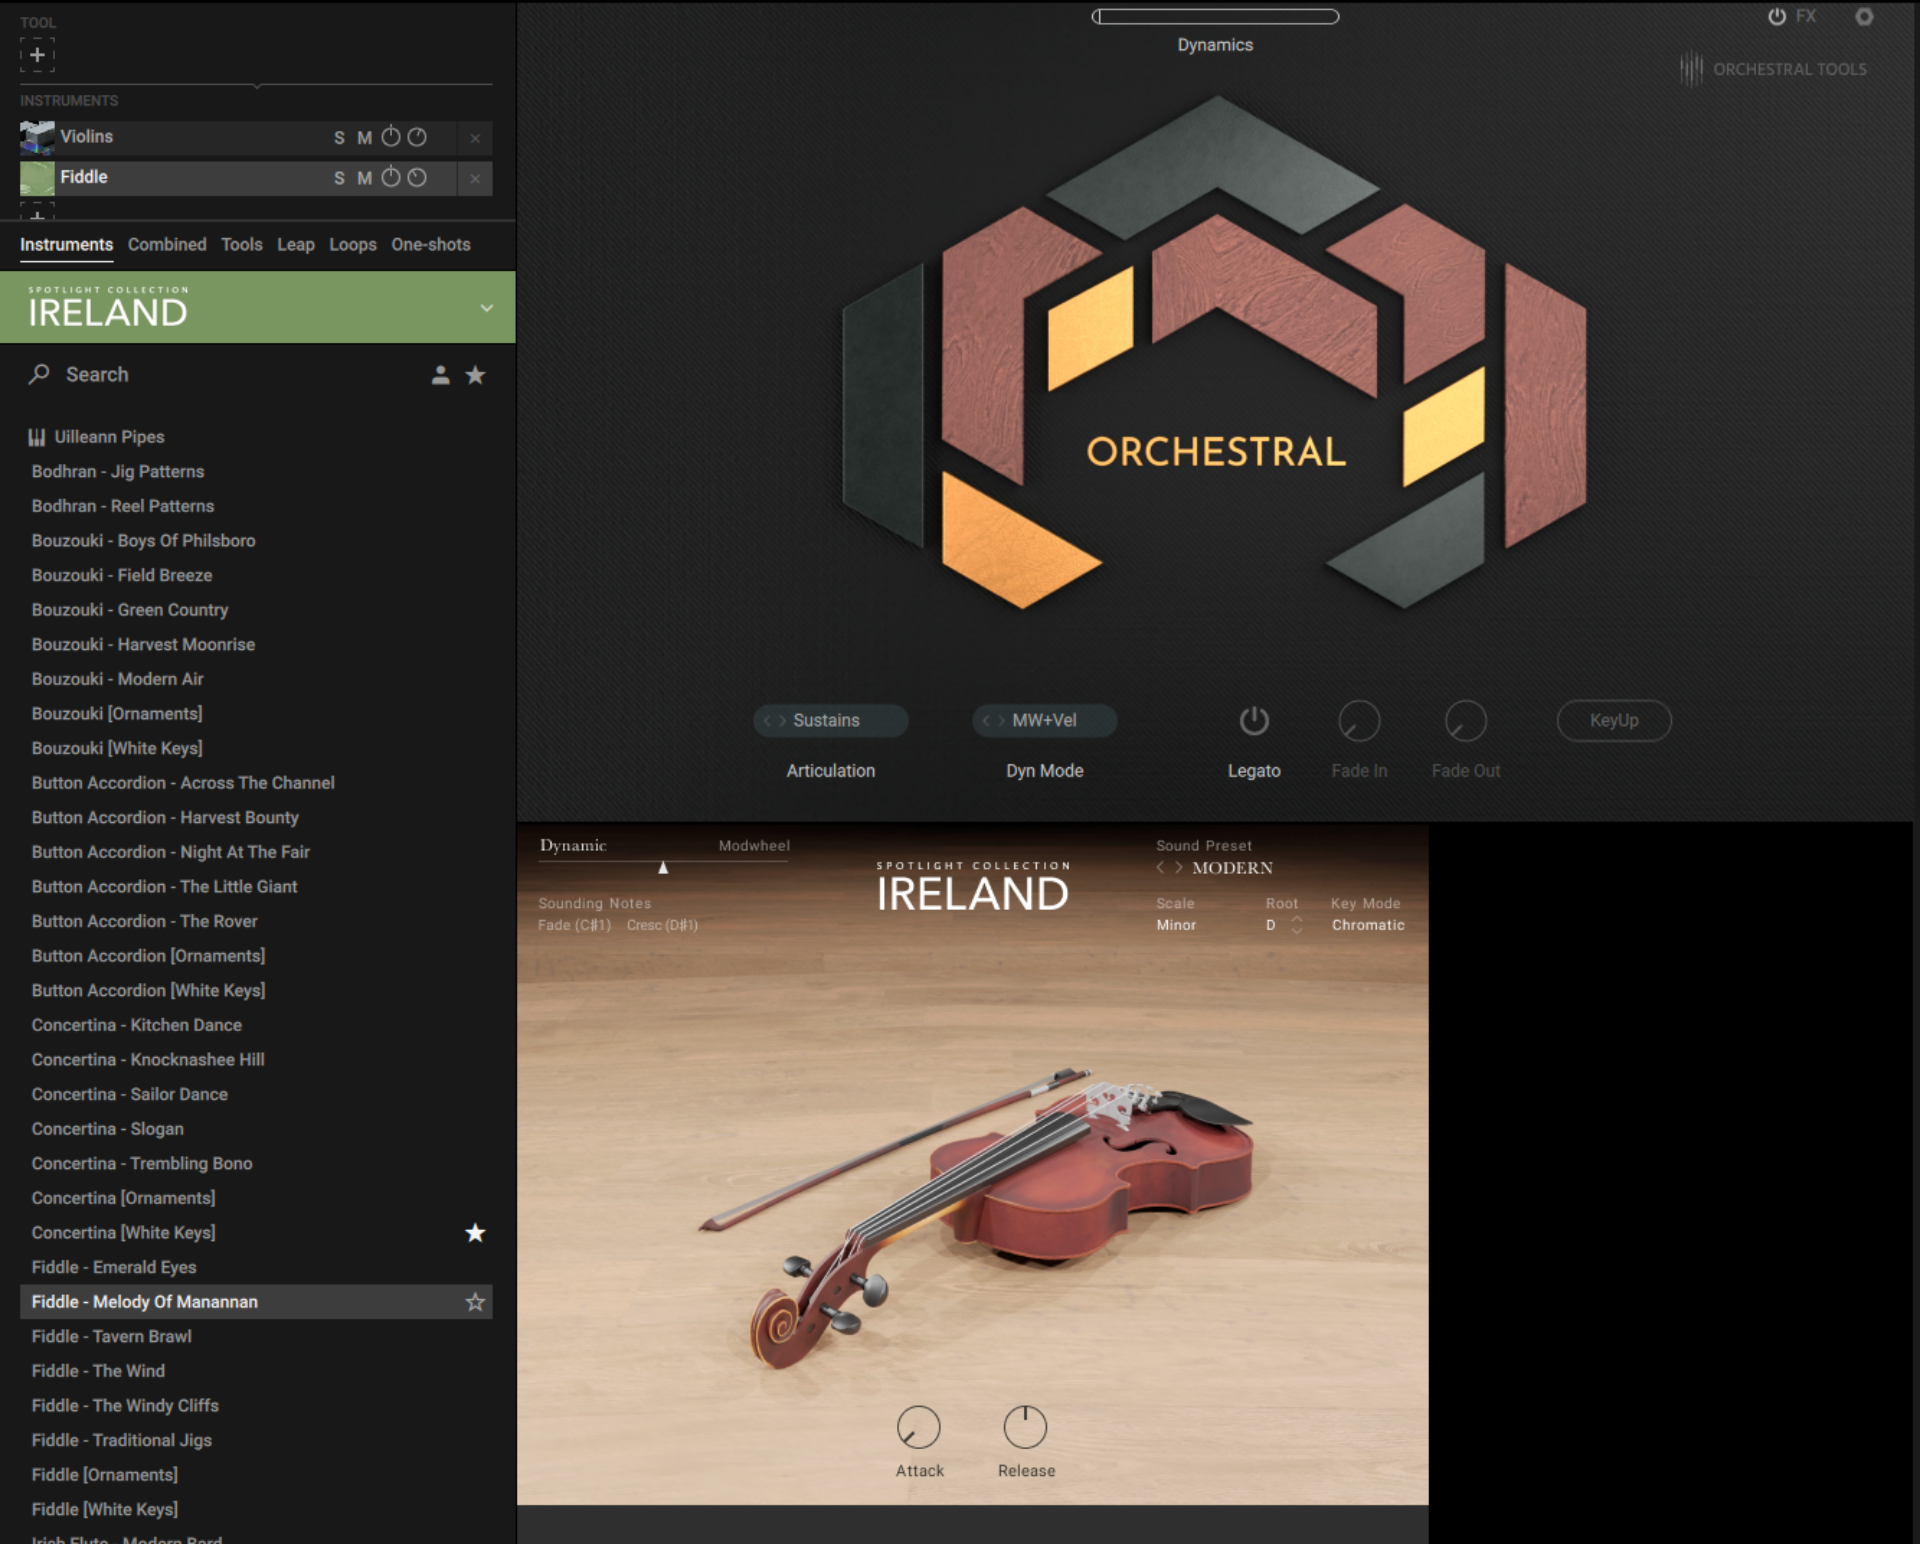
The real X-factor comes from using patches created by different sample makers and musicians. By combining libraries, like the Spotlight Collection: Ireland violins with the Orchestral Tools strings that come stock in Kontakt 8, you’re not just layering tones but also blending distinct recording techniques and performances.
This approach helps you create strings that fit together like puzzle pieces while maintaining an originality that sets your work apart. Most producers stick to a single library, but combining contrasting patches from multiple sources – like a rounder low-string section with a brighter, sharper one – creates unique interactions that others may not have explored.
This idea doesn’t have to be limited to acoustic strings either!
Subtle layers of synthetic strings (or ambient pads even from libraries like Glaze) can add an ethereal gloss or sheen when mixed in the background. These synthetic elements, when used sparingly, can bring a completely fresh dimension to an otherwise acoustic foundation. The goal is always contrast – finding innovative ways to combine these layers so the result feels greater than the sum of its parts.
That’s where the magic truly happens.

Even more unique results can come from layering a synth patch with held strings. Let’s hear the contrasting strings again.
It’s another great string patch, but it lacks the pro-level nuance and depth. Adding a touch of phase-driven movement with the Glaze library might just be what is needed.
Lightly mixing in the pads under the strings creates a modern sound that’s alive and detailed.
Three things to always try when layering
When done correctly, layering just two or three string patches can produce a dynamic and lifelike ensemble that feels far more authentic than any single patch could achieve alone.
That said, it’s worth pushing this idea further.
Here are three sound design and mixing techniques to try whenever you’re layering strings to maximize potential while keeping the layers minimal. Less is more, and these moves will help you achieve that efficiently:
1. Automation
The best way to bring computer and DAW-based music to life with expression is through automation – there’s no secret there. However, layering multiple string patches opens up more opportunities for automation, all within a single sound. For instance, combining synthetic strings with acoustic or Foley-driven layers gives you unique touchpoints to emphasize at different moments in your track.

Take the synthetic string layer mentioned in the previous section: automating the filter cutoff at key points can make its synthetic quality shine, drawing the listener’s attention to a standout moment. Meanwhile, adjusting the attack or sustain on the Foley-driven layer can highlight its percussive nature during a specific section. Libraries like Conflux are particularly well-suited for this, blending synthetic and acoustic qualities seamlessly. For example, you can lean into its acoustic feel for most of the track, then automate it to shift into a sharper, synthetic timbre for an impactful transition.
Conflux truly excels when paired with softer, more subdued libraries like Session Strings or Spitfire. These libraries provide a warm, organic base, allowing the more aggressive qualities of Conflux to cut through in a dynamic and compelling way.
Automating such contrasts throughout the arrangement creates moments that feel intentional and exciting, flipping traditional string design on its head.
2. Panning
There’s a common analogy comparing mixing and soundstage placement to the layout of an orchestra. The conductor stands in the sweet spot, much like we do as producers in our studios. Picture yourself in that position: strings span from hard left to hard right on the stage, which is a perfect reference for how to layer and pan strings in your mix.

Elements down the middle of the mix tend to draw the most attention, acting as lead layers. This is why string layers – often used as harmonic or textural support rather than leads – can benefit from more aggressive panning. By spreading string layers wide, you free up the center for lead elements like vocals, synths, or piano lines to shine.

Here’s where the real magic happens: because string layers often have varying attacks and evolving dynamics, panning one layer hard left and another hard right creates a natural width. The differences in how each layer evolves on the left and right channels create a wider soundstage, making your mix feel more immersive and your lead elements stand out even more.
Using tools like Kontakt makes this straightforward. Within a single instance, you can pan and adjust the volume of each string layer individually, blending multiple libraries to craft a sound that’s both wide and cohesive. This approach doesn’t just improve clarity – it adds a professional polish to your mix with minimal effort.
3. Group processing
Group and bus processing is not just a technical tool to manage conflicts between layers – it’s also a creative tool to blend and unify sounds. Just as applying a filter in Photoshop can tie together disparate elements in an image, processing multiple layers through a single bus can make them feel cohesive.
For instance, adding a touch of saturation can introduce grit and warmth that glues a synthetic string layer and a Foley-driven string layer together. This subtle harmonic distortion acts as a unifying veneer, making the layers sound like they belong together. Follow that with light compression to unify their dynamics, ensuring that their peaks and valleys move as one. Finally, add a small amount of shared reverb – about ten to fifteen percent – on the group. This shared spatial effect ties the layers together, making even contrasting elements feel like a single, cohesive sound.
Using these tools effectively creates a polished result that feels organic and intentional, elevating the overall mix.
Common mistakes to always avoid
As mentioned above, mixing strings is delicate politics, and most of the issues that newer producers face come down more to unforced user error than it does a lack of technical mixing knowledge or some magic bullet EQ solution that instantly levels up the production.
So, let’s talk about some of the most commonly made mistakes that are the easiest to avoid in the first place.
1. Not addressing EQ concerns early with built-in tools

While it’s never too late to clean up frequencies with your favorite third-party EQ, addressing tonal issues earlier in the chain is always better. Aim to get the source sound as close as possible to your desired result at every stage of the process before adding extra processing like EQs, delays, or reverbs. This is where the onboard EQs and tonal shaping tools (like Orchestral Tools’ shown above) in many Kontakt libraries, especially those in synth or acoustic string libraries, really shine.
These built-in tonal controls are often overlooked by producers who prefer to rely on EQs further down the chain. However, onboard shaping tools can deliver a more fluid, natural, and musical sound right at the source. This reduces the need for heavy-handed EQ adjustments later and keeps your layers feeling cohesive.
When layering strings, use the onboard tonal shaping to carve out space for each layer, ensuring they complement rather than compete. Once the source sounds are dialed in, any additional EQ, compression, or effects applied later will feel more precise and musical. Keeping this mindset ensures a cleaner and more cohesive mix every time.
2. Not adjusting ADSR for your tracks
String sounds are so emotionally powerful because of how they evolve over time. The way a string patch crescendos to its peak volume is what gives it that evocative, heart-pulling quality. However, the musicians and engineers who created your favorite Kontakt library weren’t tailoring those samples to your specific track; that would be impossible.
That means some extra tweaking is always needed to make the patch deliver the same emotional impact within the context and tempo of your song.

Modern, tempo-driven genres like hip-hop, melodic house, and trance require even more attention to how these patches interact with your track’s tempo, swing, and groove. Adjusting ADSR parameters like attack, sustain, and release is crucial to ensure the strings move with – not against – your track’s rhythm. Default settings on most patches are often about ninety percent there, but that last ten percent is where the magic happens.
It’s the difference between a groove that feels locked in or one that drags or rushes. Taking the time to align these details with your track’s unique tempo and energy is key and is often a step newer producers overlook. Dialing in these changes is essential to make strings feel alive and fully integrated into your arrangement.
Pro tip: Not all string libraries have dedicated amp envelopes, but almost all still offer ways to control the amplitude over time (which is what we’re after). Words like fade-in and even Glide settings can help soften one layer, leaving space for a brighter-attack layer to work its magic.
3. Keeping the grid on with MIDI placements
One of the biggest criticisms of computer-based music is its reliance on the grid. Whether you’re clicking in notes on the piano roll, heavily quantizing, or dragging in Kontakt’s pre-generated chord progressions, the result can feel rigid and mechanical. This grid-based nature can amplify the lifeless quality often associated with VST and sampler-based strings. However, with just a minute of extra effort, you can transform those strings into something much more human and expressive.
The trick is simple: turn off the grid. Go into your MIDI clips and make small, random adjustments to the timing of individual notes – just nudging them slightly left or right. This doesn’t need to be drastic; tiny variations are enough to mimic the natural imperfections of a live performance. For instance, if you’re working with a four-bar loop, duplicate it across sixteen bars and make subtle timing tweaks to individual notes in each iteration. These minor changes create a sense of organic variation, fooling the listener into hearing the human nuances of a live string section.
This technique requires minimal time and effort but has a massive impact on the realism of your strings. It breaks the monotony of the grid and breathes life into the performance, making it feel authentic and dynamic.

Start layering your strings
The techniques here give you everything you need to turn lifeless VST strings into expressive, dynamic layers. Layering, automation, and tweaks to ADSR parameters let you craft strings that feel alive, while tools like Kontakt lead the way with some of the most realistic string libraries available. Kontakt’s flexibility for layering and tonal shaping ensures your strings aren’t just passable – they’re transformative. When combined, these tools create results far greater than the sum of their parts.
Put these approaches to the test in your next track!
Whether you’re adding cinematic drama or melodic depth to a house groove, Kontakt’s libraries and features make it easier than ever to produce strings that move and inspire. A few thoughtful adjustments can elevate your production, giving your strings the realism and emotion they need to captivate listeners.
Related articles
-

Behind the synth: A. G. Cook on stacked sawtooths and the creation of Super*Saw
Explore the extremes of stacked sawtooth waves with Super*Saw, a new synthesizer co-created with A. G. Cook. Learn how to…
-

Inside the evolution of orchestral sampling: an interview with ProjectSAM
Discover how ProjectSAM’s Lineage Series uses NKS and smart features to change orchestral sampling. Plus, save on instruments in our…
-

How New Constellations turn emotion into sound with Massive X
Go inside the studio with New Constellations. Learn how they use Native Instruments gear, happy accidents, and lifelong friendship to…
-

Citizen Kain on building emotion and space with Replika
Citizen Kain explains how Replika helped shape the rhythm, tension, and emotion behind his debut Eversun Records single “Moments.”…
-

The organic precision behind Calcou’s Anjuna release featuring Reaktor
Calcou shares how Reaktor, Monark, and Super 8 shaped the creative balance and live energy behind their new duo EP,…
-

14 NKS instruments that will change the way you create music
Discover 14 NKS instruments to freshen up your workflow. From lo-fi tape synths to cinematic strings, shop the Native Instruments…
-

Parallelle on crafting living basslines with Reaktor and TRK-01
Parallelle share how Reaktor and TRK-01 shape the bass and warmth in 11th Avenue, balancing analog depth with modern control.
-

Where will your sound lead you? Explore the Native Instruments Summer Sale
Save 30% on instruments, effects, and sounds in our Summer Sale. Find the tools to keep your tracks moving and…